Abstract
Have you ever wondered why some liquids mix together easily, like when you mix different juices to make a fruit punch, while others do not mix at all, like oil and water? What happens to liquids when they are mixed depends on their mixing behavior. Some liquids blend, whereas others form separate layers. If you do it right, you can even stack liquids on top of each other just like solid objects! Want to see for yourself? In this science project, you will investigate the mixing behavior of liquids and create a colorful stack of liquids.Summary
/-/https/i.ytimg.com/vi/lYITnkFxa5A/maxresdefault.jpg)
Objective
Investigate the mixing behaviors of different liquids and create a density column with three different liquids
Introduction
/-/https/www.sciencebuddies.org/cdn/Files/19670/5/pexels-dominika-roseclay-thumbnail.jpg)
We mix liquids every day! When we make drinks like lemonade or smoothies, we mix liquids together. When we cook, we mix liquids to make sauces, soups, or cakes. Even when we clean our clothes or wash our hair, we mix liquids like detergent and shampoo with water. You might already know that some liquids mix together easily, like orange juice and water, but others do not mix at all, like oil and water. Why is that? It all has to do with a concept called miscibility and another important factor called density.
Miscibility describes how well or how easily two liquids mix together. Some liquids, like orange juice and water, mix together easily and become a special kind of mixture called a homogeneous mixture. In this type of mixture, you cannot tell the liquids apart anymore—they blend completely (Figure 1, left). We call these liquids miscible. Other liquids, like oil and water, do not want to mix; they stay separate. These liquids are immiscible. In an immiscible mixture, you can see different layers of liquids (Figure 1, right). A mixture where liquids remain physically separate can also be called a heterogeneous mixture.
/-/https/www.sciencebuddies.org/cdn/Files/19671/5/drink-mixtures.jpg)
Figure 1. Mixing of liquids can result in a homogeneous mixture (left) or a heterogeneous mixture (right).
Why do some liquids mix, and others do not? It has to do with how the liquid molecules are made up. Molecules are tiny particles that make up everything around us. They can be classified into polar and nonpolar molecules (Figure 2). When atoms come together to form a molecule, they share negatively charged electrons with each other, which creates a chemical bond. Sometimes, one atom attracts the electrons more than the other atom does, which results in a slight separation of the charge into a positive pole and a negative pole within the molecule. When this happens, the molecule is usually a polar molecule. Molecules that have an equal charge balance are nonpolar molecules.
/-/https/www.sciencebuddies.org/cdn/Files/19653/7/polar-nonpolar.png)
Left: A schematic diagram of a water molecule, which is an example of a polar molecule. Two blue circles represent the hydrogen atoms and a red circle represents the oxygen atom. Grey lines connecting the circles represent the chemical bonds between the atoms. A plus sign next to each hydrogen atom and a minus sign next to the oxygen atom show the charge imbalance within the molecule. Right: A schematic diagram of a carbon dioxide molecule, which is an example of a nonpolar molecule. Two red circles represent the oxygen atoms and a black circle represents the carbon atom. Grey lines connecting the circles represent the chemical bonds between the atoms.
Figure 2. The water molecule (left) is made from one oxygen (O) atom and two hydrogen (H) atoms. Molecules that have a charge imbalance, like water, are polar. The carbon dioxide molecule (right) is made from one carbon (C) and two oxygen (O) atoms. Molecules that have an equal charge balance, like carbon dioxide, are nonpolar.
A simple rule, "like dissolves like," can tell you which liquids mix and which do not. Liquids with similar polarities are miscible, whereas liquids with different polarities do not mix. Water is a polar liquid, but oils are nonpolar. This is why oil and water do not mix well.
Sometimes two liquids will form two separate layers, so it looks like they are immiscible. However, when you shake or stir the mixture, the two liquids blend together. This mixing behavior can be explained by the different densities of the two liquids. Every liquid has a density. This density tells us how tightly packed the liquid molecules are. Another way to describe density is as the amount of mass per unit of volume. Think of it like a crowd of people. If there are a lot of people in a small space, they are packed tightly together, and it feels crowded. That is similar to a liquid with high density. On the other hand, if there are only a few people in the same space, they have more room to move around, and it feels less crowded. That is similar to a liquid with low density.
Some liquids are heavier and denser, while others are lighter and less dense. This difference in density also affects how liquids mix together. When liquids have similar densities, they are more likely to mix well and become a homogeneous mixture. But when liquids have very different densities, they tend to separate into layers, even if they are miscible.
As you can see, mixing liquids, although we do it every day, is quite a complex process. In this science project, you will explore the miscibility and density of different liquids. You will be challenged to stack liquids on top of each other—without mixing them. Are you up for the challenge?
Terms and Concepts
- Miscibility
- Density
- Homogeneous mixture
- Miscible
- Immiscible
- Heterogeneous mixture
- Molecule
- Polar
- Nonpolar
- Atom
- Electron
- Positive pole
- Negative pole
Questions
- What does miscibility mean?
- What is the density of a liquid?
- What are examples of miscible and immiscible liquids?
- How does the polarity of molecules in liquids affect their mixing behavior?
Bibliography
- Ducksters. (n.d.). Solutions and Dissolving. Retrieved May 22, 2023.
- Helmenstine, A. (2023, May 7). Polar and Nonpolar Molecules. Retrieved May 22, 2023.
- Active Wild. (2015, February 14). Density For Kids. Retrieved May 22, 2023.
Materials and Equipment
- Small clear jars or 2 oz transparent mini cups with lids (15)
- Permanent marker
- Timer
- Olive oil
- Baby oil
- Liquid dish soap
- Honey
- Water
- Optional: Food coloring
- Measuring spoons
- Lab notebook
- Pen or pencil
Experimental Procedure
Mixing Different Liquids
- Optional: To make your water look different from the other clear liquids, add a couple of drops of food coloring to it. Use a color that no other liquid has.
- Use the permanent marker to label 10 of your jars or mini cups with the numbers 1–10.
- In your lab notebook, make a data table like Table 1.
- You will make 10 different mixtures with two different liquids each. The different liquid combinations are given in Table 1. Start with your first liquid mixture.
- Use the jar or mini cup that has the same number as the mixture number in Table 1. For example, use mini cup 1 for mixture 1 (with baby oil and extra virgin olive oil).
- Add one tablespoon of liquid 1 into the mini cup. (For mixture 1, liquid 1 is baby oil.)
- Clean the tablespoon with water and dish soap and let it dry.
- Carefully add one tablespoon of liquid 2 into the same mini cup, as shown in Figure 3. Pour the liquid gently on top of the other and do not stir the liquids yet. (For mixture 1, liquid 2 is extra virgin olive oil.)
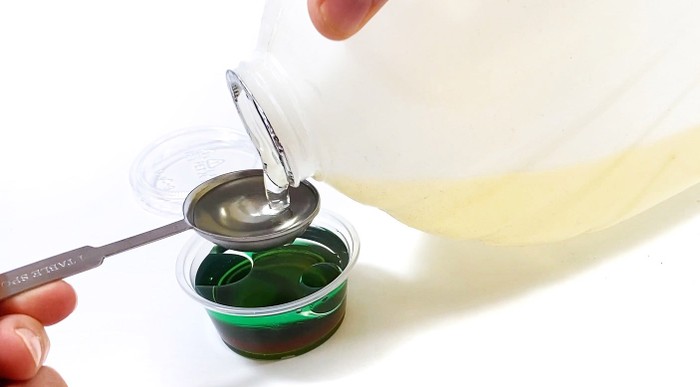
Figure 3. A miscibility test of two liquids in a mini cup. - Set a timer for three minutes and start it.
- While you wait, clean the tablespoon with water and dish soap and let it dry.
- After three minutes, look at the cup from the side. Do the two liquids form two separate layers? Record your observations in your data table.
- With a clean teaspoon, stir and mix the two liquids in your mini cup for about 30 seconds.
- Set a timer for three minutes and start it.
- While you wait, clean the teaspoon with water and dish soap and let it dry.
- After three minutes, look at the cup from the side again. Do the two liquids still form two separate layers after mixing? Record your observations in your data table.
- If the two liquids form two different layers even after mixing, write in your data table which liquid is on the top.
- Repeat step 4 with all other liquid combinations given in Table 1. Record all observations in your data table.
/-/https/www.sciencebuddies.org/cdn/Files/19672/5/oil-into-cup.jpg)
| Mixture | Liquid 1 | Liquid 2 | Do the liquids form separate layers before mixing? | Do the liquids form separate layers after mixing? | Are the two liquids miscible? | If there are separate layers, which liquid is on top? |
|---|---|---|---|---|---|---|
| 1 | Baby oil | Extra virgin olive oil | /-/https/www.sciencebuddies.org/cdn/Files/19331/9/check-yn.png) |
|
|
|
| 2 | Baby oil | Liquid dish soap | |
|
|
|
| 3 | Baby oil | Honey | |
|
|
|
| 4 | Baby oil | Water | |
|
|
|
| 5 | Extra virgin olive oil | Liquid dish soap | |
|
|
|
| 6 | Extra virgin olive oil | Honey | |
|
|
|
| 7 | Extra virgin olive oil | Water | |
|
|
|
| 8 | Liquid dish soap | Honey | |
|
|
|
| 9 | Liquid dish soap | Water | |
|
|
|
| 10 | Honey | Water | |
|
|
Analyzing Your Data
- Now that you have gathered all your data, you can analyze it. You will first analyze the miscibility of your liquids. Your data should tell you which liquids did mix and which liquids did not mix.
- Look at your results in Table 1. Based on your observations, decide if each of the two liquid combinations you tested was miscible or not. Check the "yes" or "no" box in Table 1.
- In your lab notebook, make a data table like Table 2. Based on your observations in Table 1, sort the different liquids by their polarities. Write all the polar liquids in the first column and the nonpolar liquids in the second column.
- Remember "like dissolves like," which means that liquids with similar polarities are miscible, whereas liquids with different polarities do not mix. If you need a reminder about the polarities of water and oil, you can find this information in the Introduction.
| Polar liquids | Nonpolar liquids |
|---|---|
- In the next step, you will analyze the different densities of your liquids.
- In your lab notebook, make a data table like Table 3. Based on your observations in Table 1, you should be able to rank the different liquids according to their densities.
- Write a list of your liquids in Table 3, with the least dense (1) on top and the densest (5) at the bottom. You can figure out the density ranking by comparing the liquids' mixing behaviors. For example, if liquid A floats on top of liquid B, then it is less dense than liquid B. If liquid B floats on top of liquid C, then it is less dense than liquid C. Therefore, you know that liquid A is also less dense than liquid C.
- Remember that the density of a liquid tells us how heavy or light it is for its size. If a liquid floats on top of another liquid, it is less dense. If a liquid sinks below another liquid, it is denser.
| Density ranking | Liquid | Density at 20°C [g/mL] |
|---|---|---|
| 1 (least dense) | ||
| 2 | ||
| 3 | ||
| 4 | ||
| 5 (most dense) |
- Now that you have analyzed the densities and mixing behaviors of all your liquids, you are ready to take on the Stacking Liquids Challenge in the next step.
Stacking Liquids Challenge
- Use the miscibility and density data you gathered to create a stack of liquids with at least three separate layers. Each layer should consist of a different liquid, as shown in Figure 4.

Figure 4. Three liquids stacked on top of each other create three separate layers. - You can make a data table similar to Table 4 to write down your different mixing trials.
- Based on your previous observations, choose three liquids that you think can be stacked on top of each other (without mixing) to create three separate layers.
- Write down which liquids you used and make a prediction about if and how the liquids will stack on top of each other.
- Then carefully add one tablespoon of each liquid into a mini cup, one by one.
- Set a timer for five minutes and wait until the liquids have settled in the cup.
- Once the five minutes are up, look at the cup from the side and record the stacking behavior of the liquids in your table.
- Try different liquid combinations. Each time you create a new liquid stack, repeat steps a–e.
/-/https/www.sciencebuddies.org/cdn/Files/19673/5/liquid-density-column.jpg)
| Liquids chosen | Predicted stacking behavior | Observed stacking behavior |
|---|---|---|
|
|
|
|
|
|
|
|
|
- How many trials does it take for you to create a stack of three liquids?
Ask an Expert
Variations
- In this experiment, you were challenged to create three layers of different liquids. There are plenty of other liquids that you can add to your liquid stack. Go through your kitchen and test the mixing behavior and density of other liquids. Make sure, though, that every liquid you use is safe to use. Avoid hazardous or flammable liquids, like cleaning products or medicines. Stick to food-safe items.
- You can change the density of water by adding salt or sugar to it. Try to stack three different layers of water (same volume of water, but one with 1 teaspoon (tsp) of salt or sugar, one with 2 tsp of salt or sugar, and one with 3 tsp of salt or sugar). Add different colors to each liquid to see the layers more clearly. Which layer is on the top and which layer is on the bottom? How does the amount of salt or sugar change the density of the water? What will happen this time if you shake the cup or turn it upside down?
- Find out how much the densities of your liquids vary by pouring the same volume of each liquid into a different cup and then weighing each of them. How much do the masses differ? Do these results agree with your findings of how the liquids are layered?
- Place some objects like a rubber band, a penny, or foam pieces into your liquids. They will sink or float depending on their own densities. Can you predict in which layer of your liquid stack they will settle?
- If you are curious about what other science experiments you can do with liquids, you might be interested in the following Science Buddies projects:
Careers
If you like this project, you might enjoy exploring these related careers:
/-/https/careerdiscovery.sciencebuddies.org/cdn/Files/1107/19/pexels-photo-3938023.jpg)
/-/https/careerdiscovery.sciencebuddies.org/cdn/Files/1100/18/unsplash-NP6JLl_2C-c.jpg)
/-/https/careerdiscovery.sciencebuddies.org/cdn/Files/1113/21/iStock-498128575.jpg)

/-/https/img.youtube.com/vi/ajrNj7JcCpQ/0.jpg)
/-/https/img.youtube.com/vi/nhgNh3BdMsc/0.jpg)
/-/https/img.youtube.com/vi/-xMj-Q1S7_g/0.jpg)