Abstract
Earth is an amazing planet. It has everything that we need: food, shelter, and water. Sure, we need water to drink, but have you thought about using water to create energy? Moving water has a lot of energy and all we need to do is to harness it. Moving water made the Grand Canyon. That took a lot of energy! In this science fair project, you will demonstrate the power of water by converting the kinetic energy in moving water to mechanical energy, which will lift a small weight.Summary
Michelle Maranowski, PhD, Science Buddies
- Scotch® is a registered trademark of 3M.
Railroad Commission of Texas. (n.d.). Unit 1: Energy, Student lesson, Investigation: Water Wheel. Alternative Fuels Research & Education Division.
/-/https/www.sciencebuddies.org/cdn/Files/3510/5/Energy_img014.jpg)
Objective
The goal of this science fair project is to understand hydropower. You will convert the energy in falling water to mechanical energy to lift a small weight.
Introduction
About 70 percent of the Earth is covered with ocean water. 98 percent of the water on Earth is in the ocean and is undrinkable because it is salty. 2 percent of the water on Earth is freshwater and is drinkable. However, 1.6 percent of freshwater is frozen in the polar ice caps. But no matter where the water is, it is moving and it is part of the global water cycle. The water cycle is shown in Figure 1, below. The water cycle occurs when water evaporates from bodies of water on Earth, like oceans, and then condenses into clouds. Eventually, the clouds become too heavy and the water returns to Earth in the form of rain or snow, also called precipitation. When the water comes back to Earth, some of it flows back into the ocean. As water moves back to the ocean via rivers or waterfalls, it carries a lot of energy with it. We can harness this energy to make electricity or to power machines. This is called hydropower. Because water is constantly and endlessly moving through the water cycle, hydropower is a renewable form of energy, which means the energy can be obtained over and over through natural processes.
/-/https/www.sciencebuddies.org/cdn/Files/3504/5/Energy_img008.jpg)
Figure 1. The water cycle.
Hydroelectricity is a type of hydropower. According to the United States Department of Energy, in the year 2005, hydropower accounted for 7 percent of the total U.S. electricity generation and 73 percent of generation from renewable energy sources. The advantages of hydropower are that it creates no pollution and it is available whenever it's needed. We create hydropower in hydropower plants. There are three kinds of hydropower plants: impoundment, diversion, and pumped storage. Some power plants have dams and some do not. In each type of power plant, flowing water pushes a turbine that generates electricity.
/-/https/www.sciencebuddies.org/cdn/Files/3505/5/Energy_img009.jpg)
/-/https/www.sciencebuddies.org/cdn/Files/3506/5/Energy_img010.jpg)
Figure 2. The Grand Coulee Dam.
Figure 3. The Hungry Horse Dam.
Humans have been using hydropower for centuries, harnessing the change from potential energy to kinetic energy of water. Potential energy is the energy stored in an object. For example, if you stretch a rubber band, it now has potential energy; it is ready to snap back to its original state. Kinetic energy is the energy of motion. Once you let go of the rubber band and it is moving through the air, it has kinetic energy. The potential energy stored in the stretched rubber band changes to kinetic energy as soon as you let go of it. The Greeks attached waterwheels to grinding wheels and used the kinetic energy in falling water to grind grain into flour. Waterwheels have also been used to saw logs in sawmills and to provide irrigation for farms along rivers. In this science fair project, you will extract energy from water. You will convert the kinetic energy from falling water into mechanical energy. See how falling water can lift a small weight. If just a little flow of water can lift a weight, imagine the amazing energy of the Niagara Falls!
/-/https/www.sciencebuddies.org/cdn/Files/3507/5/Energy_img011.jpg)
Figure 4. The Niagara Falls.
Terms and Concepts
- Water cycle
- Condensation
- Precipitation
- Hydropower
- Impoundment plant
- Diversion plant
- Pumped storage plant
- Turbine
- Potential energy
- Kinetic energy
- Mechanical energy
- Energy
- Power
Questions
- What is hydropower?
- What are the advantages of hydropower? Are there any disadvantages?
- How many different kinds of hydropower plants are there? What are the differences between the different kinds of power plants?
Bibliography
The following websites are full of interesting information on hydropower. The Department of Energy website allows you to research many different kinds of renewable energy.
- United States Department of Energy. (2010, December 4). Renewable Energy. Retrieved September 21, 2012.
- Wikipedia Contributors. (2008, June 13). Water wheel. Wikipedia: The Free Encyclopedia. Retrieved June 20, 2008.
- Wikipedia Contributors. (2008, June 22). Hydropower. Wikipedia: The Free Encyclopedia. Retrieved June 23, 2008.
- Wikipedia Contributors. (2008, June 19). Hydroelectricity. Wikipedia: The Free Encyclopedia. Retrieved June 23, 2008.
This website has facts on water:
- United States Geological Survey. (2012, September 13). The USGS Water Science School. Retrieved September 21, 2012.
Want to know the definitions of energy and power? This article will help you learn about these terms:
- Rathjen, D. (2001). Watt's a Joule. Science Wire. Retrieved June 24, 2008.
Materials and Equipment
- Aluminum pie plate, 9 inches; available at all grocery stores
- Scissors
- Permanent marker
- Ruler
- Drill with 3/8-inch drill bit or other bit size slightly larger than the dowel width; available at hardware stores
- Optional (if you don't use a drill): hammer and 5/16-inch width nail; available at hardware stores
- Nylon spacer, 3/8-inch inner diameter and 3/8 inch thick. The spacer must fit in the center of the waterwheel. These are available at hardware stores. See Figure 7, below, to see what a nylon spacer looks like.
- Epoxy glue; available at hardware stores
- Scotch® tape
- Wood dowel, 5/16 inch wide and 2 feet long; available at craft stores
- Plastic bucket with removable handle, 14 quarts
- Cotton string, 30-inch-long piece
- Metal nut or other small metal object that string can be tied to
- Measuring cup, 2-cup is best
- Stopwatch
- Lab notebook
Experimental Procedure
- Take your scissors and cut out the flat bottom part of the aluminum pie plate.
-
With the permanent marker, copy the design from the waterwheel template (Figure 5) onto the circle of aluminum. Draw the lines from the edge of the circle to about 2 centimeters (cm) from the middle of the circle.
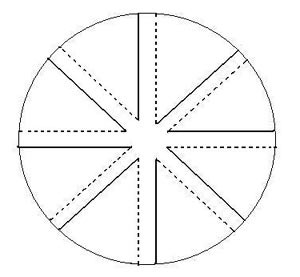
Figure 5. Waterwheel template (Courtesy of AFRED, Railroad Commission of Texas).
- Cut the aluminum circle along the eight solid lines. End each cut at 2 cm from the center. These are the paddles of the waterwheel.
-
Carefully bend each paddle at its dotted line. Put the ruler at each dotted line so that you can make a straight bend. See Figure 6.
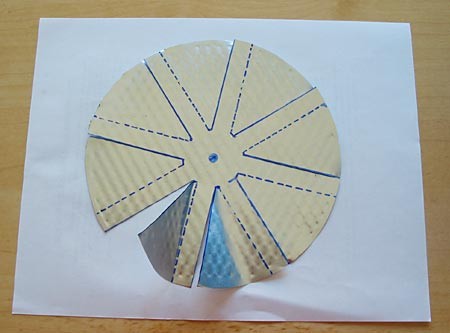
Figure 6. This waterwheel has eight paddles. Bend each paddle at its dotted line.
- Drill a 5/16-inch hole through the middle of the waterwheel. Ask an adult to help you and always wear safety goggles when using power tools. You could also use a hammer and nail to make the ¼-inch hole in the middle. If you use a hammer and nail, clip off any sharp metal edges around the hole with the scissors.
-
Glue the nylon spacer to the middle of the waterwheel. Be careful to follow the instructions on the epoxy glue package. Ask an adult for help. The nylon spacer stiffens the waterwheel.
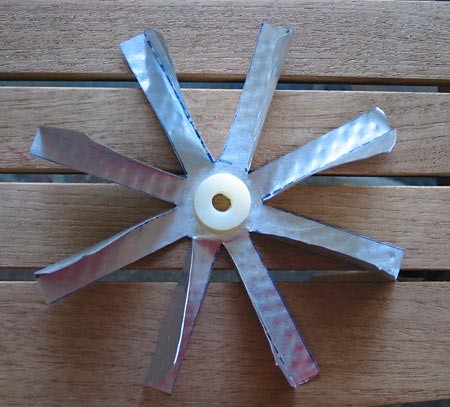
Figure 7. Here is a completed waterwheel.
- Wait until the glue is fully dry before continuing. Consult the packaging of the epoxy for drying times.
- After the glue dries, use thin strips of Scotch tape to secure the nylon spacer to the waterwheel. Make sure that the hole in the center is not covered with tape. Set the waterwheel aside.
-
Remove the handle from the bucket. Now ask an adult to drill two 3/8-inch holes where the ends of the handle use to be. Always wear safety goggles when using power tools. Make sure that the wood dowel can fit comfortably through the holes and spin freely. It should not be a tight fit.
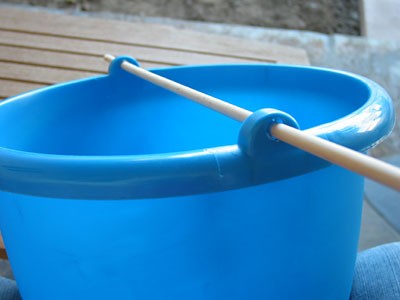
Figure 8. The wood dowel fits comfortably through the two drilled holes.
-
Wind a piece of Scotch tape around the middle of the wood dowel. This is to add some thickness in order to keep the waterwheel in place. Now insert the dowel through the holes of the bucket. Move the dowel out of one of the holes and carefully slip the waterwheel onto the dowel over the piece of tape. Reinsert the dowel through the hole in the bucket. Turn the waterwheel and make sure that the wood dowel turns as well. If the dowel doesn't move, you should gently move the waterwheel off of the tape and wind another piece of tape over the original piece of tape to add thickness so the two objects move at the same time. The waterwheel must sit tightly on the dowel so that when the waterwheel turns, the dowel turns.
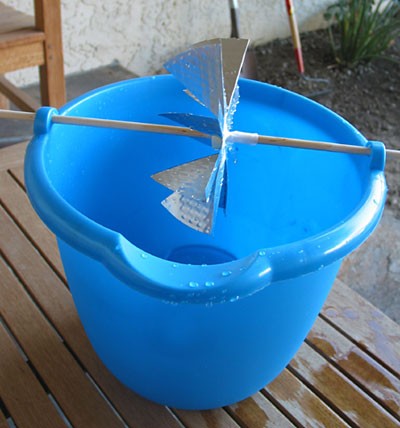
Figure 9. Waterwheel apparatus.
- Take the cotton string and tie one end to the metal nut. Tie the other end of the string to one end of the wood dowel, outside of the bucket. Tie the end such that when the dowel starts to turn, it immediately starts to wind up the string. You need to pay attention to how the waterwheel turns to do this; either clockwise or counterclockwise.
- Wind some tape and make a little tab (by folding the end of the piece onto itself) on the dowel outside of the bucket on both ends so that the waterwheel and dowel don't move horizontally too much—you don't want the dowel slipping out of the holes. The waterwheel should be sitting in the middle of the bucket and should be able to turn freely, without hitting the bucket. Now you are ready to start converting the kinetic energy in falling water to mechanical energy.
-
To do these experiments you can use any source of moving water, like a sink or bathtub faucet, or an outdoor hose.
- Pick a water source where the water comes out in a steady stream. Do not use a water source where the water is a wide, cone shaped spray it will lead to poor results. For example, a shower head would not be a good water source. If you are using a hose with several different nozzle settings choose the setting that is least like a shower and most like a steady stream.
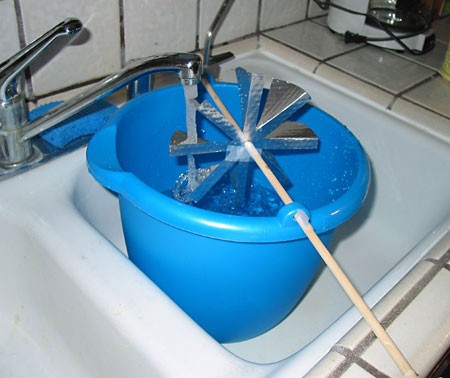
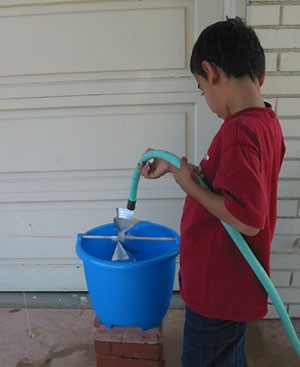
Figure 10. Using the sink faucet to turn the waterwheel.
Figure 11. Using the garden hose to turn the waterwheel. -
Using the measuring cup and the stopwatch, first calculate the flow rate of the water source you are using. You will do this by seeing how long it takes to fill 2 cups of water. Note this time down in your lab notebook in a data table like the one below.
- Divide 2 cups by the number of seconds it took to fill 2 cups. This is the flow rate and its unit of measure is cups per second. Note down the flow rate in your lab notebook.
- Do not turn off the water between measuring the flow rate and testing the waterwheel or else you will have to redo the flow rate calculation (you might turn the faucet on harder or softer the next time, which would negatively affect your results).
-
Make sure that the string and weight are unwound before you begin. Place the waterwheel under the flowing water. Measure the height of the flowing water with the ruler. Record this information in your lab notebook. Using the stopwatch, time how long it takes to wind the weight up. Note this time in your lab notebook.
- Repeat this measurement two additional times at the same water height and record the information in your lab notebook.
- One thing to keep in mind is to not let the bucket get too full of water or else the bucket water will get in the way of the waterwheel.
- Once you've filled the bucket to the point where the waterwheel won't turn anymore, don't just waste it—you can use this water to water your garden or put it in your dog's water bowl.
- Note: Make sure that the water hits the waterwheel in the same spot for every trial. The waterwheel should go either clockwise or counterclockwise each time. Record all information in your lab notebook.
- Now you do want to change the flow rate of your water source, so adjust it and repeat steps 13 and 14. Make sure that the trials are all done at the same water height. Change the flow rate one more time and repeat steps 13 and 14 again. So you should have three trials each for three different flow rates.
- Does the time it takes to wind the weight change? Is there a limit to this time?
- Plot your data on a scatter plot. Plot the flow rate on the x-axis and the wind-up times and the average wind-up time on the y-axis. If you need help making scatter plots you can check out this website: Create a Graph
/-/https/www.sciencebuddies.org/cdn/Files/3508/5/Energy_img012.jpg)
/-/https/www.sciencebuddies.org/cdn/Files/3509/5/Energy_img013.jpg)
/-/https/www.sciencebuddies.org/cdn/Files/3510/5/Energy_img014.jpg)
/-/https/www.sciencebuddies.org/cdn/Files/3511/5/Energy_img015.jpg)
/-/https/www.sciencebuddies.org/cdn/Files/3512/5/Energy_img016.jpg)
/-/https/www.sciencebuddies.org/cdn/Files/3513/5/Energy_img017.jpg)
/-/https/www.sciencebuddies.org/cdn/Files/3514/5/Energy_img018.jpg)
| Flow Rate (cups/second) | Wind-up Time (seconds) |
| Average: | |
| Average: | |
| Average: |
Ask an Expert
Global Goals
The United Nations Sustainable Development Goals (UNSDGs) are a blueprint to achieve a better and more sustainable future for all.
/-/https/www.sciencebuddies.org/cdn/Files/19750/5/E-WEB-Goal-07.png)
Variations
- Keep the flow rate the same and change the height between the water source and the waterwheel. How does the time to wind up the weight change?
- Change the design of the waterwheel. Change the number of paddles or change the size of the bend in the paddles. How does this affect the time to wind up the weight?
- Increase the weight and see how this changes the wind-up time.
Careers
If you like this project, you might enjoy exploring these related careers:
/-/https/careerdiscovery.sciencebuddies.org/cdn/Files/1372/24/iStock-1158650282.jpg)
/-/https/careerdiscovery.sciencebuddies.org/cdn/Files/1686/17/unsplash-oh40PfFL520.jpg)
/-/https/careerdiscovery.sciencebuddies.org/cdn/Files/1450/21/iStock-1227179796.jpg)
/-/https/careerdiscovery.sciencebuddies.org/cdn/Files/1457/17/pexels-photo-3861938.jpg)
/-/https/careerdiscovery.sciencebuddies.org/cdn/Files/1678/17/unsplash-WEDDt-u3q3o.jpg)

/-/https/img.youtube.com/vi/D54yMlIMN80/0.jpg)
/-/https/img.youtube.com/vi/SV2huMdNs9c/0.jpg)
/-/https/img.youtube.com/vi/8smNcRl_YZk/0.jpg)