Abstract
Have you ever thought about being stranded on a desert island? How would you find water to drink? What would you need to survive? In this science fair project you'll discover how to turn the ocean into a source of freshwater by using the power of the Sun.Summary
Kristin Strong, Science Buddies
/-/https/www.sciencebuddies.org/cdn/Files/3324/5/EnvEng_img052.jpg)
Objective
In this science fair project, you will make freshwater from saltwater using solar power and the water cycle, and investigate how salinity affects this process.
Introduction
"Water, water, everywhere,
Nor any drop to drink."
Have you heard these famous lines from Samuel Taylor Coleridge's old sea poem Rime of the Ancient Mariner? In the poem, the sailors have run out of water and are suffering because they can see water in the ocean all around them, but cannot drink it because of its salinity (salt content). Nearly all of the water on Earth, 97%, is undrinkable salt water, and much of the remaining 3% of freshwater is locked up in glaciers and icecaps. Only a tiny fraction of all the water on Earth, about 1%, is freshwater that is available for people to use, and much of that water is deep in the ground and not easily accessible from the surface. As this freshwater begins to run out, people are trying to make more freshwater from oceans and other bodies of saltwater by removing the salt.
Removing the salt is called desalination. With current technology, it requires great amounts of energy to desalinate ocean water on a scale large enough to meet the needs of a whole city. For this reason, most cities stick with traditional sources of freshwater, such as underground aquifers, rivers, lakes, and runoff from snowpack. Some people, like those in rural Indian villages, use an alternative to burning oil for desalination-solar power. While solar power is not yet able to produce enough water to sustain entire villages, it can supplement underground aquifers that are running dry.
In this science fair project, you will also use solar power. The Sun will provide the source of energy to fuel your desalination. To achieve desalination, you will take advantage of the water cycle, shown below in Figure 1.
/-/https/www.sciencebuddies.org/cdn/Files/3318/5/EnvEng_img046.jpg)
The water cycle is the process by which the Sun warms the ocean, giving water molecules at the surface enough energy to escape their liquid state and change into a gas called water vapor. This change of water from liquid to gas is called evaporation. The freshwater vapor rises up and cools, forming clouds, in a process called condensation. Winds float the clouds over land and when they become fully saturated with water vapor, either by cooling or by the addition of more moisture, they release their freshwater, most often in the form of rain or snow, in a process called precipitation. That's when you get out your rain boots! For your science fair project, you will see the water cycle in action inside a bowl!
Terms and Concepts
- Salinity
- Desalination
- Aquifers
- Snowpack
- Solar power
- Water cycle
- Water vapor
- Evaporation
- Condensation
- Saturated
- Precipitation
- Contaminant
- Desalinator
Questions
- How does the water cycle work?
- What factors affect the water cycle (make it work faster or slower)?
Bibliography
- This source describes each phase of the water cycle in detail:
U.S. Department of the Interior. (2008, May 19). The Water Cycle. Retrieved May 15, 2008. - This source shows where saltwater and freshwater are distributed on Earth:
U.S. Department of the Interior. (2008, February 1). Where is Earth's Water Located?. Retrieved May 21, 2008. - This source defines and describes how to build a solar still for desalination:
Wikipedia Contributors. (2008, April 23). Solar still. Wikipedia: The Free Encyclopedia. Retrieved May 7, 2008.
Materials and Equipment
To make your saltwater, you will need:
- Water (4 cups)
- Liquid measuring cup (2-liter or 8-cup size)
- Beets (2) or red food coloring
- Knife (if you are using beets)
- Cutting board (if you are using beets)
- Microwave
- Oven mitt
- Newspaper for your work surface
- Salt (1 box or container)
- Teaspoon measuring spoon
- Tablespoon measuring spoon
- Deep bowls (6)
- Dry measuring cup (1/2 cup)
- Spoon
- Sticky notes
To make your desalinators, you will need:
- Small cups or glasses (6), they should be less than half the height of the bowl and heavy so they will not float; small glass or ceramic cups work best
- Plastic wrap (1 box)
- Elastic bands (6), must fit snugly around the top of the bowls
- Small, heavy objects (6-18), like rocks or ball magnets
To test your desalinators, you will need:
- Medicine cup
- Clock
- Access to sunlight for a full day
- Lab notebook
Experimental Procedure
Make Your Saltwater
- Add 4 cups of water to the liquid measuring cup.
-
Wash and cut up your beets into chunks on a cutting board and add them to the liquid measuring cup. Use caution and have an adult supervise when handling the knife. If you are using food coloring instead of beets, add a few drops of the coloring to the water. The coloring "marks" the water with a contaminant, just like those that exist in real saltwater.
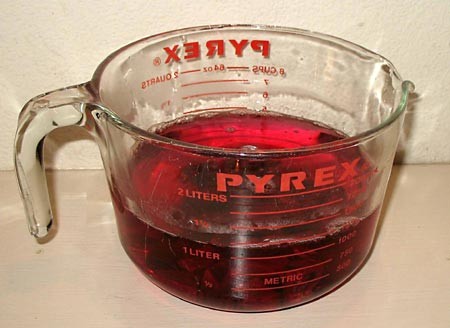
Figure 2. This shows the liquid measuring cup filled with 4 cups of water and two chopped beets. - Put the liquid measuring cup and its contents inside the microwave. Turn the microwave on high power until the water comes to a boil. If you are using beets, boil the water in the microwave for an additional 3-4 minutes. If you are using food coloring, turn off the microwave as soon as it comes to a boil. Remove the liquid measuring cup carefully from the microwave using an oven mitt. Be careful with the hot water so you don't get burned.
- Lay out newspaper on your work surface because beets and red food coloring both stain.
- Add 1 teaspoon of salt to each of three bowls. These will be your low-salinity bowls. Label them by amount of salinity, with a "D" for "Desalinator," and a number to keep track of them individually, as follows: Low Salinity D1, Low Salinity D2, and Low Salinity D3,with sticky notes.
-
Add 3 tablespoons of salt to each of three bowls. These will be your high-salinity bowls. Label them by amount of salinity, with a "D" for "Desalinator," and a number to keep track of them individually, as follows: High Salinity D1, High Salinity D2, and High Salinity D3,with sticky notes.
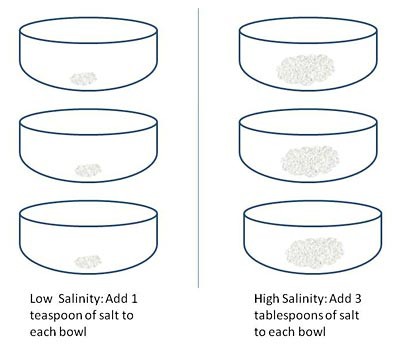
Figure 3. This shows how to prepare the bowls for the addition of hot water. - Using your dry measuring cup, add ½ a cup of hot red water from your liquid measuring cup to each of the six bowls. Use caution when pouring the hot water so you don't get burned.
- Stir the water in each of the bowls with a spoon for 1-2 minutes to help the salt dissolve. Now you have six bowls, each representing the Red Sea, one of the saltiest bodies of water in the world!
/-/https/www.sciencebuddies.org/cdn/Files/3319/5/EnvEng_img047.jpg)
/-/https/www.sciencebuddies.org/cdn/Files/3320/5/EnvEng_img048.jpg)
Make Your Six Desalinators
-
Figure 4 shows the components of a desalinator and how it should be assembled.
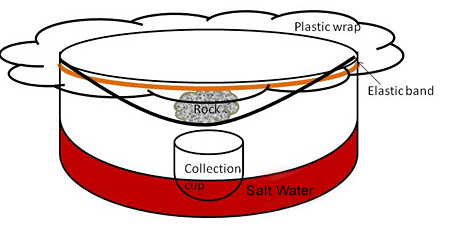
Figure 4. This is how to assemble a desalinator. - Place each of your six small cups inside each of the six bowls. Position the cups in the middle of the bottom of the bowls.
- Cover the top of each bowl with a large piece of plastic wrap. Leave extra around the edges. Press down slightly with your fingers into the middle of each piece of plastic so that it sags down toward the cup.
- Fasten the elastic bands around the top of each bowl so that there is a tight seal between the plastic wrap and each bowl, but still a sag in the middle, toward the cup.
- Place 1-3 rocks or other small heavy objects on the sagging portion of the plastic, directly over the small cup. You may need to tug the overhanging plastic slightly to get the plastic to sag evenly over the cup.
-
Your assembled desalinators should look similar to the examples in Figure 5.
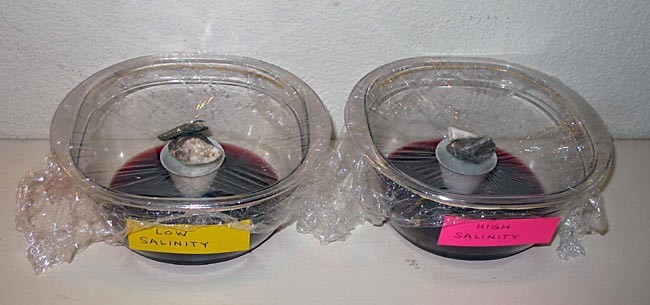
Figure 5. Here are two assembled desalinators filled with low- and high-salinity saltwater.
/-/https/www.sciencebuddies.org/cdn/Files/3321/5/EnvEng_img049.gif)
/-/https/www.sciencebuddies.org/cdn/Files/3322/5/EnvEng_img050.jpg)
Test Your Desalinators
- Find a location where your desalinators can receive direct sunlight. Carefully set your desalinators side by side in the sun. Note: warmer climates have faster rates of desalination than cooler climates, so if you live in a cooler climate, start your test in the morning so you have enough daylight hours to complete the test.
- Check on your desalinators once every hour to make sure they are all still in the sunlight. If they are not, gently move them to a sunny location.
- Also peek through the plastic and look at the water that has collected in the small cups once every hour. If any of the cups look like they are about three-quarters full, then stop the desalination. Otherwise, continue to leave the desalinators out in the sun.
- Stop the desalination when any of the small collection cups are at least three-quarters full, or if the sunlight has ended for the day. Carefully and slowly remove the weights, elastic bands, and plastic wrap from each desalinator.
- Look in your small collection cups. What is the color of the collected water? Was your desalinator able to remove the red contaminant? Write down your observations in your lab notebook.
-
For each desalinator, pour the water you collected in the small cup into the medicine cup, as shown in Figure 6, and measure what you collected. Record your measurements in a data table, like the one below. Then pour the contents of the medicine cup back into the small collection cup and place it back inside its corresponding bowl.
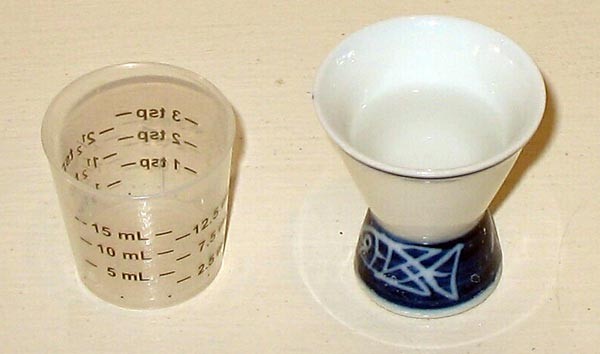
Figure 6. This shows the collected water ready to be poured into a medicine cup for measurement.
Swipe left to see moreWater Collection Data Chart Amount Collected for Low Salinity
(mL or tsp)Amount Collected for High Salinity
(mL or tsp)Desalinator 1 (D1) Desalinator 2 (D2) Desalinator 3 (D3) Sum Average
Once you have measured all your collected water, dip your finger into one of the collection cups and taste what you collected. Now dip your finger into the red saltwater and taste that. Is there a big difference between the taste of the two waters? Write down your observations for each bowl. Compare the average freshwater collected from the low-salinity desalinators with the average freshwater collected from the high-salinity desalinators. Which type of desalinator produced the most freshwater?
/-/https/www.sciencebuddies.org/cdn/Files/3323/5/EnvEng_img051.jpg)
Ask an Expert
Global Goals
The United Nations Sustainable Development Goals (UNSDGs) are a blueprint to achieve a better and more sustainable future for all.
/-/https/www.sciencebuddies.org/cdn/Files/19749/5/E-WEB-Goal-06.png)
Variations
There are many variations that you can try for this experiment to see what factors affect how much water is collected:
- Compare amounts of water collected from desalinators with the same salinity topped with different colors of plastic wrap.
-
Compare amounts of water collected from desalinators with the same salinity resting on different materials in the same location. For example, put one desalinator on grass, one on cement, and another on dirt. Or try setting them on different colors of paper, as shown below. Does this have any affect on the amount of water collected or have no impact?
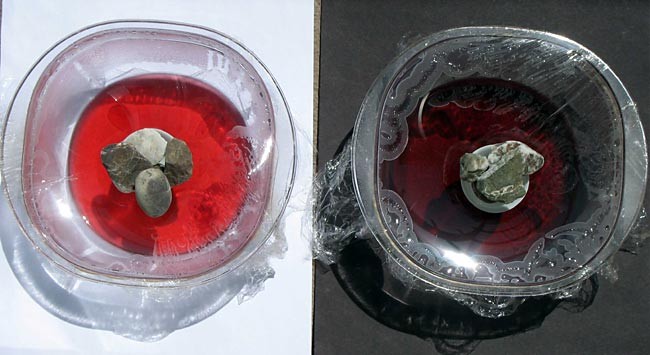 Figure 7. This variation compares desalinators resting on different surfaces.
 - Compare amounts of water collected from desalinators with the same salinity and same bowl material, but that have different bowl shapes. Compare tall and narrow bowls with broad and flat bowls. This will test different surface areas.
- Can you think of ways to increase the amount of water collected? What about a reflector or something that concentrates the Sun's rays? What about a different type of material other than plastic wrap?
/-/https/www.sciencebuddies.org/cdn/Files/3324/5/EnvEng_img052.jpg)
Careers
If you like this project, you might enjoy exploring these related careers:
/-/https/careerdiscovery.sciencebuddies.org/cdn/Files/1876/20/iStock-1188858196.jpg)
/-/https/careerdiscovery.sciencebuddies.org/cdn/Files/1789/24/ill_11.png)
/-/https/careerdiscovery.sciencebuddies.org/cdn/Files/20218/6/EnvEng_KeyPhoto.jpg)
/-/https/careerdiscovery.sciencebuddies.org/cdn/Files/1281/17/pexels-photo-3580281.jpg)

/-/https/img.youtube.com/vi/hTRsEjJnKZM/0.jpg)
/-/https/img.youtube.com/vi/RStgV8mA-gA/0.jpg)
/-/https/img.youtube.com/vi/MG22NaWqkU4/0.jpg)