Sustainable Construction: Building with Mushroom Roots
Abstract
Does growing your own house sound futuristic? If so, this project might surprise you! An overlap of biology, material science, and environmental science has resulted in some intriguing self-assembling materials. In this project, you will grow one of these materials: mycelium composite. It is made of agricultural waste and mushroom roots. You will explore two ways to grow your own construction material. Try it out and see which method proves to be the strongest!
Summary
None
This project requires a mycelium composite growing kit. See the materials list for details. Estimated project time includes time for shipping specialty materials.
No issues
Grow-It-Yourself Mushroom® is a registered trademark of GROW.bio
/-/https/www.sciencebuddies.org/cdn/Files/17572/24/three-mycelium-panel-fracturing.jpg)
Objective
Grow mycelium composite construction material and measure if a second growing period makes the material stronger.
Introduction
/-/https/www.sciencebuddies.org/cdn/Files/17572/24/three-mycelium-panel-fracturing.jpg)
Concrete and bricks are amazingly versatile building materials: they are strong, durable, and resilient. They also do not burn, rust, or rot and require little maintenance. Versatile as they are, the impact of their use in large quantities, like we currently see, is turning them into an environmental hazard. This is where biological construction materials like mycelium composite become interesting.
Mycelium is the root system of mushrooms and belongs to the kingdom of fungi. It is a network of strong fibers, that, when grown in molds around biological waste like wood chips or corn husks, can create strong, lightweight, biodegradable material referred to as mycelium composite. The use of agricultural waste as a structural component, the fact that it grows or assembles itself with only small requirements for heat or other energy resources, and finally, its biodegradability are the main reasons why mycelium composite scores so highly for sustainability. Mycelium composite is not as strong as many other construction materials currently used, but because it is so lightweight, it can still be stacked to a height of 40 ft. Mycelium also has other qualities that are desirable in construction, e.g., it is a fire retardant and a good heat insulator.
In this project, you will grow mycelium composite panels like the ones shown in Figure 1.
/-/https/www.sciencebuddies.org/cdn/Files/17573/8/mycelium-composite-panels.jpg)
Figure 1. Mycelium composite panels grown by Science Buddies staff.
You can find an overview of how to grow mycelium products in the video Making Everyday Objects Out of Mushroom Roots! In the video, you will notice that growing strong mycelium composite products happens in two stages, a first growing period in a bag, and a second growing period in a mold. It is suggested that this method creates a stronger final product compared to growing mycelium directly in the mold. You will test this claim in this project. You will grow some mycelium panels directly in the molds, and you will grow other mycelium in a bag first, and then put in the molds. You will then test the strength of the panels to see if one way of growing creates stronger panels than the other.
You will use a three-point flexural test on the panels to get an indication of their bending strength and fractural toughness. In this test, the panel is supported at two points near the far edges of the panel and a force is applied in the middle (Figure 2). The maximum force the panel can withstand before it breaks is an indication of its bending strength and fractural toughness. This force depends on the dimensions of the panel being tested, but because all your panels will be very similar in dimensions, this force will be a good indicator of the bending strength of your panels. The panels might bend during the test, stretching it at the bottom and compressing it at the top. Depending on where the fractures appear first, you can know if the panel fails under tensile stress (if they start at the bottom, where the panel is stretched) or compressive stress (if they start at the top, where the panel is compressed). Will one method create measurably stronger panels? Get started with this project to find out!
/-/https/www.sciencebuddies.org/cdn/Files/17574/8/three-point-flexural-test-explained.png)
Figure 2. Illustration of a three-point flexural test.
Terms and Concepts
- Mycelium
- Biodegradable
- Mycelium composite
- Self-assembling
- Fire retardant
- Heat insulator
- Three-point flexural test
- Bending strength
- Fractural toughness
- Tensile stress
- Compressive stress
Questions
- What are some advantages of mycelium composite material compared to other construction materials?
- What might be some advantages and some disadvantages of using a second-growth period to create mycelium composite construction material, compared to growing the material directly in its mold?
- Where has mycelium composite been used in construction?
- What might be a good function for mycelium composite in construction: weight bearing, insulation, etc.?
Bibliography
- Van der Hoeven, D. (2020, April 7). Mycelium as a Construction Material. Retrieved June 25, 2021.
- Jacobson, A. (2020, February 28). Why fungi could be the future of environmentally sustainable building materials. Retrieved June 25, 2021.
Materials and Equipment
To grow mycelium composite construction material:
- Mycelium growing material, like the Grow-It-Yourself Mushroom® material sold by Grow.bio. Enough to grow 0.12 ft3 (3398 cm3). (Use promo code SCIENCEBUDDIES25 to receive 25% off one order per customer.)
- Extra plastic filter patch bags (2), like the ones sold by Grow.bio. If not available, use thick plastic bags (e.g., re-sealable zipper storage bags, heavy-duty garbage bags, ...) in which you perforate a few small airholes.
- Spray bottle of 70% isopropyl alcohol
- Disposable gloves, at least three pairs
- Flour (people with gluten allergies can use maltodextrin as a substitute)
- Water
- Measuring spoon
- Measuring cup
- Large bowl
- Scissors
- Clips or tape
- Loaf pans (3)
- Plastic wrap
- Kitchen scale
- Wire rack
- Optional: Oven or fan, and baking sheet
- Lab notebook
/-/https/www.sciencebuddies.org/cdn/Files/17575/8/mycelium-brick-materials.jpg)
To measure its strength:
- Two tables of similar height; books can be used to make them the same height.
- Dowel; can be wooden, plastic, or metal. Should be able to hold up to 10 lbs.
- Rope
- Bucket with a sturdy handle
- Water
- Body weight scale or large measuring cup
/-/https/www.sciencebuddies.org/cdn/Files/17576/8/materials-three-point-flextural-test.jpg)
Disclaimer: Science Buddies participates in affiliate programs with Home Science Tools®, Amazon.com, Carolina Biological, and Jameco Electronics. Proceeds from the affiliate programs help support Science Buddies, a 501(c)(3) public charity, and keep our resources free for everyone. Our top priority is student learning. If you have any comments (positive or negative) related to purchases you've made for science projects from recommendations on our site, please let us know. Write to us at [email protected].
Experimental Procedure
Preparation
- Plan your project. Growing products out of mushroom roots takes about two weeks. It consists of three major steps, each separated by 4–6 days of growing (Figure 3). Check your calendar to make sure that if you start today, you will have time in 4–6 days to work on your mushroom project, and again 4–6 days after that.
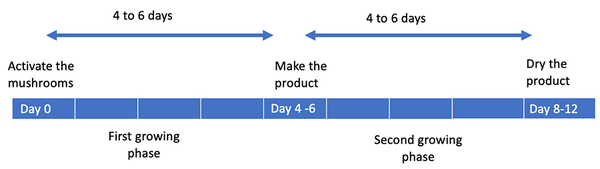
Figure 3. Timeline to grow mycelium composite. - If you need to postpone work on your mushroom product, place the growing mushroom roots in a plastic bag, add air holes, and store it in the refrigerator. Your mushroom roots will stay alive at refrigerator temperatures, but their growth will slow down drastically.
- Always work in a clean space. The following guidelines will prevent bacteria from entering the growth environment:
- Wash your hands, tools, and workspace with soap and water before and after you handle your mushroom project.
- Wear disposable gloves while handling your mushroom project.
- When you are about to start working on your project at each stage, disinfect the tools that will be in contact with the mushroom (including the disposable gloves you are wearing) by spraying them with 70% isopropyl alcohol. Let the tools and gloves air-dry before using them.
- Do not touch your mushroom project with bare hands while it is still growing, and do not breathe on it.
Mushroom roots grow in a moist and nutrient-rich environment, an environment in which many bacteria can thrive. These guidelines prevent bacteria from getting into the growing environment and interfering with your project. It is okay to breathe on, smell, and touch the products you make from mushroom roots after they have been dried.
- If you have not yet done so, watch the video Making Everyday Objects Out of Mushroom Roots! so you know what to expect when growing mycelium composite material.
/-/https/www.sciencebuddies.org/cdn/Files/17283/11/Mycelium-growing-timeline.png)
Growing Mycelium Composite Construction Material
- Spray your loaf pans with isopropyl alcohol. Let them air-dry before use.
- Follow the instructions that came with your mycelium kit to activate the material. It will list the following steps:
- Disinfect your workspace, your gloves, and all the tools you will use. Let them air-dry before use.
- To activate the material, you will need to add a specific amount of water and flour (or flour substitute) to it. The exact amounts will be listed in the instructions that came with your kit. Mix these ingredients well.
- Carefully cut the top of the bag open.
- Pour the water-flour mixture into the bag with the mushroom material.
- Close the bag with tape or clips.
- Shake the bag well until all the material in the bag is wet. This will take at least 1 min. of shaking. The result is shown in Figure 4.
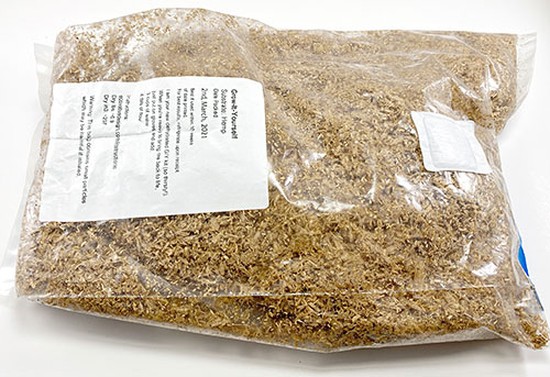 Figure 4. Bag with activated material.
 - Mold your first set of panels.
- Open the bag and fill the loaf pans with a layer of the contents, 1.5 to 2.5 cm deep when compacted together. Make sure to keep half for your second set of mycelium composite panels.
- Place your pans in filter patch bags if available, making sure not to cover the filter patch when taping the bags closed. You can put two, or even three pans in one bag if the bag can still be taped close. If you do not have filter patch bags, use a thick plastic bag, and make a few small holes in the bag to allow air exchange with the environment.
- Prepare the first growth of mycelium in a bag.
- Re-close the bag that came with the kit. Your bag will probably have a filter patch that allows air exchange with the environment. Close it so nothing is covering the filter patch. If there is no filter patch, make a few small holes in the plastic bag to allow air exchange with the environment.
- Place all the bags with the activated material in a spot away from direct sunlight, where they can stay undisturbed for 4–6 days. Room-temperature works well; colder temperatures will result in slower mushroom growth.
- After 4–6 days, the contents of your bags should look white (Figure 5), covered with mushroom roots. It is normal to see condensation (water droplets) build up inside the bags. Condensation is a result of the mycelium breathing.
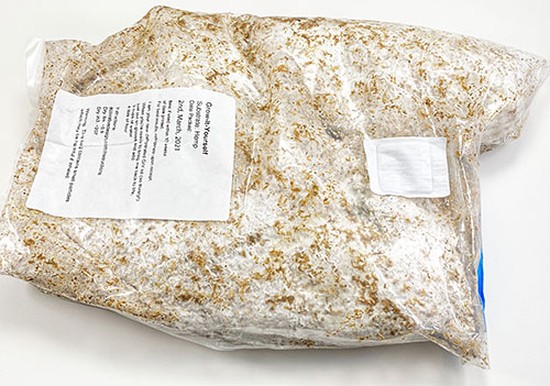 Figure 5. Mycelium kit after 4–6 days of growth.
 - Unmold your first set of panels.
- Carefully remove the mycelium composite panels from the loaf pans.
- Weigh each panel with a kitchen scale. Write the mass in your lab notebook.
- Place the panels on a wire rack and let them dry.
- Wash and disinfect your loaf pans.
- Mold your second set of panels as described below.
Follow the instructions that come with your kit to transform your mushroom material that grew in the bag into three panels. The following steps will be listed:
- Disinfect your workspace, your gloves, and all the tools you will use. Let them air-dry before use.
- Open your bag of mushroom root material and break it apart, collecting all pieces in a large bowl (Figure 6). The white will disappear as you break the white material apart; that is fine. Keep breaking it up into small pieces.
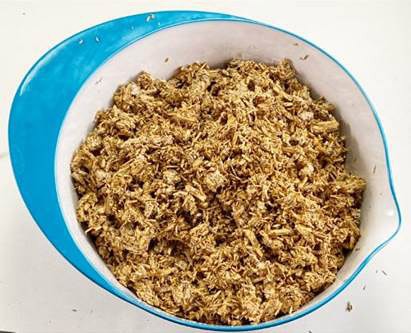 Figure 6. Mycelium composite broken down into pieces after its first growth period.
 - The instructions for your kit will indicate what to add to your mushroom material at this stage. Usually, it is a specific amount of flour or flour substitute. If needed, adjust the listed amount to reflect that you already used part of your bag. For example, if you used half of the bag for your first three panels, mix in half of the listed amount of flour. Mix this thoroughly into the bowl of pieces.
- Pour the mixture into your loaf pans and pack it down. These panels should be as similar as possible in thickness to your first three panels.
- Place the pans in filter patch bags and close the bags with tape, making sure not to cover the patches. If you do not have filter patch bags, use thick plastic bags, and make a few small holes in the bags to allow air exchange with the environment.
- Finish your first set of panels.
- Weigh your drying panels after 1–2 days on a kitchen scale. Your panels are dry when their mass has been reduced to about one-third of its original mass (mass before drying).
- When they are ready, write down their dry masses in your lab notebook.
- Mark each with a pen so you will see the difference between these and your next set of panels.
- After 4–6 days, the contents in your loaf pans should look white, covered with mushroom roots.
- Repeat steps 7 and 10 for your second set of panels. Do not mark these, or mark them with a different sign so you always know which panel was from the first or second growth period.
- Optional: Finish the drying process by placing all your panels in an oven preheated to 200° F (93° C ) for 30 min.
- Example panels are shown in Figure 1 in the background. Your first growth panels might look different from those that underwent a second growth period, but it is okay if they do not!
/-/https/www.sciencebuddies.org/cdn/Files/17284/11/Mycelium-kit-activated.jpg)
/-/https/www.sciencebuddies.org/cdn/Files/17286/11/Mycelium-after-first-growth.jpg)
/-/https/www.sciencebuddies.org/cdn/Files/17577/8/mycelium-pieces-growth.jpg)
Testing Mycelium Composite Construction Material
- This test will destroy your panels, so take pictures before you start!
- Make a table in your lab notebook to collect the data. Table 1 is an example table you can use.
| Panel | Length (cm) |
Width (cm) |
Height (cm) |
Mass (g) |
Breaking weight (lb) |
Observations |
|---|---|---|---|---|---|---|
| Grown directly in mold | ||||||
| Panel 1 | ||||||
| Panel 2 | ||||||
| Panel 3 | ||||||
| Average | ||||||
| Second growth period in mold | ||||||
| Panel 1 | ||||||
| Panel 2 | ||||||
| Panel 3 | ||||||
| Average | ||||||
Table 1. Example data table.
- Choose a panel to start with and measure the length, width, and height of this panel. Note your findings in your data table.
- Look at and feel this panel. Does it feel spongy or stiff, do you see any imperfections that might make this panel weak, etc.? Note your observations in your lab notebook.
- Set up the equipment for a three-point flexural test. Use Figures 7 and 8 as your guide.
- Choose two tables that are identical in height and place them near each other on a flat surface. If the tabletops are not identical in height, place books on top of the lower table until its top surface is level with that of the other table.
- Place the tables so the mycelium composite panel spans the width of the gap between the tables. At each end, 1 cm of the panel should be resting on the table. The mycelium panel should lay horizontal.
- Lay the dowel crosswise in the middle of the panel.
- Tie two loops in the rope, pass the rope through the bucket handle.
- Hang the empty bucket from the dowel, with one rope loop on each side of the dowel. The bucket should not touch the ground.
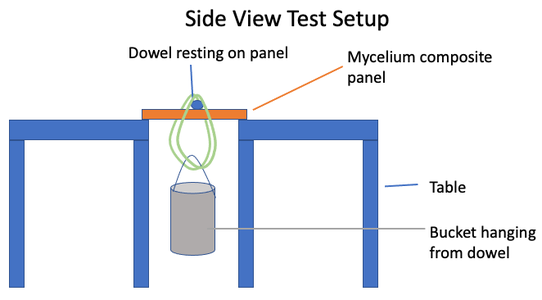
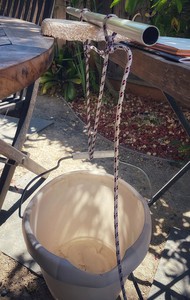 Figure 7. Schematic drawing and picture of a side-view of the test setup.
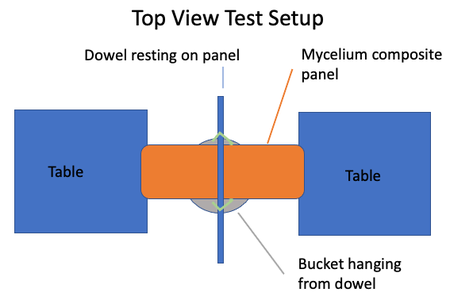
 Figure 8. Schematic drawing and picture of the test setup seen from the top.
 - Perform the three-point flexural test.
- Slowly pour water into the bucket and watch your panel. As you fill the bucket, the forces exerted on the panel increase.
- Stop filling the bucket as soon as you see the mycelium panel bend, and look for fractures in the panel below the dowel. Do they start from the top, from the bottom, or are they not visible? Figure 9 shows an example of a fracture starting from the bottom, which means this panel fails under tensile stress (see also the background explanation of tensile and compressive stress). Make notes of your observations in your lab notebook.
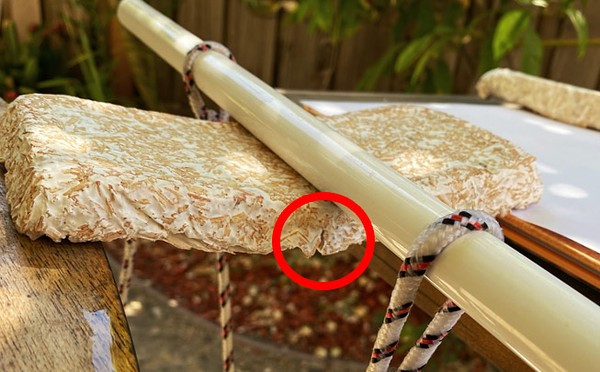 Figure 9. A mycelium composite panel fracturing under a three-point flexural test.
 - Slowly add more water until the panel breaks.
- Weigh the bucket with water, using the body weight scale. If no scale is available, measure the amount of water in the bucket with a large measuring cup. Note your measurement in your table.
- Repeat steps 3–6 for your other five panels.
- Once all the panels have been tested, calculate the average breaking weight over the three panels that were directly grown in a mold, and the ones that had their second growth period in a mold. Write the average in your data table.
- Optional: Calculate the average length, width, height, and mass and use these to calculate the average density of the three panels for each set. The average density is obtained by dividing the average mass over the average volume, as shown in the formula below:
/-/https/www.sciencebuddies.org/cdn/Files/17579/8/three-point-flexural-test-side-view.png)
/-/https/www.sciencebuddies.org/cdn/Files/17580/9/three-point-flexural--side-view.png)
/-/https/www.sciencebuddies.org/cdn/Files/17581/9/three-point-flexural-test-top-view.png)
/-/https/www.sciencebuddies.org/cdn/Files/17582/10/top-view-flexural-test-picture.jpg)
/-/https/www.sciencebuddies.org/cdn/Files/17572/24/three-mycelium-panel-fracturing.jpg)
Conclusions
- Graph your data, especially the average breaking weight versus the type of panel (grown directly in mold or second growth period in mold).
- Optional: Graph the average density versus the type of panel (grown directly in mold or second growth period in mold).
- Looking back at your observations, measurements, and graphs, did you observe a clear difference between the panels grown directly in a mold compared to those that had their second growth period in a mold, or is your data inconclusive? If you see a trend, what is it, and why do you think this trend exists?
- If you had more time and material, how would you extend your experiment? What would you like to know or find out about mycelium composite material?
- From your experiment and research, do you think the mycelium composite grown with one of the methods you used in this project can be used as construction material? Why or why not?
Ask an Expert
Global Goals
The United Nations Sustainable Development Goals (UNSDGs) are a blueprint to achieve a better and more sustainable future for all.
/-/https/www.sciencebuddies.org/cdn/Files/19755/5/E-WEB-Goal-12.png)
Variations
- Use a mini loaf pan and make mycelium composite bricks. To do a three-point flexural test, as shown in Figure 10, you should not make the bricks thick, as it quickly becomes very hard to break them with this test. The bricks in Figure 11 look nice, but can hold more than a full 4-gallon bucket during a flexural test.
/-/https/www.sciencebuddies.org/cdn/Files/17583/9/three-point-flexural-test-brick.jpg)
Figure 10.Three-point flexural test performed on a mycelium composite brick.
/-/https/www.sciencebuddies.org/cdn/Files/17584/8/stack-mycelium-bricks.jpg)
Figure 11. Mycelium composite bricks.
- Mycelium composite material can grow together. Try to grow bricks or panels together, as follows. Shorten the growth in the mold by a day. Then, stack the bricks in the way you want them to grow together, place the bricks in a plastic bag or cover with plastic wrap to trap moisture, add holes to allow air exchange, and wait for another couple of days. Did the bricks or panels grow together? Can you test how strong this bond is?
- Mycelium composite material is supposed to be a good thermal insulator. Can you test how quickly heat travels through your panels? Mycelium is a fire retardant, so it is safe to place it on a griddle placed on 'warm', or below 200°F. To test how well mycelium insulates, you could time how long it takes for an ice cube to melt when placed directly on the griddle compared to when a mycelium panel sits between the plate and the ice cube (Figure 12).
Note: If you want to compare the insulating properties of mycelium composite to that of other insulating materials, check with an adult to make sure it is okay to place these insulating materials on a warm plate before performing the test!
/-/https/www.sciencebuddies.org/cdn/Files/17585/8/mycilium-thermal-insulator.jpg)
Figure 12. Testing the thermal insulation capacities of mycelium composite material.
Careers
If you like this project, you might enjoy exploring these related careers:
/-/https/careerdiscovery.sciencebuddies.org/cdn/Files/1429/17/unsplash-4pM4nhHyo9M.jpg)
/-/https/careerdiscovery.sciencebuddies.org/cdn/Files/1832/17/iStock-1158126977.jpg)
/-/https/careerdiscovery.sciencebuddies.org/cdn/Files/20218/6/EnvEng_KeyPhoto.jpg)
/-/https/careerdiscovery.sciencebuddies.org/cdn/Files/1288/18/Career-Map-Environmental-Scientist.jpg)

/-/https/img.youtube.com/vi/EO67-HnE-Hw/0.jpg)
/-/https/img.youtube.com/vi/5W9KozawQVw/0.jpg)
/-/https/img.youtube.com/vi/Q-BluEJBHLw/0.jpg)