Disappearing Act: How Fast Do Different Biodegradable & Compostable Materials Decompose?
Abstract
Have you ever seen a product labeled "biodegradable" or "compostable" and wondered just how well it decomposes? A lot of different products claim to be biodegradable or compostable, such as food containers, bags, packaging materials, and spoons and forks. Not only do they clearly come in different shapes and sizes, but they are made of different materials as well. Do they decompose differently, and, if so, which decomposes the fastest? In this science project, you will make your own indoor composter and investigate how different biodegradable and compostable items decompose.Summary
Teisha Rowland, PhD, Science Buddies
/-/https/www.sciencebuddies.org/cdn/Files/4237/5/EnvSci_img086.jpg)
Objective
Make an indoor composter and determine how readily different materials decompose.
Introduction
Composting is a great way to recycle material that might otherwise be thrown into a landfill and take years to decompose. Composting is the process of converting some of the "waste" that we produce, such as spoiled food, rotten fruits and vegetables, or yard trimmings and lawn cuttings, into compost. The result is decomposed materials that can be used to feed, or fertilize, plants. Compost is rich in nutrients that plants readily devour. Figure 1 shows what some normal compost looks like.
/-/https/www.sciencebuddies.org/cdn/Files/4233/5/EnvSci_img083.jpg)
Figure 1. Compost, such as that shown here, is nutrient-rich matter made from decomposed materials. Decomposed leaves can be seen in this compost.
One material that cannot be composted and frequently finds its way into landfills is plastic. Many everyday items, such as grocery bags, food containers, packaging materials, and disposable forks and plates, are made of plastic (usually polyethylene or polystyrene). It is estimated that plastic takes hundreds of years to decompose. Consequently, researchers are developing new products that decompose more quickly and can be used instead of plastic products. Some of these new products claim to be "biodegradable" or "compostable." But what does this translate into in terms of how well they decompose and turn into compost?
The United States Government Printing Office actually defines these terms. A compostable product is defined as something that "will break down into, or otherwise become part of, usable compost (e.g., soil-conditioning material, mulch) in a safe and timely manner (i.e., in approximately the same time as the materials with which it is composted) in an appropriate composting program or facility, or in a home compost pile or device." In other words, if you have a compost bin at home, compostable products should decompose similarly to normal compost material, such as leaves and other organic matter. The compost should also be safe to use to fertilize plants. On the other hand, a biodegradable or "degradable" product has been defined as something that "will completely break down and return to nature, [or in other words] decompose into elements found in nature, within a reasonably short period of time after customary disposal."The words "customary disposal" can be confusing because this could be defined as, on one hand, putting the product in a compost pile, in which case it would be similar to a compostable product, or on the other hand, incinerating (burning) the product. Consequently, you can see how a lot of products could be biodegradable and not compostable. Also, some products labeled as biodegradable are not "safe" to use in compost for plants because as a biodegradable material breaks down it can release toxins into the compost.
When evaluating how well a biodegradable or compostable product decomposes, one factor to consider is what the product is made of, exactly. There are a lot of different biodegradable or compostable food containers, bags, packaging materials, and spoons and forks, and you can sometimes find what they are made of by looking at the fine print on the product or its packaging. Many compostable products are essentially made from corn starch, which, as its name implies, is starch made from corn. In general, starch is a commonly consumed carbohydrate produced by plants. Corn starch and other plant material, such as sugarcane, are often processed to make polylactic acid (PLA). A lot of compostable products are made of PLA. Other materials used to make compostable products are fibrous pulp made from agricultural plants, such as sugarcane (called bagasse), or starch from other plants, such as potatoes. Many biodegradable products are also made from other plant materials, such as sugarcane pulp or bamboo.
New materials are tested all the time to see if they can be transformed into biodegradable or compostable products. Watch this video to learn how scientists are using fungus to make packaging materials that can be composted.
/-/https/www.sciencebuddies.org/cdn/Files/4761/62/youtube.jpg)
How well does one biodegradable or compostable material decompose compared to another? In this science project, you will explore this question by making your own indoor composter. You will need a basic understanding of "brown" and "green" scraps, small pieces of organic matter that you add to a compost bin to create compost. Green scraps are, unsurprisingly, usually green, such as grass cuttings, but they can also be colorful, such as fruits and vegetables. They are also wet and rich in nitrogen. Brown scraps, which include things like dried leaves and newspaper, are dry and rich in carbon. Nitrogen, water (from the green scraps), and carbon are three of the key ingredients that microorganisms need to make compost efficiently. One other important element is oxygen, which is introduced to the compost when it is "turned," or aerated, with a pitchfork or compost aerator, or simply with your hands. If a compost pile has these four components in the right ratios, it should efficiently turn scraps into compost.
Terms and Concepts
- Composting
- Decomposition
- Compost
- Nutrients
- Plastic
- Polyethylene
- Polystyrene
- Biodegradable
- Compostable
- Organic matter
- Degradable
- Starch
- Carbohydrate
- Polylactic acid (PLA)
- Nitrogen
- Carbon
- Microorganisms
- Aeration
Questions
- Why do people compost?
- What is the difference between a "hot" compost pile and a "cold" compost pile?
- What kind of biodegradable or compostable materials do you think would decompose more quickly than others when put into a compost pile?
- How are green scraps different from brown? How are they similar? Why are they both important?
- What factors affect how quickly something decomposes?
Bibliography
These websites are a good place to start gathering information about composting and biodegradable and compostable products:
- Journey to Forever. (n.d.). Composting indoors. Retrieved February 17, 2012.
- Starkey, S. (2011, February 7). How to make your own indoor compost bin. Apartment Therapy. Retrieved February 17, 2012.
- # Link Name="EnvSci_p058.4" Value="HtmlAnchor" HtmlText="GrowingAnything.com." #] (n.d.). Hot vs. cold composting instructions: What's the difference?. Retrieved February 17, 2012.
- The U.S. Government Printing Office (GPO). (2013, Sept. 18). Part 260 - Guides for the use of environmental marketing claims. Retrieved September 20, 2013.
- National Science Foundation. (n.d.). Mushroom packaging - Innovation Nation. Retrieved February 20, 2012.
Materials and Equipment
- Compostable or biodegradable products to test (at least 3). Use products made of different materials so that you can compare how well the different materials decompose. Here are some products you could test:
- Compostable bowls (made out of bagasse) can be purchased at Amazon.com.
- Compostable cutlery (made of starch) can be purchased at Amazon.com.
- Some SunChips® bags are compostable (made of PLA). Check the bag for details.
- Some grocery stores that sell natural and organic foods, such as Whole Foods Market®, may also sell compostable and biodegradable products or offer compostable or biodegradable food containers for prepared foods.
- Ruler
- Scissors
- Blank paper or white paper towels
- Camera
- Digital scale with 0.1 gram (g) increments. Can be purchased at Amazon.com.
- String or yarn made out of synthetic fibers, such as polyester or acrylic (at least 7 meters)
- Tape
- Permanent marker
- Plastic bin with a lid that seals, at least 10 gallons in size
- Drill with bits that are ideally 3/8 inch or ¼ inch
- Tray for under the bin; A second lid may work for this
- Two wooden boards, 3/4 x 1½ inches. The boards should be cut the same length as the plastic bin. Some hardware stores will cut the wood for you.
- Optional: Saw
- Green composting materials, see Table 1 below (enough to fill the bin at least half full to start with, and a small continual supply to continue filling the bin over time)
- Brown composting materials, see Table 1 below (enough to fill the bin at least half full to start with, and a small continual supply to continue filling the bin over time)
- Optional: Buckets
- Soil not treated with chemicals or organic potting soil (enough to fill the bin at least 6 centimeters [cm] deep)
- Compost aerator or long rubber gloves. A compost aerator can be purchased at Amazon.com.
- Optional: Digital thermometer, available from Carolina Biological, item #: 745360
- Optional: Humidity gauge, available from Carolina Biological, item #: 745538
- Lab notebook
Disclaimer: Science Buddies participates in affiliate programs with Home Science Tools®, Amazon.com, Carolina Biological, and Jameco Electronics. Proceeds from the affiliate programs help support Science Buddies, a 501(c)(3) public charity, and keep our resources free for everyone. Our top priority is student learning. If you have any comments (positive or negative) related to purchases you've made for science projects from recommendations on our site, please let us know. Write to us at [email protected].
Experimental Procedure
Preparing the Biodegradable or Compostable Items
Before setting up your compost bin, you will want to make sure your biodegradable or compostable products are ready for testing.
- Lay your different test products out. How are they similar to each other, and how are they different? Are some thicker or longer than others? Write your observations in your lab notebook.
- Cut your products up into squares that are each about 10 cm long. Because the size of something can affect how quickly it decomposes, try to make your items as similar in size as possible.
- In this way, prepare three different test items from each product. For example, if you are testing three products, you should make a total of nine test items.
- Testing multiple items made from each product will help you ensure that your results are accurate and reproducible.
- Record data on what the test items look like now. This will help you see how they change after you compost them and assess which product decomposed the most. Create a table in your lab notebook to record this data.
- Lay your different items out on some blank paper or white paper towels.
- Assign each item a number and write it on the paper next to the item. Write down which item was assigned which number in your lab notebook, including the product each item came from.
- Take a picture of all your items with their numbers written next to them. You can take extra pictures of individual items, too.
- Using the digital scale, weigh each item separately and record the weight in your lab notebook.
- If any item does not weigh enough to register on your scale (i.e., the scale says "0.0 g"), then make a larger test item out of the same product to replace the smaller test item. Ideally, you want to use items that weigh at least 1.5 g.
- When something decomposes, it loses weight. By determining how much weight each item loses, you will have an idea of how much each item decomposed.
- Attach permanent labels to your test items so you can easily find and identify them later.
- For each test item, cut a piece of string that is about twice as long as the height of the bin.
- Tightly tie the string to each test item. Make sure the string is securely attached.
- You may need to cut a slit in the item to tie a string securely to it. Do not actually cut out a hole because this will change the item's weight.
- To the free end of each string, fold a small piece of tape over on itself. Then use the permanent marker to write the number of the test item the string is attached to on the tape.
- Make sure the tape label is securely attached to the string.
Setting Up the Compost Bin
In this part of the science project, you will build the compost bin and start the composting process.
- First you will ready your plastic bin for composting.
- On the bottom of the plastic bin, drill ten to 12 holes roughly evenly spaced from each other. You may want to ask an adult to help you do this. Ideally, you will use a 3/8 inch or 1/4 inch drill bit.
- Find a place indoors that is out of the way where you can keep your compost bin for several weeks. It should not be in a place that receives a lot of direct sunlight, because this may dry out the compost. After you fill the compost bin, it will be heavy, so you will not want to move it.
- In the area you picked to set up your compost bin, place the tray (or extra bin lid). Inside the tray, space the two wooden boards evenly across it.
- The boards will help raise your bin up so that air flows easier through the holes in the bottom.
- On top of the boards, place your bin so that it is stable. Your setup should now look like the diagram in Figure 2.
/-/https/www.sciencebuddies.org/cdn/Files/4235/5/EnvSci_img084.jpg)
Figure 2. When you have finished assembling your compost bin, it should look like the one in this diagram.
- Next collect and prepare the materials you will use for composting. When making compost, the materials that
are added are usually green or brown materials, as listed in Table 1. Several materials, also listed in
Table 1, should not be used in an indoor compost.
Swipe left to see moreRecommended Wet
or Green Scraps
(nitrogen-rich)Recommended Dry
or Brown Scraps
(carbon-rich)Scraps Not Recommended
for Indoor Composts- Fruits
- Vegetables
- Old flowers
- Dead plants
- Young weeds
- Manure from herbivores
- Tea bags
- Coffee grounds
- Leaves (if moist)
- Pond algae and seaweed (sparingly)
- Grass cuttings (if the lawn is not treated with chemicals)
- Dry leaves
- Black and white newspaper
- Dry hedge clippings
- Dry garden trimmings
- Paper towels (do not use ones that were in contact with meat)
- Straw or hay
- Small wood chippings (if not treated with chemicals)
- Crushed egg shells
- Tissues
- Cardboard (if untreated)
- Coffee filters
- Ashes (from plants/wood)
- Old clothes or fabric made from natural fibers
- Sphagnum peat moss
- Coconut husk fibers (coir)
- Anything sprayed with pesticides or treated with other chemicals
- Non-biodegradable plastics or synthetic fibers
- Meat
- Fish
- Bones
- Dairy products
- Potato peelings
- Garlic
- Watermelon rinds
- Oils
- Diseased plants
- Weeds that have seeds
- Weed roots
- Dog or cat manure
- Disposable diapers
- Glossy paper or magazines
- Charcoal
- Cat litter
Table 1. Materials recommended for composting are generally categorized as green or brown scraps, as shown in this table. Several items not recommended for indoor composting are shown in this table and should not be used in your composter.
- Collect enough scraps to entirely fill your compost bin.
- Using buckets is a good way to collect and sort your scraps.
- You will need slightly more brown scraps than green scraps.
- Because the scraps get compressed as you add more to the bin, you will actually need a lot more scraps than what you would need to simply fill the space inside the bin, so collect many more scraps than you think you will need.
- In your lab notebook, write down what kind of green and brown scraps you collected. You can observe how well these different scraps decompose in your compost bin over time.
- Shred all of the scraps so that none are longer than 5 cm.
- You can use the scissors very carefully to do this.
- Add layers of green and brown scraps to the bin. Fill your bin with scraps all at the same time, or you can add them over several days. Just make sure that when you add the biodegradable and compostable test items, you add them all at the same time.
- Make a layer of brown scraps at the bottom of the bin. This layer should be about 7.5 cm deep. An example of a brown layer is shown in Figure 3.
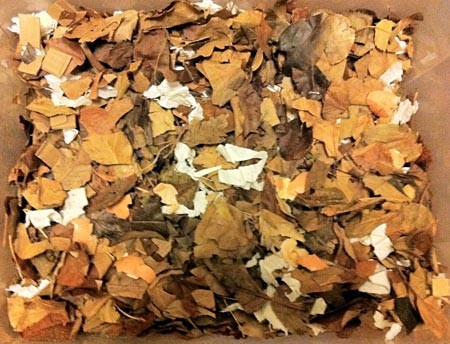
Figure 3. This photo shows an example of a brown layer with pieces of dried leaves, paper towels, and untreated cardboard.
- On top of the brown layer, add a layer of green scraps. This layer should be 7.5 cm deep at most.
- If the green scraps are very wet and start to form a thick, dense, clumpy layer, make this layer less than 7.5 cm deep.
- An example of a green layer is shown in Figure 4.

Figure 4. This photo shows an example of a green layer with fruits and vegetables.
- On top of the green layer, add a brown layer with a little bit of soil or organic potting soil mixed in. (The soil helps introduce bacteria that should speed up the decomposition process.) This layer should be a total of about 9 cm deep.
- The brown scraps should again be about 7.5 cm deep, while the soil should be about 1.5 cm deep. Mix the brown scraps and soil together in this layer.
- Continue making layers, alternating between green and brown as you did in steps 3a to 3c, as shown in Figure 5 (adding soil to every other brown layer). Stop when you have filled the bin about half full and are ready to make a brown layer.
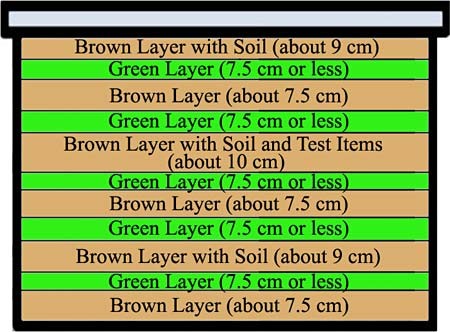
Figure 5. Fill the compost bin by alternating between green and brown layers. Mix in a layer about 1.5 cm deep of soil into every other brown layer. When you have filled the bin about halfway, add the test items to a brown layer. Filling your bin may take several more layers than depicted in this figure.
- When you have filled the bin about half full and are making a brown layer, include your test items. Do this by adding about 4 cm of brown scraps, then adding your test items, and then adding another 4 cm of brown scraps on top of the items.
- Space the test items out so that no items are touching each other or the sides of the bin.
- If you have a large, flat item, fold it so that when you add it to the compost layer it fits better. Put some brown scraps between the folds of the item so that it is not in contact with itself.
- Hang the strings that are tied to the test items over the side of the bin so that the labeled tape pieces are spaced around the outside of the bin. Try to keep the strings separated to prevent them from getting tangled. Make sure the labels are firmly attached to the ends of the strings.
- Continue alternating between making green and brown layers as you did in steps 3a to 3c, as shown in Figure 5. To every other brown layer, add soil as you did in step 3c. Stop when you have filled the bin all the way to the top.
- Make a layer of brown scraps at the bottom of the bin. This layer should be about 7.5 cm deep. An example of a brown layer is shown in Figure 3.
/-/https/www.sciencebuddies.org/cdn/Files/4236/5/EnvSci_img085.jpg)
/-/https/www.sciencebuddies.org/cdn/Files/4237/5/EnvSci_img086.jpg)
/-/https/www.sciencebuddies.org/cdn/Files/4238/5/EnvSci_img087.jpg)
Keeping the Compost Bin Going and Checking Your Test Items
- Check your compost and mix it weekly. When mixing the compost, focus on moving material from the lower part of the compost up to the top of the compost, and burying the material that was at the top. Also check on your test items at this time, being sure to bury them back in the compost after checking on them.
- You can measure the temperature and humidity of your compost bin immediately after you assemble it, and then every following week. If you take these measurements, take them before mixing the compost (which will be covered in step 1b). If you will not be taking these measurements, skip to step 1b.
- If you have a digital thermometer with a metal rod, carefully stick the rod down as close to the middle of the compost bin as you can get. What is the temperature of the middle of the compost?
- Note: An indoor composter like the one you have made will probably be between about 20 to 30 degrees Celsius (C). This is known as a "cold" compost pile. "Hot" compost piles are usually outdoors and can reach 60 to 70 degrees C, mainly because they are larger. Because they get so hot, these hot composters make compost more quickly.
- When measuring the humidity, place the humidity gauge on top of the compost in the bin and close the lid. It may take about a minute for the gauge to accurately read the humidity levels. What is the humidity of the compost?
- Ideally, the compost bin humidity should not exceed 65%. If it is greater than 65%, add extra brown scraps when you next add scraps.
- If you take these measurements, record them over time in a table in your lab notebook. How do the temperature and humidity change over time? How do the temperature and humidity compare to the temperature and humidity outside of the bin in the room? (You can take the outside measurements using the same thermometer and humidity gauge.)
- You can make a graph of these measurements, with time on the x-axis and either temperature or humidity, or both, on the y-axis.
- If you have a digital thermometer with a metal rod, carefully stick the rod down as close to the middle of the compost bin as you can get. What is the temperature of the middle of the compost?
- Every week, starting one week after you started your compost bin, mix its contents. You can do this using a compost aerator or using your hands with long rubber gloves.
- When mixing, you mostly want to move the contents from the bottom of the bin to the top of the bin. Try to mix everything else around as well. Mix everything gently to avoid damaging any of your test items. When you mix, how do the contents at the bottom of the bin look (and feel) different from the ones at the top?
- Break up any clumps that have formed.
- Be careful not to lose any strings and their labels in the compost bin when mixing.
- If any of your test items surfaced while you mixed the compost, set those aside to examine later.
- When you mix your compost, it is also a good time to check on your test items.
- Carefully dig up any test items that did not surface while you mixed the compost. You can do this by following the strings down into the compost, but do not pull on the strings too hard or they may detach from the items.
- If you cannot find a test item, make a note in your lab notebook. It may have decomposed so much that the string was no longer attached to anything.
- Write down other observations in your lab notebook. Do the test items look like they are decomposing at all (becoming less firm or changing color)? Do some look like they are decomposing more than others? How does the compost in general look?
- Bury the test items back in the compost when you are finished making observations.
- Make sure none of the items are touching each other or the sides of the bin.
- Carefully dig up any test items that did not surface while you mixed the compost. You can do this by following the strings down into the compost, but do not pull on the strings too hard or they may detach from the items.
- You can measure the temperature and humidity of your compost bin immediately after you assemble it, and then every following week. If you take these measurements, take them before mixing the compost (which will be covered in step 1b). If you will not be taking these measurements, skip to step 1b.
- As your compost bin decomposes its contents, you should notice that its volume decreases. Because of this, you will need to continue adding scraps to your compost bin to keep it full.
- Add green scraps to your bin as they become available. Kitchen scraps are often a good source of regular green scraps. Always add a layer of brown scraps on top of the new green scraps that is at least as thick.
- Because you will need a continual supply of brown scraps, you may want to keep a bucket or other container of brown scraps near your bin that are always ready to add.
- In your lab notebook, you may want to keep track of how many centimeters in layers of scraps you add over time. When you are finished, this will show you how efficient your composter was at turning its contents into compost.
- At the end of your experiment, what is the total centimeters of scraps you put into the compost bin (including when you filled it at the beginning)? What is the final height in centimeters of compost in the bin?
- You can figure out how much the volume has decreased by dividing the final height in centimeters of the compost in the bin by the total centimeters of compost added.
- Note: There should not be much liquid draining from the bottom of the compost bin into the tray, but if there is, there are some easy ways to stop the leaking.
- Liquid coming out of the bottom of the bin could indicate that the humidity in the composter is too high. Try adding a layer of brown scraps to the bin and mix it in (especially with the scraps at the bottom of the bin, which may be wetter). If the liquid persists for a few days, mix in more brown scraps and add fewer green scraps next time you add scraps to the bin overall.
- The compost bin may need better aeration. You can try to fix this by drilling a few holes around the sides of the bin.
- Use paper towels to soak up any liquid coming out of the bottom of the bin.
- After your test items have been in the compost for about four or five weeks, or until you notice a visible difference in how your different items are decomposing, stop your experiment and analyze your results.
- For many biodegradable or compostable products, it may take much longer than four or five weeks of composting to completely decompose, but you want to end your experiment before the items are completely decomposed. Why do you think this is?
Analyzing Your Data
- Carefully dig up all of your test items.
- Do not pull on the strings too hard or they may detach from the items.
- If you cannot find any of your test items, make a note in your lab notebook. The item may have decomposed so much that the string had nothing to hold on to anymore.
- Gently remove dirt or debris from any item.
- You may need to use a little water to help remove attached debris. If you do this, be careful not to remove any part of the actual test item.
- Let your items dry out for at least three days.
- The items will be moist from being in the composter. You want to weigh your test items when they are dry because this will let you determine more accurately how their weight has changed (since they were dry when you first weighed them).
- Gently press the test items between paper towels to remove some of the excess water.
- Place your items on fresh paper towels somewhere safe where they are exposed to air for at least three days.
- Once they are dry, inspect your items. What do they look like now compared to when you first put them in the composter? How have they changed? Write your observations in your lab notebook.
- Lay your different items out on blank paper or white paper towels.
- Gently remove the string from each item and write its number on the paper next to it.
- Take a picture of all your items with their numbers written next to them. You can take extra pictures of individual items too.
- Using the digital scale, weigh each item separately and record the weight in your lab notebook.
- Did all of the test items lose weight, or did only some lose weight? Which items lost the most weight?
- Because some items may have initially weighed more than others, you should calculate how much weight they lost as a percentage of their original weight.
- For example, if an item weighed 2.0 g before you put it in the composter, but it weighed 1.7 g when you took it out at the end of your experiment, then at the end of your experiment the item weighed 85% what it did at the beginning.
- Make a graph of your data. Put the name of each test item (including the material and product it was from) on the x-axis and weight of the test items on the y-axis. Be sure to include the weight of each test item before and after composting.
- Which items retained the smallest percentage of their original weight? What does this suggest about the materials that they are made of?
- What other factors might have affected how much the different items decomposed? If some items are thicker than others, how do you think this might have affected how thoroughly they decomposed?
- Some products give estimates for how long they need to be composted to decompose. If you can find an estimate for a product, how does it compare to your data? Does the estimate recommend certain composting conditions that are different than yours?
- Because some items may have initially weighed more than others, you should calculate how much weight they lost as a percentage of their original weight.
- When you are finished with your experiment, you can mix your compost into the potting soil of house plants or add it to the soil around plants in your garden.
- Note: If you tested biodegradable products, the compost should not be used on plants that will make food, because biodegradable products may contain toxins that could be released into the compost.
Ask an Expert
Global Goals
The United Nations Sustainable Development Goals (UNSDGs) are a blueprint to achieve a better and more sustainable future for all.
/-/https/www.sciencebuddies.org/cdn/Files/19745/5/E-WEB-Goal-02.png)
/-/https/www.sciencebuddies.org/cdn/Files/19755/5/E-WEB-Goal-12.png)
Variations
- One efficient composting method uses worms. This method is called vermicomposting, and it can also be done indoors. How well do compostable and biodegradable products decompose using worms? Is it faster than the indoor composter you built in this experiment? You can start learning more about vermicomposting here:
- Journey to Forever. (n.d.). Composting indoors. Retrieved February 17, 2012, from http://journeytoforever.org/compost_indoor.html
- You can also investigate using worms in compost piles in the Science Buddies project Get Rid of Those Leftovers: How Much Organic Waste Can Composting Worms Eat?
- In this experiment you made an indoor composter, specifically with a cold compost pile. Cold piles are usually between 20 to 30 degrees C. However, you could try making a hot compost pile, which usually reaches between 60 to 70 degrees C. Hot compost piles are generally more efficient at decomposing scraps and are usually kept outdoors, although electric indoor varieties can be purchased that heat up the scraps. How much faster do compostable and biodegradable products decompose in a hot compost pile compared to a cold one? You can read more about hot composters in the GrowingAnything.com article cited in the Bibliography.
- You may have noticed in this experiment that some biodegradable or compostable products are much thicker than others, such as a fork compared to a thin bag. Design an experiment to test how the thickness of the product affects how it decomposes.
- In this experiment you should have seen that compost piles produce heat. But just how much heat do they make? You can investigate this in the Science Buddies project Extracting Heat Energy from a Compost Pile.
Careers
If you like this project, you might enjoy exploring these related careers:
/-/https/careerdiscovery.sciencebuddies.org/cdn/Files/1288/18/Career-Map-Environmental-Scientist.jpg)
/-/https/careerdiscovery.sciencebuddies.org/cdn/Files/20218/6/EnvEng_KeyPhoto.jpg)
/-/https/careerdiscovery.sciencebuddies.org/cdn/Files/1832/17/iStock-1158126977.jpg)
/-/https/careerdiscovery.sciencebuddies.org/cdn/Files/1429/17/unsplash-4pM4nhHyo9M.jpg)

/-/https/img.youtube.com/vi/dC9uuHoIgXk/0.jpg)
/-/https/img.youtube.com/vi/2ymXk67MAcs/0.jpg)
/-/https/img.youtube.com/vi/bIfo0anMI98/0.jpg)