Abstract
Would you like to add an unusual twist to a yummy food like ice cream? In this kitchen science project, you will make mind-bending hot ice cream. You will experiment with, and of course munch on this gastronomic treat. It is easy, it is delicious, and it is fun! Go ahead and try it out!Summary
/-/https/www.sciencebuddies.org/cdn/Files/8400/8/strawberries-hot-ice-cream.jpg)
Objective
Measure how adding more methyl cellulose to your homemade hot ice cream recipe changes how it melts.
Introduction
Do you like to experiment with food's taste, texture or appearance? These types of science experiments allow you to be creative and learn about science—and most of the time, the result is yummy as well! Being creative with new foods can result in the weirdest inventions. For example, what do you think about the combination of strawberries topped with a scoop of hot ice cream shown in Figure 1?
/-/https/www.sciencebuddies.org/cdn/Files/8400/8/strawberries-hot-ice-cream.jpg)
Figure 1. Strawberries topped with a scoop of vanilla hot ice cream.
Hot ice cream is a creation of molecular gastronomy, an area of cooking in which cooks use tools and ingredients that are usually only used by scientists and the food industry to craft uncommon and new food creations. Hot ice cream is one of these mind-bending creations as it is solid when hot and melts as it cools down to room temperature. That doesn't sound right, does it? Can you see how this is weird?
The special ingredient in hot ice cream is methyl cellulose. Methyl cellulose is modified cellulose, and cellulose is the fibrous material that makes plants strong. To add the methyl cellulose to foods, cooks dissolve it evenly in a solution of other ingredients. Cooks like methyl cellulose because it makes a solution thicken when heated and become a liquid again when cooled back to room temperature. This property is called thermo-gelling. You might question what this could be useful for. As an example, methyl cellulose helps to create liquid fillings in baked goods. The filling is solid while baking, but becomes liquid again when cooled. Methyl cellulose has more properties that can help enhance or preserve flavor, taste, texture, and appearance of food, making it a common food additive.
In this science project, you will use methyl cellulose to make your own hot ice cream recipe. You will experiment with different cooking times and recipe solutions, and measure how fast the resulting hot ice cream melts. Whatever solution or cooking time you are going to try, you can be sure to get a delicious result, so go ahead and try it out!
Wondering how methyl cellulose makes solutions thicken as they heat up and become fluid again as they cool down? At room temperature, water sticks around methyl cellulose molecules. This prevents the cellulose molecules from getting together and forming links. When heated, water can no longer hold on to the methyl cellulose molecules. These molecules can get close enough to one another to form links and create a gel or thicker liquid.
Terms and Concepts
- Hot ice cream
- Molecular gastronomy
- Methyl cellulose
- Cellulose
- Solution
- Thermo-gelling
- Food additive
Questions
- What is the one special ingredient for hot ice cream that makes the ice cream melt as it cools?
- Why is hot ice cream classified under molecular gastronomy?
- How fast—or how slow—would cooks like hot ice cream to melt? Think of the time it takes to serve food and how you would like to present it to customers?
Bibliography
- Melnich, B (2013, February 26). Hot Ice Cream (Methyl cellulose) The Cook and the Chemist. Retrieved January 25, 2017 from http://thecookandthechemist.blogspot.com/2013/02/hot-ice-cream-methylcellulose.html
- Molecular Recipes Contributors (2014). What is Molecular Gastronomy? Molecular Recipes. Retrieved January 19, 2017.
- Wikipedia Contributors (2016, December 15). Methyl cellulose Wikipedia: The Free Encyclopedia. Retrieved January 19, 2017.
- Chem4Kids Contributors (n.a.) Solutions and Mixtures Chem4Kids. Retrieved January 19, 2017.
For help creating graphs, try this website:
- National Center for Education Statistics, (n.d.). Create a Graph. Retrieved June 25, 2020.
Materials and Equipment
- Methyl cellulose A4C (20 g.) available from online vendors like Modernist Pantry.
- Note: There can be a great variation between different types of methyl cellulose. This project works well with the A4C type. If you need to use a different type, you might need to adjust the cooking time, the microwave power, as well as the concentration of the solutions used.
- Tap water (200 ml)
- Heavy whipping cream (½ pint)
- Milk, (½ pint); 1%, 2% or whole milk
- White sugar (25 g)
- Vanilla extract (12.5 g)
- Microwavable mixing bowl, 1 L capacity or more.
- Digital scale with 0.1 g increments. A digital scale that would be suitable (the Fast Weigh MS-600-BLK Digital Pocket Scale) is available from Amazon.com.
- Fork
- Microwave
- Food-grade containers with lids (3), must be able to hold at least 0.3 L.
- Refrigerator
- Microwavable measuring spoon (round), table spoon size. This scoop-shaped tablespoon available from Amazon.com works well.
- Knife
- Millimeter graph paper, preferably printed on colored paper. Printable versions can be found online, like this one from Wikimedia Commons.
- Clear sheet protector
- Paper towels
- Spoon
- Lab notebook
- Optional: Photo camera
- Timer
Disclaimer: Science Buddies participates in affiliate programs with Home Science Tools®, Amazon.com, Carolina Biological, and Jameco Electronics. Proceeds from the affiliate programs help support Science Buddies, a 501(c)(3) public charity, and keep our resources free for everyone. Our top priority is student learning. If you have any comments (positive or negative) related to purchases you've made for science projects from recommendations on our site, please let us know. Write to us at [email protected].
Experimental Procedure
First, you will experiment with making hot ice cream. You will try different cooking times and observe how it melts. Once you are familiar with the process and have chosen a specific cooking time, you will test this cooking time on three different hot ice cream solutions, make detailed measurements, and pick your favorite hot ice cream recipe.
Before starting with the experiments, you will need to plan the following:
- Make the recipes a day ahead, as the solutions need to rest in the refrigerator for one complete day (24 hours).
- Take your recipe out the refrigerator one hour before you plan to start cooking. This gives the solutions time to adjust to room temperature.
- You can keep your ice cream solutions for up to three days; however, make sure to perform the detailed measurements on the same day. The solutions will slightly thicken as time passes, which will alter your measurements. If you do take a break, be sure to store your solutions in the refrigerator.
Preparing Your Hot Ice Cream Solutions
Hot ice cream is made by cooking your ice cream solution (which contains methyl cellulose) in the microwave. In this section, you will prepare 3 solutions. All will start from the same base recipe: a mixture of water, milk, cream, sugar and vanilla extract. You will then dissolve different amounts of methyl cellulose into the base recipe to create the different ice cream solutions.
- Prepare the base recipe.
- Gather all your ingredients as shown in Figure 2.
- Weigh each ingredient listed in Table 1, one by one. Section How to Use a Scale can help you use your scale accurately.
- Pour all ingredients into a microwave-safe mixing bowl.
- Mix the solution well with a fork. The result should look like shown in Figure 3.
| Ingredient | Amount (g) |
|---|---|
| Water | 200 |
| Heavy whipping cream | 175 |
| Milk | 125 |
| Sugar | 25 |
| Vanilla Extract | 12 |
/-/https/www.sciencebuddies.org/cdn/Files/8401/8/hot-ice-cream-materials.jpg)
Figure 2. Hot ice cream is made from cream, milk, water, sugar, vanilla extract, and methyl cellulose.
/-/https/www.sciencebuddies.org/cdn/Files/8402/8/hot-ice-cream-base.jpg)
Figure 3. Mixing the cream, milk, water, sugar, and vanilla extract results in about half a liter of base solution.
- Heat the base slightly, about one minute on the highest setting in the microwave. Methyl cellulose dissolves better in a lukewarm liquid.
- Label containers as shown in Figure 4. You should have a container for each: a 2%, 3%, and 4% ice cream solution.
/-/https/www.sciencebuddies.org/cdn/Files/8403/8/label-containers-hot-ice-cream.jpg)
Figure 4. Label containers for 2%, 3%, and 4% hot ice cream solutions.
- Finish the three solutions by adding methyl cellulose.
- Take the 2% container.
- Look up the amounts of base and methyl cellulose needed for the 2% solution in Table 2.
Table 2. Amounts of base and methyl cellulose needed to create a specific hot ice cream solution.Recipe Amount base (g) Amount methyl cellulose (g) Technical note: % calculation 2% 98.0 (or almost 100) 2.0 2/(98+2)= 2/100 or 2% 3% 194.0 (or almost 200) 6.0 6/(194+6)= 6/200= 3/100 or 3% 4% 96.0 (or almost 100) 4.0 4/(96+4)= 4/100 or 4%
- Add the amount of base given in Table 2 to the container, followed by the indicated amount of methyl cellulose. The How to Use a Scale section can help you weigh the quantities accurately.
- With the fork, stir the methyl cellulose into the base until all clumps disappear.
- Repeat steps a–d for the 3% and 4% solutions. Note that you make more of the 3% solution as you will use this solution to explore the preparation of hot ice cream.
- You should have three different ice cream solutions now: one with 2%, 3%, and 4% methyl cellulose as shown in Figure 5.
/-/https/www.sciencebuddies.org/cdn/Files/8404/8/hot-ice-cream-solutions.jpg)
Figure 5. Hot ice cream solutions ready to be stored in the refrigerator.
- Close the containers and store them in the refrigerator for about 24 hours. This allows the methyl cellulose to dissolve and hydrate fully. If you can, take out the solutions and stir them once or twice during the resting time.
- Figure 6 gives an example of how you can plan your experiment. As you can see, you can start testing the day after you made the solutions. If you need to wait another day or two, that is fine, too.
/-/https/www.sciencebuddies.org/cdn/Files/8416/8/agenda-wait-a-day.png)
Figure 6. Prepare the solutions at least one day before you plan to perform the test.
/-/https/www.sciencebuddies.org/cdn/Files/8405/9/use-scale.jpg)
Figure 7. Set your scale to measure in grams (g) and zero out the scale with your container sitting on the scale before you start adding the ingredient you like to weigh.
Determining the Best Cooking Time
Time to cook and explore! In this section, you will experiment and determine the best cooking time for your 3% solution.
- Take the 3% solution out of the refrigerator. Stir well and let it adjust to room temperature for about one hour.
- Put a sheet of millimeter graph paper in a plastic holder as shown in Figure 8.
/-/https/www.sciencebuddies.org/cdn/Files/8406/8/millimeter-paper-covered.jpg)
Figure 8. Millimeter graph paper protected by a plastic holder will be used to measure how fast the hot ice cream scoops melt.
- Place the covered paper on a flat surface near the microwave. Molten ice cream scoops tend to be rounder puddles when you work on a flat surface, and round puddles are easier to measure.
- Choose a microwavable round measuring spoon (with a clear, deep scoop) that holds exactly one tablespoon to scoop out a tablespoon of solution. Level off the top as shown in Figure 9.
/-/https/www.sciencebuddies.org/cdn/Files/8407/8/level-off-scoop-hot-ice-cream.jpg)
Figure 9. A microwavable, deep tablespoon is used to scoop up the solution and make a nice-looking hot ice cream scoop.
- Place the measuring spoon in the middle of the microwave, as shown in Figure 10. Always place the spoon at the same location for each trial.
/-/https/www.sciencebuddies.org/cdn/Files/8408/10/scoop-in-microwave.jpg)
Figure 10. The scoop of hot ice cream is cooked for a short time in the microwave on low power.
- Microwave for 1:30 minutes (min) on power level 3. The hot ice cream is better when cooked slowly.
- When you take the spoon out, let the cooked ice cream rest inside the spoon for 30 seconds. Figure 11 shows the different steps on a timeline.
/-/https/www.sciencebuddies.org/cdn/Files/8409/8/timeline-cooking-hot-ice-cream.png)
The timeline for an experiment begins with a scoop being placed in a microwave with a cooking time between 30 seconds to 5 minutes. After the microwave is stopped, 30 seconds are allowed for the scoop to rest before being transfered to a sheet of paper. Observations are made directly after the scoop is placed on the paper.
Figure 11. Give the ice cream 30 seconds rest time before transferring it to the paper.
- Turn the spoon over on the protected graph paper. The scoop will most likely fall out of the spoon, as shown in Figure 12. Below some tips:
- If the scoop falls apart or if the solution is still too liquid, try again with a slightly longer cooking time.
- If the ice cream sticks to the scoop, you can slide a different spoon around the edges to loosen the hot ice cream scoop as shown in Figure 13.
- Place the scoop near the middle of the paper and not at the edges, as it is going to melt and increase in size.
/-/https/www.sciencebuddies.org/cdn/Files/8410/9/transfer-hot-ice-cream.jpg)
Figure 12. Transferring a spoon of cooked hot ice cream to the protected graph paper.
/-/https/www.sciencebuddies.org/cdn/Files/8415/8/slide-spoon-transfer-scoop.jpg)
Figure 13. If the scoop does not slide out by itself, try sliding a different spoon around the edges of the cooked ice cream scoop.
- Take a moment to observe. How does the scoop look when still hot? Is it appealing and appetizing?
- Observe how the scoop melts; this can take up to 20 minutes. Does the scoop melt fast, or does it take quite some time? Is the molten cream like a sauce, appetizing, thick, or thin?
- With your observations in mind, think about what you like to obtain. How quickly or how slowly should the scoop melt? Think about where and how it would be used. Should it melt instantly, or is there time needed for serving?
- Time to experiment! Explore how different cooking times get you closer or further from your ideal. A table like Table 3 will help you record your observations.
Note: If your results do not look good after a few trials, try switching to a slightly higher microwave power.
| 3% hot ice cream recipe cooked in a microwave at power 3 | ||
|---|---|---|
| Cooking time (min) | Appearance | Melting Characteristics |
| 1:30 | ||
| ... | ||
| ... | ||
| ... | ||
- You can place several scoops on the same paper as long as they are not touching each other. If you need more space, throw out molten scoops and clean your plastic-covered graph paper with a paper towel to make room for new scoops.
- Explore until you feel satisfied with a specific cooking time, or until you used up half of your 3% solution. If you are still unsatisfied with the results, choose the time that you feel is best. Testing the other solutions might help you reach your goal.
Comparing Different Recipes
In this section, you will take detailed measurements of how fast the ice cream scoops of the 2%, 3%, and 4% solutions melt when cooked for a specific time. What is your hypothesis? Note these measurements need to be done all in one sitting. If you are afraid there might not be enough time left, take a break now and come back to it later.
- Take all three solutions out of the refrigerator. Stir well and let adjust to room temperature for about one hour.
- Clean your plastic-protected graph paper and place it back on the flat surface near the microwave.
- Copy table 4 in your notebook. It will help record your measurements. Remember to fill in the cooking time you established in section "Determining the Best Cooking Time."
| Melting characteristics of hot ice cream cooked for ... minutes in a microwave at power 3 | |||||||
|---|---|---|---|---|---|---|---|
| Recipe | Initial diameter (mm) | Diameter after 10 minutes (mm) | Diameter after 20 minutes (mm) | ||||
| Horizontal | Vertical | Horizontal | Vertical | Horizontal | Vertical | ||
| 2% | Trial 1 | ||||||
| Trial 2 | |||||||
| Trial 3 | |||||||
| 3% | Trial 1 | ||||||
| Trial 2 | |||||||
| Trial 3 | |||||||
| 4% | Trial 1 | ||||||
| Trial 2 | |||||||
| Trial 3 | |||||||
- To see how fast a scoop melts, you will measure how the dimensions, or diameter, of your scoops changes over time. Specifically, you will measure the scoop diameter after 0, 10 and 20 minutes. Figure 14 shows each step on a timeline.
/-/https/www.sciencebuddies.org/cdn/Files/8411/10/timeline-hot-ice-cream-measurements.png)
The timeline for an experiment begins with a scoop being placed in a microwave. After the microwave is stopped, 30 seconds are allowed for the scoop to rest before being transfered to a sheet of paper. Observations are made directly after the scoop is placed on the paper. Measurements are taken immediately after the scoop is transfered to the paper, 10 minutes after the initial transfer and 20 minutes after the initial transfer.
Figure 14. In this section, you cook the hot ice cream for a fixed time, then let it rest for 30 seconds before transferring it and take a measurement just after transferring (0 minutes), after 10 minutes of melting, and after 20 minutes of melting.
- Define the diameter of a scoop, or measure its size.
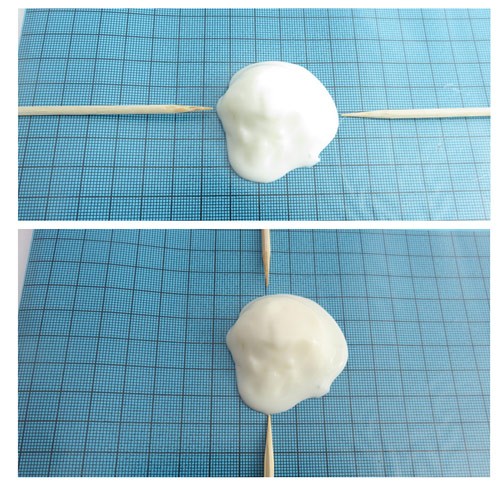
Figure 15. This project defines the "diameter" of a scoop as the average of the largest horizontal distance of the scoop (shown in the top graph, referred to as horizontal diameter) and the largest vertical distance of the scoop (shown in the bottom graph, referred to as vertical diameter).
See these detailed instructions on how to measure the diameter.
/-/https/www.sciencebuddies.org/cdn/Files/8412/8/measure-irregular-scoop.jpg)
/-/https/www.sciencebuddies.org/cdn/Files/8413/8/measure-round-scoop.jpg)
- Take a scoop of your 2% solution, and cook it as you did previously for the time duration established in section "Determining the Best Cooking Time." It is very important to stick to one cooking method (scoop size, cooking time, microwave power, and rest time) for all measurements.
- Set your timer to 10 minutes. Then, start the timer after you transferred the scoop to the covered graph paper.
- Measure the initial diameter of the scoop. Optional: Instead of measuring now, you can take a birds-eye picture of the scoop and count the cages it covers later, when you review the pictures. If you do so, remember to include a label in your picture, as shown in Figure 17.
/-/https/www.sciencebuddies.org/cdn/Files/8414/8/hot-ice-cream-label-pictures.jpg)
Figure 17. When taking pictures, take a birds-eye view and include a label of what is in the picture. Pictures can help you take accurate data.
- Measure again when the timer indicates 10 min and set your timer to 10 minutes again. Once the second 10 minutes is over, measure the scoop diameter for the 20 min time point.
- Record your data in your data table.
- This ends the first trail for the 2% solution. Repeat steps 6–10 for the 3% solution, and again for the 4% solution.
- Repeat steps 6–11 three more times, for a total of three trials.
- Your data would not be complete without a taste test! Copy Table 6 in your notebook, cook a sample of the 2% solution, and taste the sample at the 10-minute melting point. Repeat for the other two recipes. Note your observations on taste and texture in your table.
| Recipe | Taste and texture observations |
|---|---|
| 2% | |
| 3% | |
| 4% |
Analyzing Your Results
- Calculate the average diameter of each scoop by adding the horizontal and vertical diameter and dividing the sum by 2. If you need help, look back at the examples in section Learn how to measure the diameter. Note your results in a table like Table 7.
| Melting characteristics of hot ice cream cooked for ... minutes in a microwave at power 3 | ||||
|---|---|---|---|---|
| Recipe | Average Initial Diameter (mm) | Average Diameter after 10 minutes (mm) | Average Diameter after 20 minutes (mm) | |
| 2% | Trial 1 | |||
| Trial 2 | ||||
| Trial 3 | ||||
| Average | ||||
| 3% | Trial 1 | |||
| Trial 2 | ||||
| Trial 3 | ||||
| Average | ||||
| 4% | Trial 1 | |||
| Trial 2 | ||||
| Trial 3 | ||||
| Average | ||||
- Calculate the average diameter over the three trials for 1 specific recipe. As an example, add the three initial average diameters for the 2% solution, and divide the sum by 3. This yields the total average initial diameter for the 2% solution. Record the total average values for this recipe in the average row in your data table like Table 7.
- Optional: You might see how one solution melts faster than another, or how its average diameter grows faster. This trend can be made even more explicit when using the relative diameter, which tells you how much the diameter of the scoop changes over time compared to its original size. To calculate the relative diameter, divide the average diameter at a time point (initially, 10 minutes or 20 minutes) by its initial average diameter. As an example, if you measured 48 mm initially, 62 mm after 10 min., and 96 mm after 20 min., the relative diameters would be 48/48=1 initially, 62/48 =1.5 for the 10 min. mark and 96/48=2 for the 20 min. mark. This means that the diameter of the scoop at 10 minutes is 1.5 times bigger than the original one, and the molten scoop at 20 minutes has a diameter that is twice the size compared to the beginning. Copy a table like Table 6 in your notebook, calculate the relative average diameters, and note them in your table.
| Recipe | Relative Average Diameter (mm) | ||
|---|---|---|---|
| Initial | 10 min | 20 min | |
| 2% | 1 | ||
| 3% | 1 | ||
| 4% | 1 | ||
- Make a bar graph with the time points (0, 10, and 20 minutes) on the horizontal axis and the average diameter on the vertical axis. You can make a graph for each recipe (2%, 3%, and 4% methyl cellulose) or use one bar graph with different colors indicating the different recipes. The Bibliography lists an online graphing tool that can help you create graphs.
- Optional: If you calculated the relative diameter, graph the relative diameter (vertical axis) for each time point (horizontal axis). Use one bar graph with different colors indicating the different recipes.
- Looking at your graph(s) and your data tables, what can you conclude? Do you see any trends? Does one solution melt faster than another?
- Looking at all your data, notes, and observations, which recipe and cooking time do you think is best-suited for restaurant use of hot ice cream? Which recipe would you serve your guests if you were a chef in a restaurant?
Ask an Expert
Variations
- This project studies how ice cream melts differently when you slightly alter the ingredients in the recipe. What happens when you alter the solutions more? Maybe you can include 1%, 6%, or 8 % methyl cellulose to your recipe solutions?
- You already experimented a little bit with changing the cooking times in Part 1 of this project. Instead of looking at the melting behavior of the ice cream using different ice cream recipes, you can also choose one recipe and study in more detail how melting changes when you alter the cooking time. Does your ice cream melt faster when cooked for 1:30 minutes or 3 minutes?
- Can you find more or different recipes for hot ice cream that use methyl cellulose online? Which ingredient(s) are different? What effect would this change have on the ice cream melting behavior, the taste, and the appearance? Make a hypothesis and test it out!
- Methyl cellulose is often used when creating liquid fillings in baked goods. As an engineering project, can you design, test, and improve a method to create liquid fillings in home-baked goods?
- Find other molecular gastronomy recipes using methyl cellulose, like these noodles. Can you make a science project from it? Can you measure the effect of changing one or another variable in your recipe or during cooking?
Careers
If you like this project, you might enjoy exploring these related careers:
/-/https/careerdiscovery.sciencebuddies.org/cdn/Files/1309/18/unsplash-vGA1ei1yxos.jpg)
/-/https/careerdiscovery.sciencebuddies.org/cdn/Files/1316/17/unsplash-ePJQise0OkQ.jpg)
/-/https/careerdiscovery.sciencebuddies.org/cdn/Files/1107/19/pexels-photo-3938023.jpg)
/-/https/careerdiscovery.sciencebuddies.org/cdn/Files/20209/5/chemical-engineer-citgo.jpg)

/-/https/img.youtube.com/vi/dhV3h-Hjpmk/0.jpg)
/-/https/img.youtube.com/vi/XrEN1oszq_Y/0.jpg)
/-/https/img.youtube.com/vi/qfara8ci2oE/0.jpg)