Abstract
Imagine a wonderful summer day at the beach. You play in the sand, swim in the ocean—and, of course, put a lot of sunscreen on. The sunscreen protects your skin from harmful ultraviolet (UV) radiation. Special ingredients absorb or reflect the UV rays so they do not harm your skin. Different types of sunscreen have different types of ingredients, and some of them can be harmful to the environment—especially if they get into the ocean. In this science project you will put your sunscreen to the test and investigate how much of the UV-absorbing chemicals on your skin end up in the water.
Summary
This project requires the use of a spreadsheet program, such as Excel or Google Sheets.
This project requires a few special materials. See the Materials section for details.
No issues
/-/https/www.sciencebuddies.org/cdn/Files/19355/8/sunscreen-water-solubility-thumbnail.jpg)
Objective
Investigate how much of a sunscreen's UV-absorbing chemicals get from the skin into the water at different intervals after sunscreen application.
Introduction
/-/https/www.sciencebuddies.org/cdn/Files/19355/8/sunscreen-water-solubility-thumbnail.jpg)
Sunlight is important for our health. The health benefits of sunlight include producing vitamin D, reducing high blood pressure, and boosting our mood. At the same time, too much sunlight can be harmful to our skin. In the short term it can cause a bad sunburn, and in the long term it can lead to skin cancer.
The culprit is one specific component of sunlight. Sunlight travels through space as waves, and it can be broken down into three main components with different wavelength ranges. These are shown in Figure 1 and consist of ultraviolet light (wavelengths less than 400 nanometers), visible light (wavelengths between 400 and 800 nanometers), and infrared light (wavelengths greater than 800 nanometers). You can learn more about the science of light in the Bibliography.
/-/https/www.sciencebuddies.org/cdn/Files/19356/8/sunlight-wavelength-spectrum.jpg)
The wavelength in nanometers is on the x-axis and the irradiance in watts per square meter is on the y-axis. Below the x-axis the wavelength ranges of Ultraviolet, Visible, and Infrared light are marked. The graph shows a larger peak between 250 and 1200 nanometers, with two smaller peaks in the 1200 nm to 2200 nm range.
Figure 1. Wavelength spectrum of sunlight. W/m2 is the unit of irradiance, which is the amount of light power hitting a specific surface area. (Image credit: MIT OpenCourseWare, CC BY-NC-SA 2.0, via Flickr)
Ultraviolet (UV) light is invisible to our eyes. It can be further divided into UV-A (315–400 nm), UV-B (280–315 nm), and UV-C (100–280 nm) radiation. Earth's atmosphere can block out some of the UV radiation. After that, the UV light that reaches our skin consists of about 95% UV-A and 5% UV-B radiation. Because ultraviolet light carries more energy than visible light, it is the main contributor to sunburn and skin cancer.
But how do we know how much sunlight or UV radiation is too much for our skin?
Scientists have developed a tool called the UV Index to help us understand the potential danger of sun exposure. The UV Index measures the effective power of the sunlight that reaches our skin's surface. It gives us an indication of the level of UV radiation that can lead to sunburn. The UV Index is a unitless number that generally ranges from 0 to 12 when the sun is at its highest point in a clear sky. If we know the UV Index, we can use the scale shown in Figure 2 to determine the expected risk of overexposure to the sun.
/-/https/www.sciencebuddies.org/cdn/Files/19350/14/UV-index-scale-exposure.png)
The UV index ranges described start at 0 to 2, which is considered low-risk, with an estimate of 60 minutes to sunburn and a recommendation of sunscreen with SPF 15. At the high end of the scale, a UV of 10+ carries extreme risk, with only 10 minutes to sunburn. Recommendations at this level include sunglasses, cover up and hat, sunscreen with SPF 50+, and avoiding the sun from 11 a.m. to 5 p.m.
Figure 2. The UV Index Scale helps shows expected sun exposure risks and recommendations for different levels of UV Index.
Sun protection is recommended even at a low UV Index. You can protect your skin using sunscreen. Sunscreen prevents your skin from getting damaged by UV radiation. There are two different types of sunscreen, each with a different way of protecting your skin. The two different types are physical sunscreen and chemical sunscreen.
The active ingredients of physical sunscreens are zinc oxide or titanium dioxide. Both are white-colored, odorless minerals that are added to the sunscreen in powder form. This is why physical sunscreen is also called "mineral sunscreen." When you apply physical sunscreen, the titanium dioxide or zinc oxide particles form a layer on your skin's surface; they do not penetrate the skin. You might notice this layer as a white residue on your skin. The sunscreen layer creates a barrier that reflects UV radiation away from the skin, sort of like a mirror would. Thus, physical sunscreen protects your skin by preventing UV radiation from reaching it, as shown in Figure 3 on the left.
/-/https/www.sciencebuddies.org/cdn/Files/19351/15/chemical-physical-sunscreen.png)
On the left is a schematic drawing of a cross-section of skin with the epidermis on the top, the dermis in the middle, and the hypodermis at the bottom. A blue line on top of the skin represents the physical sunscreen. Red arrows representing sunrays hit the physical sunscreen layer, then reflect away from the skin. On the right is a schematic drawing of a cross-section of skin with the epidermis on the top, the dermis in the middle, and the hypodermis at the bottom. A green gradient along the skin depth represents chemical sunscreen that gets absorbed into the skin. Red lines representing sunlight fade as they penetrate the epidermis and dermis, because the sunlight is absorbed by the sunscreen chemicals inside the skin.
Figure 3. Physical sunscreen (left) reflects UV light, whereas chemical sunscreen (right) absorbs UV light and transforms it into harmless radiation.
Chemical sunscreen uses different active ingredients. These can include avobenzone, homosalate, octocrylene, and octisalate. When chemical sunscreen is applied, these chemicals penetrate the skin. Once there, they absorb harmful UV radiation and transform it into non-damaging radiation or heat, as shown in Figure 3 on the right. Because the UV-absorbing chemicals need time to penetrate the skin, it is important to apply chemical sunscreen at least 15 minutes before sun exposure. One benefit of chemical sunscreens is that they do not leave a white layer on your skin like mineral sunscreens do.
The different active ingredients in physical and chemical sunscreens not only change the way these sunscreens work but can also affect characteristics like their toxicity and environmental impact. You can learn more about these in the video below.
/-/https/i.ytimg.com/vi/28qWIPeOkvI/maxresdefault.jpg)
In this science project, we will look at sunscreens from a green chemistry perspective. Green chemistry means designing more eco-friendly products and incorporating sustainable methods of manufacturing. There are 12 principles that guide the green chemistry movement. These include reducing waste and reducing the use and creation of harmful chemicals, as well as being more efficient with energy and natural resources. In the video below, you can hear Paul Anastas, one of the founders of the green chemistry movement, explaining the concept of green chemistry.
/-/https/i.ytimg.com/vi/WIMHTWNYAoo/maxresdefault.jpg)
The main focus of this science project will be to test how much of the potentially harmful chemicals in sunscreens get from your skin into the water at different intervals after sunscreen application. We can use this information as a proxy for how eco-friendly or reef-safe the products are.
You might wonder how we can measure the amount or concentration of sunscreen chemicals in the water. We can make use of the fact that the chemicals present in physical and chemical sunscreens absorb or reflect UV light. You will use a UV meter, which is a small handheld device that uses a UV sensor to measure the UV Index, or the amount of UV light reaching the sensor. If you hold a water sample that contains sunscreen chemicals in front of the UV sensor, the water will absorb part of the UV light. The amount of UV light that passes through the sample, or is transmitted, is measured by the UV detector on the exit side of the sample. If there are UV-absorbing sunscreen chemicals in the water sample, the UV sensor readings will decrease. The setup for measuring your samples is shown in Figure 4.
/-/https/www.sciencebuddies.org/cdn/Files/19357/8/measurement-setup.png)
The sun is on the left. In the middle, a blue rectangle represents a cuvette filled with sample. On the right, an orange box represents the UV meter. A yellow line from the sun to the UV meter represents the sunlight shining on the UV sensor. The line color gets lighter after passing through the cuvette due to UV light absorption of the sample.
Figure 4. Setup (not to scale) for measuring your samples. The UV radiation from the sun passes through your water sample before it hits the UV sensor. Since it also passes through the sides of the vessels holding the sample, those vessels need to be standardized. Cuvettes ,— which are clear, flat, and 1 cm wide—are designed precisely for this application.
But how do we get from the UV meter readings to the concentration of sunscreen chemicals? This question is answered by the Beer-Lambert law (Equation 1), which states that the concentration of a chemical in a sample solution is directly proportional to the amount of light it absorbs. If you double the concentration of the chemical, the solution absorbs twice as much light.
Equation 1:
- A = absorbance, which is unitless
- ε = molar absorption coefficient, measured in liters/(mol x cm)
- c = concentration, measured in moles per liter (mol/L)
- l = path length of the light through the sample, measured in centimeters (cm)
The Beer-Lambert law says that the absorbance of light by a chemical in a solution is equal to the product of the chemical's concentration, the path length of light in the container (l) in centimeters, and the molar absorption coefficient (formerly referred to as the "extinction coefficient"). The size of the molar absorption coefficient reflects how well the molecule absorbs light of a given wavelength.
You will make use of the proportional relationship between concentration and absorbance stated in the Beer-Lambert law to prepare a calibration curve, also known as a standard curve. A calibration curve allows you to determine the concentration of a chemical in an unknown sample by comparing it to standard samples with known concentrations.
You will prepare a set of standards containing different concentrations of sunscreen. The UV meter readings for each standard will change depending on the amount of sunscreen in the water sample. Based on the Beer-Lambert law, the relationship between the sample's absorbance and the sunscreen concentration should be linear. This linear relationship will allow you to calculate the sunscreen concentration of your unknown sample.
It is important to note that with the UV meter you do not directly measure the absorbance of your sample. Absorbance means how much light gets absorbed by your sample. What you measure with the UV meter is the amount of light passing through the sample, which is called transmittance. The absorbance has a logarithmic relationship to the transmittance. You can use Equation 2 to convert a value from percent transmittance (%T) to absorbance.
Equation 2:
Once you know the absorbance of your sample, you can calculate its sunscreen concentration based on your calibration curve. Don't worry—even though it sounds complicated, the measurements you will do are quite easy.
Now that you have learned all about the different types of sunscreens and their chemicals, are you curious about how your sunscreen performs in terms of its eco-friendliness and reef safety?
As mentioned above, the active ingredients in chemical sunscreens need at least 15 minutes to penetrate your skin. But do you really wait that long after applying your sunscreen to jump in the water? How does the amount of sunscreen chemicals released into the water change depending on how long you wait after you put your sunscreen on? This is exactly what you will find out in this science project!
Terms and Concepts
- Wavelength
- Ultraviolet light
- Visible light
- Infrared light
- Irradiance
- UV Index
- Physical sunscreen
- Chemical sunscreen
- Active ingredient
- Zinc oxide
- Titanium dioxide
- Mineral
- Avobenzone
- Homosalate
- Octocrylene
- Octisalate
- Green chemistry
- UV meter
- Absorb
- Absorbance
- Transmit
- Transmittance
- Cuvette
- Beer-Lambert law
- Proportional
- Molar absorption coefficient
- Calibration curve or standard curve
Questions
- Why is UV radiation harmful to our skin?
- What is the difference between physical and chemical sunscreen?
- What is the UV Index?
- Why are certain chemical sunscreens banned
Bibliography
- The Physics Classroom (n.d.). The Electromagnetic and Visible Spectra. Retrieved February 21, 2023.
- Environmental Protection Agency (2004, May). A guide to the UV Index. Retrieved February 16, 2023.
- Richey, J. (2018, March). Colorescience. How does sunscreen work to protect your skin?. Retrieved February 16, 2023.
- Environmental Working Group (n.d.). The trouble with ingredients in sunscreens. Retrieved February 16, 2023.
- WikiLectures (n.d.). Lambert-Beer's law. Retrieved February 16, 2023.
Materials and Equipment
- UV meter
- Physical sunscreen containing zinc oxide, titanium dioxide, or both. Should be a lotion (not a spray) and should have the same SPF as the chemical sunscreen.
- Chemical sunscreen containing at least one of the following ingredients: avobenzone, homosalate, octisalate, or octocrylene. Should be a lotion (not a spray) and have the same SPF as the physical sunscreen.
- Mini cups with lids, 2 oz (16)
- Permanent markers
- Digital scale, 0.1 gram accuracy
- Cup
- Teaspoons (2)
- Plastic cuvettes (12)
- Graduated pipettes, 3 mL (12)
- Water
- Rubbing alcohol
- Paper towels
- Resealable plastic bags, snack size (3)
- Waterproof tape
- Scissors
- Dish soap
- Timer
- Pen or pencil
- Lab notebook
Disclaimer: Science Buddies participates in affiliate programs with Home Science Tools®, Amazon.com, Carolina Biological, and Jameco Electronics. Proceeds from the affiliate programs help support Science Buddies, a 501(c)(3) public charity, and keep our resources free for everyone. Our top priority is student learning. If you have any comments (positive or negative) related to purchases you've made for science projects from recommendations on our site, please let us know. Write to us at [email protected].
Experimental Procedure
Testing the Water Solubility of Sunscreens
In the first part of the project, you will do a simple water solubility test with both sunscreens.
- Label two mini cups "physical sunscreen" and "chemical sunscreen."
- Add 0.3 g of the mineral sunscreen containing zinc oxide or titanium dioxide to the cup labeled "physical sunscreen."
- Add 0.3 g of the chemical sunscreen to the cup labeled "chemical sunscreen."
- Fill a cup with room-temperature tap water.
- Label a fresh pipette as "water." This will prevent the pipettes from getting mixed up later. With the pipette, add 10 mL of water to each labeled mini cup. Swirl the cup or use two fresh spoons to mix the solutions in each cup. Observe what happens in each cup and record your observations.
- How do the results for the chemical and physical sunscreens differ?
- What do your water solubility results mean regarding the eco-friendliness or reef safety of the different types of sunscreens?
Preparing Your Standards for the Calibration Curve
In this part of the project, you will prepare a set of standards for your calibration curve with the water-soluble sunscreen(s) from your water solubility test. Table 1 gives you an overview of the different standards you will prepare.
| Standard # | Water [mL] | Addition | Sunscreen Concentration [g/10mL water] |
|---|---|---|---|
| 1 | 10 | 0.3 g sunscreen | 0.3 |
| 2 | 9 | 1 mL standard #1 | 0.03 |
| 3 | 5 | 5 mL standard #2 | 0.015 |
| 4 | 5 | 5 mL standard #3 | 0.0075 |
| 5 | 9 | 1 mL standard #2 | 0.003 |
| 6 | 5 | 5 mL standard #5 | 0.0015 |
| 7 | 5 | 5 mL standard #6 | 0.00075 |
| 8 | 9 | 1 mL standard #5 | 0.0003 |
| Blank | 10 | nothing | 0 |
Table 1. Overview of the different sunscreen standards.
- Prepare one set of standards and complete the following steps for each water-soluble sunscreen. Note: If only one of your sunscreens was water soluble, you will prepare eight standards for this sunscreen. If both sunscreens were water soluble, you will prepare an additional eight standards for the second sunscreen. With a permanent marker, label eight mini cups with the numbers 1–8. You can use different colored markers for different sunscreens.
- Label eight pipettes with the numbers 1–8.
- Prepare standard #1.
- To the mini cup labeled "1," add 0.3 g sunscreen.
- With the pipette labeled "water," add 10 mL of water to the cup.
- Use a spoon to mix the sunscreen and swirl the cup until the sunscreen has fully dissolved.
- This standard has a sunscreen concentration of 0.3 g per 10 mL water.
- Prepare standard #2.
- With the water pipette, add 9 mL water to the mini cup labeled "2."
- Use the pipette labeled "1" to add 1 mL of standard #1 to the water in mini cup 2.
- Swirl the solution with the pipette until everything is mixed.
- This standard is a 1:10 dilution of standard #1 and has a sunscreen concentration of 0.03 g per 10 mL water.
- Prepare standard #3.
- With the water pipette, add 5 mL water to the mini cup labeled "3."
- Use the pipette labeled "2" to add 5 mL of standard #2 to the water in mini cup 3.
- Swirl the solution with the pipette until everything is mixed.
- This standard is a 1:2 dilution of standard #2 and has a sunscreen concentration of 0.015 g per 10 mL water.
- Prepare standard #4.
- With the water pipette, add 5 mL water to the mini cup labeled "4."
- Use the pipette labeled "3" to add 5 mL of standard #3 to the water in mini cup 4.
- Swirl the solution with the pipette until everything is mixed.
- This standard is a 1:2 dilution of standard #3 and has a sunscreen concentration of 0.0075 g per 10 mL water.
- Prepare standard #5.
- With the water pipette, add 9 mL water to the mini cup labeled "5."
- Use the pipette labeled "2" to add 1 mL of standard #2 to the water in mini cup 5.
- Swirl the solution with the pipette until everything is mixed.
- This standard is a 1:10 dilution of standard #2 and has a sunscreen concentration of 0.003 g per 10 mL water.
- Prepare standard #6.
- With the water pipette, add 5 mL water to the mini cup labeled "6."
- Use the pipette labeled "5" to add 5 mL of standard #5 to the water in mini cup 6.
- Swirl the solution with the pipette until everything is mixed.
- This standard is a 1:2 dilution of standard #5 and has a sunscreen concentration of 0.0015 g per 10 mL water
- Prepare standard #7.
- With the water pipette, add 5 mL water to the mini cup labeled "7."
- Use the pipette labeled "6" to add 5 mL of standard #6 to the water in mini cup 7.
- Swirl the solution with the pipette until everything is mixed.
- This standard is a 1:2 dilution of standard #6 and has a sunscreen concentration of 0.00075 g per 10 mL water.
- Prepare standard #8.
- With the water pipette, add 9 mL water to the mini cup labeled "8."
- Use the pipette labeled "5" to add 1 mL of standard #5 to the water in mini cup 8.
- Swirl the solution with the pipette until everything is mixed.
- This standard is a 1:10 dilution of standard #5 and has a sunscreen concentration of 0.0003 g per 10 mL water.
- Prepare your blank, which is a water sample without any sunscreen.
- Label a fresh mini cup with "blank."
- Use the water pipette to add 10 mL of water to the "blank" mini cup.
- Put the standard solutions into the cuvettes, as shown in Figure 5.
- Label eight cuvettes with the numbers 1–8. Write the numbers on the frosted sides of the cuvettes at the very top.
- Use pipettes 1–8 to add 2 mL of each standard (1–8) to its corresponding cuvette. Make sure to swirl or mix the standard solutions one more time before you add them to the cuvette.
- Label one extra cuvette "blank" and add 2 mL water to the cuvette using the water pipette.
- Pour a little rubbing alcohol on a paper towel and wipe all the cuvettes with the damp paper towel. Make sure to especially clean the clear sides of the cuvette, but don't wipe away your written labels. Now your standards are ready to be measured.
/-/https/www.sciencebuddies.org/cdn/Files/19358/8/standards-in-cuvette.jpg)
The cuvettes contain milky-white sunscreen solutions, with the highest concentration on the left and the lowest concentration on the right.
Figure 5. Sunscreen standards in the labeled cuvettes.
Preparing Your Samples
In this part of the project, you will create your water samples using the water-soluble sunscreen(s) from your water solubility test. Each water sample will be taken at a different time after applying the sunscreen.
- Prepare one set of samples and complete the following steps for each of your water-soluble sunscreen(s). Note: If only one of your sunscreens was water soluble, you will prepare three samples for this sunscreen, but if both sunscreens were water soluble, you will prepare an additional three samples for the second sunscreen. You can use different colored markers for different sunscreens.
- For each of your water-soluble sunscreens, label three snack-sized resealable plastic bags with "0 minutes," "7 minutes," and "15 minutes."
- Cut a corner off the bottom of each bag, as shown in Figure 6, so that the hole is just big enough to fit one of your pointer fingers through.
Figure 6. Resealable plastic bag with bottom left corner cut off.
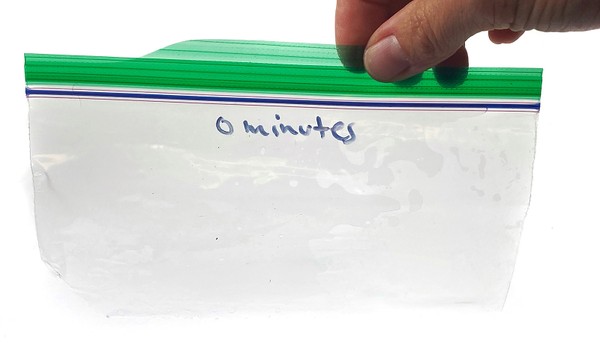
- With the water pipette, add 10 mL of water to each plastic bag through the hole. Place the bags on their sides so the water doesn't come out, as shown in Figure 7.
Figure 7. A prepared plastic bag with 10 mL of water inside.
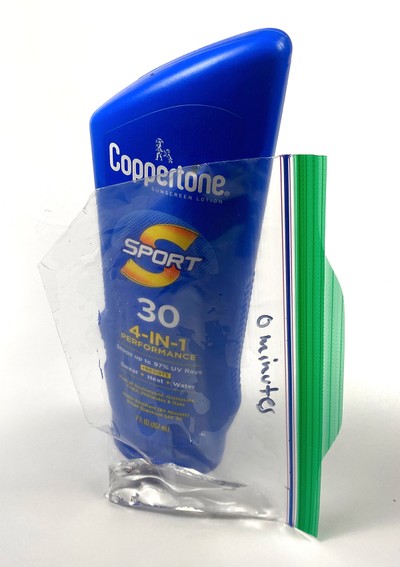
The bag leans against a bottle of sunscreen so it does not spill.
- Label three mini cups, three fresh pipettes, and three cuvettes with "0 minutes," "7 minutes," and "15 minutes."
- Weigh 0.5 g sunscreen into an unlabeled fresh mini cup. Then apply the sunscreen in the cup to both of your hands. Spread the sunscreen evenly across both hands, and make sure to cover each of your fingers as well as the tops and palms.
- Prepare the water sample "15 minutes."
- As soon as you have applied the sunscreen, set a timer for 15 minutes and start the timer. While you are waiting, don't use your hands to do anything.
- Once the 15 minutes are up, stick one of your pointer fingers through the hole of the bag labeled "15 minutes" and use waterproof tape to tape the bag to your finger, as shown in Figure 8.
Figure 8. Submerge the pointer finger in the water inside the plastic bag.
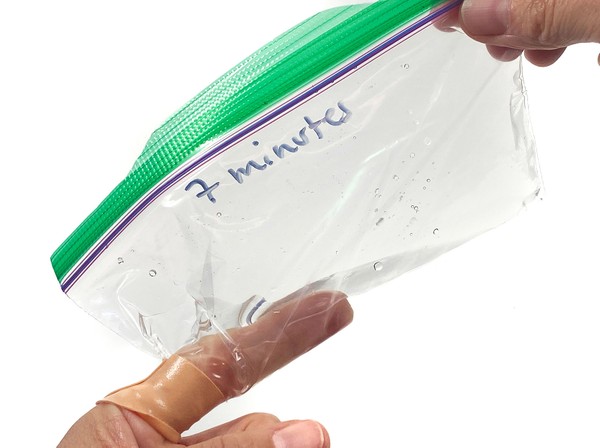
The pointer finger of another hand is inserted into the bag through the hole cut in the bottom corner of the bag. The finger is submerged in the water inside the bag.
- Set a timer for one minute and start it. Then swirl the water around in the bag. Make sure the water covers your finger. This simulates entering the water 15 minutes after applying sunscreen.
- After one minute, take your finger out of the bag and pour its water content into the mini cup labeled "15 minutes."
- Use the pipette labeled "15 minutes" to add 2 mL of the solution to the corresponding cuvette.
- Pour a little rubbing alcohol on a paper towel and wipe the cuvette with the damp paper towel. Make sure to especially clean the clear sides of the cuvette. Now your sample is ready to be measured.
- Wash your hands with plenty of dish soap and warm water for 30 seconds. While washing, thoroughly rub your hands free of sunscreen. Then rinse your hands with rubbing alcohol and dry them with paper towels.
- Prepare the water sample "7 minutes."
- Set a timer for 7 minutes. Then repeat step 6 and start the timer. While you are waiting, don't use your hands to do anything.
- Once the 7 minutes are up, stick your left pointer finger through the hole of the bag labeled "7 minutes" and use waterproof tape to tape the bag to your finger.
- Set a timer for one minute and start it. Then swirl the water around in the bag. Make sure the water covers your finger. This simulates entering the water 7 minutes after applying sunscreen.
- After one minute, take your finger out of the bag and pour its water content into the mini cup labeled "7 minutes."
- Use the pipette labeled "7 minutes" to add 2 mL of the solution to the corresponding cuvette.
- Pour a little rubbing alcohol on a paper towel and wipe the cuvette with the damp paper towel. Make sure to especially clean the clear sides of the cuvette, but be careful not to wipe your written labels off. Now your sample is ready to be measured.
- Wash your hands with plenty of dish soap and warm water for 30 seconds. While washing, thoroughly rub your hands free of sunscreen. Then rinse your hands with rubbing alcohol and dry them with paper towels.
- Prepare the water sample "0 minutes."
- Repeat step 6. Immediately after applying the sunscreen, stick your left pointer finger through the hole of the bag labeled "0 minutes" and use waterproof tape to tape the bag to your finger.
- Set a timer for one minute and start it. Then swirl the water around in the bag. Make sure the water covers your finger. This simulates entering the water right after applying sunscreen.
- After one minute, take your finger out of the bag and pour its water content into the mini cup labeled "0 minutes."
- Use the pipette labeled "0 minutes" to add 2 mL of the solution to the corresponding cuvette.
- Pour a little rubbing alcohol on a paper towel and wipe the cuvette with the damp paper towel. Make sure to especially clean the clear sides of the cuvette. Now your sample is ready to be measured.
/-/https/www.sciencebuddies.org/cdn/Files/19359/9/cut-corner-snackbag.jpg)
/-/https/www.sciencebuddies.org/cdn/Files/19360/8/cut-bag-with-water.jpg)
/-/https/www.sciencebuddies.org/cdn/Files/19361/8/finger-in-snackbag.jpg)
Measuring Your Standards and Samples
Once you have prepared all your standards and samples, it is time to measure them.
- Familiarize yourself with the UV meter by reading the directions that came with it. Locate the UV sensor and do some test measurements. Do your measurements on a sunny day with a clear sky, preferably between 10 a.m. and 2 p.m., when the sun is still high in the sky. Note: All your measurements need to be taken at the same background UV Index. If your UV Index changes during measurements due to clouds covering the sun, you have to start all your measurements again. Pick a time for your measurements where you can be sure that your sunlight intensity will not change over the course of at least 30 minutes.
- Find a place to put your UV meter upright with the UV sensor facing the sun. Keep the UV meter standing at the same location during your measurements. For your measurements, ideally, the UV meter should read around 7 when facing the sun. Record the UV Index that you measure in your data table.
- Make a data table like Table 2 to record your measurements.
| Sample | Sunscreen concentration [g/10mL] | UV Index Trial 1 | UV Index Trial 2 | UV Index Trial 3 | UV Index Average |
|---|---|---|---|---|---|
| Just the sun with no cuvette | |||||
| Blank | 0 | ||||
| Standard 1 | 0.3 | ||||
| Standard 2 | 0.03 | ||||
| Standard 3 | 0.015 | ||||
| Standard 4 | 0.0075 | ||||
| Standard 5 | 0.003 | ||||
| Standard 6 | 0.0015 | ||||
| Standard 7 | 0.00075 | ||||
| Standard 8 | 0.0003 | ||||
| Sample "0 minutes" | |||||
| Sample "7 minutes" | |||||
| Sample "15 minutes" |
Table 2. Data table to record the UV Index measurements for all prepared standards and samples.
-
First, measure your blank. Hold the cuvette right in front of the UV sensor, as shown in Figure 9. The clear side of the cuvette needs to face the UV sensor, and there should be only a minimal air gap between the sensor and the cuvette. The UV meter reading should only drop by about 0.5 with the blank water sample. If it drops more than that, play with the positioning of the cuvette in front of the UV sensor until you find the right location. Make sure you don't block the sun with your body or move the UV meter during the measurements. Also, do not press the Max or Hold buttons during the measurements. Once the UV Index readings are stable, record the number in your data table.
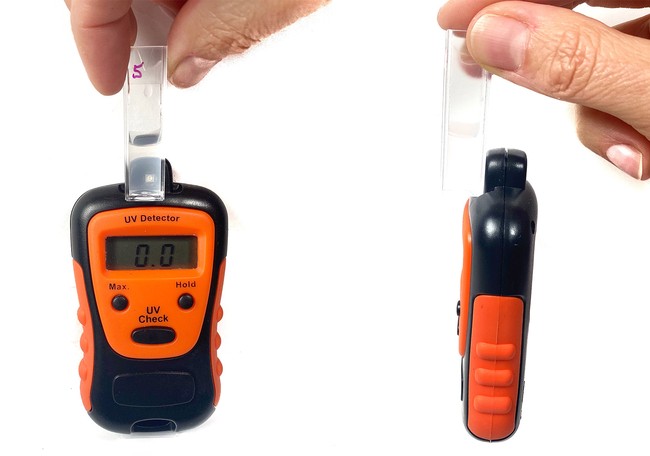
On the right is the same setup from the side. The cuvette is held right against the UV sensor with minimal space in between.
Figure 9. Front (left) and side (right) view of the UV meter with the cuvette held in front of the UV sensor. Note Your UV meter might be more tilted than shown in this picture. This is ok. You can tilt the UV meter more as long as the cuvettes don't spill their liquid when you hold them in front of the UV meter. - Continue measuring all your standards and samples the same way. Briefly shake the cuvettes to mix the samples again before you measure them. Try to hold the cuvettes at the same location every time. Between measurements, make sure the background reading with just the sun hasn't changed. This might happen if the sunlight gets more intense or a cloud moves in front of the sun. All the measurements need to be done with the same background UV Index. Record all your measurements in your data table.
- Do two more rounds of measurements with all standards and samples and record your results in your data table. All the measurements need to be done with the same background UV Index as the first round. If the background UV Index changes, you need to start measuring all your standards and samples again.
/-/https/www.sciencebuddies.org/cdn/Files/19362/10/UV-index-measurement-cuvette.jpg)
Analyzing Your Data
- Open a spreadsheet program such as Excel;® or Google Sheets® and create a table like Table 3. You will need this data table to create your calibration curve.
| Sunscreen concentration [g/10mL] |
Average UV Index | Transmittance [%] | Log[%T] | Absorbance [2-log[%T]] |
|---|---|---|---|---|
| 0.3 | ||||
| 0.03 | ||||
| 0.015 | ||||
| 0.0075 | ||||
| 0.003 | ||||
| 0.0015 | ||||
| 0.00075 | ||||
| 0.0003 | ||||
| 0 |
Table 3. Data table for creating the calibration curve.
- From your three rounds of measurements, calculate the average UV Index for each standard and record the average UV Index in the data table in your spreadsheet program. The blank with just water is your standard with no sunscreen.
- Use the average UV Index to calculate the transmittance percentage for each standard. Remember, the transmittance is the amount of light passing through the sample, which is what you are measuring with the UV meter. The blank sample will be assigned a transmittance of 100%, as there are no UV-absorbing chemicals in this sample, and all UV light should be able to pass through. To calculate the percentage transmittance for each standard, use Equation 3. Record the results in your data table.
Equation 3:
- Next, use the log function of the spreadsheet program or a scientific calculator to calculate the logarithm of the transmittance percentage. Record the result in your data table.
- To calculate the absorbance, use Equation 2 from the Introduction. Record the results in your data table.
- Create a scatter plot with the sunscreen concentration in g/10mL on the x-axis and the absorbance on the y-axis. As stated by the Beer-Lambert law, the relationship between concentration and absorbance should be linear.
- Use the spreadsheet program to add a linear trendline to your data. Display the correlation factor R2 and the equation of the trendline in your plot. Note:The correlation factor tells you how well the trendline matches your data. A perfect fit is 1. Your correlation factor should be at least 0.9. If this is not the case, you might have made some mistakes while preparing your standard solutions or during your measurements. Repeat your measurements or make new standard solutions until you achieve a correlation factor greater than 0.9 before continuing your data analysis.
- Once you have a good calibration curve, you can use the trendline equation to calculate the sunscreen concentration of your samples. Because you plotted absorbance on the y-axis, the "y" in your trendline equation represents the absorbance of your measured sample. The "x" of your trendline equation represents the sunscreen concentration of your sample, since you plotted the sunscreen concentration on the x-axis.
- Create a new data table like Table 4.
- Follow steps 2–5 to calculate the absorbance of your three samples.
- Rearrange your calibration curve trendline equation to solve it for x as a function of y.
- For each sample, calculate "x," the sunscreen concentration of your sample, by inserting the corresponding absorbance of your sample ("y") into the equation. Record the results in your data table.
| Time after sunscreen application [min] | Average UV Index | Transmittance [%] | Log[%T] | Absorbance [2-log[%T]] |
Sunscreen concentration [g/10mL] |
|---|---|---|---|---|---|
| 0 | |||||
| 7 | |||||
| 15 |
Table 4. Data table to calculate the sunscreen concentration of your samples.
- Create a bar graph with the time after sunscreen application on the x-axis and the sunscreen concentration in the water sample on the y-axis. Then use your data to answer the following questions.
- How much UV-absorbing sunscreen chemical was released from your pointer finger into the 10mL of water?
- How does the wait time after sunscreen application affect the amount of sunscreen that is released into the water?
- Did you expect these results?
- What do your results tell you about the eco-friendliness or reef safety of your tested sunscreen?
Ask an Expert
Global Goals
The United Nations Sustainable Development Goals (UNSDGs) are a blueprint to achieve a better and more sustainable future for all.
/-/https/www.sciencebuddies.org/cdn/Files/19746/5/E-WEB-Goal-03.png)
/-/https/www.sciencebuddies.org/cdn/Files/19757/5/E-WEB-Goal-14.png)
Variations
- The results of this science project told you how much sunscreen got from your pointer finger into the water sample—and the number might seem very small to you. However, you are not only putting your pointer finger in the water when swimming in the ocean—you go into the water with your whole body! Can you extrapolate from your results how much sunscreen would get into the water from your whole body? How does the surface area of the pointer finger relate to the surface area of your body? You also need to take into account how much of your body you actually put sunscreen on.
- Your tests in this project were limited to one physical and one chemical sunscreen. But how do different sunscreens compare? Repeat the experiment with different sunscreens. Do you see different results for sunscreen lotions versus spray sunscreens? Does the sun protection factor (SPF) make a difference? And how do different sunscreen brands compare?
- You learned in the Introduction section that some active ingredients in sunscreens can be toxic to marine life and even humans. Can you design an experiment to investigate the toxicity of sunscreen chemicals on water organisms? The Science Buddies project Looking Downstream: Could Nanosilver in Consumer Products Affect Pond Life? might give you an idea of how to tackle this question.
- As discussed in this project, there are many different UV-absorbing sunscreen chemicals. Some of them have already been banned in several locations. Take a closer look at all the active ingredients in chemical or physical sunscreens. Do some research to find out what their function is and if there are any health or toxicity issues associated with them.
- This project focused on a small subset of the green chemistry principles, such as pollution prevention and using less-hazardous and safer chemicals. How do different sunscreens compare when considering additional sustainability factors? Review the 12 principles of green chemistry and do an analysis of different sunscreens based on other sustainability criteria.
Careers
If you like this project, you might enjoy exploring these related careers:
/-/https/careerdiscovery.sciencebuddies.org/cdn/Files/1107/19/pexels-photo-3938023.jpg)
/-/https/careerdiscovery.sciencebuddies.org/cdn/Files/1288/18/Career-Map-Environmental-Scientist.jpg)
/-/https/careerdiscovery.sciencebuddies.org/cdn/Files/1832/17/iStock-1158126977.jpg)
/-/https/careerdiscovery.sciencebuddies.org/cdn/Files/1416/17/unsplash-FY3vXNBl1v4.jpg)

/-/https/img.youtube.com/vi/NmMflaqzJXQ/0.jpg)
/-/https/img.youtube.com/vi/xbpMddOoq9U/0.jpg)
/-/https/img.youtube.com/vi/dxC_GuLNiAs/0.jpg)