Abstract
Do you love the look and feel of leather? Many luxury items like handbags, belts, wallets, and coats are made from leather. What if you could make your own vegan leather in a few weeks? Could it be a greener, more sustainable option than cowhide leather? In this science project, you will grow your own vegan leather from kombucha and see how different growing conditions affect the resulting leather.Summary
/-/https/www.sciencebuddies.org/cdn/Files/19427/5/kombucha-thumbnail.jpg)
Objective
Investigate the material properties of vegan kombucha leather grown at different sugar concentrations.
Introduction
/-/https/www.sciencebuddies.org/cdn/Files/19427/5/kombucha-thumbnail.jpg)
The wet kombucha sheet drapes over the fingers like a damp paper towel, while the dry sheet is more rigid.
Historically, leather has been synonymous with luxury. Just think of high-end fashion handbags, fancy designer shoes, or the upholstery of luxurious cars. High-quality leather has been, and still is, a popular material for many luxury designer brands.
What makes leather so valuable—besides its fashion appeal—is its versatility and durability. As a material, leather is strong, flexible, waterproof, and durable, and it can be molded into any shape. These properties come from leather's unique composition. Leather is composed of a network of fibrous collagen, a protein found in animal cells. The animal skin (or "hide") used to make leather undergoes a long manufacturing process. The most important step is leather tanning. During the tanning process, leather is treated with chemicals that change the chemistry of its collagen fibers. As a result, the fibers become more stable, durable, and resistant to decay. You can find more resources explaining the steps of the leather manufacturing process in the Bibliography.
/-/https/www.sciencebuddies.org/cdn/Files/19428/5/leather-hides.jpg)
Figure 1. Processed and dyed leather at a leather tannery.
Despite its desirable material properties, leather has become more and more controversial. Some people refrain from buying leather products because they are a byproduct of the meat industry. Others argue that the leather industry has a high environmental impact, citing issues like deforestation, high water and land use, and methane production, all of which can be linked to raising cattle. Water pollution can be a problem, too, due to the use of toxic chemicals in the tanning process. These issues lead some people to question the sustainability of leather and look for alternatives.
The idea of replacing genuine leather with an animal-free product, or vegan leather, is not new. Faux (or "synthetic") leathers came into mass production at the end of the 19th century, when the plastic industry took off. Synthetic leathers are petroleum-based and usually made from polyurethane (PU) and polyvinyl chloride (PVC). Other faux leathers are made from polyester. All synthetic leathers are created from plastics and are treated with chemicals so that they have a similar feel and look to genuine leather. When it comes to sustainability, plastic-based leathers have also been questioned. PVC and PU both contain toxic chemicals and are derived from petroleum, which affects their carbon footprint. In addition, plastic-based vegan leathers, unlike animal-derived leathers, are not biodegradable.
As a result, the focus has recently shifted toward more innovative vegan leather alternatives. One way to work toward creating a sustainable vegan leather is to use green chemistry. Green chemistry requires thinking about the starting materials, waste, and biproducts of your manufacturing process from the very beginning so that your design choices are as eco-friendly as possible. There are 12 principles that guide the green chemistry movement. These include reducing waste, reducing the use and creation of harmful chemicals, and being more efficient with energy and natural resources. You can hear Paul Anastas, one of the founders of the green chemistry movement, explain the concept of green chemistry in the video below.
/-/https/i.ytimg.com/vi/WIMHTWNYAoo/maxresdefault.jpg)
Vegan leather made from kombucha is one possible green chemistry solution. You might know kombucha as a fermented, sweetened black tea drink. Kombucha is made by adding a symbiotic culture of bacteria and yeast, or SCOBY, to sugared tea. The yeast ferments the tea by converting the sugar to alcohol, and then the bacteria turn the alcohol into acids. As a byproduct of fermentation, several types of bacteria produce microbial cellulose. The cellulose-producing bacteria, together with the cellulose they produce, will create a biofilm—a solid layer—on the tea's surface, as shown in Figure 2. This layer is also called the SCOBY pellicle. The cellulose biofilm will continue to thicken during fermentation until it grows downward and entraps the cellulose-producing bacteria, thus limiting their oxygen supply. You can find references with more detailed information on the processes going on during kombucha tea fermentation in the Bibliography.
/-/https/www.sciencebuddies.org/cdn/Files/19429/5/kombucha-tea.jpg)
The kombucha liquid (sugared black tea) is brown and somewhat translucent. The microbial cellulose forms solid layers of biofilm on top of the tea.
Figure 2. Fermented kombucha tea. (Image credit: Mgarten at the English Wikipedia, CC BY-SA 3.0, via Wikimedia Commons.)
The biofilm (SCOBY pellicle) is, like leather, composed of a tight network of fibers. But whereas leather's fibers are made up of animal-derived collagen, the fibers in the biofilm are made up of bacteria-grown cellulose. Once the biofilm is harvested and processed, it turns into vegan leather. This vegan leather possesses similar properties to genuine leather, such as being very strong, durable, flexible, and moldable. The material is fully biodegradable, too.
The New York streetwear label Public School was the first company to create a pair of compostable sneakers from kombucha leather. The sneakers were created in collaboration with material scientists as a proof of principle. Other companies, such as Bucha Bio, have made it their mission to create kombucha-based materials for luxury fashion as well as automotive and interior design. Watch this video where Bucha Bio's CEO, Zimri Hinshaw, explains how kombucha-based materials could become a game-changer, replacing many animal-based and plastic-based products.
In this science project, you will grow your own vegan leather from kombucha. More specifically, you will investigate how the properties of the kombucha biofilm change depending on its growth conditions. One crucial ingredient for cellulose biofilm growth is sugar. During the fermentation process, yeast transforms the sugar into alcohol. You will grow two batches of kombucha with two different sugar concentrations. After you harvest the biofilm, you will compare the properties of the two kombucha leathers.
Leather alternatives, especially when used in the textile industry, should have certain mechanical properties, as these determine the durability of the final product. There are several different mechanical properties that are relevant to alternative leather materials, especially when they are used for clothing purposes. These include tensile, flexural, and torsional properties.
- Tensile strength measures how strong a material is when you put it under tension or pull on it from both ends. In other words, it measures how hard you can pull on the material before breaking it.
- Flexural properties are relevant for materials used in clothing, as they describe how a material behaves when it is bent—for example, when you bend your elbows while wearing a long-sleeve shirt or bend your knees while wearing pants.
- Torsional properties describe how a material behaves when it is twisted.
You can find more resources about how these material tests are performed in the textile industry in the Bibliography section.
In this project, you will use a variety of quantitative and qualitative testing methods to assess the tensile strength, flexibility, and other mechanical properties of your kombucha leather. Based on your test results, you will be able to assess the effects of the concentration of sugar on your kombucha leather.
Terms and Concepts
- Collagen
- Leather tanning
- Environmental impact
- Sustainability
- Vegan leather
- Polyurethane (PU)
- Polyvinyl chloride (PVC)
- Polyester
- Green chemistry
- Kombucha
- SCOBY
- Fermentation
- Microbial (or bacterial) cellulose
- Biofilm
- Pellicle
- Kombucha leather
- Mechanical property
- Tensile strength
- Flexural property
- Torsional property
Questions
- What are the environmental impacts of the global leather industry?
- What are the 12 principles of green chemistry?
- What are the main microorganisms in a SCOBY culture?
- What are the main chemical reactions happening during kombucha tea fermentation?
- What vegan leather alternatives exist, and how do they compare to animal leather in terms of sustainability?
- What properties are important in a material serving as a leather alternative?
Bibliography
- Britannica. (n.d.). Leather. Retrieved February 3, 2023.
- Cernansky, R. (2021, May 20). Leather: Sustainable fashion's big debate. Vogue Business. Retrieved February 3, 2023.
- Ernest, M. (2021, August 5). How plant-based 'leathers' are becoming the future of luxury fashion. Vogue Business. Retrieved February 3, 2023.
- Villarreal-Soto, S. A., Beaufort, S., Bouajila, J., Soucard, J.-P., Taillandier, P. (2018, March 06). Understanding Kombucha Tea Fermentation: A Review. Journal of Food Science 83 (3), p. 580-588. Retrieved February 3, 2023.
- Hahn, J. (2021, March 10). Public School creates 'backyard compostable' sneaker from kombucha waste. Dezeen magazine. Retrieved February 3, 2023.
The following resources show how mechanical property testing is conducted using special machines in the industry.
- Instron (n.d.). What is Torsion Testing? Retrieved January 10, 2013.
- Instron (n.d.). What is Bend Testing? Retrieved March 30, 2023.
- ADMET Testing Systems (n.d.). Polyurethane Foam Tensile Strength Test-ASTM D3574 Test E. Retrieved January 10, 2013.
Materials and Equipment
Materials for growing the kombucha leather:
/-/https/www.sciencebuddies.org/cdn/Files/19431/5/kombucha-growing-materials.jpg)
Supplies include kombucha culture, a pot, vinegar, sugar, scissors, and a measuring cup.
- Pots with lids (2) that can each hold at least 5 cups of water
- Tape
- Marker
- Water (10 cups or 2 liters). Use filtered tap water or bottled water, as any residual chlorine in tap water can harm the bacteria and yeast in the kombucha starter culture.
- Tea bags (4) or loose-leaf tea (4 tsp). Use unflavored, caffeinated black or green tea.
- Digital scale
- Small bowl
- Sugar (1/2 cup, or 100 grams)
- Spoons or whisks (2)
- Hot plate or stove
- Scissors
- Optional: Immersion thermometer
- Apple cider vinegar
- pH paper
- Kombucha starter culture. Available on Amazon.
- Two transparent plastic or glass containers, big enough to hold 1 liter of water. The shape of the container will determine the shape of the kombucha leather sheet.
- Rubbing alcohol or isopropyl alcohol
- Paper towels
- Pieces of cloth (2), each big enough to cover one container. Alternatively, plastic cling wrap can be used.
- Rubber bands (2) that fit around the containers
- Wooden boards (2) bigger than the containers
- Optional: Seedling mat with thermostat. Available on Amazon.
- Lab notebook
- Pencil or pen
Additional materials for testing the kombucha leather's properties:
/-/https/www.sciencebuddies.org/cdn/Files/19432/5/kombucha-testing-materials.jpg)
- Screw compressor clamps (2). Available on Amazon.
- String
- Calipers. Available on Amazon.
- Something to measure forces, such as
- Option A: Spring scale, >10 kg. Available on Amazon.
- Option B: Container, such as a small bucket, and metal or sand to use as weight
- Calculator
- Sewing needle
- Sewing thread
Disclaimer: Science Buddies participates in affiliate programs with Home Science Tools®, Amazon.com, Carolina Biological, and Jameco Electronics. Proceeds from the affiliate programs help support Science Buddies, a 501(c)(3) public charity, and keep our resources free for everyone. Our top priority is student learning. If you have any comments (positive or negative) related to purchases you've made for science projects from recommendations on our site, please let us know. Write to us at [email protected].
Experimental Procedure
For health and safety reasons, science fairs regulate what kinds of biological materials can be used in science fair projects. You should check with your science fair's Scientific Review Committee before starting this experiment to make sure your science fair project complies with all local rules. Many science fairs follow Regeneron International Science and Engineering Fair (ISEF) regulations. For more information, visit these Science Buddies pages: Project Involving Potentially Hazardous Biological Agents and Scientific Review Committee. You can also visit the webpage ISEF Rules & Guidelines directly.
Growing the Kombucha Leather
- You will make two kombucha recipes with different sugar concentrations. The ingredients for each recipe and their amounts are provided in Table 1.
Table 1. Kombucha recipes.Ingredients Recipe 1 Recipe 2 Water (filtered or bottled) 5 cups 5 cups Teabags (black or green) 2 2 Sugar 66 grams 16.5 grams SCOBY starter culture 1/2 cup + 1/2 pellicle 1/2 cup + 1/2 pellicle - Use tape and a marker to label the two pots "Recipe 1" and "Recipe 2."
- To each pot, add five cups of water and bring to a boil.
- Switch the oven off and add two teabags (or two teaspoons of loose-leaf tea) to each pot. If you use loose-leaf tea, use a tea infuser so you can remove the tea later. Let the tea infuse for 10–15 minutes. Then remove the teabags or tea leaves from the pots.
- To the pot labeled Recipe 1, add 66 grams of sugar. To the pot labeled Recipe 2, add 16.5 grams of sugar. Use spoons to stir until all sugar is dissolved.
- Place the pots back on the stove and let the sugared tea boil for about 20–30 minutes with the lid on. Boiling helps sterilize your tea to avoid the growth of any unwanted bacteria.
- Let your tea cool to room temperature, or below 30°C. You can use a thermometer to measure its temperature if you are unsure. Make sure to sterilize the thermometer with rubbing alcohol first.
- While the tea is cooling, label and sterilize your growth equipment.
- Use tape and a marker to label the two containers "Recipe 1" and "Recipe 2."
- Spray the insides of your growth containers with rubbing alcohol or isopropyl alcohol and rub the bottom and sides of the container with paper towels. Let the alcohol evaporate.
- Sterilize a 1/2 cup measuring cup the same way.
- Clean your hands with rubbing alcohol. You don't want to risk contamination of your kombucha tea.
- Once the tea has cooled, pour the contents of the Recipe 1 pot into the Recipe 1 growth container. Then pour the contents of the Recipe 2 pot into the Recipe 2 growth container.
- Add the starting culture to each growth container.
- The starter culture consists of liquid as well as a solid pellicle. You need to transfer both to your kombucha batch.
- To each growth container, add 1/2 cup of the liquid kombucha starter culture. It is ok to add floating bits of solid as well.
- Add 1/2 of the solid SCOBY pellicle to each growth container. You can either use clean hands to separate the SCOBY pellicle or use sterilized scissors to cut the SCOBY pellicle in half. Figure 3 shows how the sugared tea with the starter culture should look.
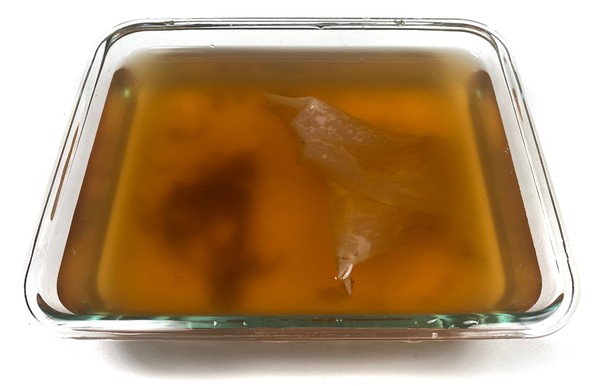
Figure 3. Growth container with sugared tea containing the kombucha starter culture, including the liquid and the solid pellicle. - Use pH paper to check the pH of your solutions. The starting pH of kombucha needs to be lower than 4.5 to create the optimal environment for the kombucha bacteria and yeast. During biofilm growth, the pH will drop even lower due to the acidic fermentation products. Finished kombucha has a pH between 2.5 and 3.5. You can add apple cider vinegar to your kombucha batch to adjust the pH.
- Cover each container with cloth and secure it with a rubber band. The cloth should let air through and not touch the liquid. Alternatively, you can close the containers with plastic cling wrap. Poke some holes into the plastic wrap with a fork so air can get through.
- Carefully place your containers in a dark place where they will not be disturbed for a couple of weeks. The growth temperature should be 16–29°C (60–85°F). The optimal temperature for growth is 27°C (85°F). Colder temperatures increase the risk of mold growth. If necessary, you can put your growth containers on a heat mat to keep them at the ideal temperature. Make sure the containers are not exposed to direct sunlight, since the SCOBY grows better in the dark. Airflow to the growth containers is also important because the SCOBY needs oxygen to grow.
- Check your kombucha cultures every two to three days for growth. Make a data table like Table 2 for each kombucha recipe and record any observations you make. In the first week, you can expect to see initial patches of a biofilm growing on the surface of the solution. Over time the patches should grow into a solid layer of biofilm. Figure 4 shows an example of kombucha biofilm at different growth stages.
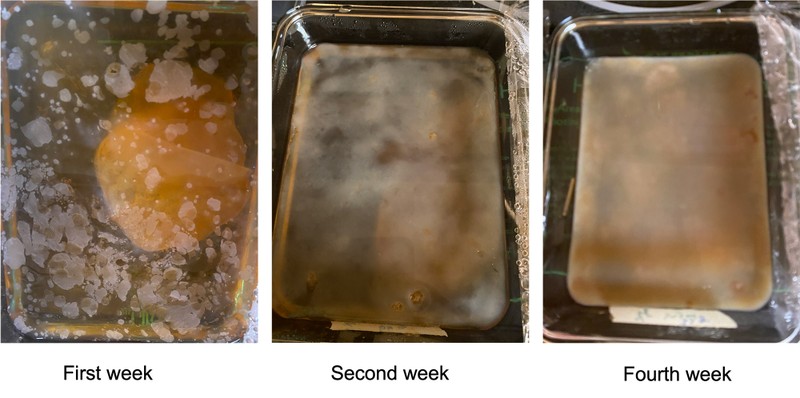
In the first week, the biofilm forms patches on the surface. The second week, it covers the surface. The fourth week, the biofilm layer is thicker.
Figure 4. Top view of the kombucha biofilm at different stages during the growth phase.Every time you check on your cultures, remove the cloth from the container. Then complete the following steps:
- Look for any biofilm growth on the surface of the solution. Write in your data table the approximate percentage of the surface that is covered with biofilm. Once the full surface is covered with biofilm, look at the sides of the container and measure the thickness of the biofilm with a ruler. The biofilm thickness might vary along the length of the sheet. The first time you measure biofilm thickness, pick the area where the biofilm is thickest. Then measure the thickness at the same location every time. Record the measurements in your data table.
- Check whether bubbles are accumulating under your biofilm sheet. The bubbles are CO2 gas produced from fermentation. They will be visible as raised areas or lighter areas under the biofilm sheet. With disinfected hands, carefully massage the bubbles to the edges of the sheet to push them out. Be careful not to push the sheet under the liquid or let too much liquid stream on top of the sheet. If the sheet sinks to the bottom of the container, it won't grow anymore, and another biofilm will form on the surface of the liquid.
- Look for any mold growth. If your kombucha batch gets contaminated, unwanted bacteria or fungi can grow. Sometimes it is difficult to distinguish mold from healthy kombucha. You can check this Does My Kombucha Have Mold? resource to see examples of kombucha mold and get tips on how to prevent it. If your kombucha shows mold growth, you must discard it and start a new batch.
- Once you are done with your kombucha observations, put the cloth back on both containers.
/-/https/www.sciencebuddies.org/cdn/Files/19433/5/set-up-kombucha-culture.jpg)
/-/https/www.sciencebuddies.org/cdn/Files/19434/5/progress-biofilm-growth.jpg)
| Time [days] | Percentage of biofilm growth on surface [%] | Thickness of biofilm [mm] | Mold growth? | Additional comments |
|---|---|---|---|---|
| Day 1 | ||||
| Day 3 | ||||
| Day 5 | ||||
| ... |
Harvesting and Processing the Kombucha Leather
Wait until one of your kombucha biofilms is at least half a centimeter thick, as shown in Figure 5, before harvesting both. The biofilm sheet will shrink significantly during the drying process. Thinner biofilms might not have a leather-like consistency; they may be more similar to tissue paper or printer paper.
/-/https/www.sciencebuddies.org/cdn/Files/19435/6/side-view-kombucha-biofilm.jpg)
The lower layer is liquid kombucha tea. The top layer, which is about half a centimeter thick, is a light brown solid biofilm.
Figure 5. Side view of a kombucha biofilm mat grown for 4 weeks.
- Once one of your biofilms reaches a thickness of 1/2 cm, harvest both biofilms. Remove the cloth from the container and, with disinfected hands, carefully take the biofilm sheet from the liquid. Note: You can use the remaining liquid as the starter culture for a new kombucha batch.
- In the sink, rinse and wash the biofilm sheet with lukewarm water and a little bit of dish soap.
- Place your biofilm sheet on a wooden board and measure the final thickness of the wet biofilm. Record your results in the data table.
- Let the biofilm on the wooden board dry.
- It might take several days to dry at room temperature. To speed up the drying process, you can place your biofilm sheet close to a radiator or in the sun. However, you don't want to dry it at high temperatures or in the oven; otherwise, it will wrinkle.
- Flip the sheet every day to make sure it does not stick to the board while drying.
- When the sheet feels dry to the touch and it doesn't have a strong vinegar smell anymore, the drying process is complete, and your kombucha leather is ready! Dry both sheets to the same consistency. This might take longer for one sheet than the other. If you dry the sheet for too long, it will become brittle.
- The next step is to condition your kombucha leather. Apply coconut oil to both sides of your leather and rub it in with your hands. Use enough oil so the material feels very greasy on both sides and becomes more flexible. Note: If you notice that some parts of the sheet (for example, the edges) have dried but the rest of the sheet has not, start conditioning the dried parts of the sheet. If you wait until the whole sheet is dry, the edges might already have dried out and become brittle.
- Let the oil-coated leather sit for about 24 hours. The oil prevents the biofilm from drying out and becoming brittle.
- Take a paper towel or clean cloth and rub the excess oil off both sides of the leather sheet. Start in one small area and work your way through both sides of the whole sheet. On each spot, you want to apply a little bit of pressure and friction to create some heat so your paper towel can absorb the excess oil.
- Now your kombucha leather sheet is ready for testing.
Testing the Kombucha Leather Properties
To assess how the kombucha's sugar concentration affects the material properties of your leather, you will do several tests to determine various mechanical properties of your different leather sheets. Follow the written procedure below or watch the material testing video to view each testing step.
/-/https/i.ytimg.com/vi/dt_eIeKJYbE/maxresdefault.jpg)
- Qualitative description. Before you start cutting your leather sheets for testing, look at each of your sheets closely and make notes about how the material looks, feels, etc. Record your observations in a data table like Table 3.
Table 3. Data table to record the qualitative features of the different biofabrics.Sample Qualitative description of the leather sheets Recipe 1 66 g sugar Recipe 2 16.5 g sugar - Tensile test. In this test, you will investigate how your different leather sheets behave when they are stretched by measuring their tensile strength. Tensile strength is the load or force at failure divided by the cross-sectional area of the sample. Its unit is pascals [Pa] or megapascals [MPa].
Equation 1:
To measure the tensile strength, make a data table like Table 3 in your lab notebook and follow steps a–g to test both kombucha leather sheets.
- Cut three 0.5 cm × 4 cm strips of your first kombucha leather. Don't cut them from the very edges, as these tend to be thinner. Choose a section that is free of defects, such as small tears, bubbles, or ridges.
- Measure the thickness and width of your first strip using calipers, as shown in Figure 6. Convert your measurements to meters and record the results in your data table. Then calculate the cross-sectional area of your test sample. Record the result in your data table.
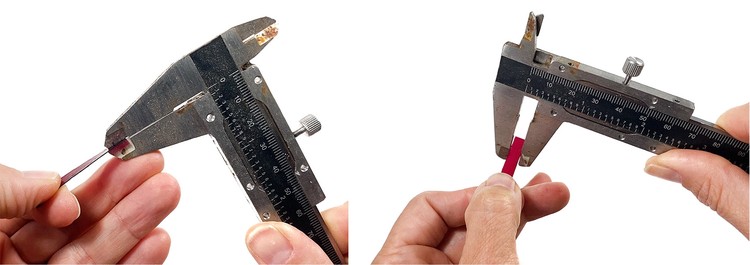
Figure 6. Thickness and width measurements with calipers. - Place each end of the strip into one of the clamps. The end of the sample strip should line up with the end of the metal clamp. Make sure to secure the strip tightly in the clamp.
- Do the tensile test. There are two ways to stretch the materials.
- Option A. If you have a spring scale, attach a string to one clamp, as shown in Figure 7.
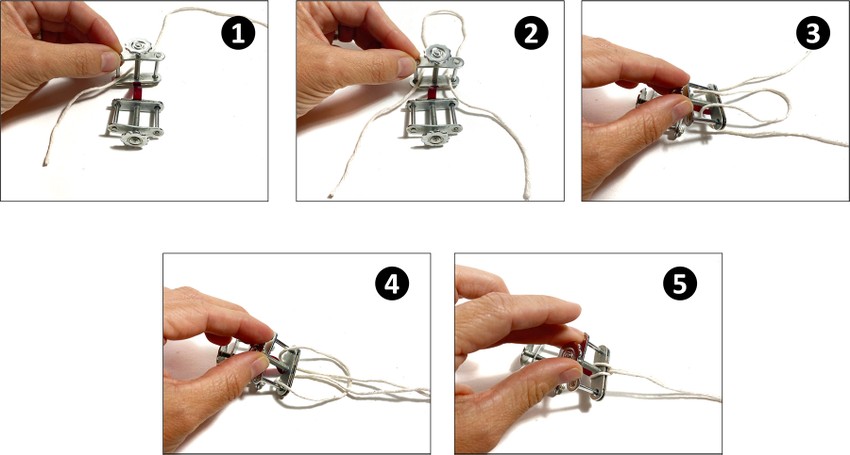
Figure 7. Instructions on how to attach a string to one of the compressor clamps.Attach the hook of the spring scale to the string loop. Hold the other clamp with one hand upright on the table. Do NOT move the clamp during the test. The test setup should look like Figure 8.

A hand holds the clamp attached to one end of the sample strip. Another hand pulls on a spring scale attached to the clamp holding the other end of the sample strip.
Figure 8. Tensile test setup using a spring scale.Then very slowly pull the spring scale straight away from the clamp so your sample gets stretched. Be careful not to bend or twist the sample. While pulling, make sure to monitor the readings on the spring scale. Pull until the sample strip breaks. Make sure that the sample broke somewhere in the middle and did not just slip off the clamp. Record the force (in newtons) that made the sample break in your data table. If your scale measures in pounds or kilograms, convert the force to newtons: 1 lb = 4.448 N, and 1 kg = 9.81 N (but only if you're in Earth's gravity!). Reset your scale to zero if you are using a trigger scale.
- Option B. Attach a string to both clamps as shown in Figure 9.
Figure 9. A string attached to each compressor clamp holding the leather sample.Use the string to attach one clamp to a door handle or other sturdy object. The clamps should hang freely in the air. Use the string on the other (bottom) clamp to attach a container, like a cup or small bucket. Make sure that the container is close to the ground. This avoids spillage of its contents if your sample breaks. The test setup should look like Figure 10. Gradually add weight (e.g., metal or sand) to the container until the sample strip breaks.
The compressor clamp at one end of the sample strip is attached to a hook. The compressor clamp at the other end is attached to a little bucket. A hand holds metal washers, which are added to the bucket until the strip breaks.
Figure 10. Tensile test setup with a little bucket and weight.Again, make sure that the sample broke somewhere in the middle and did not just slip off the clamp. When the sample fails, weigh the filled container and record the weight that caused the sample to break in your data table. If needed, convert the weight to newtons first: 1 lb = 4.448 N, and 1 kg = 9.81 N (but only if you're in Earth's gravity!).
Swipe left to see more
Table 4. Data table to record your data from the tensile strength test.Sample Thickness
[m]Width
[m]Cross-sectional Area
[m2]
(Thickness × width)Maximum applied force
[N]Tensile Strength
[MPa]Kombucha recipe #1 with 66 g sugar #1 #2 #3 Average Kombucha recipe #2 with 16.5 g sugar #1 #2 #3 Average - Option A. If you have a spring scale, attach a string to one clamp, as shown in Figure 7.
- Use Equation 1 and your data to calculate the tensile strength of your test sample. You might want to convert your result from pascals to megapascals (1 Pa = 1 × 10⁶ MPa). Record your result in your data table.
- Repeat the tensile test with the remaining two sample strips of the same kombucha leather.
- Finally, repeat steps a–f with the second kombucha leather. You want to test both kombucha leathers at least three times to make sure you can trust your results.
- Torsion test. In this test, you will investigate how your different leather sheets behave when they are twisted. To do the torsion test, make a data table like Table 5 in your lab notebook and follow steps a–e to test both kombucha leather sheets.
- Cut three 0.5 cm × 4 cm strips of your first kombucha leather. Don't cut them from the very edges, as these tend to be thinner. Choose a section that is free of defects, such as small tears, bubbles, or ridges.
- Place each end of one strip into one of the clamps. The end of the sample strip should line up with the end of the metal clamp. Make sure to secure the strip tightly in the clamp.
- Hold each clamp in one of your hands with the screws both facing up, as shown in Figure 11. To twist your sample, keep one clamp still and rotate the other clamp until its screw is facing down. Now you have rotated the clamp halfway. Rotate the same clamp in the same direction so that the screw is facing up again. This makes one rotation. Continue rotating the clamp in the same direction, half a rotation at a time, until the sample breaks. Record the number of rotations until the sample breaks in your data table.
In each image the right compressor clamp has been rotated by 180 more degrees.
Figure 11. Torsion test setup. - Repeat the torsion test with the remaining two sample strips of the same kombucha leather.
- Finally, repeat steps a–d with the second kombucha leather. You want to test both kombucha leathers at least three times to make sure you can trust your results.
Table 5. Data table to record the number of rotations until the sample breaks from the torsion test.Trial Kombucha recipe 1 with 66 g sugar Kombucha recipe 2 with 16.5 g sugar #1 #2 #3 Average - Flexure test. In this test, you will investigate how your different leather sheets behave when they are bent. To do the flexure test, make a data table like Table 6 in your lab notebook, and follow steps a–e to test both kombucha leather sheets.
- Cut three 1 cm × 4 cm strips of your first kombucha leather. Don't cut them from the very edges, as these tend to be thinner. Choose a section that is free of defects, such as small tears, bubbles, or ridges.
- To bend your first sample, fold it in half, as shown in Figure 12. Then slide your finger along the fold with some pressure, as if you were folding a paper airplane. Remove your finger and observe what happens. Did the sample break? Did the material spring back into its original flat state, or did it stay folded? Can you see a fold line in the material? Record your observations in your data table.
Figure 12. Folding the sample strip in half. - Repeat the flexure test with the remaining two sample strips of the same kombucha leather.
- Finally, repeat steps a–c with the second kombucha leather. You want to test both kombucha leathers at least three times to make sure you can trust your results.
Swipe left to see more
Table 6. Data table to record your data from the flexure test.Trial Did the sample break? Does the material spring back
into its original flat state?Do you see the fold line? Kombucha recipe 1 with 66 g sugar #1 
#2 #3 Totals __ yes __ no __ yes __ no __ yes __ no Kombucha recipe 2 with 16.5 g sugar #1 #2 #3 Totals __ yes __ no __ yes __ no __ yes __ no - Sewing test. In this test, you will investigate whether your leather can be sewn easily, which is crucial for most textile applications. To do the sewing test, make a data table like Table 7 in your lab notebook and follow steps a–e to test both kombucha leather sheets.
- Cut two 3 cm × 3 cm square pieces of your first kombucha leather. Don't cut them from the very edges, as these tend to be thinner. Choose a section that is free of defects, such as small tears, bubbles, or ridges.
- Place both leather squares on top of each other.
- Use a sewing needle and sewing thread and try to sew the leather squares together. Make a single straight seam along the edges of the square using a backstitch. If you don't know how to backstitch, you can review this backstitch tutorial (Method 1).
- Repeat steps a–c with the second kombucha leather.
- How easy or difficult is it to sew the materials? Do the materials break? Record your observations in your data table. Then rank both materials from easiest to sew (1) to hardest to sew (2) in your data table.
/-/https/www.sciencebuddies.org/cdn/Files/19342/5/caliper-measurements.jpg)
/-/https/www.sciencebuddies.org/cdn/Files/19343/5/make-knot-string.jpg)
/-/https/www.sciencebuddies.org/cdn/Files/19344/5/spring-scale-setup.jpg)
/-/https/www.sciencebuddies.org/cdn/Files/19345/5/string-on-both-clamps.jpg)
/-/https/www.sciencebuddies.org/cdn/Files/19346/5/container-setup-weight.jpg)
/-/https/www.sciencebuddies.org/cdn/Files/19347/5/torsion-test-setup.jpg)
/-/https/www.sciencebuddies.org/cdn/Files/19348/6/flexure-test.jpg)
| Sample | Can you sew your leather without breaking it? |
Rank from easiest to sew (1) to hardest to sew (2) |
|---|---|---|
| Kombucha recipe 1 with 66 g sugar | /-/https/www.sciencebuddies.org/cdn/Files/19331/9/check-yn.png) |
|
| Kombucha recipe 2 with 16.5 g sugar | |
Analyzing your Data
In this section, you will analyze your data and come up with a conclusion about how the sugar concentration affects the properties of your bacteria-grown kombucha leather.
- Biofilm growth
- Use the data from data table 2 to make a line graph showing the thickness of the SCOBY biofilm sheet over time. Put the time in days on the x-axis and the biofilm thickness in milimeters on the y-axis.
- Tensile strength data
- For data table 3, calculate the average tensile strength for each sugar concentration. Record the result in your data table.
- Make a bar graph of your data. Put the sugar concentration on the x-axis and the average tensile strength on the y-axis.
- Torsion test data
- For data table 4, calculate the average number of rotations that made the sample break for each sugar concentration.
- Make a bar graph of your data. Put the sugar concentration on the x-axis and the average number of rotations that made the sample break on the y-axis.
- Flexure data
- Review your data table 5 and for each question count the total number of yes and no answers for each sample. Record the results in your data table.
- Look at your data tables (2–6), graphs, and observations and try to draw conclusions from your results about which kombucha recipe makes the better leather replacement. Take the following questions into consideration.
- How did the different sugar concentrations affect the SCOBY biofilm growth?
- What similarities or differences do you see between the two processed leather sheets?
- How did the amount of sugar change the material properties of the different leathers?
- Based on your results, what function does sugar have in your kombucha recipe?
- Can you explain your results?
- Which of the tests you conducted do you think are most relevant for a leather alternative material?
- Is there a possibility that other factors could have affected your test results? If yes, which ones?
- Based on your results, do you think kombucha leather is a good leather replacement?
- Do you think the kombucha leather you made in this project is more or less sustainable than conventional leather? Use the 12 principles of green chemistry to answer this question.
Troubleshooting
For troubleshooting tips, please read our FAQ: Grow Vegan Kombucha Leather.
Ask an Expert
Global Goals
The United Nations Sustainable Development Goals (UNSDGs) are a blueprint to achieve a better and more sustainable future for all.
/-/https/www.sciencebuddies.org/cdn/Files/19755/5/E-WEB-Goal-12.png)
Variations
- Try varying other growth conditions, such as the growth temperature, the type of tea, or the amount of starter culture. How do the properties of your resulting leather change depending on these variables?
- Test how your kombucha leather compares to genuine leather. Complete the same tests that you did with your kombucha leather with genuine animal-derived leather. How do the materials compare?
- After harvesting, the kombucha biofilm has to be dried and processed. Investigate how different processing conditions change the properties of your kombucha leather. Does it matter on what type of material you dry your biofilm sheet (plastic, wood, aluminum foil, etc.)? Can you use different oils to massage the material to make it flexible? Can you mold your leather sheet by letting it dry on a shaped object? How can you dye your leather?
- When worn daily, clothes have to withstand a lot. The tests you performed in this experiment were mostly limited to the mechanical properties of your leather. But other properties are relevant to textiles, too! Think about what your clothes have to tolerate on a daily basis: They may get stained, washed, ironed, or exposed to rain and UV radiation from the sun. Can you come up with testing procedures to find out how your kombucha leather behaves when treated like real clothes?
- The focus of this science project is on growing vegan kombucha leather and testing its material properties. Take this project one step further by making enough kombucha leather to create an actual product! If you need larger pieces of leather, you can use larger growth containers. Based on the material properties of your kombucha leather, think about what kind of product you can create. Then go ahead and design your product and make it! If you can't think of anything to make, you can get started with this easy cardholder wallet. Once you have finished making your product, you can decorate it.
Frequently Asked Questions (FAQ)
- Use chlorine-free water. Often, tap water contains residual chlorine from water treatment, which can kill your kombucha culture. If you taste or smell chlorine in your tap water, use bottled or filtered water instead.
- Use unflavored and caffeinated black or green tea. The kombucha culture needs caffeine as a nitrogen source. Decaffeinated tea or herbal tea, or low-quality black and green tea, will not work.
- Add enough starter culture to your kombucha batch. The rule of thumb is to use 10% starter culture per batch. In addition, you need to add a solid SCOBY pellicle to provide enough bacteria and yeast to initiate new biofilm growth.
- Check to make sure your solution has the right pH. The starting pH of kombucha needs to be lower than 4.5. During biofilm growth, the pH will drop even lower due to the acidic fermentation products. Finished kombucha has a pH between 2.5 and 3.5. You can add apple cider vinegar to your kombucha batch to adjust the pH.
- Make sure your kombucha growth conditions are right.
- The growth temperature should be 16–29°C (60–85°F). The optimal temperature for growth is 27°C (85°F). Colder temperatures increase the risk of mold growth. If necessary, you can put your growth containers on a heat mat to keep them at the ideal temperature.
- Keep your kombucha growth containers in the dark and out of direct sunlight. The SCOBY biofilm grows better in the dark.
- Provide enough airflow to your kombucha culture, as the SCOBY bacteria need oxygen to convert the ethanol (alcohol) in kombucha to acetic acid. Don't place the kombucha growth containers in a cupboard, and make sure the cloth you use to close the containers lets enough air through.
- Option 1: Go ahead and grow three batches of each recipe at the same time. If you do this, you need six growth containers and more starting culture. You will also have to triple the ingredient amounts for each recipe. This means you need to spend more money and set aside more space for storing your six containers during growth.
- Option 2: You can still grow three batches of kombucha for each recipe, but instead of growing them simultaneously, you can grow them sequentially. Once you harvest your first kombucha biofilm, you can use the remaining liquid and pellicle as a starter culture for a new kombucha batch. This way, you can save the money you would have spent on extra growth containers and starting cultures, and you won't need extra space. However, growing the kombucha batches sequentially will require more time, since you will have to wait for the kombucha biofilm to grow three times in a row.
- Option 3: If you are short on money and time, discuss with your teacher whether it is sufficient to grow only one batch of kombucha for each recipe. Note that you are repeating your material testing experiments three times with different samples from the same batch of kombucha leather. Check whether this is sufficient for your teacher, given space, money, and time constraints.
Careers
If you like this project, you might enjoy exploring these related careers:
/-/https/careerdiscovery.sciencebuddies.org/cdn/Files/1107/19/pexels-photo-3938023.jpg)
/-/https/careerdiscovery.sciencebuddies.org/cdn/Files/20209/5/chemical-engineer-citgo.jpg)
/-/https/careerdiscovery.sciencebuddies.org/cdn/Files/1429/17/unsplash-4pM4nhHyo9M.jpg)
/-/https/careerdiscovery.sciencebuddies.org/cdn/Files/1486/17/pexels-photo-4033018.jpg)

/-/https/img.youtube.com/vi/Mfk3Qk3-LWU/0.jpg)
/-/https/img.youtube.com/vi/FQy8cAU8SW4/0.jpg)
/-/https/img.youtube.com/vi/jBpS6W-2otk/0.jpg)