Abstract
Have you ever heard the phrase, "Seeing is believing"? Well, it is more accurate than you might think! In this science project, you can investigate the phenomenon of apparent motion by making your own flip-book animationsSummary
Sara Agee, Ph.D., Science Buddies
Teisha Rowland, Ph.D., Science Buddies
/-/https/www.sciencebuddies.org/cdn/Files/4626/6/phenakistoscope.gif)
Objective
Investigate the perception of apparent motion by making flip-book animations.
Introduction
Do optical illusions trick your eyes or your brain? That is a question scientists were trying to answer for centuries. The answer is, it is a little bit of both since the eyes and the brain work together during the perception of vision. When you visually perceive an object, what is happening, put in the simplest way, is that the image of that object is projected onto the back of your eye and this information is sent to the brain, where it is processed and interpreted, forming the image that you see.
Optical illusions are scientific, but also just plain fun! One optical illusion that has had a huge impact on our culture is the illusion of apparent motion . You perceive this illusion every time you watch cartoons or a movie. You perceive that the characters on the screen are moving around, but in fact you are seeing many still pictures flashing before your eyes! How does this work? Our brains are trying to make sense of what we are looking at, by, for example, making the motions in a cartoon look smooth. To do this it is thought that our brains put all of the pieces together and fill in blanks, or missing images, based on what we have already seen. Thus we have the illusion of objects moving. Our brains do this all the time, not just when we watch cartoons. For example, when someone blinks they do not see a brief black screen because their brain fills in an image that is an assumption of what they would see if their eyes were not closed. This phenomenon is called persistence of vision.
The process of making an animated feature film is long and involved, sometimes taking several years! But there are a few very simple devices you can make to investigate apparent motion:
- Flip-books are stacks of heavy-weight paper that are held together, such as with staples or binder clips. Each page in the stack has a slightly different variation of the image on the previous card. When you quickly thumb through the stack, your brain assembles the series of images into movement.
- Thaumatropes (THAW-muh-tropes) are made by mounting two images on either side of a disc. Usually the two images go together, like a bird and a cage, or a fish and a bowl. When you rotate the disc, the images from the two sides come together into one image! Figure 1 below shows an example of a thaumatrope that uses an image of a cage on one side of the disc and an image of a mouse on the other side.
- Phenakistiscopes (fuh-NAH-kih-stuh-scopes) are discs decorated with a pattern that "moves" when you spin the disc. You can create animations by drawing a series of images around the outer edges of the disc. Figure 2 below shows an example of a phenakistiscope.
- Zoetropes (ZOH-ee-tropes) are similar to phenakistiscopes, except they take the shape of a cylinder instead of a disc. The images are placed along the inside wall of the cylinder, and when you spin the cylinder, you see the animation.
/-/https/www.sciencebuddies.org/cdn/Files/4625/13/mouse-in-cage-thaumatrope-img.jpg)
Figure 1. A thaumatrope made from these two images will show the mouse inside the cage when spun quickly.
/-/https/www.sciencebuddies.org/cdn/Files/4626/6/phenakistoscope.gif)
Figure 2.This example of a phenakistiscope shows two people dancing. (Eadweard, Muybridge.)
You can find out more about flip-books, thaumatropes, phenakistiscopes, and zoetropes by checking out the resource by B. W. Rich in the Bibliography below.
In this human behavior science project, you will use flip-books to investigate the limits of apparent motion. In other words, you will test how well our brains can fill in missing images to make smooth motion. You will test this by making flip-books out of index cards, binder clips, and sticker dots or markers. Each flip-book will have a series of dots that shift a certain distance from card to card, resulting in the perception of "moving" dots. By spacing the "moving" dots farther and farther apart, you can find out when the brain stops perceiving apparent motion. As the dots become farther apart, when will your volunteers NOT perceive them to be moving?
Terms and Concepts
- Perception
- Apparent motion
- Optical illusion
- Persistence of vision
- Flip-book
- Thaumatrope
- Phenakistiscope
- Zoetrope
Questions
- Why do we perceive apparent motion of stationary objects?
- How is the brain tricked into filling in the blanks?
- Do you think there are limits to our perception of apparent motion?
Bibliography
You can do further research by visiting the following websites, which give information about flip-books, animation, apparent motion, the persistence of vision, and the history of animation:
- Baianat (n.d). Simple Animation. Animation Revolution, Chapter 2. Retrieved June 26, 2023.
- New York Film Academy. (2014, June 5). Flipbook Animation: Techniques & Mind-Blowing Examples. Retrieved June 6, 2023.
This science project is a simpler version of the Apparent Motion experiment from CogLab, an online laboratory manual for studying cognitive psychology:
- CogLab. (n.d.). Apparent Motion. CogLab 2.0 Online Laboratory. Wadsworth Publishing. Retrieved April 1, 2013.
For help creating graphs, try this website:
- National Center for Education Statistics, (n.d.). Create a Graph. Retrieved June 25, 2020.
Materials and Equipment
- Lined index cards, 3 x 5 inches (50).
- Alternatively, half-size index cards, 3 x 2.5 inches, may be used instead (100).
- Scissors
- Small, colored sticker dots, like Avery 1/4" Round Color Coding Labels (100), which can be purchased online from
Amazon.com
- Alternatively, colored markers, highlighters, pencils, or crayons may be used.
- Binder clips (4)
- Volunteers (at least 3)
Disclaimer: Science Buddies participates in affiliate programs with Home Science Tools®, Amazon.com, Carolina Biological, and Jameco Electronics. Proceeds from the affiliate programs help support Science Buddies, a 501(c)(3) public charity, and keep our resources free for everyone. Our top priority is student learning. If you have any comments (positive or negative) related to purchases you've made for science projects from recommendations on our site, please let us know. Write to us at [email protected].
Experimental Procedure
-
First, if you have 3x5 index cards (and not half-size index cards), cut them in half to make half sizes (3x2.5-inch cards).
- Tip: Try to cut the cards as evenly in half as possible. You can try doing this by using a ruler or folding one card in half and seeing where the crease mark is, and following this mark when cutting the cards in half. It will be easier to cut small stacks of cards at a time.
- Then make four stacks of 25 half-sized index cards each.
-
Next, take each stack and make a series of "animated dots" along the right edge of the cards by placing one dot on each card. Each colored series of dots will be spaced differently (you will use the lines on the index cards as a guide for placing your dots). This will allow you to test for the perception of apparent motion in your volunteers by showing them the series of flip-books. Figure 3 below shows an example of a dot series in a flip-book that skips one line space per card:
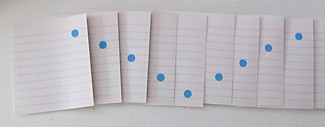
Figure 3. You will make four stacks of cards with a different dot series in each of them. In the example in this picture, the dot skips one line space between cards.
-
Take one of your four stacks of cards. Make a dot (or circle) on the top card on the far right end of the top line, as shown on the top card in Figure 3.
- You can do each series using a different colored dot or using the same color. You may use colored sticker dots or colored markers, highlighters, pencils, or crayons. If you do not use stickers, try to make your dots as similar in size and shape as possible.
- On the next card in the stack, make a dot just as far to the right, but on the next line space down. Repeat this step until you reach the bottom of a card.
-
On the next card, make a dot (just as far to the right) on the next line space up from the previous dot.
- This pattern should look similar to the one in Figure 3 above (but without skipping line spaces).
- Repeat step 3c until you reach the top of the card. Then repeat step 3b. Repeat this pattern until you reach the end of the stack of cards.
-
Repeat steps 3a-d with a new blank stack of cards but this time in step 3b make the next dot two line spaces down (skipping one line space) and in step 3c make the next dot two line spaces up (skipping one line space).
- For example, if you made a dot on the top line space, the dot on the next card should go on the third line space down (skipping one line space).
- This series should look like the one in Figure 3 above.
-
Repeat steps 3a-d with a new blank stack of cards but this time in step 3b make the next dot three line spaces down (skipping two line spaces) and in step 3c make the next dot three lines spaces up (skipping two line spaces).
- For example, if you made a dot on the top line space, the dot on the next card should go on the fourth line space down (skipping two line spaces).
-
Repeat steps 3a-d with a new blank stack of cards but this time in step 3b make the next dot four line spaces down (skipping three line spaces) and in step 3c make the next dot four lines spaces up (skipping three line spaces).
- For example, if you made a dot on the top line space, the dot on the next card should go on the fourth line space down (skipping two line spaces).
-
Take one of your four stacks of cards. Make a dot (or circle) on the top card on the far right end of the top line, as shown on the top card in Figure 3.
- Neatly stack each deck and make sure the dot series are all correct.
- Tap the animated edge of each card stack on a flat surface so that none of the cards' edges are sticking out (or in) from the rest of the cards in the stack.
- Assemble the flip-book by attaching a binder clip to the left side of each of the four stacks. Your assembled flip-books should look like the ones in figure 4 below.
/-/https/www.sciencebuddies.org/cdn/Files/3156/5/HumBeh_img036.jpg)
/-/https/www.sciencebuddies.org/cdn/Files/3155/5/HumBeh_img035.jpg)
Figure 4. Your neatly assembled flip-books should look like these ones. (You do not need to use different colored dots for each flip-book.)
-
Flip through each flip-book to make sure nearly every card is shown while flipping. If you are having trouble with this, remove the stack's binder clip and try carefully repeating steps 5-6.
- If a card's edge is too rough or uneven to flip smoothly, you may need to remake that card and re-assemble the stack.
- You are now ready to test out your flip-books on some volunteers! In your lab notebook, make a data table like Table 1 below to record your results in.
|
Does it look like the dot moves to the bottom of the card, then back to the top, and so on? (Yes/No) |
||||
| Card Stack | Volunteer 1 | Volunteer 2 | Volunteer 3 | Total "Yes" Answers |
| No Line Spaces Skipped | ||||
| One Line Space Skipped | ||||
| Two Line Spaces Skipped | ||||
| Three Line Spaces Skipped | ||||
-
Ask a volunteer to flip through each flip-book. For each flip-book, ask the volunteer if it looks like the dot moves to the bottom of the card, then back to the top, and so on, going up and down along the edge of the stack. For this first volunteer, write "Yes" or "No" in the data table in your lab notebook for each of the four stacks.
- Note: If a volunteer thinks that the dot is jumping around on the edge of the stack, or is flashing, but is not clearly moving up and down along the edge, write "No" in your data table for this volunteer and stack.
- It may be difficult for some volunteers to decide if the dots are moving up and down along the edge of the stack. Just ask the volunteer for their best answer.
-
Repeat step 9 with at least two other volunteers.
- Write their answers in the other volunteer columns in your data table, such as "Volunteer 2" and "Volunteer 3."
- When you are done testing the flip-books with volunteers, add up the total number of "Yes" answers for each stack. Write this number in the column in your data table labeled "Total 'Yes' Answers."
-
Make a bar graph of the total number of "Yes" answers that each stack received.
- You can make a graph by hand or use a website like Create a Graph to make a graph on the computer and print it.
- Put each stack on the x-axis (the horizontal axis going across) and the total number of "Yes" answers it received on the y-axis (the vertical axis going up and down). Identify each stack by the number of line spaces skipped between the cards.
-
Analyze your graph.
- As the number of line spaces increases in the stack, does the total number of "Yes" answers also change?
- If you saw a change, do you think this is related to a change in the apparent motion as the number of line spaces increase? How?
- Overall, what do you think your results tell you about apparent motion in animations and other devices that use still images to create a sense of motion?
Ask an Expert
Variations
- In this science project, you tested whether the variable distance between objects had an effect on apparent motion. Two more variables you can test for are:
- Frequency - Will flipping the cards faster or slower make a difference? Have your volunteers flip the books at different speeds. What happens to your results?
- Size - Do larger objects work better than smaller objects? Change the size of the dots and find out.
- Design a science project investigating the practical application of apparent motion to animation. Can you use the results of your experiment to design better animations?
- Do your results with the spacing of objects in the flip book also apply to thaumatropes, phenakistiscopes, and zoetropes? Try making some of these devices and test them to find out.
- Advanced students who have experience in programming can turn this project into a computer science project. See the Science Buddies project Follow the Bouncing Ball: A Web Animation Project to find out more.
Careers
If you like this project, you might enjoy exploring these related careers:
/-/https/careerdiscovery.sciencebuddies.org/cdn/Files/1907/18/pexels-photo-3153207.jpg)
/-/https/careerdiscovery.sciencebuddies.org/cdn/Files/1698/17/pexels-photo-5699469.jpg)
/-/https/careerdiscovery.sciencebuddies.org/cdn/Files/1522/17/unsplash-FVh_yqLR9eA.jpg)

/-/https/img.youtube.com/vi/P6PGedCKrUM/0.jpg)
/-/https/img.youtube.com/vi/KQH2UhHss6c/0.jpg)
/-/https/img.youtube.com/vi/ajrNj7JcCpQ/0.jpg)