Abstract
Through the ages, creative minds have made an amazing variety of paper toys, many of them delicate, beautiful, and inspiring. All too often, though, they do not withstand very well the wear and tear of play.This science project is your chance to fix that. You will make paper dolls with movable parts and study how the choice of materials influence the strength of the toy. Beginning with a strong design, you will finish by making a durable paper doll (or toy) with moving parts.
Summary
/-/https/www.sciencebuddies.org/cdn/Files/5704/6/Paper-doll-arms-core-lineup.jpg)
Objective
Create four different models of a paper doll (or toy) with movable parts, then measure and compare their strength with durability of the toy in mind.
Introduction
Choose your favorite from the paper toys in Figure 1, below. Imagine you created this toy. Imagine the joy you would feel putting it together. Then imagine how sad or mad you would feel whenever it breaks.
/-/https/www.sciencebuddies.org/cdn/Files/5701/6/Paper-toys-examples.jpg) |
| Figure 1. Paper toys with movable parts, clockwise from top left: dinosaur with movable head, neck, tail, and legs; horse with movable wings, tail, mane, and skirt; knight's helmet with movable visor; and nymph with two pairs of movable wings. |
How can the toy industry make paper dolls or paper toys that withstand play so well? Those toys last and are said to be "durable." Durability refers to the ability to resist wear.
You might still remember a toy, like a car, doll, or action figure, that had a part like a leg or a wheel fall off. Did this happen because the toy was old and had been used a lot, or because it accidentally dropped, or someone threw it? Engineers make a distinction, speaking about durability under normal use (like playing nicely with a toy) or durability under exceptional circumstances or abusive use (like being left outside in the rain or jumping on it). Design teams make specific choices to increase the durability of the toys.
In this science project, you will be the designer of a paper doll (or other paper toy) with movable parts, and you will have some design choices. You are also the scientist, measuring, quantifying, and comparing the durability of each design choice. You will test the paper doll under an exceptional circumstance, where the movable arms are pulled away from the main body.
As a scientist, you will search for quantitative measurements. These are measurements that result in numerical data, or data with a number and a unit (such as 1 kilogram [kg]) as opposed to qualitative or descriptive results (such as "stronger"). A mass hanging from the movable part will determine how hard you can pull before the paper doll breaks.
As a scientist, you will also test not just one but several paper dolls of the same type and then average the results. Why? Think of a scientist trying to answer the question "How strong are 10-year-old boys?". Would testing one 10-year-old boy be enough? No, she might have picked an exceptionally strong or weak boy. A scientist needs to test several and average the results. This is also what you will do for your paper dolls.
Now, go ahead and experience what it is to be a designer and scientist.
Terms and Concepts
- Durability
- Normal use
- Exceptional circumstances
- Abusive use
- Quantitative
- Qualitative
- Mass
- Average
Questions
- Which of the following durability tests would be adequate to test a paper doll under normal use and which would test it under exceptional circumstances or abusive use?
- Give the paper doll to a hundred toddlers and record how long they are able to play with it before it breaks.
- Measure how much force it takes to pull the arms of the paper doll apart (in opposite directions) before it breaks.
- Which of the following will increase the durability of a paper doll (or paper toy)?
- Use heavier, stronger paper to build the toy.
- Add a flower high above the head or a sword way out to the side.
- Add a layer of plastic contact paper or laminate the paper so it becomes water resistant.
- Color the paper toy with crayons.
- Reinforce vulnerable places with masking tape.
Bibliography
Explanation of how to calculate the average, also called the mean, of a set of numbers:
- Pierce, R. (2014, January 13). How to find the mean. Math Is Fun. Retrieved March 6, 2014.
Explanation of mass and weight:
- Balter, Arile. (2019, October 17). The Differences Between Mass & Weight for Kids. Sciencing. Retrieved March 3, 2021.
For help creating graphs, try this website:
- National Center for Education Statistics, (n.d.). Create a Graph. Retrieved June 25, 2020.
Materials and Equipment
- Printer paper (10 sheets) - Heavier printer paper works a little better as this paper will be used to create the template.
- Children's scissors
- One-hole punch for 1/4-inch holes, such as this punch available at Amazon.com.
- Marker
- Heavy craft paper or card stock (minimum of 6 sheets)
- Yarn (2 m)
- Brads (12), medium or 8 mm, such as these brad packs available at Amazon.com.
- Masking tape, such as these general purpose masking tapes available from Amazon.com.
- Bucket, such as a child garden pail or beach pail such as these sand play buckets available from Amazon.com.
- Marbles, coins, or other small items (20 to 100, depending on their weight) that can be used as weights
- Kitchen scale with metric indications, digital or otherwise such as these Digital Pocket Scale available from Amazon.com.
- Notebook
Disclaimer: Science Buddies participates in affiliate programs with Home Science Tools®, Amazon.com, Carolina Biological, and Jameco Electronics. Proceeds from the affiliate programs help support Science Buddies, a 501(c)(3) public charity, and keep our resources free for everyone. Our top priority is student learning. If you have any comments (positive or negative) related to purchases you've made for science projects from recommendations on our site, please let us know. Write to us at [email protected].
Experimental Procedure
In this science project, you will create toys with movable parts. Paper dolls are used as example but you can replace the doll with any creature you wish. Before adding the details to your paper toy, you need to evaluate the different design options available and select the most durable one.
As design options, you have:
- two types of paper (heavy paper and regular printer paper); and
- two ways to connect the limbs to the body (using brads and using yarn).
This leads to four different types of paper dolls as listed in Table 1.
| Type | Type name | Design choice | |
| Paper | Connection method | ||
| 1 | H-Y | Heavy paper | Yarn |
| 2 | H-B | Heavy paper | Brads |
| 3 | P-Y | Printer paper | Yarn |
| 4 | P-B | Printer paper | Brads |
Your task is to determine which paper doll type — or which design choice — is more durable, by putting it through a scientific test. Scientists test multiple paper dolls of each type and average the results. As a scientist, you will test each design choice three times. You will need three paper dolls of each design to do this.
Note that in this science project, we named the paper doll types using letters like P-Y, H-B, and so on. The letters refer to the first letter of the associated design choices; for instance, a paper doll of type P-Y is made of printer paper and uses yarn to connect the arms to the body.
Create Paper Body Parts
- You may want an adult's help to do this step:
- Download the PDF file Paper-Doll-Template.
- Print the file two times. If you have a choice, choose a heavier printer paper.
- Give the templates to the student.
Optional: Create your own template. It can be a dinosaur, a cat, a fairy, or any creature you wish. Be sure to keep the punch holes as far as possible from the edge of your template and keep the limbs straight and bulky (rather than skinny). These choices result in a more durable design and will make your testing easier.
- You now have two identical templates of the paper doll. Put one template aside. You can use it in case you accidentally cut or rip the one you are using.
- Cut out the three main body parts: a core, a leg, and an arm. Note: Leave the core as one piece with a head, a neck, a chest, and a belly (as shown in Figure 2).
- Use a hole punch to make the indicated holes (little circles on the template).
/-/https/www.sciencebuddies.org/cdn/Files/5702/6/Paper-doll-template-pictures.jpg) |
| Figure 2. To create your template, print the file, cut out the body parts, and punch holes where indicated. |
- Trace the template on heavy paper. Make sure to trace the punch holes as well.
- Trace the core template once.
- Trace the arm template two times for the two arms needed for each doll.
- Note: In this science project, you will test how well the arms are connected to the core. To do this test, the paper doll does not need legs. For this reason, you can choose but do not need to create legs for the test paper dolls.
- Repeat step 5 five more times as you need six paper dolls with this type of paper (three with arms connected with brads and three with arms connected with yarn).
- Cut out all the body parts you traced as shown in Figure 3.
- Use the hole punch to create holes on the indicated places in all body parts (see Figure 3). Try your best to punch the holes at the indicated spots. Holes closer to or farther from the edge of the paper might affect the strength of the paper doll.
/-/https/www.sciencebuddies.org/cdn/Files/5703/6/Create-paper-doll-BodyParts.jpg) |
| Figure 3. To create the body parts for the paper dolls used in the test, trace the core and arms, cut out the traced body parts, and punch holes where indicated. |
- Stack the created body parts in a pile.
- Repeat steps 5 through 8 six times, now using printer paper.
- Stack these body parts in a second pile.
- At this point, you have all the body parts needed to evaluate the strength of the paper doll types.
- Put your template aside. You will need it again only to create your final, nicely decorated paper doll.
Connect Arms to Core Using Yarn
- Cut six lengths of yarn, each measuring 30 centimeters (cm).
- Place your pile of heavy paper body parts within reach.
- Take two arms and one core.
- Form a body with arms as shown in Figure 4:
- Place a core in front of you.
- Place the arms on top, lining up the holes in the arms with the holes in the shoulders of the core.
/-/https/www.sciencebuddies.org/cdn/Files/5704/6/Paper-doll-arms-core-lineup.jpg) |
| Figure 4. Line up the arms with the core so they can easily be connected. |
- Take the end of one length of yarn. Thread it starting from the top of the core:
- through the hole in the right arm,
- through the hole in the right shoulder,
- going around the back of the core and coming from the back
- through the hole in the left shoulder, and
- through the hole in the left arm.
Use Figure 5 to visualize these actions.
/-/https/www.sciencebuddies.org/cdn/Files/5705/6/Paper-doll-tread-arms-to-core.jpg) |
| Figure 5. Thread the arms to the core using yarn. |
- Tie a knot using the ends of the yarn, as shown in the top two images of Figure 6. Tighten the yarn until the core almost curls up. The remaining images in Figure 6 show examples where the yarn is too loose or too tight.
/-/https/www.sciencebuddies.org/cdn/Files/5706/7/Paper-doll-knod-yarn.jpg) |
| Figure 6. Yarn connecting the arms to the core should be tight but keep the core flat, as shown in the top two figures. |
- This makes one H-Y type paper doll.
- Repeat steps 3 through 6 two more times for a total of three H-Y type paper dolls.
- Now turn to the pile of printer paper body parts.
- Repeat steps 3 through 6 three times for a total of three P-Y type paper dolls.
Connect Arms to Core Using Brads
- Place your pile of heavy paper body parts within reach.
- Line up two arms with one core. For details, see steps 3 and 4 from the section Connect Arms to Core Using Yarn.
- Use a brad to connect one arm to the core. Use Figure 7 as a guide. Make sure to bend each leg of the brads until they touch the back of the core.
/-/https/www.sciencebuddies.org/cdn/Files/5707/6/Paper-doll-insert-brad.jpg) |
| Figure 7. Use brads to connect the arms and the core. Make sure to bend the legs of the brad completely down on the back side of the core. |
- Repeat step 3 for the other arm.
- This completes one H-B type paper doll.
- Repeat steps 2 through 4 two more times for a total of three H-B type paper dolls.
- Turn to the pile of remaining printer paper body parts.
- Repeat steps 2 through 4 three times for a total of three P-B type paper dolls.
Test the Types
The strength of the paper doll, as in how well the arms are attached to the core, is one aspect of its durability. To determine which type — or which design choice — is stronger, you need a scientific test to measure how much force the arms of the paper doll can hold.
Would pulling both arms in opposite directions away from the core (as shown in Figure 8) until it breaks be a scientific test?
/-/https/www.sciencebuddies.org/cdn/Files/5708/6/Paper-doll-pulling-arms.jpg) |
| Figure 8. Pulling the arms in opposite directions away from the core is not a scientific way to determine the strength of the paper doll. |
It would let you know if it was easy, hard, or very hard to break the paper doll. Scientists would call this a qualitative measurement. But you are looking for a quantitative measurement.
Would letting the paper doll hang from one arm (as shown in Figure 9), adding weights to the basket attached to the other arm until the paper doll breaks, be a scientific test?
/-/https/www.sciencebuddies.org/cdn/Files/5709/6/Paper-doll-weigts-process.jpg) |
| Figure 9. A weight pulling the arms away from the core helps quantify the force needed to break the paper doll. |
Yes, the weight of a known mass attached to the hand pulls the arms away from the core. The amount of mass quantifies the strength of the paper doll.
Mass and weight are not identical. The mass of an object is the amount of matter in the object. It is measured in grams (g) using a scale or a balance. The weight of an object represents something different. It is the force (or pull) of gravity on that object. Weight is measured in newtons (N), not grams. The Earth pulls with a force of 9.8 N on a mass of 1 kilogram (kg) placed at its surface, so we can say that on Earth, a mass of 1 kg weighs 9.8 N.
- Copy following table in your notebook. It will help you record your findings.
| P-Y paper dolls | Paper doll 1 | Paper doll 2 | Paper doll 3 | Average |
| Mass breaking the paper doll (g) | ||||
| Failure source (yarn/paper) | ||||
| P-B paper dolls | Paper doll 1 | Paper doll 2 | Paper doll 3 | Average |
| Mass breaking the paper doll (g) | ||||
| Failure source (brad/paper) | ||||
| H-Y paper dolls | Paper doll 1 | Paper doll 2 | Paper doll 3 | Average |
| Mass breaking the paper doll (g) | ||||
| Failure source (yarn/paper) | ||||
| H-B paper dolls | Paper doll 1 | Paper doll 2 | Paper doll 3 | Average |
| Mass breaking the paper doll (g) | ||||
| Failure source (brad/paper) | ||||
- Apply the test procedure described in the section on:
- Each of the three P-Y type paper dolls.
- Each of the three P-B type paper dolls.
- Each of the three H-Y type paper dolls.
- Each of the three H-B type paper dolls.
This totals 12 tests.
Procedure to Test a Paper Doll
- Use masking tape to attach a bucket to the hand of the paper doll, as shown in Figure 10. Note: Pay attention to doing a good job of taping here. If this connection comes apart while you are testing a paper doll, use tape to reconnect the bucket better and continue with your test.
/-/https/www.sciencebuddies.org/cdn/Files/5710/6/Paper-doll-bucket-hand-connection.jpg) |
| Figure 10. Attach a bucket to the hand of the paper doll with masking tape. |
- Keep weights (coins, marbles, or any objects you use as weight) within reach.
- Hold the paper doll up with your right hand as shown in Figure 9 (image on the right).
- Go to step 11 if the paper doll cannot hold the weight of the bucket alone.
- Lower the paper doll so the bucket rests on the floor, as shown in Figure 9 (image on the left).
- Add a small weight to the bucket with your left hand.
- Slowly lift the paper doll with your right hand until the bucket dangles above the floor.
- Count slowly to five to make sure the paper doll can comfortably hold this weight.
- Repeat steps 5 through 8 until the paper doll breaks.
- Notice what part failed (paper, brad, or yarn) and write it in a data table like Table 2.
- Measure and write down the mass needed to break the paper doll:
- Use a kitchen scale to measure the mass of the bucket with its contents (coins, marbles, or other objects). Do not forget to select "g" for gram as units. This is the unit for mass used by scientists.
- In case the filled bucket is heavier than the maximum capacity of your scale:
- Take some weights out of the bucket.
- Measure the mass of the bucket with whatever is left in it.
- Measure the mass of what you took out.
- Add these measured masses to obtain the total mass that broke the paper doll.
- Write the measured mass in your data table.
- Remove the tape and any body part left from the bucket.
- Place any weights left in the bucket back on the weights pile.
- Continue testing more paper dolls.
Finished testing three paper dolls of each type? Your data table should then show the first three columns filled in.
Analyze the Data
- Look more closely at what failed when testing the P-Y paper dolls:
- Do all three show the same kind of failure (for example, in all three of the P-Y type paper dolls, the yarn stays together but it tears trough the paper) or is there variation (some P-Y types fail because the yarn broke and some fail because the paper rips.)?
- Can you conclude which is stronger, the paper or the yarn?
- If you could improve on this type of paper doll, what would you change?
- Look more closely at what failed when testing the P-B paper dolls:
- Do all three show the same kind of failure (for example, a brad pops off because it can no longer support the pull of the weights) or do some show a different failure (for example, the paper rips)?
- Can you conclude which is stronger, brads or paper?
- If you could improve on this type of paper doll, what would you change?
- Repeat step 1 for the H-Y type paper dolls.
- Repeat step 2 for the H-B type paper dolls.
- Calculate the average mass needed to break a P-Y type paper doll. The masses needed to break the P-Y types can be found in the second row of your data table.
- Add up the three masses needed to break doll 1, doll 2, and doll 3. Divide this total by three (because you tested three paper dolls). The result is the average mass needed to break a P-Y type paper doll.
- Write this number in the last column of your data table.
- Repeat step 5 for the three other paper doll types.
- Compare the average weight needed to break the different types of paper dolls. Note that a higher number corresponds to more mass or more force needed to break the paper doll.
- Which paper doll type is weakest?
- Which type is strongest?
- Are the differences small or large?
- Make a bar graph of your data. Choose the paper doll type as the variable for the horizontal axis and the average weight to break the paper doll as the variable for the vertical axis. (Check the Bibliography if you need help making graphs.)
- In case you have another paper doll with movable parts in mind, would the results for these paper doll types apply to your new paper doll?
This completes your science project. You now know which type of paper doll will hold longest when a child pulls the limbs away from the body.
As a scientist, you would need to add more tests to confirm this type of paper doll also performs best under other durability tests, such as how it performs under normal conditions (a child playing with the paper doll). You can find ideas to include in your durability science project in the Variations section.
Maybe this science project sparked ideas on other design choices, which might create more durable paper dolls or toys. You can now use the Engineering Design Process to develop and improve the design.
Finally, do not forget to decorate and enjoy your toy!
Ask an Expert
Variations
- To test the durability of your paper doll under normal conditions, you can:
- Create three or more paper dolls of each type.
- Distribute the paper dolls to a group of children.
- Watch the children play with the paper dolls.
- If any of the paper dolls break, note what handling caused this failure. If it failed due to abusive use, remove this doll from this test. It if failed under normal use, note after how much time it failed.
- Notice anything that might bias your tests — such as children only playing with one type, a child grabbing the paper doll out of the hands of another child, etc.
- Collect the paper dolls.
- Examine the paper dolls for any visible damage.
- Make the initial template 50% smaller (using a copying machine) and investigate if the size of the paper doll affects its strength (or durability).
- For a different durability test, count how many times you can twist the arm of the paper doll before it breaks.
- Test the durability of removable parts of a paper toy (instead of movable parts as used in this science project). A removable part — for example, a coat for a horse — can be added by making a cut in the removable part (paper coat) and slipping a part of the paper toy (in this case, the head of the horse) through the cut, as shown in Figure 11.
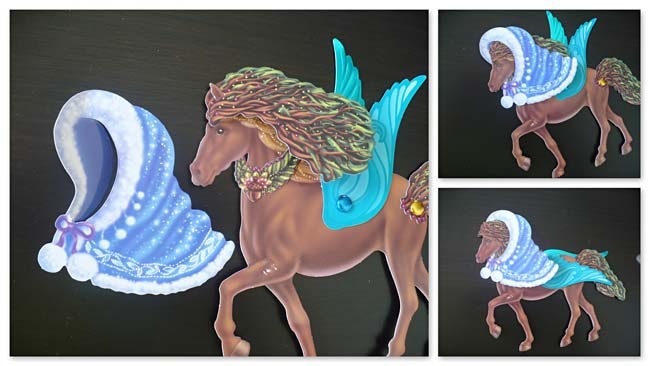
Figure 11. A cut in the coat allows the coat to be removed from the main paper toy (the horse). Clockwise starting from the figure on the left: the coat with cut and the horse; the head of the horse slips through the cut in the coat; rotating the coat lets it fall in place. Removable parts can be prone to wear and tear of play. Design choice will influence its durability. For this variation, choose two design options that might influence the durability such as:
- The cut starts close to the edge or away from the edge of the removable part.
- The cut is narrow or a wide.
- Printer paper or heavy paper.
- A cut reinforced with tape (applied before you create the cut) or no tape.
This leads to four types of removable parts (example: narrow cut in printer paper, narrow cut in heavy paper, wide cut in printer paper, wide cut in heavy paper.) You can compare the durability under normal conditions of these four types by counting the number of times you can put on and off the removable part before failure occurs.
/-/https/www.sciencebuddies.org/cdn/Files/5711/6/PAper-toy-removable-parts.jpg)
Careers
If you like this project, you might enjoy exploring these related careers:
/-/https/careerdiscovery.sciencebuddies.org/cdn/Files/1450/21/iStock-1227179796.jpg)
/-/https/careerdiscovery.sciencebuddies.org/cdn/Files/1457/17/pexels-photo-3861938.jpg)
/-/https/careerdiscovery.sciencebuddies.org/cdn/Files/1429/17/unsplash-4pM4nhHyo9M.jpg)

/-/https/img.youtube.com/vi/kzJ480muh4U/0.jpg)
/-/https/img.youtube.com/vi/WcMT-MGv2cw/0.jpg)
/-/https/img.youtube.com/vi/IFJGr29oWso/0.jpg)