Abstract
This is a straightforward project on glucose metabolism in yeast. You will grow yeast under aerobic and anaerobic conditions and measure carbon dioxide output to assess metabolic efficiency.Summary
Edited by Svenja Lohner, PhD, Science Buddies
Recommended Project Supplies
/-/https/www.sciencebuddies.org/cdn/Files/12671/17/Kit-Measuring-Gas-Production.jpg)
Objective
The objective of this experiment is to investigate yeast metabolism under aerobic and anaerobic conditions by measuring carbon dioxide output.Introduction
/-/https/www.sciencebuddies.org/cdn/Files/12535/7/yeast-metabolism-thumbnail.jpg)
Yeasts, as shown in Figure 1, are single-celled fungi. Like the cells in your body, they can derive energy from sugar molecules. They can also break down larger carbohydrate molecules (like starches present in flour) into simple sugar molecules, which are then processed further.
/-/https/www.sciencebuddies.org/cdn/Files/12532/18/bakers-yeast-Saccharomyces-cerevisiae.jpg)
Figure 1. Baker's yeast (Saccharomyces cerevisiae) viewed with a scanning electron microscope.
Yeast can extract more energy from sugar when oxygen is present in their environment. In the absence of oxygen, yeast switch to a process called fermentation. With fermentation, yeast can still get energy from sugar, but less energy is derived from each sugar molecule.
In addition to deriving less energy with fermentation, the end products of sugar metabolism are also different. When oxygen is present, the sugar molecules are broken down into carbon dioxide and water (plus the energy that the yeast uses to grow and reproduce). In the absence of oxygen, the fermentation process produces alcohol, carbon dioxide and water (and less energy).
In this experiment, you will grow yeast in containers with and without aeration, and compare the amount of carbon dioxide in the two conditions.
Terms and Concepts
To do this project, you should do research that enables you to understand the following terms and concepts:
- Anaerobic
- Aerobic
- Glycolysis
- Fermentation
- Cellular respiration
Bibliography
- Khan Academy (video), Cellular Respiration Introduction. Retrieved August 29, 2018.
- Thomson Gale, part of the Thomson Corporation. (2006). Respiration. Science of Everyday Things: Real-Life Chemistry, Volume 5. Retrieved October 22, 2009.
- cK-12, Cellular Respiration. Retrieved August 29, 2018.
Materials and Equipment 
Recommended Project Supplies
- Measuring Gas Production Kit, available from our partner
Home Science Tools®. Includes:
- 250-mL graduated cylinder
- 100-mL graduated cylinder
- Wide-mouth, 8 oz. squirt bottles (4)
- Clear plastic tubing
- Waterproof thermometer
- You will also need to gather these items:
- Dry yeast. Tip: Buying a whole jar is probably more economical than individual packets.
- Aquarium aerator pump
- Air or oxygen stone
- Plastic tub or bucket
- Water
- Optional: Plastic wrap
- Packing tape
- Permanent marker
- Measuring spoons
- Sugar (at least ¾ cup)
- Measuring cup
- Warm water, typically 43-46°C (about 110°F–115°F), but consult the recommendations on your yeast package
- Clock or timer
- Lab notebook
Disclaimer: Science Buddies participates in affiliate programs with Home Science Tools®, Amazon.com, Carolina Biological, and Jameco Electronics. Proceeds from the affiliate programs help support Science Buddies, a 501(c)(3) public charity, and keep our resources free for everyone. Our top priority is student learning. If you have any comments (positive or negative) related to purchases you've made for science projects from recommendations on our site, please let us know. Write to us at [email protected].
Experimental Procedure
For health and safety reasons, science fairs regulate what kinds of biological materials can be used in science fair projects. You should check with your science fair's Scientific Review Committee before starting this experiment to make sure your science fair project complies with all local rules. Many science fairs follow Regeneron International Science and Engineering Fair (ISEF) regulations. For more information, visit these Science Buddies pages: Project Involving Potentially Hazardous Biological Agents and Scientific Review Committee. You can also visit the webpage ISEF Rules & Guidelines directly.
Setting Up the Gas Collection Apparatus
-
Remove the small red cap from one of the squeeze bottles. Then connect the tubing to the tip opening, as shown in Figure 2. Make sure that you have a tight fit.
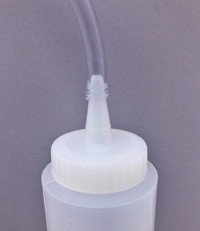
Figure 2. Tube connected to the bottle opening.
-
You will be collecting carbon dioxide from the yeast by displacing water trapped in an inverted graduated cylinder. Here's how to set it up:
- Fill your plastic dishpan (or bucket) about one-third full with water.
-
Fill the 100-mL graduated cylinder with water.
- If your dishpan is deep enough, fill the graduated cylinder by tipping it on its side inside the dishpan. Allow any bubbles to escape by tilting the cylinder up slightly, while keeping it under water. Keeping the opening of the cylinder under water, turn it upside down and attach it to the side of the dishpan with packing tape (or have your helper hold it in place).
- If your dishpan is not deep enough, fill the graduated cylinder completely using the faucet and cover the top tightly with plastic wrap. Quickly invert the cylinder and place the opening in the dishpan, beneath the surface of the water. Remove the plastic wrap. Attach the cylinder to the side of the tub with packing tape (or have your helper hold it in place).
-
The graduated cylinder should now be upside down, full of water and with its opening under the surface of the water in the dishpan. Place the free end of the tubing from the plastic bottle inside the graduated cylinder. Your apparatus is now ready to trap carbon dioxide from the yeast (see Figure 3).
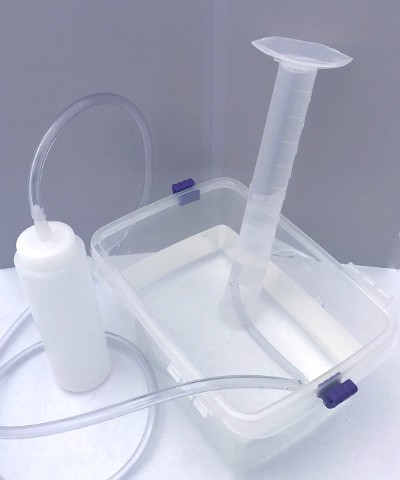
A graduated cylinder is placed upside-down in a tub of water and a plastic tube enters the cylinder from underwater. The plastic tube is connected to the nozzle of a squeeze bottle. Air from the squeeze bottle will be funneled into the upside-down cylinder and will be trapped by the water below.
Figure 3. Picture of the inverted graduated cylinder gas collection apparatus.
- You can test your gas collection apparatus by removing the tube from the bottle top and blowing gently into the tube. The bubbles you create should be captured inside the cylinder. (You will need to reconnect the tube to the bottle and re-fill the cylinder before starting your experiment.)
/-/https/www.sciencebuddies.org/cdn/Files/12486/36/bottle-tube-connection.jpg)
/-/https/www.sciencebuddies.org/cdn/Files/12485/41/gas-collection-setup-1.jpg)
Running the Experiment
- Make a data table in your lab notebook to record your data in.
- The conditions you will be testing are with oxygen and without oxygen. You will do at least three trials for each condition.
- Label one bottle "+air" and the other bottle "−air".
- You will be making one solution at a time (unless you decide to set up more than one gas collection apparatus). It is important to use the same water temperature each time you make a solution, since yeast activity is temperature-dependent.
- Test the yeast with a solution that has oxygen.
- Boil ½ cup of water and let the water cool to between 43–46°C (about 110–115°F).
- Dissolve 1 teaspoon (tsp.) of sugar in ½ cup of warm water. Stir slowly and gently.
- When the sugar is fully dissolved, aerate the solution with the aquarium aerator pump and airstone, as shown in Figure 4, below. After 5 minutes, stop aerating the solution.
- Next add and mix in ½ tsp. of yeast.
- Pour the entire solution into the "+air" bottle. Be sure to note the actual temperature of the water in your lab notebook.
- Cap the bottle tightly with your "tube cap," and place the open end of the collection tube inside your gas collecting cylinder. Note the starting time in your lab notebook.
- There should be water in the tubing as soon as it is submerged in the water. The CO2 gas will push some water out of the tubing before the graduated cylinder starts to fill with CO2 gas.
- Within 5–10 minutes, the yeast solution may start foaming, and you may see bubbles collecting in the graduated cylinder. If you observe them, note the time when you first start seeing bubbles in your lab notebook.
- To promote oxygen circulation in the yeast solution, periodically gently "swirl" the bottle to stir the contents.
- Decide how long to collect CO2 (somewhere between 15–30 minutes is probably good, but you may need to adjust for your particular conditions). Use the same amount of time for all of your tests.
- Note: Do not let the graduated cylinder become completely filled with CO2, but instead stop it before this point. If you let it become completely filled, and the next condition you test makes even more CO2, this could lead to poor and inaccurate results because your graduated cylinder may fill up before your test time is over.
- Tip: If your solution makes a large amount of CO2 very quickly, you can try to make it produce less CO2 by using less sugar and possibly less yeast. For example, you could repeat this step using ½ tsp. sugar (instead of 1 tsp.) and ¼ tsp. yeast (instead of ½ tsp.).
- When the time is up, note how much CO2 was collected. Record your results in the data table in your lab notebook.
/-/https/www.sciencebuddies.org/cdn/Files/6525/6/aerator-aquarium-pump-aerating.JPG)
Figure 4. Aeration of the sugar solution using the aquarium aerator pump and airstone.
- Re-fill your gas collection cylinder to reset your gas collection apparatus. Carefully rinse out the yeast solution from the bottle.
- Repeat steps 4 and 5 at least two more times.
- You should run at least three separate trials for each condition.
- Repeat steps 4–6 but this time test the solution without oxygen by making the following changes:
- Skip step 4 c so that you do not aerate the solution.
- Boiling the water should have minimized the dissolved oxygen in the water.
- In step 4 e, pour the solution into the "-air" bottle and cap it, placing the open end of the collection tube inside your gas collecting cylinder.
- Skip step 4 h, as you do not want to promote oxygen circulation this time.
- Be sure to note the starting time in your lab notebook and, if you observe them, note the time when you first start seeing bubbles in your lab notebook.
- Skip step 4 c so that you do not aerate the solution.
Analyzing Your Data
- Calculate the average volume of the CO2 produced for each condition you tested and write this in your lab notebook.
- Make a graph of your results.
- Write the different conditions ("+air", "-air") on the x-axis (the horizontal axis).
- Plot the corresponding average volume of CO2 produced on the y-axis (the vertical axis).
- Which condition produced more CO2? What is the ratio of CO2 production between the two conditions? Is this consistent with your expectations from your background research?
Ask an Expert
Variations
- For a more advanced science project, investigate what happens if you double the amount of sugar. You will need to do more background research on yeast metabolism for this science project.
- For other science projects that explore CO2 production in yeast, take a look at:
Careers
If you like this project, you might enjoy exploring these related careers:
/-/https/careerdiscovery.sciencebuddies.org/cdn/Files/1486/17/pexels-photo-4033018.jpg)
/-/https/careerdiscovery.sciencebuddies.org/cdn/Files/940/18/pexels-photo-1267347.jpg)
/-/https/careerdiscovery.sciencebuddies.org/cdn/Files/962/18/pexels-photo-4299436.jpg)
Contact Us
Our kits are developed in partnership with Home Science Tools®. If you have purchased a kit for this project, Home Science Tools® is pleased to answer any questions.In your email, please follow these instructions:
- Include your Home Science Tools® order number.
- Please describe how you need help as thoroughly as possible:
Examples
Good Question I'm trying to do Experimental Procedure step #5, "Scrape the insulation from the wire. . ." How do I know when I've scraped enough?
Good Question I'm at Experimental Procedure step #7, "Move the magnet back and forth . . ." and the LED is not lighting up.
Bad Question I don't understand the instructions. Help!
Good Question I am purchasing my materials. Can I substitute a 1N34 diode for the 1N25 diode called for in the material list?
Bad Question Can I use a different part?
Contact Support

/-/https/img.youtube.com/vi/nhOyKdeRPXA/0.jpg)
/-/https/img.youtube.com/vi/XrJ_zLWFGFw/0.jpg)
/-/https/img.youtube.com/vi/67hDDnlqaKc/0.jpg)