Take a Musical Step Back in Time: Make Your Own Phonograph from Everyday Items
Abstract
Don't you just love listening to music? In the 1980s, people listened to music on the Sony® Walkman®. Now, people listen to their favorite tunes on MP3 players and on their Apple® iPhonesTM. But listening to music on devices actually started in the late 1800s and early 1900s. In those days, people would gather around their phonograph to listen to their favorite tunes—people were just as amazed with the phonograph as you would be to handle an iPhone. In this physics science fair project, you will make a simple pickup and stylus and see if you can play back music from a vinyl record album, investigating different membrane materials and pickup shapes.Summary
Michelle Maranowski, PhD, Science Buddies
- Sony® is a registered trademark of Sony Corporation.
- Walkman® is a registered trademark of Sony Corporation.
- Apple® is a registered trademark of Apple, Inc.
- iPhoneTM is a trademark of Apple, Inc.
- Scotch® is a registered trademark of 3M.
/-/https/www.sciencebuddies.org/cdn/Files/3935/5/Music_img020.jpg)
Objective
To investigate whether simple materials can be put together to play back sound from a vinyl record album, and to determine which materials produce the best sound.
Introduction
Everybody loves listening to music—from rock to classical to punk, everybody has a style of music that appeals to them. Different people like different music. What is not different about people is how we listen to music. We use CD players, MP3 players, and even telephones to listen to music. The kind of media that is used in these devices is digital. This means that the sound is represented by ones and zeroes. But this is a relatively new way to represent sound. From the early 20th century until the early 1980s, music was provided to listeners on plastic (vinyl) discs, called record albums or on a cassette tape. These forms are an analog method of listening to music and sound. People would rush out to purchase their favorite music on a record album, put it on their record players and waltz, boogie, and disco the night away.
But when was the beginning of listening to recorded music? In 1857, Edouard-Leon Scot de Martinville devised and patented a phonoautograph. This machine could record sound, but could not play the sound back. In 1877, French scientist Christopher Cros developed the theory of phonography. He described how to record and to play back, but was not able to actually build a working model. At around the same time, in the year 1877, Thomas Alva Edison was working on a system that would transcribe telegraphic messages through indentations on paper tape. He noticed that when he ran a needle over the indentations, running at a high enough speed, he could hear sounds. This gave him the idea to make a machine that would record sounds by making indentations in a material with a needle and playing back the sound by running the needle over the indentations. He called his machine the phonograph. Edison experimented with a diaphragm, which had an embossing point held against a metal cylinder, wrapped with tin foil. In 1878, Edison established the Edison Speaking Phonograph Company to handle selling his invention. He saw his initial invention as a tool that could be used to help with the recording of important business meetings, and a way to preserve languages.
The original phonograph had two needles or styluses; one for recording and one for playback. When you spoke into the mouthpiece (or horn), the sound vibrations from your voice would make the diaphragm vibrate and the stylus connected to the diaphragm would make a groove in the foil-covered cylinder as it rotated. The stylus would also move up and down, making indentations in the groove, as it vibrated, due to the sound vibrations. To play back the sound, the second stylus was aligned with the groove in the cylinder and the cylinder rotated. The stylus' up-and-down motion due to the indentations in the groove would cause the diaphragm to vibrate. The vibrations in the diaphragm set the particles of air around in vibrational motion. Eventually, the vibrating particles hit the eardrums in our ears and convert the vibrations into sound. The vibrations from the phonograph's diaphragm are amplified by the horn so that we can better hear the sound.
In this physics science fair project, you will experiment with playing back sound from a vinyl record. You will investigate different diaphragm materials, along with different shapes of amplifiers. Remember that just as Thomas Edison said, "Genius is 1% inspiration and 99% perspiration," so get to work!
/-/https/www.sciencebuddies.org/cdn/Files/3935/5/Music_img020.jpg)
Figure 1. Thomas Alva Edison seated with his invention, the phonograph. (Courtesy of The Library of Congress.)
Terms and Concepts
- Digital
- Analog
- Phonograph
- Diaphragm (acoustics)
- Vibration
- Amplification
Questions
- How did Alexander Graham Bell improve upon Edison's phonograph?
- Who invented the replacement for the phonograph cylinder? Why was this an improvement?
- How does the phonograph's playback feature work?
- How does the vibration of the phonograph's diaphragm become something that we can hear?
Bibliography
- The Library of Congress. (n.d.). The History of the Edison Cylinder Phonograph. Retrieved August 7, 2009.
- PBS.org. (2002). The Challenge: Record a Sound or Voice. Retrieved August 7, 2009.
- The Physics Classroom. (n.d.). Sound Waves and Music. Retrieved August 7, 2009.
Materials and Equipment
- Tin cans, emptied and completely cleaned out (3); try to find cans of different sizes and shapes, like soup cans and small tomato paste cans.
- Can opener
- Aluminum foil (1 roll)
- Rubber bands (1 box)
- Sewing needle, size 9 or 10 (1)
- Scotch® tape ( 1 roll)
- Vinyl record albums (3–4). Check your local thrift shop to find record albums, or you can try garage sales or flea markets. Try to choose records from the same category of music, i.e. all rock, all country, all classical, etc. It will make it easier to compare the level of sound. The records used in this experiment will be permanently damaged, so don't use someone's favorite record album.
- Turntable or lazy Susan (1); go to you local thrift shop to find a turntable, or you can try garage sales or flea markets. If you can't find a turntable, you can purchase a lazy Susan at your local home goods store.
- Latex balloons (1 bag)
- Scissors
- Funnel, plastic (1); available at local home goods or auto parts stores
- Volunteers (3); one of the volunteers should be an adult
- Lab notebook
Experimental Procedure
- Using the can opener, take off both ends of one of your tin cans. Discard the ends. Make sure that the rims of your can are smooth and free of sharp burrs. You should now have a tin tube.
- Take a piece of aluminum foil and wrap it tightly over one end of the can, but don't make it so tight that the foil tears or rips. Secure the foil on the end of the can with two rubber bands. The foil will act as the diaphragm and vibrate.
-
Use a piece of Scotch tape and tape half of the needle down to the foil-covered opening. The other half should hang off the edge. See Figure 2.
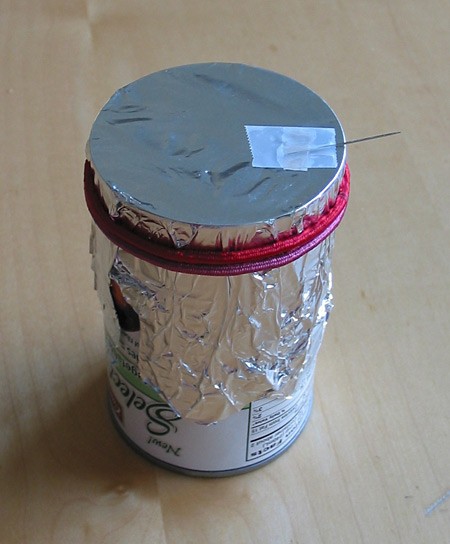
Figure 2. Tin can with foil diaphragm and needle assembly.
-
Place a record on the turntable. If you were not able to find a turntable, then put the record on the lazy Susan. Make sure that the record is centrally placed on the lazy Susan. Turn on the turntable. Set the speed to 33 rotations per minute (rpm).
- If you are using a lazy Susan, then have your adult volunteer spin the lazy Susan so that the record spins at 33 rpms. Have the volunteer spin the lazy Susan to get a feel for how fast it spins. Use a stopwatch to count how many rotations happen in a minute before you start. Once your volunteer gets a feeling for how fast 33 rpms is, he or she should try to stick to spinning the lazy Susan at that same speed for the rest of the experiment.
- Now hold the can-and-needle assembly close to the spinning record, at an angle. Carefully insert the needle onto the first groove of the album. It may take a few tries before you get the placement correct, but keep trying and don't give up. Hold the can lightly and don't push the needle too hard into the album groove. You should hear sound from the record. Try to use just one track or song on the record.
- After you have listened to the sound with the can-and-needle assembly and have confirmed that you can hear sound, remove the needle, rubber bands, and foil from the can. With the scissors, cut off the narrow part of the balloon and stretch it over the opening where the foil used to be. The balloon top forms a latex diaphragm. Slip the rubber bands back onto the can in order to secure the balloon. Tape the needle onto the latex, in the same manner as you did with the foil.
- Repeat step 5 with the latex diaphragm and confirm that you can hear sound. Using a needle on the record will damage the grooves or music tracks, so listen to the sound from a different track on the same side, or you can turn the record over.
- Now remove the needle from the latex and undo the rubber bands. Put some foil over the narrow opening of the funnel and secure the foil with some rubber bands. Make sure that the foil doesn't rip or tear because it won't be able to vibrate properly in that condition. Tape the needle carefully to the foil.
- Repeat step 5 with the funnel, foil, and needle assembly and confirm that you can hear sound. Move to a new track on the record or try a new record.
- Remove the foil diaphragm and the needle from the funnel and replace it with a balloon or latex covering. Tape the needle back onto the latex diaphragm. Repeat step 5 with a new track on the record or a new record.
-
Now repeat the experiment with all of your volunteers, using the four different assemblies discussed above. Have your volunteers rank the sound that they hear from each of the assemblies. Use a scale of 1 to 3, where 1 is "Too Soft," 2 is "Just Right," and 3 is "Too Loud." Also have each volunteer rank how clear the sound (called clarity) is on a scale of 1 to 3, where 1 is "Just Right," " 2 is "Okay," and 3 is "Not Clear." Record the data in a table like the one shown. You might have to listen to records with the different assemblies a couple of times so that everyone can decide on their evaluation scores.
Assembly Volunteer 1 Volunteer 2 Volunteer 3 Self Loudness Clarity Loudness Clarity Loudness Clarity Loudness Clarity Tin can with aluminum foil diaphragm Tin can with latex diaphragm Funnel with aluminum foil diaphragm Funnel with latex diaphragm
/-/https/www.sciencebuddies.org/cdn/Files/3936/5/Music_img021.jpg)
Analyzing Your Data
-
Average the data from the table above and record the data in a table like the one shown below.
Assembly Average Loudness Average Clarity Tin Can with Aluminum Foil Diaphragm Tin Can with Latex Diaphragm Funnel with Aluminum Foil Diaphragm Funnel with Latex Diaphragm - What does the data above tell you? Which amplifier shape produces the best sound? Which diaphragm membrane produces the best sound?
Ask an Expert
Global Goals
The United Nations Sustainable Development Goals (UNSDGs) are a blueprint to achieve a better and more sustainable future for all.
/-/https/www.sciencebuddies.org/cdn/Files/19752/5/E-WEB-Goal-09.png)
Variations
- Try some of the other cans that you found. Compare the loudness and clarity that you get from them with the different membranes.
- Try different sizes of needles. Does the size of the needle affect the sound you hear?
- Try to record the impression of sound. Instead of a needle, attach a ballpoint pen to the diaphragm and speak into the amplifier. Hold the pen against a rotating piece of cardboard. Can you see the vibrations of your voice? How does the speed of the turntable or the lazy Susan affect the vibrations?
- Expand on the previous variation and try recording sound. The PBS.org reference in the Bibliography gives details on how to record sound.
Careers
If you like this project, you might enjoy exploring these related careers:
/-/https/careerdiscovery.sciencebuddies.org/cdn/Files/1450/21/iStock-1227179796.jpg)
/-/https/careerdiscovery.sciencebuddies.org/cdn/Files/1457/17/pexels-photo-3861938.jpg)
/-/https/careerdiscovery.sciencebuddies.org/cdn/Files/1147/17/unsplash-fJebhGIP0P4.jpg)

/-/https/img.youtube.com/vi/6RA9x4wlnW8/0.jpg)
/-/https/img.youtube.com/vi/9RtRKIs21Ws/0.jpg)
/-/https/img.youtube.com/vi/T8tmVMyzu18/0.jpg)