Abstract
Have you ever wondered what it would be like to have an extra sense? What if you could hear above the normal range (ultrasound) like dogs or bats? What if you could see ultraviolet light, like bees or juvenile trout? What if you could see infrared light, like a rattlesnake or boa constrictor? This project shows you how you can use a phone or camera, tripod, and a special filter to take pictures using near infrared illumination. It's a whole new way of looking at the world.Summary
Andrew Olson, Ph.D., Science Buddies
Objective
The goal of this project is to use infrared photography to measure the transmission and reflection of near-infrared light by ordinary objects in our everyday surroundings.
Introduction
This is a project that will have you looking at the world in a whole new way. You can use a smartphone or camera to extend your vision into the near infrared, which is beyond the range of what our eyes can detect. Visible light is just a small portion of the electromagnetic spectrum. Visible light has wavelengths ranging from roughly 400 to 700 nm (1 nm = 10-9 m). The perceived color of the light changes with wavelength (see Figure 1). Shorter wavelengths have higher frequencies and higher energy. Longer wavelengths have lower frequencies and lower energy.
/-/https/www.sciencebuddies.org/cdn/Files/2416/5/Photo_img016.gif)
Below 400 nm is the ultraviolet region of the electromagnetic spectrum. Ultraviolet light is not visible, but has higher energy than visible light (think of sunburn). At even shorter wavelengths are x-rays and beyond that, gamma rays, each with increasing frequency and energy. Infrared light is beyond the other end of the visible spectrum, with wavelengths longer than about 700 nm. This light has lower energy than visible light. Beyond the infrared region of the spectrum are microwaves, and then progressively longer-wavelength (and lower-energy) radiofrequency bands: TV and FM radio, shortwave and AM radio, and finally aircraft and shipping bands.
Infrared light is often divided into three different "bands": near, mid, and far infrared. For infrared photography, it is the near infrared (NIR) band that is detected. As with visible-light photography, NIR photography is capturing reflected light (not intrinsic heat of objects, which is emitted at longer IR wavelengths). What makes this project fascinating is that you get to find out how well (or how poorly) objects in the environment reflect or transmit NIR wavelengths. Since we are accustomed to seeing objects in the visible spectrum, this new way of looking at the world is often surprising.
Terms and Concepts
To do this project, you should do research that enables you to understand the following terms and concepts:
- electromagnetic spectrum
- visible spectrum
- infrared spectrum
- reflection
- transmission
- scattering
Bibliography
- IPAC, date unknown b. Cool Cosmos Home Page, Infrared Processing and Analysis Center, California Institute of Technology. Retrieved April 4, 2006.
Materials and Equipment
To do this experiment you will need the following materials and equipment:
- Tripod
- NIR pass filter (blocks visible light; e.g., Hoya R72, Wratten 89b (passes some visible light), B+W 092)
- An infrared remote control. Note that not all remotes are infrared. TV remotes that you must point directly at the TV are infrared (they require "line of sight" because in the infrared light will be blocked by solid objects). Many remotes for streaming devices like Apple TV or an Amazon Fire TV Stick are not infared. You can tell because they work even if you do not point them directly at the TV (they use a different part of the electromagnetic spectrum that can pass through some solid objects, like WiFi and cellular signals can).
- A camera, this can be either:
- a smartphone where you can control manual/pro camera settings
- a digital camera with near IR sensitivity and the ability to manually control long exposures, or
- a film camera with manual exposure control (use both IR-sensitive and normal film).
- Photo editing software will be useful for analyzing results with digital photos.
Experimental Procedure
-
If you are planning to use a phone or digital camera for this project, it is a good idea to test its sensitivity to NIR before spending your money on a visible light blocking filter. Sensitivity to NIR for digital camera determined by the intrinsic properties of the light-sensing chip, plus the IR transmission of the filters (color, and IR blocking) in the light path. Silicon-based sensors typically do have a measurable response to NIR. Because of this, camera manufacturers often use an IR-blocking filter in front of the sensor, so that only visible light is recorded. (For a film camera, sensitivity is determined by the film, so IR-blocking filters are typically not used.) Here's a "quick-and-dirty" method for testing the IR sensitivity of your digital camera (McCreary, 2004):
- Put your camera in Program mode at ISO 100.
- Have a helper point a TV, camera or other IR remote into the lens from no more than 12" away. If you can see your camera's LCD screen from the front of the camera, you can do this yourself. Remember that not all remotes are IR (see materials list).
- Have your helper press any button on the remote.
- Look for the IR beam in the camera's through-the-lens (TTL) LCD screen or electronic viewfinder.
- Compare the IR beam that you see with the images in Figure 2. If the IR beam looks about as bright as the one on the left, you should be able to get handheld NIR images with a Hoya 72 or Wratten 89b filter. If the IR beam is as dim as the one on the right, you will need to use a tripod and long exposures. If the IR beam looks even dimmer, you should consider using a film camera or choose another project.
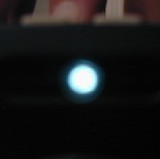
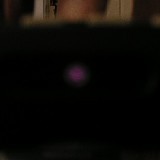 Figure 2. Example responses to IR remote signal. On the left is a bright image. If your camera responds similarly, you should be able to take handheld NIR photos in daylight. On the right is an example of a dim image. If your camera responds like this, you will need a tripod and long exposures for NIR photography.
 - Do background research to learn about how ordinary objects transmit and reflect NIR light. What are good sources of NIR light?
- Take photographs of the same scene using NIR and visible light. It will be easier to make comparisons if you convert the images to grayscale (or use black-and-white film, if using a film camera).
- Note that it is somewhat tricky to compare grayscale values between two images taken with different lighting. You will either have to use relative comparisons within each image, or find an object whose reflectivity is similar in visible and NIR and use it to set a common scale for both images.
- Compare the sky in visible and infrared photos. What happens when the sky is hazy, or foggy? Hint: use known distances in your NIR and visible-light photographs to measure any effects.
- Compare reflectivity of ordinary objects, both natural and manmade, in both visible and NIR illumination. What differences do you notice? Can you explain them?
/-/https/www.sciencebuddies.org/cdn/Files/2417/5/Photo_img017.jpg)
/-/https/www.sciencebuddies.org/cdn/Files/2418/5/Photo_img018.jpg)
Ask an Expert
Variations
- Try different light sources: sunlight, incandescent bulb, fluorescent tube, xenon flash.
- Can you "see" heat with NIR? Photograph identical cups holding water at different temperatures (or the same cup photographed sequentially with water at different temperatures). Use ice cold, room temperature and very hot water (be careful!) Do you see any differences?
- Investigate IR reflection and transmission of different types of window glass. Use either sunlight or incandescent light as the light source.
Careers
If you like this project, you might enjoy exploring these related careers:
/-/https/careerdiscovery.sciencebuddies.org/cdn/Files/1640/26/Fyysikot_tyossaan.jpg)
/-/https/careerdiscovery.sciencebuddies.org/cdn/Files/1649/17/pexels-photo-1181398.jpg)

/-/https/img.youtube.com/vi/_uruQS6EJyI/0.jpg)
/-/https/img.youtube.com/vi/tXWv9JbmnKs/0.jpg)
/-/https/img.youtube.com/vi/sjHCztFSxTw/0.jpg)