Abstract
Pinhole cameras are not just for grannies! Even compared to all of the latest technology, a pinhole camera still gets beautiful results. Find out how this very simple aperture design works to control the way light enters the lens of your camera.Summary
Sara Agee, Ph.D., Science Buddies
/-/https/www.sciencebuddies.org/cdn/Files/2476/3/Photo_img032.jpg)
Objective
In this experiment you will investigate how light passes through pinhole apertures of different sizes.
Introduction
All photography, whether it is with a digital or manual camera, depends upon exposure to light. The light enters the camera through the lens. Inside of the lens is a tiny hole that is responsible for controlling how much light enters the camera. This little hole is called an aperture.
/-/https/www.sciencebuddies.org/cdn/Files/2475/3/Photo_img031.jpg)
How does the aperture work? The size of the aperture is controlled by something called a diaphragm. The size of the opening changes when the diaphragm is rotated, making the aperture larger or smaller. Control over the diaphragm opening and aperture size can be either manual (by changing the f-stop) or automatic. Aperture size is usually measured in f-numbers.
/-/https/www.sciencebuddies.org/cdn/Files/2476/3/Photo_img032.jpg)
The simplest type of aperture is called a "pinhole" and was used in the early days of photography in a pinhole-camera. This type of aperture does not use a diaphragm to work, so it stays the same size and is not adjustable. But the design is so simple that you can have many different pinholes of different sizes and switch them if you need to change the aperture size. People still use pinhole cameras today because of the simplicity of the design and the beautiful photography that results.
In this experiment you will investigate the relationship between light and aperture size. After making a series of differently sized pinholes in an aluminum pie plate, you can use a flashlight and a blank piece of paper to measure the amount light that passes through each aperture.
Terms and Concepts
To do this type of experiment you should know what the following terms mean. Have an adult help you search the internet, or take you to your local library to find out more!
- lens
- exposure
- aperture
- diaphragm
- pinhole camera
- How will light pass through the aperture?
- How does the size of the aperture change the amount of light passing through?
- How is this important for camera design, function and use?
Bibliography
- Wilson, Tracy V., Nice, K., and Gurevich, G. (2005). How Digital Cameras Work. HowStuffWorks, Inc. Retrieved April 20, 2006.
- MIR. (2000). The Resource Page: What is an Aperture? Maylasian Internet Resources (MIR), Photography in Maylasia. Retrieved April 30, 2006.
- Look up the diameter, in millimeters (mm), of your wires with this wire gauge table:
Wikipedia contributors. (2014, April 14). American wire gauge. Wikipedia, The Free Encyclopedia. Retrieved April 15, 2014.
Materials and Equipment
- 9 aluminum pie pans (usually sold with three pans in a package)
- short wire clippings of assorted sizes and known gauge. You can get different gauges of wire at a local Radio Shack® or an online vendor like Jameco Electronics.
- toothpick
- small flashlight
- 4 Styrofoam cups
- secure packaging, masking or duct tape
- blank wall
- piece of paper
- ruler
Experimental Procedure
- First you will make a stand to hold your pans and the light bulb at a set distance above a piece of paper.
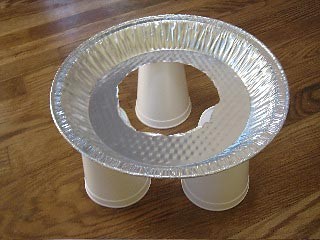
- Take one of the pie pans and cut out the circle in the center about the size of the rim of the cup. This hole does not need to be perfect and it will not effect your results.
- Glue or tape three cups to the outer perimeter of the pan, making sure that they are evenly spaced. The stand should resemble a tripod.
- Next, you will make an assortment of pinholes in the rest of the pie pans using the pieces of wire. Write down the gauge of the piece of wire used to make each pinhole on the pie pan.
- Put one hole in each pie pan, right in the center. Push gently so that the hole is uniform in size and so the aluminum doesn't tear around the edges.
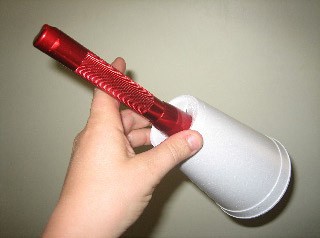
- Next, you will make the illuminator. Turn the cup over and place the flashlight on top of the cup, with the light bulb side down.
- Trace the outline of the flashlight onto the cup.
- Cut out the circle by poking through the cup along the outline with a toothpick to perforate the edges and then remove the circle.
- Push the flashlight slightly into the circle so that it fits snugly and tape around the edges to secure the cup to the flashlight.
- Now you are ready to make your measurements. You will need a data table to keep track of your data:
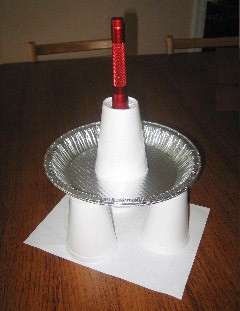
Swipe left to see morePie Pan Diameter of Pinhole Diameter of Light 1 2 3 etc. - You will also need to assemble the complete apparatus in a dark room. Put the tripod on top of a piece of paper. Put one of the pinhole pie pans on top of the tripod. Put the flashlight cup on top of the pinhole pointing down towards the paper. The complete apparatus looks like this:
- Turn on the flashlight. Trace the perimeter of the circle of light on the piece of paper and measure the diameter across the circle with a ruler. Write the data in your data table.
- Repeat steps 11 and 12 for each pinhole.
- Analyze your results. Make a graph of your data. What happens to the circle of light as the diameter of the pinhole gets larger? Which sizes do you think are best for focusing the light?
/-/https/www.sciencebuddies.org/cdn/Files/2477/3/Photo_img033.jpg)
/-/https/www.sciencebuddies.org/cdn/Files/2478/3/Photo_img034.jpg)
/-/https/www.sciencebuddies.org/cdn/Files/2479/3/Photo_img035.jpg)
Ask an Expert
Variations
- Another factor important for the function of a lens is focus. A lens will focus by changing the distance between the lens (objective) and the aperture. This is called focal length. You can investigate the relationship between focal length and how light is focused through the aperture using a very similar apparatus. The only difference is that instead of changing the apertures, you will change the distance of the pie pan from the piece of paper.
- You can use a digital camera to make your own pinhole camera. See the Science Buddies Starter Kit Digital Pinhole Camera to find out more.
Careers
If you like this project, you might enjoy exploring these related careers:
/-/https/careerdiscovery.sciencebuddies.org/cdn/Files/1640/26/Fyysikot_tyossaan.jpg)
/-/https/careerdiscovery.sciencebuddies.org/cdn/Files/1649/17/pexels-photo-1181398.jpg)

/-/https/img.youtube.com/vi/nCLHMmkFth8/0.jpg)
/-/https/img.youtube.com/vi/sGK1Q7jcEfY/0.jpg)
/-/https/img.youtube.com/vi/lLASgvqAddI/0.jpg)