Abstract
Did you know that when you dip your finger in water and pull it out, the water is actually pulling back on you? Here's a way you can measure how much.Summary
Gardner, R., 2004. Science Fair Projects About the Properties of Matter: Using Marbles, Water, Balloons, and More, Berkeley Heights, NJ: Enslow Publishers.
Calder, V. and D. Plano, 2002. Measuring Surface Tension. Ask A Scientist Physics Archive, University of Chicago, Newton BBS.
/-/https/www.sciencebuddies.org/cdn/Files/18146/5/surface-tension-needle-in-water.jpg)
Objective
The goal of this project is to use a homemade single-beam balance to directly measure the surface tension of a liquid.
Introduction
/-/https/www.sciencebuddies.org/cdn/Files/18146/5/surface-tension-needle-in-water.jpg)
You've seen examples of surface tension in action: water striders walking on water, soap bubbles, or perhaps water creeping up inside a thin tube. What, exactly, is surface tension?
Surface tension is defined as the amount of energy required to increase the surface area of a liquid by a unit amount. So the units can be expressed in joules per square meter (J/m2). You can also think of it as a force per unit length, pulling on an object (Mellendorf, 2002). In this case, the units would be in newtons/meter (N/m). Since the forces are so small, you often see surface tension expressed in millinewtons per meter (mN/m — 1 mN is 1/1000 N). It's a good exercise to do the dimensional analysis and prove that both ways of expressing surface tension—J/m2 and N/m—are equivalent.
The force arises from the mutual attraction between the molecules of the liquid. Do background research on the chemistry of water to learn more about its intermolecular attractions. In particular, you should study up on hydrogen bonding.
In this experiment, you will be making and using a single beam balance to measure the force exerted by surface tension on a needle, floating on the surface of the water. The needle will be attached to your balance, and you will measure how much force is required to pull the needle out of the water. The surface tension of the water is providing the resistance. From your measurements, you will be able to calculate the surface tension of water.
Terms and Concepts
To do this project, you should do research that enables you to understand the following terms and concepts:- Surface tension
- Water molecules
- Hydrogen bonding of water molecules
- Detergent
- Force
Questions
Considering what you have learned about hydrogen bonding in your background research:- Will adding detergent to water increase or decrease the surface tension?
- Will adding rubbing alcohol to water increase or decrease the surface tension?
Bibliography
- Agrawal, A. (n.d.). Fundamentals of Surface Tension/Wettability. Massachusetts Institute of Technology: Non-Newtonian Fluid Dynamics Research Group. Retrieved March 24, 2014.
- Rader, A. (n.d.). Motion Basics: Gravity. Physics4Kids.com. Retrieved March 24, 2014.
- This is an archive of a physics discussion board with information on measuring surface tension:
Calder, V. and Plano, D. (2002). Measuring Surface Tension. Ask a Scientist Physics Archive, University of Chicago, Newton BBS. Retrieved March 24, 2014. - This is an archive of a physics discussion board with information on surface tension units:
Calder, V., Mellendorf, K., and Plano, D. (2003). Surface Tension Units. Ask a Scientist Physics Archive, University of Chicago, Newton BBS. Retrieved March 24, 2014. - A great book with lots of project ideas on the properties of matter:
Gardner, R. (2004). Science Fair Projects About the Properties of Matter: Using Marbles, Water, Balloons, and More. Berkeley Heights, NJ: Enslow Publishers.
Materials and Equipment
To construct a homemade single-beam balance (see Figure 1 in the Experimental Procedure section), you will need the following:- A beam (e.g., drinking straw, piece of stiff cardboard, wooden or plastic ruler)
- A fulcrum (e.g., a pin or nail)
- Metric ruler
- 2 supports of equal height (e.g., two books arranged back-to-back with a small space between them, two cans, two wood blocks)
- Pan for weights (you can make this from foil or paper and tape)
- Needle (or 5 cm length of straightened paper clip wire)
- Thread (for attaching pan and needle to balance)
- Small bit of modeling clay to counterbalance the empty pan
- A small bowl
- Water
- Weights (common pins, drops of water from an eyedropper)
- A way to calibrate them (self-service scale at post office, 10 ml graduated cylinder)
Experimental Procedure
- Do your background research.
- Gather the materials and find a good place to work.

Figure 1. Diagram of a simple single-beam balance - Constructing the balance (refer to Figure 1).
- Take your time and work carefully. You'll get better results.
- Make a support. Figure 2 shows an example.
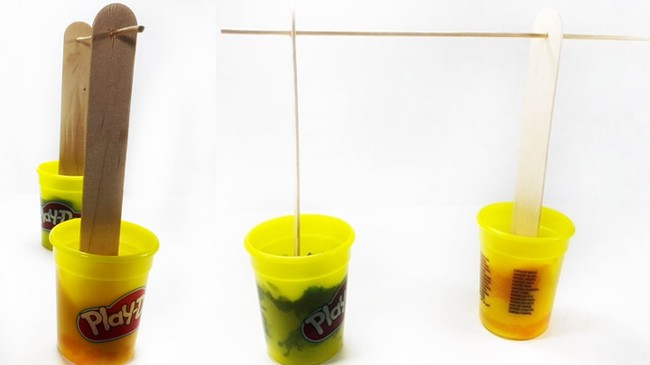
Figure 2. Side and front view of the support structure that will hold the balance beam up. - Construct the balance beam.
- There are many choices for materials. You just need something stiff enough to support a few grams at each end.
- You will need to mark the center point for the fulcrum. Depending on your choice of material, either drill a hole for the fulcrum (e.g., for wood), or simply push it through (e.g., a skewer through a drinking straw, as shown in Figure 3). The beam needs to rotate freely about the fulcrum.
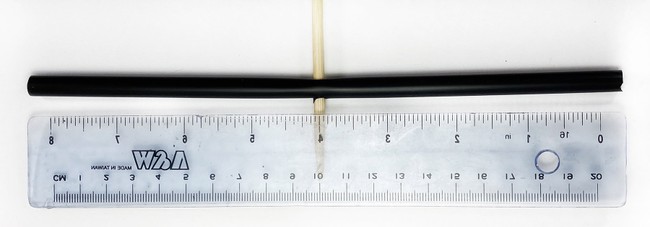
Figure 3. A black straw is perforated In the middle to serve as a balance beam. - You'll also need to make holes at each end of the balance beam, equidistant from the center. Attach loops of thread through the holes (paper clips, or ornament hangers could also work), as shown in Figure 4.
- Push the fulcrum through the center hole of the beam, and place it on the supports as shown in Figure 1, or thread it through the support as shown in Figure 2.
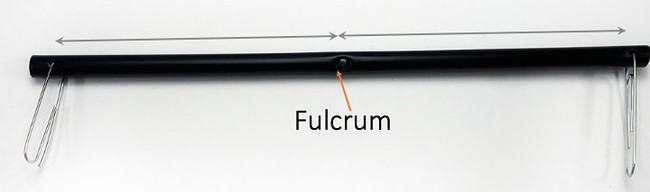
Figure 4. The balance beam is perforated near the middle and at equidistant ends from the fulcrum. - Construct the pan.
- This can be a simple box or dish folded from aluminum foil or other material. (It's square in the diagram only because it was easier to draw.)
- If you make a round pan, three strings will work fine to support it.
- Use a water-resistant material or coat the pan with tape or water-repellent paint.
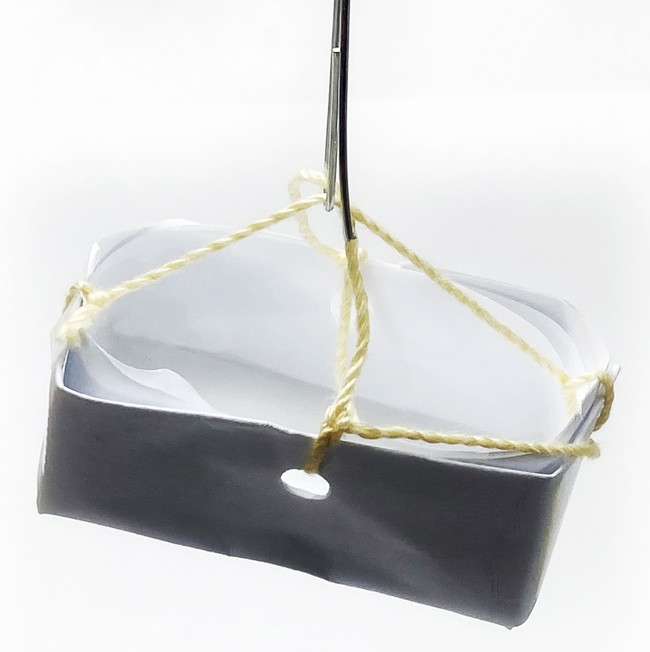
Figure 5. Basket or pan to hold drops of water or pins. - Tie a thread to the center of your needle or paperclip wire. Adjust the thread so that the needle or wire hangs horizontally. The pictures show a thicker string so the string would be visible. For your project, it is better to use thread instead.
- Measuring surface tension.
- Hang the pan from one end of the beam and the needle from the other, as shown in Figure 1 or Figure 6.
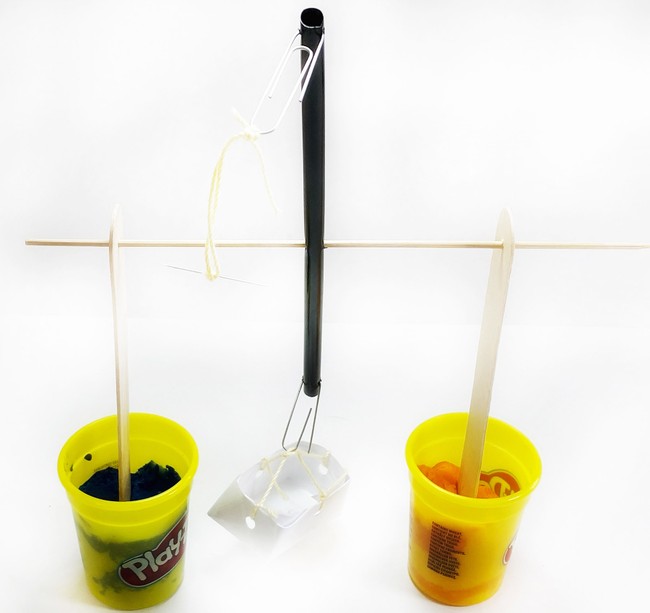
Figure 6. The balance beam with the needle and basket attached. Because the basket is heavier, the balance beam tilts to one side. - Use a small piece of modeling clay as a counterbalance (as shown in Figure 1 or Figure 7) to balance the needle and empty pan.
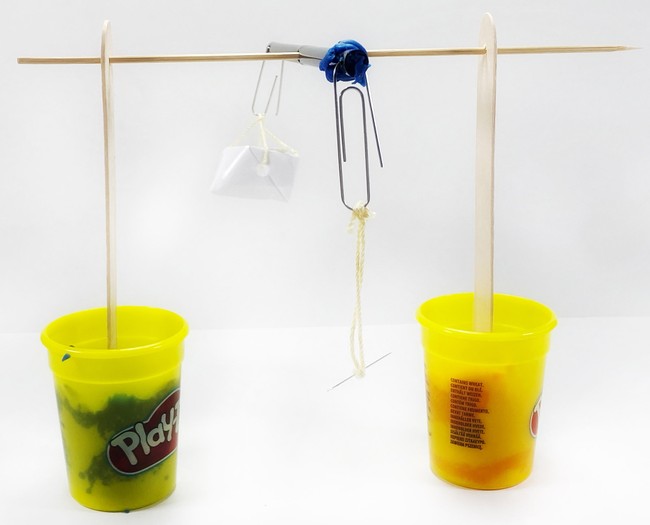
Figure 7. The balance beam is balanced by adding a small piece of blue modeling clay on the lighter end. - Fill the container that the needle will go in with water. Put the container under the needle. You might need to make a platform to put your container with water on so the needle just dips into the water while the string stays taut, as shown in Figure 8.

Figure 8. An instrument to measure surface tension. - Place your container of water so that the needle (or wire), still hanging horizontally, is resting just on the surface of the water. Make sure the string holding the needle is taut (shorten it if necessary).
- You will add small amounts of weight to the pan, and measure the force needed to pull the needle (or wire) free from the surface of the water. The beam will tip as soon as the needle breaks free, as shown in Figure 9.
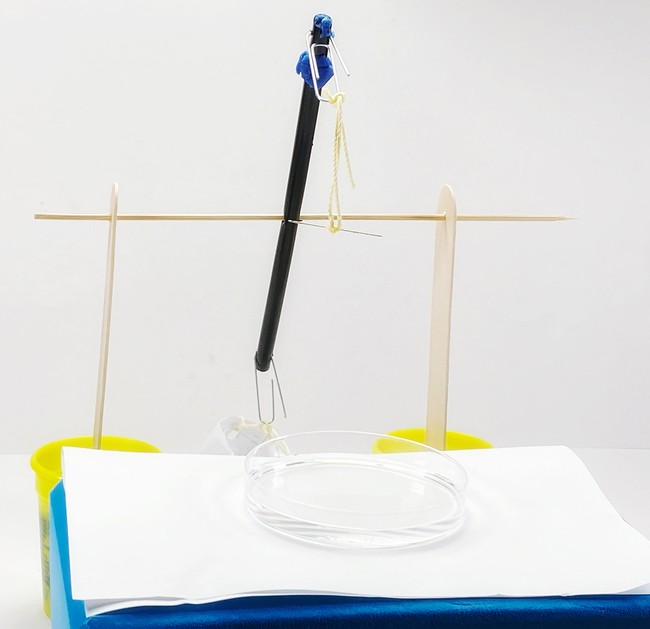
Figure 9. As soon as the surface of the water breaks, the beam tips. - It will not take much weight, so you need to add it in small increments. Here are two different methods you could try.
- Use common pins as your weights, adding them one at a time. Calibrate them by weighing a bunch of pins on a postal scale, and dividing by the number of pins to get the weight per pin.
- Use drops of water from an eyedropper or plastic transfer pipette. You can calibrate the water drops by counting how many drops are needed to make, say, 5 ml. Each milliliter of water weighs 1 g, so with your count you can calculate how much each drop weighs.
- Try both methods and see how your results compare!
- Make sure you record which method(s) you used, and how many pins or drops of water it took to completely remove the needle from the water. A table like Table 1 can help collect the data.
Swipe left to see more
Table 1. Example table to collect experimental data.Weight needed to break the surface tension
Length of needle: ______meter.Trail 1 Trail 2 Trail 3 Trail 4 Trail 5 Average Drops of water Pins - Repeat the measurement (steps 4.a-4.e) at least five times (more is better), to ensure consistent results. If something goes wrong (e.g., you accidentally tap the pan and pull the needle out of the water), repeat the trial from the beginning.
- Average your results.
- The force you will be measuring can be expressed by the equation:
F = 2sd, where
- F is the force, in newtons (N),
- the factor of 2 is because the film of water pulled up by the needle (or wire) has 2 surfaces,
- s is the surface tension per unit length, in units of newtons/meter (N/m), and
- d is the length of the needle (or wire), in units of meters (m).
- To convert grams to the force, F, you have to account for gravity pulling down on the mass in the pan. Calculate the total mass in the pan by multiplying the number of pins (or drops of water) by the mass of a single pin (or drop of water), which you calculated in step 4.f. Then multiply the total mass (in grams) by 9.81×10⁻³ N/g or 9.81/1000 N/g (for more information, see the reference about gravitational force in the Bibliography).
- You can rearrange the equation above to solve for s, the surface tension of water. Measure the length of the needle (or wire), and you'll have all the information you need to calculate the surface tension of water.
- How do you know that you are measuring surface tension, and not an attractive force between the needle (or wire) and the water? Here's a good tip from Robert Gardner's book (Gardner, 2004). Surface tension is the cohesive force between water molecules. Observe the needle (or wire) carefully after it is pulled out of the water. If it remains wet, then it must be the water that pulled apart, and this is the force (surface tension) that you measured. If it is dry, then the adhesive force between the water and the needle broke first, and this is what you measured, not surface tension.
- Hang the pan from one end of the beam and the needle from the other, as shown in Figure 1 or Figure 6.
/-/https/www.sciencebuddies.org/cdn/Files/2195/3/Phys_img010.gif)
/-/https/www.sciencebuddies.org/cdn/Files/18114/7/support-structure-surface-tension-measurement.jpg)
/-/https/www.sciencebuddies.org/cdn/Files/18115/7/measure-middle-of-beam.jpg)
/-/https/www.sciencebuddies.org/cdn/Files/18116/7/balance-beam-distances-from-fulcrum.jpg)
/-/https/www.sciencebuddies.org/cdn/Files/18117/7/basket-to-collect-drops.jpg)
/-/https/www.sciencebuddies.org/cdn/Files/18118/7/making-surface-tension-instrument.jpg)
/-/https/www.sciencebuddies.org/cdn/Files/18120/7/surface-tension-instrument-2.jpg)
/-/https/www.sciencebuddies.org/cdn/Files/18119/7/surface-tension-experiment.jpg)
/-/https/www.sciencebuddies.org/cdn/Files/18121/7/surface-tension-measurement-end.jpg)
Ask an Expert
Variations
- Add a drop of liquid dish detergent to the water in your dish, mix it by stirring gently (you don't want a lot of bubbles), and measure the surface tension again. Do you think it will be higher or lower than for plain tap water?
- Try measuring the surface tension of other liquids, (e.g., rubbing alcohol, cooking oil). Remember note 2j, in the Experimental Procedure section.
- For another method of investigating surface tension, see: Build a Motorboat Powered by Surface Tension.
- For a project on the chemistry of surface tension, see: Measuring Surface Tension of Water with a Penny.
Careers
If you like this project, you might enjoy exploring these related careers:
/-/https/careerdiscovery.sciencebuddies.org/cdn/Files/1450/21/iStock-1227179796.jpg)
/-/https/careerdiscovery.sciencebuddies.org/cdn/Files/1692/17/unsplash-G1Xk2C87Rb8.jpg)
/-/https/careerdiscovery.sciencebuddies.org/cdn/Files/1640/26/Fyysikot_tyossaan.jpg)
/-/https/careerdiscovery.sciencebuddies.org/cdn/Files/1457/17/pexels-photo-3861938.jpg)

/-/https/img.youtube.com/vi/8s9hg4C80Ik/0.jpg)
/-/https/img.youtube.com/vi/dZhmcai85Y0/0.jpg)
/-/https/img.youtube.com/vi/2MOFAHGUGps/0.jpg)