Abstract
A siphon is a handy device for emptying out a liquid reservoir that has no drain. For example, they're great for cleaning fish tanks. An interesting aspect of a siphon in action is that the liquid flows "uphill" for a portion of its journey through the tube. This project asks the question, is there a maximum height for that uphill part of the siphon?Summary
Andrew Olson, Ph.D., Science Buddies
Sources
This idea for this project is from an entry to the 2007 San Mateo County Science Fair, "Siphoning: What Is the Maximum Height Achievable?" (project authors not identified).
/-/https/www.sciencebuddies.org/cdn/Files/3101/5/Phys_img054.jpg)
Objective
The goal of this project is to measure the maximum intermediate height that siphon can achieve and remain functioning.
Introduction
If you've ever had to clean out a fish tank, you know the practical value of a siphon. A siphon allows you to drain water from a higher reservoir to a lower one, using a tube that goes up and over the edge of the higher reservoir, then down to the lower one (see Figure 1, below). You can initiate the siphon by applying negative pressure to the lower end of the tube (in other words, sucking on it like a straw). Once the siphon has started, the water will keep flowing on its own.
/-/https/www.sciencebuddies.org/cdn/Files/3100/5/Phys_img053.png)
Figure 1. Illustration of the siphon principle. A closed tube allows water to be drained to a lower reservoir from a higher reservoir. Within the tube, the water level exceeds the height of the higher reservoir. A siphon is usually initiated by applying negative pressure to the lower end of the tube. Once the water is flowing, the pressure difference between the inlet and outlet drives the water through the uphill section of the siphon
For part of the trip, the water flows "uphill" through the tube. How can this be? When you suck on the tube, you create a partial vacuum (lower pressure) inside the tube. Normal air pressure, pushing down on the surface of the liquid in the reservoir, then forces some liquid up into the tube. As soon as the water inside the tube reaches the crest and starts flowing "downhill" to the lower reservoir, the flow keeps going on its own. Now the flowing water itself is creating the lower pressure at the drain end of the tube.
An interesting question to ask is: "How high can the crest of the siphon tube be before the siphon fails and the water stops flowing?" This project is designed to answer that question.
Terms and Concepts
To do this project, you should do research that enables you to understand the following terms and concepts:
- Siphon
- Atmospheric pressure
- Gravity
- Partial vacuum
Questions
- How does a siphon allow water to flow "uphill"?
Bibliography
- Here are some good sources to get you started on researching siphons:
- Wikipedia contributors, 2007. Siphon, Wikipedia, The Free Encyclopedia. Retrieved July 26, 2007.
- Adams, C., 2001. How Does a Siphon Work? The Straight Dope®, Chicago Reader Online. Retrieved July 26, 2007.
- For information on atmospheric pressure, try these references:
- Benson, T. Air Pressure, National Aeronautics and Space Administration Glenn Research Center. Retrieved March 8, 2018.
- Wikipedia contributors, 2007. Atmospheric Pressure, Wikipedia, The Free Encyclopedia. Retrieved July 26, 2007.
Materials and Equipment
To do this experiment you will need the following materials and equipment:
- 2 large buckets: 5 gallon (19 L) size works well
- Sturdy table (for raising height of one bucket)
- 22 m of clear tubing
- Water
- Food coloring
- Two pulleys (one large, one small)
- Attachment hardware (e.g., a wood screw) for the small pulley
- 22 m of heavy string or twine
- ~10 m tall support for pulleys
- One idea is to attach a pulley support to a second-floor balcony.
- Another idea is to construct a 10 m long pole from several pieces of 2" x 4" lumber. The pieces can either be glued or screwed together with lap joints (overlapping sections). The pole will need to be attached firmly to some external support.
- 10 m (or greater) tape measure
Experimental Procedure
- Do your background research so that you are familiar with the terms, concepts, and questions, above.
-
Figure 2 below shows the essentials of the experimental apparatus for this project.
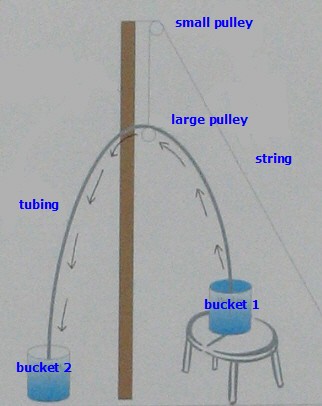
Figure 2. Diagram of the experimental apparatus.
- The source bucket (bucket 1) must be higher the outlet bucket (bucket 2).
- The source bucket should always contain the same amount of water at the start of each test. Draw a "fill-to" line inside the bucket to make it easy to start with the same water level.
- Attach the string securely to the large pulley, then pass the string over the small pulley as shown. The string can now be used to raise or lower the large pulley.
- Pass the tubing over the large pulley so that the tubing can be raised or lowered as desired.
- Attach the inlet end of the tubing firmly to the side of the source bucket, so that the opening is near the bottom of the bucket.
- Tip: if you add food coloring to the water it will make it easier to see whether or not it is flowing through the tube.
- Tip: always start with the same amount of water in the source bucket.
- Apply negative pressure to the outlet end of the tubing to get the siphon started.
- Measure the time it takes to siphon a standard amount of water (e.g., two liters) from the source bucket to the outlet bucket.
- Use the string to raise the tubing to successively higher intermediate heights. Repeat the flow rate measurement at each height. Make at least three measurements (more is better) at each height.
- Calculate the average flow rate for each height.
- More advanced students should also calculate the standard deviation.
- At what height did the siphon stop working?
/-/https/www.sciencebuddies.org/cdn/Files/3101/5/Phys_img054.jpg)
Ask an Expert
Variations
- What happens if you use a different starting height for the source bucket?
- What happens if you change the water level in the source bucket?
Careers
If you like this project, you might enjoy exploring these related careers:
/-/https/careerdiscovery.sciencebuddies.org/cdn/Files/1450/21/iStock-1227179796.jpg)
/-/https/careerdiscovery.sciencebuddies.org/cdn/Files/1133/17/pexels-photo-3862135.jpg)
/-/https/careerdiscovery.sciencebuddies.org/cdn/Files/1457/17/pexels-photo-3861938.jpg)
/-/https/careerdiscovery.sciencebuddies.org/cdn/Files/1125/17/pexels-photo-3862390.jpg)

/-/https/img.youtube.com/vi/M0eTiAE3gI0/0.jpg)
/-/https/img.youtube.com/vi/XCFCEadgXIA/0.jpg)
/-/https/img.youtube.com/vi/Kfvt5zs2se8/0.jpg)