Abstract
Did you know that you can lift an object that's heavier than you are? Just use a lever! In this science project you'll build a tabletop lever and measure how much effort it takes to lift an object using it.Summary
/-/https/www.sciencebuddies.org/cdn/Files/3216/5/Phys_img081.jpg)
Objective
In this science project you will build a tabletop lever and investigate how changing the length of the effort arm affects the amount of effort it takes to lift an object.
Introduction
Today, skyscrapers, homes, and other buildings are all created using the help of machines to lift heavy pieces of wood, steel, and stone into place. But have you ever wondered how large structures, like the pyramids in Egypt, were built before cranes and bulldozers existed? The answer is that they used simple machines. Simple machines are tools like an inclined plane, a pulley, a wheel and axle, or a lever, that make it easier to do work. These simple machines give the user a mechanical advantage. Mechanical advantage is the multiplication of the effort the user puts in. This means that if you use a lever and the mechanical advantage it provides, you can lift an object that's much heavier than you are because the lever multiplies your effort!
Levers have several important parts. There is a fulcrum, which is the point on which the beam can balance and thus, move freely up and down. The end holding the object (also called the load) that you want to lift is called the load end. The end you apply weight to in order to try to move the load is called the effort end. In Figure 1, the see-saw is the lever and the fulcrum is where the see-saw rests on the ground, allowing the see-saw to move up and down. One girl is sitting at the load end, and her lighter friend is sitting at the effort end. The space between the effort end and the fulcrum is called the effort arm, while the space between the load end and the fulcrum is called the load arm.
/-/https/www.sciencebuddies.org/cdn/Files/3216/5/Phys_img081.jpg)
Before ancient builders could use levers to construct their monuments, they needed to calculate the weight of each block, how much effort it would take to lift each block, and what size lever they would have to make. In short, they needed to know how levers worked. In this science project, you will build a lever and figure out how it works. A massive stone block would be hard to find though, so instead, you'll use a bar of soap as the load. After you build your tabletop lever, you will experiment to discover how much effort, as measured by the number of pennies, it takes to lift the soap load. Do you think the amount of effort required will change depending on the length of the effort arm? Try it and see!
Terms and Concepts
Before you start this science project you'll need to understand these terms and be able to answer the questions below. Have an adult help you research them on the Internet or look them up in a book.
- Simple machine
- Lever
- Mechanical advantage
- Fulcrum
- Beam
- Load end
- Effort end
- Effort arm
- Load arm
Questions
- What are levers used for?
- What are the three classes of levers?
- Can you identify levers that you use in your life?
Bibliography
This project was originally based on Episode 604, "Escape from Merlin's Maze," of Cyberchase by PBS Kids Go!. This episode can be seen on YouTube:
- Cyberchase Escape from Merlin's Maze, Episode 604. Retrieved Octobre 8, 2020.
An encyclopedia is a great place to start your background research. In addition, you may want to check out these websites, which describe the three classes of levers, and the use of levers in everyday life.
Materials and Equipment
- Metric ruler (preferably one that is stiff and has centimeter markings)
- Plastic sandwich bag (1)
- Tape (preferably masking tape)
- Scissors
- Pen or pencil
- Bar of soap (still in its packaging)
- Pennies (approximately $3 worth; alternatively, marbles, beans, or some other small numerous item will work)
- Lab notebook
- Graph paper
Experimental Procedure
- To start this project, you will need to build your lever. The ruler will be the beam for the lever. Tape a bar of soap to one end of the ruler. The soap is the load you will be trying to lift.
-
Next you will need to construct a container out of your plastic bag to hold the pennies in. The bag and the pennies you'll place in the bag will be the effort. As you add more pennies, you are increasing the weight in the bag-and thus, the effort-until you eventually have enough effort to lift the soap bar (the load).
- Put a piece of tape approximately 1 centimeter (cm) from the zipper part of the top of a plastic sandwich bag. Do this on both the inside and the outside of one side of the plastic bag. See Figure 2.a. below.
- Fold the taped section in half, width-wise. Using a pair of scissors, cut a slit long enough to allow the ruler to slip through. See Figure 2.b. below.
- Slip the free end of the ruler (the effort end) into the slit. Tape the bag to the ruler so it does not slide around. Be careful not to tape the bag closed, as you will need to add pennies inside it (the effort).
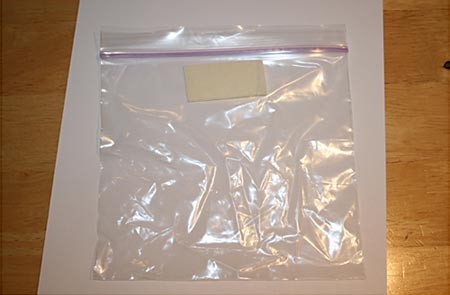 Figure 2.a. This picture shows the plastic bag strengthened with two strips of tape.
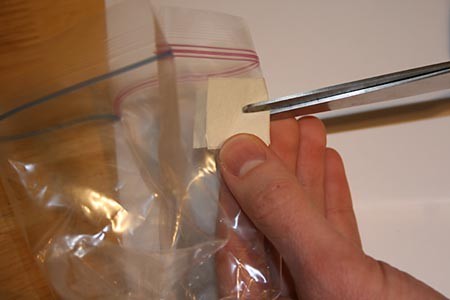 Figure 2.b. To cut a slit in the bag, fold the tape in half, as shown, and cut a slit for the ruler to fit in.
- Tape a pen or pencil to the edge of a table; this will be the fulcrum for your lever.
-
Place your lever on the fulcrum. The bar of soap (the load) should be resting on the table, and the bag for the pennies (the effort) should be dangling over the edge of the table. See Figure 3 below.
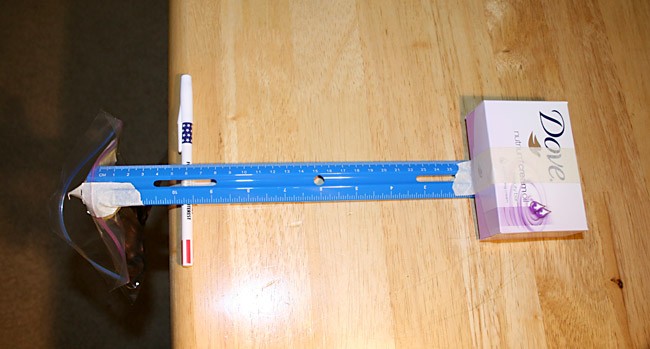
A ruler is placed on a table with one end secured by a weight and taped to the tabletop. Roughly a quarter of the ruler hangs over the edge of the table on a pen that is taped to the edge of the tabletop. The end of the ruler that hangs over the edge of the table is inserted into a small slit cut into the side of a plastic bag so that the plastic bag is held in the air and off the table by the ruler.
Figure 3. Your tabletop lever should look similar to this when you finish building it. Remember to tape the fulcrum securely to the table!
-
Now you are ready to test your lever! You know that changing the length of the effort arm (the distance between the fulcrum and the effort end) changes how much effort has to be used to lift the load.
- Position the ruler so that the length of the effort arm is 6 cm. You can use the markings on the ruler to measure 6 cm.
- Add pennies to the bag, one at a time, counting as you go, until the bar of soap lifts off the table. Watch out, it might fall off the table!
- In your lab notebook, record both the length of the effort arm, and the number of pennies it took to lift the load in a data table like the one below.
Length of Effort Arm (cm) # of Pennies to Lift Load 6 cm 8 cm 10 cm - Increase the length of the effort arm by 2 cm (total length should now be 8 cm) and repeat step 5 again. Did it take more or fewer pennies to lift the load? Record your findings.
- Continue increasing the effort arm length by 2-cm increments and retrying the experiment until the effort arm measures 24 cm. Don't forget to record all the data in your data table.
-
Analyze your data. You can make a line graph with the length of the effort arm on the x-axis and the number of pennies it takes to lift the load on the y-axis. Do you see a pattern? What happens when you double the distance? What happens when you quadruple the distance?
To use the computer to make your graph you can visit the Create A Graph website.
- You are trying to determine the relationship between two variables: the effort (# of pennies) it takes to lift the load (bar of soap) and the length of the effort arm, so choose the XY graph.
-
Select the Data Tab, fill in:
- The graph title
- X-axis label (remember, the x-axis is the length of the effort arm)
- Y-axis label (remember, the y-axis is the number of pennies is takes to lift the load)
- In the Data Set box, tell the program you have 12 data points.
- For each point, fill in the length of the effort arm (x) and the number of pennies (y). So, point 1x would be 6 since you took your first data reading when the effort arm was 6 cm long. Point 1y would be the number of pennies, recorded in your data table, that it took to lift the soap bar at an effort arm length of 6 cm.
- You can use the remaining options to customize the font styles and colors of your chart.
- When you are done, print it out.
/-/https/www.sciencebuddies.org/cdn/Files/3218/5/Phys_img078.jpg)
/-/https/www.sciencebuddies.org/cdn/Files/3219/5/Phys_img079.jpg)
/-/https/www.sciencebuddies.org/cdn/Files/3220/5/Phys_img080.jpg)
Ask an Expert
Global Goals
The United Nations Sustainable Development Goals (UNSDGs) are a blueprint to achieve a better and more sustainable future for all.
/-/https/www.sciencebuddies.org/cdn/Files/19752/5/E-WEB-Goal-09.png)
Variations
- What happens if you double the load by adding two soap bars? Does the effort (number of pennies in this science project) required to lift the load also double? What if you triple or quadruple the load?
- Use a kitchen scale, such as the Fast Weigh MS-500-BLK Digital Pocket Scale, 500 by 0.1 G, available from Amazon.com, to determine how much the load (soap bar) weighs and how much the effort (number of pennies needed to lift the soap bar) weighs. Can you use this information to calculate how much effort it would take to lift you?
- In your background research you learned that there were several classes of levers. In the project above, you built a class 1 lever. Try building a class 2 lever, too. Compare the class 1 and 2 levers. Do they require the same effort to lift the load? Remember to keep the distance between the fulcrum and the effort end the same when comparing the levers!
- If you want to explore more fun science projects that use levers, try The See-Saw as a Simple Machine or Effect of Trebuchet Arm Length or Counterweight Mass on Projectile Distance.
Careers
If you like this project, you might enjoy exploring these related careers:
/-/https/careerdiscovery.sciencebuddies.org/cdn/Files/1450/21/iStock-1227179796.jpg)
/-/https/careerdiscovery.sciencebuddies.org/cdn/Files/1640/26/Fyysikot_tyossaan.jpg)
/-/https/careerdiscovery.sciencebuddies.org/cdn/Files/1649/17/pexels-photo-1181398.jpg)
/-/https/careerdiscovery.sciencebuddies.org/cdn/Files/1457/17/pexels-photo-3861938.jpg)

/-/https/img.youtube.com/vi/9FZRSmbO_as/0.jpg)
/-/https/img.youtube.com/vi/AOVD7WgFP2s/0.jpg)
/-/https/img.youtube.com/vi/Wa8CjGsOFzY/0.jpg)