Particles in the Mist: See Radioactive Particles Decay with Your Own Cloud Chamber!
Abstract
Are you fascinated by radioactivity and the emission of particles caused by the disintegration of an atom? This science project enables you to observe safely a spectacular display of radioactive decay. Following the instructions in the Procedure, you will be able to isolate a safe radioactive source and build a cloud chamber to watch the radioactive decay. Then you will use your cloud chamber to discover if a plastic lid can shield you from this type of radioactive decay particles.Summary
You will be working with radioactive material in this science project; it is completely safe as long as the simple safety instructions in the Procedure are followed.
This project uses isopropyl alcohol, a flammable product. Do not use it near an open flame or anything hot.
Dry ice is colder than regular ice and can damage your skin. Wear insulating gloves when handling it.
If you choose to take apart a smoke detector, be very careful when cutting through metal or plastic. Cut edges might be sharp. Adult help and supervision is required. Minor injury is possible.
Sabine De Brabandere, Ph.D., Science Buddies
/-/https/www.sciencebuddies.org/cdn/Files/4443/6/SciF_See-Radioactivity_Figure12_SDB_img.jpg)
Objective
In this physics science project, students will create a cloud chamber to make radioactive decay visible and test if a plastic lid stops the decay particles.
Introduction
Can you imagine looking at what goes on inside of an atom? It is too tiny to see with the naked eye, but with this project you will build a cloud chamber to watch atoms and see how they fall apart. But what are atoms? And why do some of them fall apart? We will explain, but let us start by reviewing the basics.
Atoms are the extremely small particles that make up everything around us. As shown in Figure 1, atoms consist of a nucleus surrounded by a cloud of electrons . The nucleus is a very small area made of protons and neutrons, together called nucleons. In terms of electrical charge, protons are positively charged particles, electrons are negatively charged particles, and neutrons are electrically neutral. An atom is electrically neutral, the negative charge contributed by the electrons is counterbalanced by the positive charge contributed by the protons. The number of protons within an atom's nucleus is called the atomic number. In the periodic table, each element has a different atomic number. If an atom gains or loses a proton, the atomic number changes, and the atom is transformed from one element into another.
/-/https/www.sciencebuddies.org/cdn/Files/4423/10/SciF_See-Radioactivity_Figure1_SDB_img.jpg)
Figure 1. This drawing shows an atom with its nucleus and an electron cloud around it. Note that in this figure, the nucleus is shown larger than it actually is.
While an element always has the same number of protons, it can have a different number of neutrons in its nucleus. We call these different variations of the same element isotopes of each other. The total number of nucleons (protons and neutrons) in the nucleus is called the mass number and is commonly written in superscript in front of the element abbreviation. For example, the element "lead," abbreviated as Pb, contains 82 protons in its nucleus, making 82 its atomic number. 206Pb contains 206 nucleons, specifically 82 protons and 124 neutrons. However, 204Pb, 206Pb, 207Pb, and 208Pb all exist in nature. They are isotopes of the element Pb, because they all have 82 protons in their nucleus but the number of neutrons in the nucleus is slightly different. Can you calculate how many neutrons are in each isotope mentioned?
To summarize, an atom converts from one element to another if the number of protons (the atomic number) changes, but not if the number of neutrons does. How about if the number of electrons changes? It turns out that this is a fairly common event. Electrons can be both gained or lost without altering the atomic number. When either of these events occurs, the total charge of the atom goes from neutral to either negative (if electrons were gained) or positive (if electrons were lost). A non-neutrally charged atom is called an ion. Ionization (gain or loss of an electron) does not change what element an atom is.
Now you know what makes up an atom. But what makes them fall apart? Every atom is a balancing act between electromagnetic forces and the strong forces of its nucleus. The electromagnetic forces bind negative electrons to the positive nucleus by attracting opposite charges but also attempt to rip the nucleus apart by repelling like charges, such as two protons. In contrast, the strong nuclear forces act to keep the atom's nucleus intact by working to bind together nucleons. The strong nuclear forces act on all types of nucleon pairings: proton-proton, neutron-neutron, and proton-neutron. The balance of these forces is disrupted in ions and isotopes.
Ions can be fairly stable; however isotopes, although they can sometimes exist for a while, are unstable or radioactive . In their search for stability, isotopes will fall apart or decay by emitting radiation in the form of a particle or electromagnetic wave. The released particle, or decay particle, is most often an alpha particle (α particle), a beta particle (β particle), or a gamma ray (γ ray). Figure 2 shows the three main types of decay. Note that although we say the nucleus "falls apart," it only sends out one or two particles at a time.
/-/https/www.sciencebuddies.org/cdn/Files/4424/11/SciF_See-Radioactivity_Figure2_SDBnew_img.jpg)
Figure 2. Representations of the three main radioactive decays of unstable atoms: alpha, beta, and gamma decay.
An alpha particle (α particle) is made up of two protons and two neutrons bound together; it is a mini-nucleus. It is relatively heavy and travels relatively slowly (at approximately one-twentieth the speed of light). Its larger size means it collides relatively frequently with surrounding atoms or molecules in its way. As it collides, it knocks electrons from the outer layers of the atom. This process is called ionizing the atom, because what is left is an ion. Losing energy with each collision, the alpha particle usually slows quickly. Because it is big, it cannot easily penetrate solid material. Alpha particles are stopped in the dead top layer of skin, causing no damage to the human body. Can you see how emission of an alpha particle (two neutrons and two protons) from a nucleus will change the conditions in the nucleus quite drastically? Do you see how the element will change (as the number of protons in the nucleus will be reduced by two) and how the mass number will change (as there are four nucleons emitted in this process)?
A beta particle (β particle) is a high-speed electron or positron. A positron is similar to an electron, only with a positive electric charge. Electrons and positrons are extremely tiny, much smaller and lighter than protons or neutrons. They interact less frequently with surrounding molecules or atoms and can travel several feet in open air. Some lower-energy beta particles can be stopped by the dead layer of human skin causing no harm to the human body, but some need a thicker shield (like wood) to stop them. But how can an electron or positron appear from a nucleus containing only neutrons and protons, and how would that affect the nucleus? When the nucleus has too many neutrons, a physical transformation occurs, where a neutron changes into a proton creating an electron and a neutrino as byproducts. Similarly, a proton can transform itself into a neutron by creating a positron and neutrino as byproducts. What conditions do you think would prompt a nucleus to make this transformation? Do you see that while the total number of nucleons (protons and neutrons) is not affected by this so-called beta emission, the relative number of protons and neutrons does change? This means that the beta emissions also result in a change from one type of element to another.
Because this project only deals with α and β particles, we will not discuss the γ radiation any more here (but you can study them further on your own if you are curious about them).
Most radioactive isotopes do not decay directly into a stable state with the emission of one particle. Rather, they undergo a series of decays, releasing one decay particle at a time, until eventually they reach a stable state. This series of decays is called a decay chain. Some elements also undergo several decay options to reach stability, by seeking stability using alpha emission or via beta emission. Some will decay fast, within seconds, while others will take years to decay.
With respect to 210Pb, which is a radioactive isotope that can be used in this science project, the nucleus of 210Pb contains 82 protons and 128 neutrons (210 minus 82). In its progression to stability, it lowers the proton-to-neutron ratio (82/128). Changing this ratio will change the balance of the repulsive electromagnetic force between the protons with respect to the strong force between all nucleons progressing to a more stable ratio. This can be done by transforming a neutron into a proton (wherein the ratio becomes 83/127) or emitting an alpha particle (wherein the ratio becomes 80/126). In nature, we see that 210Pb is mainly a beta emitter, meaning that it mainly emits beta particles, though it does emit an alpha particle in 1 out of 50 million decays. 210Pb is also a nice example of a decay chain. Beta emission turns 210Pb into bismuth-210 (210Bi). 210Bi is unstable and mainly turns into polonium-210 (210Po) via beta emission. 210Po is a pure alpha emitter, turning itself into lead-206 (206Pb). 206Pb is a stable element at the end of this chain, with a small fraction of titanium-206 (206Ti) as a stable end product. In 1 out of 50 million decays, 210Pb transforms into mercury (206Hg) and decays on to 206Ti.
A graphical visualization of this decay chain is shown in Figure 3. Note that all beta particles emitted in the 210Pb chain are relatively low-energy beta particles.
/-/https/www.sciencebuddies.org/cdn/Files/4425/6/SciF_See-Radioactivity_Figure3_SDB_img.jpg)
210 Pb decays into 206 Hg and 210 Bi. 206 Hg decays further into 206 Ti while 210 Bi decays into 210 Po which then decays again into 206 Pb.
Figure 3. Decay chain of 210Pb with mainly 206Pb and some 206Ti as stable element at the end of the decay chain.
Knowing this, do you think a radioactive source labeled 210Pb contains only 210Pb? If not, which elements will it contain? Will it change over time? It contains 210Pb, 210Bi, 206Po, 206Pb, 206Hg and 206Ti all at the same time in various quantities. As the source ages, less 210Pb and more and more of the stable element (here 206Pb and some 206Ti) is present in the source.
In addition to 210Pb, the other radioactive source recommended in this science project is retrieved from an ionizing smoke detector and contains a small amount of americium-241 (241Am). 241Am contains 95 protons. Can you calculate the number of neutrons in this nucleus? 241Am decays directly to neptunium-237 (237Np), and 237Np is not known to naturally decay any further. What particle, or particles, do you think are emitted when 241Am decays to 237Np? Hint: how the mass number and the atomic number change in the decay. You will need to look up the atomic number of Np.
Because decay particles are too tiny to reflect light, they cannot be "seen" with the naked eye. So, how will you ever "see" radioactive decay? Scientists build cloud chambers, also called Wilson chambers, to study decay particles. Much as you would study the wind by looking at the movement of leaves stirred by wind, scientists study radioactive decay particles by looking at tracks caused by decay particles in cloud chambers. You cannot see wind but you can study its presence, direction, and strength by seeing how the leaves on trees move. In this science project, you will not see the decay particles, but you will observe that they exist and study their characteristics by observing how the tracks they create in your cloud chamber function.
Before we explore how a cloud chamber works, let us review some theory around vapor and condensation. When we heat a liquid, it transforms into a vapor; when we cool a vapor, it condensates back into a liquid. A saturated vapor is a vapor ready to condensate. Tiny solid or liquid particles (like dust or tiny droplets) need to be present to make the transition from vapor to liquid happen. Those particles are called condensation nuclei. A supersaturated vapor is ready to condense but lacking the nuclei on which to condense.
So where is the link with a cloud chamber? A cloud chamber is nothing more than a sealed environment containing a supersaturated vapor of water or alcohol. When decay particles travel trough the chamber, they collide with the surrounding molecules. As they collide, they strip electrons from the molecules, creating ions as they go. The trail of ions serves as a trail of condensation nuclei giving the supersaturated vapor a place to condense. At this stage, a trail of tiny condensation droplets forms on ions left by the passage of an ionizing decay particle. A strong light will bounce off on the droplets and there you have it — a visible track! In short, you see droplets of alcohol forming on ion trails left by charged particles that are shooting off the radioactive source.
Different radioactive-decay particles produce different types of tracks. Alpha particles are bigger, so their tracks are broader. Beta particles produce more imperceptible tracks. (Under the conditions of the Experimental Procedure, gamma particles will not be generated.)
In this science project, you will build a cloud chamber. The chamber will enable you to visualize the decay particles of the radioactive source of your choice. You can even experiment to see what material(s) can block the decay particles.
Terms and Concepts
- Atoms
- Nucleus
- Nucleons
- Protons
- Electrons
- Neutrons
- Atomic number
- Element
- Isotopes
- Mass number
- Ion
- Electromagnetic force
- Strong nuclear force
- Unstable
- Radioactive
- Radiation
- Decay particle
- Alpha particle
- Ionizing
- Beta particle
- Positron
- Decay chain
- Cloud chambers or Wilson chambers
- Vapor
- Condensation
- Saturated
- Condensation nuclei
- Supersaturated
Questions
- Why are some elements radioactive and others not?
- How are the three main decay particles similar and how are they different?
- Why is a radioactive source almost never made up of one element?
- Based on the decay particles you expect from 210Pb and 241Am, what do you expect to see when you put these isotopes in a cloud chamber?
- How does a cloud chamber work? What enables you to "see" the decay particles?
- Why do scientists use cloud chambers to study radioactive decay particles?
Bibliography
- U.S. Environmental Protection Agency. (2011, July 8). Radiation Basics. Retrieved March 26, 2018.
Materials and Equipment
- Disposable gloves (any type), available at hardware or drug stores
- Radiation source - choose one of the following:
- 210Pb needle; available for purchase from a vendor such as Spectrum Techniques
- Ionizing smoke detector. Such a detector can be found at a hardware store. But check to make sure it is of the ionizing type.
- Hardware tools: nipper and tweezers
- Plastic pot - about 25 cm (10 inches) wide or wider
- Petri dish with lid, size 10 cm diameter x 1.4 cm high or slightly larger, can be bought online from Amazon.com
- Black construction paper
- Scissors
- Thick back felt rectangle, approximately 1 m x 4 cm (or 40 x 1.6 inches)
- Metric tape measure
- Room that can be made dark
- Insulating gloves (to handle dry ice)
- Safety glasses or goggles (any type)
- Block of dry ice (about 1 lb.). Dry ice can be found in well-equipped grocery stores, most often stored in a separate freezer located next to the freezer selling regular ice. Bring a (small) insulating box or bag to store the dry ice on your way home.
- When transporting dry ice remember to put it in a container with a lid that shuts to prevent evaporation, but do not seal the dry ice in an airtight container because this can cause a buildup of gas that may result in an explosion. Always wear gloves when handling dry ice. Bring your insulating gloves to the store.
- Baking tray
- Hammer
- Isopropyl alcohol 99% (40 ml); 99% isopropyl can be ordered online from Amazon.com
- Eye dropper
- Bright beam LED flashlight or headlamp
- Optional: Strong magnet
- Lab notebook
- Adult helper
Disclaimer: Science Buddies participates in affiliate programs with Home Science Tools®, Amazon.com, Carolina Biological, and Jameco Electronics. Proceeds from the affiliate programs help support Science Buddies, a 501(c)(3) public charity, and keep our resources free for everyone. Our top priority is student learning. If you have any comments (positive or negative) related to purchases you've made for science projects from recommendations on our site, please let us know. Write to us at [email protected].
Experimental Procedure
/-/https/www.sciencebuddies.org/cdn/Files/4213/8/warning_radiation.png)
The radiation sources recommended in this experiment are low-dose radioactive sources and do not require a license to purchase; they are safe to work with as long as these common-sense safety tips are followed:
- Wear disposable gloves when handling any radioactive source.
- Never rub your eyes or mouth while you are handling the radioactive source.
- For the lead-210 (210Pb), handle the needle as much as possible from the cork it comes on and refrain from touching the gold-colored needle tip. Do not point the needle at other people.
- NEVER swallow any radioactive source and use protective glasses when bringing a source within a few inches of your eyes.
- When not in use, store your source in a cardboard or plastic container placed out of reach of children or animals.
- Dispose of both recommended sources with normal garbage collection.
Additional background information on radiation safety is available in the Introduction to Radiation & Radiation Safety. Although you will be working with a radioactive source, the doses and type of radiation emitted by the suggested sources make monitoring your exposure with a Geiger counter unnecessary.
The first two sections of this science project describe the preparation of the radioactive source so it can be used easily in the cloud chamber. Choose the preparation procedure corresponding to the source(s) you chose to do this science project with.
Preparing a 210Pb Needle Source
If you are using a 210Pb needle source, prepare it for testing. You will be cutting the needle so that the total length of the needle (cork included) is less than the diameter of the petri dish, as you will put the source in the dish. If you are using a smoke detector as your radioactive source, skip this section and proceed to the next.
- Put gloves on. Be sure not to rub your mouth or eyes while you are handling the 210Pb needle.
- Make sure the plastic pot is clean (wash it if necessary) and place it on a table. The pot will catch the part you cut.
- Hold the needle source by the cork over the pot.
- Have an adult help you carefully cut the needle about 4 cm (1.5 inches) from the top with the nipper, making sure the part you cut falls in the pot. Be very careful not to poke yourself or anyone else with the tip of the needle.
- Remove the part of the needle left in the cork and put it with the trash. You can use the tweezers or your hands for this step.
- Retrieve the shorter part of the needle you cut using the tweezers and carefully stick it firmly back in the cork. Figure 4 shows a prepared needle source like the one you have now.
- Store your needle source in the plastic tube it came in.
/-/https/www.sciencebuddies.org/cdn/Files/4427/6/SciF_See-Radioactivity_Figure4_SDB_img.jpg)
Figure 4. A 210Pb needle source, shown cut down and ready to use in this science project.
Preparing a 241Am Radiation Source from a Smoke Detector
If you are using an ionizing smoke detector (as a source of 241Am), prepare it for testing by retrieving the radioactive source from it. If you are using the needle source as your radioactive source, skip this step and proceed to the "Build the Cloud Chamber" section.
- Open the smoke detector as you would to put the battery in place, as shown in Figure 5.
/-/https/www.sciencebuddies.org/cdn/Files/4428/6/SciF_See-Radioactivity_Figure5_SDB_img.jpg)
On the back of the smoke detector, open the battery compartment first and then push on the clips to remove the top lid.
Figure 5. On the back of the smoke detector, open the battery compartment first and then push on the clips to remove the top lid.
- Carefully remove the top lid (the side that faces the wall or ceiling when installed).
- Push on the clips, shown by the arrows in Figure 5. After removing the top lid, the smoke detector should look like the one in Figure 6.
/-/https/www.sciencebuddies.org/cdn/Files/4435/7/SciF_See-Radioactivity_Figure6_SDB_img.jpg)
Figure 6. Picture of a smoke detector with the top lid removed. The beige semicircle is the circuit board.
- Remove the circuit board from the radioactive source housing.
- Pull the circuit board so it detaches from the radioactive source housing. The front and back of the circuit board and radioactive source housing are shown in Figure 7 a and b.
- You will have to break the solder to remove the radioactive source housing.
/-/https/www.sciencebuddies.org/cdn/Files/4436/6/SciF_See-Radioactivity_Figure7_part1_SDB_img.jpg)
Picture of the front sides of the circuit board with the radioactive source housing retrieved from a smoke detector.
Figure 7.a. Picture of the front sides of the circuit board with the radioactive source housing retrieved from a smoke detector.
/-/https/www.sciencebuddies.org/cdn/Files/4437/6/SciF_See-Radioactivity_Figure7_part2_SDB_img.jpg)
Figure 7.b. Picture of the back side of the circuit board.
- Separate the radioactive source housing from the circuit board. Adult help is required for this step. You will need to cut the housing open and break the solder holdings. Figure 7 shows where to find the solder holdings on the back side of the circuit board.
- Hold the plate with one hand. Use your other hand to force the nipper in the ventilation holes of the housing.
- Cut the housing open with the nipper. Take care not to cut yourself, as the metal edges can be sharp.
- For further cuts, use the tweezers to hold any cut metal. This will help avoid cuts and allow using more force to break the housing.
- Break or cut the solder. The result along with the tools used are shown in Figure 8.
/-/https/www.sciencebuddies.org/cdn/Files/4438/6/SciF_See-Radioactivity_Figure8_SDB_img.jpg)
Figure 8. Picture of a circuit board retrieved from a smoke detector showing the plastic cage holding the radioactive source. The remains of the metal housing and the tools used to remove it are also shown.
- In this step, you remove the plastic cage holding the radioactive source, which is labeled in Figure 8.
- Put on your gloves. Be sure not to rub your mouth or eyes while handling the radioactive source.
- Push on the plastic clips to release them from the circuit board. It is a bit tricky, but you can do it.
- If the plastic is still attached with some metal solder, use the nipper to cut the solder. The result is shown in Figure 9.
/-/https/www.sciencebuddies.org/cdn/Files/4439/6/SciF_See-Radioactivity_Figure9_SDB_img.jpg)
Figure 9. Picture of a circuit board and the plastic cage holding the radioactive source, both retrieved from a smoke detector. The holes where the clips on the plastic cage fit before it was detached from the board are indicated by arrows.
- Retrieve the radioactive source from the plastic cage. Adult supervision or help is required for this step.
- Carefully use the nipper to cut the plastic cage in two. Use your tweezers to hold any cut plastic, as the cut edges can be sharp. Your goal is to retrieve the radioactive source, so try to cut the plastic cage in half so that the source has an opening to fall out.
- Cut or force the metal plate out.
- The radioactive source will slip out as soon as it has room to do so. Figure 10 a and b shows a picture before and after the plastic cage is cut in two.
/-/https/www.sciencebuddies.org/cdn/Files/4440/6/SciF_See-Radioactivity_Figure10_part1_SDB_img.jpg)
Figure 10.a. Picture of a plastic cage holding the radioactive source retrieved from a smoke detector.
/-/https/www.sciencebuddies.org/cdn/Files/4441/7/SciF_See-Radioactivity_Figure10_part2_SDB_img.jpg)
Figure 10.b. Picture of a plastic cage holding the radioactive source retrieved from a smoke detector after the cage is cut in two. Note the source can slip out of the cage.
- If your radioactive source looks like something in Figure 11, you are there!
/-/https/www.sciencebuddies.org/cdn/Files/4442/6/SciF_See-Radioactivity_Figure11_SDB_img.jpg)
Figure 11. Picture of the radioactive source retrieved from an ionizing smoke detector.
Build the Cloud Chamber
This section of the science project concerns the preparation of the cloud chamber, which you will use to make radioactive decay visible.
- Prepare the black background of your cloud chamber. A black background will enable you to see the decay particles better.
- Cut a circle out of the black construction paper that will fit neatly inside the bottom of the petri dish.
- Place the black circle in the petri dish.
- Create the piece of felt that will cover the inside perimeter of the petri dish. The felt will be made to cover the perimeter in two layers to make sure It can hold enough alcohol to keep the chamber permeated with alcohol vapor for some time.
- Measure the circumference of the petri dish.
- Cut out a rectangular strip of felt measuring twice the circumference of the petri dish long by the height of the petri dish wide.
- Put the felt inside the petri dish so that it covers the inner side, going around the inside perimeter twice. The felt will easily stay in place.
- Place the lid on your petri dish and your cloud chamber is ready for the experiment.
Watching Radioactive Decay in the Cloud Chamber
This section teaches how to use the cloud chamber to visualize radioactive decay, so get ready for some exciting views!
- For safety reasons, if you have never used isopropyl alcohol before, read the Material Safety Data Sheet (MSDS) for isopropyl alcohol.
- Prepare to make observation notes by copying Table 1 in your lab notebook.
- Take a moment to think what you expect to see when you put your radioactive sample into the cloud chamber. Hint: Re-read the Introduction if you are not sure what you expect to see. Take into account that the presence of lower-energy beta particle tracks might easily be masked by abundant alpha particle tracks. It might be hard to differentiate between the two in this setup.
| Characteristic | Observation with source in the cloud chamber | Observation with source on top of the cloud chamber |
| Amount of tracks (plenty or few) | ||
| Shape of tracks (Straight / curved / curled tracks) | ||
| Size of tracks (thick or thin) | ||
| Brightness of tracks (faint or clear) | ||
| Length of the tracks (long / short) |
Table 1. Observations of particle track characteristics with the radioactive source in the cloud chamber and on top of the chamber.
- Choose an environment that can be made dark (it can be indoors or outdoors) and away from any heat source. Bring all the materials listed after "Room that can be made dark" in the materials list with you. It is important to have everything ready, as you need to perform some steps within a limited time frame.
- Put the insulating gloves and glasses or goggles on to handle the dry ice.
- Place the dry ice on the baking dish and crush the ice to small pieces with your hammer.
- The goal is to form a nice bed of tiny pieces of dry ice for the petri dish. Smaller pieces create a more even contact with the petri dish, avoiding relatively cooler and warmer spots in the petri dish during the experiment.
- Take the insulating gloves off and put on your original disposable gloves.
- Using the eye dropper, soak your felt with the isopropyl alcohol.
- Do not worry if some of the isopropyl alcohol spills on the construction paper. It is important, though, to soak the felt thoroughly.
- Quickly place your radiation source inside the petri dish and put the lid of the petri dish on top.
- You need to perform step 9 quickly after step 8 to trap the alcohol vapors in the chamber.
- Hold the petri dish between your hands to warm it up for a minute or two. The warmth from your hands will cause the isopropyl alcohol to evaporate and create a vapor that permeates the chamber. You cannot see the vapor — it will only be apparent when it condenses into microscopic droplets, forming a mist.
- Place the petri dish on the dry ice. Your setup should now look similar to the one in Figure 12.
/-/https/www.sciencebuddies.org/cdn/Files/4443/6/SciF_See-Radioactivity_Figure12_SDB_img.jpg)
Black construction paper and felt are soaked in alcohol and placed into a petri dish. The petri dish rests upon a mound of crushed dry ice in a baking sheet and a radioactive source is added into the petri dish. As the radioactive source decays you'll be able to see tracks appear in the cloud of carbon dioxide emitted by the dry ice bed.
Figure 12. Experimental setup with cloud chamber and radioactive source. Note that the petri dish cover is in place.
- Turn off the lights and/or darken your workroom and light up the cloud chamber with a flashlight held at about a 45-degree angle to the petri dish. Figure 13 shows how to illuminate the cloud chamber.
/-/https/www.sciencebuddies.org/cdn/Files/4444/6/SciF_See-Radioactivity_Figure13_SDB_img.jpg)
Figure 13. This drawing shows the angle at which to hold the flashlight to see tracks appear in the cloud chamber.
- Look in the same direction in which your flashlight is pointed. Wait a few minutes. As the cloud chamber cools, it creates the conditions for a supersaturated vapor. By now, a very thin fog of alcohol vapor might be visible in your cloud chamber. Soon, tracks of condensation formed on ions left by radioactive decay particles passing trough the chamber should be visible.
- If you do not see any decay particles passing through the chamber within five minutes, the following tips may help:
- Reposition yourself at a different spot. If you are at the 12 o'clock position relative to the cloud chamber, go and observe at the 9 or 3 o'clock position. Figure 14 shows the different positions to try out. If you can not reposition yourself, carefully turn the petri dish to obtain the same result. The goal is to catch the light reflected by the tiny drops of alcohol that form in your chamber.
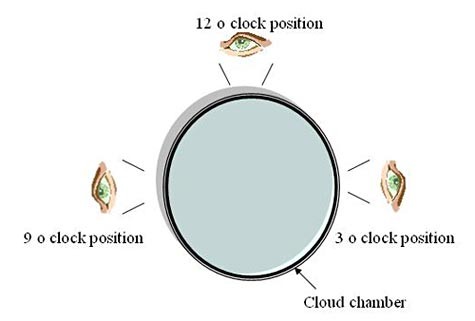
Figure 14. Proposed positions for observing particle tracks, relative to the petri dish. - Check your petri dish for cracks. Felt or black construction paper might hide cracks. Openings let the alcohol vapor escape, making saturation of the chamber impossible. If you do see cracks, prepare a new cloud chamber with a new, intact petri dish and repeat the experiment.
- Reposition your radioactive source in the petri dish. If you do not see any mist around your source but you do see an area with thick mist in your chamber, reposition your source in the area were mist is visible. Sometimes, super-saturation conditions are met only in particular areas of the cloud chamber.
- Gently tilt your chamber at an angle so the source can roll to the desired spot.
- Put the chamber back on the dry ice.
- You can resume observing after a minute or so.
- Turn your source in the petri dish so a different side is facing down (toward the baking dish). Although the radioactive material sends out particles in all directions, the caging that holds the radioactive material might absorb all decay particles emitted in specific directions.
- If you have a strong magnet handy, use it to turn or reposition your source without taking the lid off your petri dish. You can also try to roll the source to its side. If you are successful, put the chamber back on the dry ice. You can resume observing after a minute or so.
- If you are not successful trying step i, open the petri dish, reposition your source, wipe off any condensation that might occur on the source and restart from step 8 of this section (adding alcohol to the felt).
- A layer of condensed alcohol on the source might stop the particles before they reach the air.
- Open the petri dish, wipe off any condensation that might occur on the source and restart from step 8 of this section.
- Reposition yourself at a different spot. If you are at the 12 o'clock position relative to the cloud chamber, go and observe at the 9 or 3 o'clock position. Figure 14 shows the different positions to try out. If you can not reposition yourself, carefully turn the petri dish to obtain the same result. The goal is to catch the light reflected by the tiny drops of alcohol that form in your chamber.
- Observe carefully and describe your observations in detail by filling in the data in Table 1 in your lab notebook.
- Describe precisely what you see. Do the tracks come in a burst or only sporadically? Are they straight, bent or curly tracks? Long or short tracks? Clearly visible or faint? Broad or thin?
- Do the tracks look like what you would expect based on the particle decay for your radioactive source, or do they look different somehow? Alpha particles are expected to give relatively short and thick, clearly visible tracks; beta particles create faint very thin tracks. (Gamma radiation will not be detected with this cloud chamber.) Would an abundance of thick tracks hide the presence of faint tracks?
- Do tracks appear to come from one side of the source or equally from all sides? Can you identify where the housing or caging absorbs all or part of the decay particles? If tracks come from one side, carefully identify which side. You will need to know this when testing materials on their capacity to stop the decay particles.
- For the Pb source, it is handy to write a line on the cork holding the needle. You can do so when finished observing and opening the cloud chamber.
- For the Am source: Describe where the tracks originate.
- Your observations might change during the experiment (tracks become shorter, tracks become less obvious or faint). What might be the cause of this change? Are all observations as accurate?
- When tracks become faint, re-warm your petri dish in between your hands. Every time you re-warm the dish, it will take a couple of minutes to create the conditions in your chamber for tracks to be visible. After a couple of re-warmings, there will not be enough alcohol left in your cloud chamber to form vapor. In this case, repeat the procedure from step 8 on (adding alcohol to the felt).
- Repeat the entire experiment (from step 8 on) at least one more time to confirm or detail your observations.
/-/https/www.sciencebuddies.org/cdn/Files/4447/6/SciF_See-Radioactivity_Figure14_SDB_img.jpg)
Studying Radioactive Decay with the Source on Top of the Cloud Chamber
Now that you have seen radioactive decay within the cloud chamber, it is time to study the phenomenon further. This section of the science project examines to what extent the plastic lid of the petri dish absorbs radioactive decay particles emitted from your source. To find out, repeat the experiment with the radioactive source on top of the lid of your cloud chamber instead of inside the cloud chamber and observe what happens.
- Take a moment to think about what you expect to see when you put your radioactive sample on top of the cloud chamber. Hint: Re-read the description of the different types of decay particles in the introduction if you are not sure what you expect to see. Take into account that the beta particles arising from 210Pb decay are low-energy beta particles.
- Repeat steps 3 through 14 of the section titled "Watching Radioactive Decay in the Cloud Chamber" but skip step 9.
- Instead of placing the radioactive source inside the cloud chamber (as instructed in step 9), place the source on top of the plastic lid on the petri dish.
- If your source showed tracks only on one side while in the cloud chamber, make sure radioactive particles emitted by radioactive decay point toward the cloud chamber through the petri dish lid. If you are not sure which side of the source was covered with caging material, redo your experiment and turn your source around during the experiment to determine which side is not covered and emits radioactive particles.
- Describe as well as you can what you observe on Table 1 in your lab notebook.
- If you do see tracks, compare them with the observations you made when the source was inside the cloud chamber. How are they different and how are they similar?
- If you see no tracks at all, why do you think this could be? Which particles did you detect when the source was placed in the cloud chamber? Which particles do you think might be stopped by the plastic lid?
- When you have finished with both parts of this experiment, dispose of your gloves in a normal garbage can.
- Safely store your radioactive source or dispose of it in normal garbage.
Ask an Expert
Global Goals
The United Nations Sustainable Development Goals (UNSDGs) are a blueprint to achieve a better and more sustainable future for all.
/-/https/www.sciencebuddies.org/cdn/Files/19752/5/E-WEB-Goal-09.png)
Variations
- Use your cloud chamber to investigate how well other materials like aluminum foil, plastic foil, paper, cloth, etc., stop the decay particles of your radioactive source. You can try wrapping your source in these other materials and placing it back into the cloud chamber to study the absorption capacity of these materials.
- Charged particles are deflected in the presence of a magnetic field, making them travel most often along different, or unusual, paths. Position a strong magnet (such as a neodymium magnet) close to the cloud chamber and observe how this affects the shape of tracks. What happens if you turn your magnet around, bringing its other pole close to the chamber?
- Compare the observations of two different sources — e.g. 210Pb decay versus 241Am decay. Do your observations confirm your expectations knowing the decay chains of 210Pb and 241Am?
Careers
If you like this project, you might enjoy exploring these related careers:
/-/https/careerdiscovery.sciencebuddies.org/cdn/Files/1528/22/Lamb-esp.gif)
/-/https/careerdiscovery.sciencebuddies.org/cdn/Files/1544/22/iStock-1031172586.jpg)
/-/https/careerdiscovery.sciencebuddies.org/cdn/Files/1640/26/Fyysikot_tyossaan.jpg)
/-/https/careerdiscovery.sciencebuddies.org/cdn/Files/1649/17/pexels-photo-1181398.jpg)
/-/https/careerdiscovery.sciencebuddies.org/cdn/Files/1550/18/iStock-1272407073.jpg)
/-/https/careerdiscovery.sciencebuddies.org/cdn/Files/19465/5/technician-xray.jpg)

/-/https/img.youtube.com/vi/3gj_68ywod4/0.jpg)
/-/https/img.youtube.com/vi/hlCc1Yoiv5c/0.jpg)
/-/https/img.youtube.com/vi/bcfzUOdM8lg/0.jpg)