Abstract
Can you make water fall up? Or make drops of water hover in mid-air? While you might not be able to make water defy gravity, you can create the illusion that it does using something called the stroboscopic effect. In this project you will make use of the stroboscopic effect to build your own "levitating water" fountain.Summary
/-/https/i.ytimg.com/vi/kUUl-QcbHbA/maxresdefault.jpg)
Objective
Design and build a "levitating water" fountain that can make it look like water drops are frozen in mid-air.
Introduction
/-/https/www.sciencebuddies.org/cdn/Files/18699/5/levitating-water-fountain-images.png)
A wooden frame supports tubing over a container of water with a pump inside. An inset photo shows drops of water that look like they are frozen in midair.
The stroboscopic effect is an optical illusion generated by repeated flashes of bright light. To understand the effect, imagine that you are looking at a clock that only has a second hand. The hand completes one revolution every 60 seconds. If you keep your eyes open and look at the clock, you will see the second hand moving forward continuously.
Now imagine that you close your eyes and only open them very briefly at a certain interval.
- If you open your eyes every 60 seconds, each time you open your eyes you will see the second hand in the same location, because it will have completed one full revolution. To you, it will look like the second hand has not moved at all.
- If you open your eyes every 59 seconds, the second hand will have finished just less than one complete rotation each time you open your eyes. It will look like it is moving backwards.
- If you open your eyes every 61 seconds, the second hand will have finished just more than one complete rotation, and it will look like it is moving forward again, but much more slowly.
Figure 1 illustrates these three scenarios.
/-/https/www.sciencebuddies.org/cdn/Files/18697/5/stroboscopic-effect-clock-v1.png)
The first row shows the second hand moving backward by 1 second for each clock, with 59-second gaps indicated between the images. The second row shows the second hand in the same position on each clock, with 60-second gaps indicated between the images. The third row shows the second hand moving forward by one second for each clock, with 61-second gaps indicated between the images.
Figure 1. What you would see if you looked at a clock with a second hand and only briefly opened your eyes every 59 (top), 60 (middle), or 61 (bottom) seconds.
The stroboscopic effect works in a similar manner, except instead of closing your eyes and opening them periodically, you keep your eyes open and the object is illuminated by a bright strobe light that flashes periodically. The number of flashes per second is called the strobe light's frequency. Frequency is measured in hertz (Hz). A frequency of 10 Hz, for example, means that the strobe light flashes 10 times per second.
The period is the amount of time from the beginning of one flash to the beginning of the next flash. You can calculate the period using this equation:
Equation 1:
So a strobe light with a frequency of 10 Hz has a period of 1/(10 Hz) = 0.1 seconds.
For the stroboscopic effect to work well, the frequency of the strobe light must be above the flicker fusion threshold. This means that the light will flash fast enough that your eye perceives continuous illumination instead of flickering light. Sometimes this effect is also called persistence of vision. If the light flashes too slowly, though, you will see the dark periods in between flashes, and the motion of objects will look jerky.
The stroboscopic effect works for rotating objects like the clock, a fan, or a wheel with spokes, but it also works on a series of falling objects, like a stream of water drops. In this project you will use a strobe light app on your phone to illuminate falling water drops. As explained in this video, the stroboscopic effect can make it look like the water drops are frozen in mid-air, moving up, or falling down very slowly.
Note: Filming objects illuminated by a strobe light is difficult due to something called the rolling shutter effect. You will see this effect as dark bands sweeping across the screen in the video, but you will not see it in person.
For the stroboscopic effect to work well, the frequency of the strobe light should be very close to the frequency of the falling water drops (the number of drops per second). The bursts of light should also be very short. This will result in crisp, clear illumination. If the flashes of light are too long, the drops of water will appear blurry.
The duration of each flash of light is controlled by the strobe light's frequency and its duty cycle. The duty cycle is the percentage of each period that the strobe light is on. Figure 2 shows two flashing patterns, both at 10 Hz (meaning they flash 10 times per second, and they have a period of 0.1 seconds).
The first pattern has a duty cycle of 50%, so the strobe light is on for half of each period and off for half of each period (0.05 seconds each). The second pattern has a duty cycle of 10%, so the strobe light is only on for 10% of each period (0.01 seconds) and off for 90% of each period (0.09 seconds).
For this project it is important to find an app that lets you adjust both the frequency and the duty cycle of the strobe independently. Some strobe light apps might only let you control the frequency.
/-/https/www.sciencebuddies.org/cdn/Files/18698/5/frequency-duty-cycle.png)
Figure 2. Top: A strobe pattern with a frequency of 10 Hz and a duty cycle of 50%. Bottom: A strobe pattern with a frequency of 10 Hz and a duty cycle of 10%.
Now that you understand the stroboscopic effect, frequency, and duty cycle, you are ready to build your own "levitating water" fountain!
Terms and Concepts
- stroboscopic effect
- optical illusion
- frequency
- hertz (Hz)
- period
- flicker fusion threshold
- persistence of vision
- rolling shutter effect
- duty cycle
Questions
- How does the stroboscopic effect work?
- What is the relationship between frequency and period?
- How do you think the frequency of the strobe light will affect the apparent motion of falling water drops?
- Should the duty cycle of your strobe light be high or low to obtain a good stroboscopic effect illusion? Why did you choose this answer?
Bibliography
- Fritzel Media (March 18, 2020). High-Speed Camera Investigates Levitating Water Droplets. Retrieved June 1, 2022.
- isaac879 (Feb 17, 2018). Levitating Water Drops - My RGB Time Fountain Project. Retrieved June 1, 2022.
- ElectroBOOM (July 3, 2013). The Strobe Light Effect (Levitating Water Experiment). Retrieved June 1, 2022.
- Science Buddies Staff (n.d.). The Engineering Design Process. Retrieved June 1, 2022.
Materials and Equipment
Note: this is an engineering design project. You will decide how to build your "levitating water" fountain, so the project does not have an exact list of materials. If you have a question about materials for this project, you can ask on our Ask an Expert forums.
- Small water pump with a flow rate of roughly 1 gallon per minute (GPM) or less. Pumps are available online, at hardware stores, and at aquarium supply stores.
- Power supply compatible with your pump. Many small pumps will not plug directly into a wall outlet. You will need to read the instructions for your pump to figure out the required voltage. For example, a 12 volt pump will require a 12 volt DC adapter.
- Depending on your pump and power supply, you may need wire strippers to cut the power supply wires and alligator clips to connect them to the pump. See Procedure for details.
- Flexible tubing compatible with your pump (about 3 feet or 1 meter). Tubing is measured by its inner diameter (ID) and outer diameter (OD). The inner diameter of your tubing must fit around the nozzle of your pump. 1/8 inch ID tubing works well to create drops of water. If your pump has a large nozzle, you may need to buy additional smaller diameter tubing: for example, tubing that is 1/8 inch ID and 3/16 inch OD will fit inside tubing that is 3/16 inch ID and 5/16 inch OD, so you can connect two pieces of the tubing to step down the diameter.
- Small C-clamp
- Tape
- Bowl or other container
- Water
- Materials to build a frame to hold the tubing roughly 1 foot or 30 cm above the water container. You can use scrap wood or building toys like LEGO® or K'Nex®, or you can just attach your tubing to a piece of furniture, like a chair. Tip: We do not recommend using cardboard as a construction material since the water tends to splash and your frame will get wet.
- Phone or tablet with a strobe light app. The app must allow you to adjust both the frequency and duty cycle of the strobe. Note: Some strobe lights intended for dance parties do not work well for this project. They do not flash at a high enough frequency and do not allow you to adjust the duty cycle of the strobe.
- Optional: tripod to hold your phone steady
- Access to a dark room where you can turn off the lights and close any window curtains or blinds, or the ability to do the experiment at night.
Disclaimer: Science Buddies participates in affiliate programs with Home Science Tools®, Amazon.com, Carolina Biological, and Jameco Electronics. Proceeds from the affiliate programs help support Science Buddies, a 501(c)(3) public charity, and keep our resources free for everyone. Our top priority is student learning. If you have any comments (positive or negative) related to purchases you've made for science projects from recommendations on our site, please let us know. Write to us at [email protected].
Experimental Procedure
Strobe Light Warning
Strobe lights may not be safe for people with epilepsy or other conditions with sensitivity to light.
Build Your Levitating Water Fountain
Build the experimental setup as shown in Figure 3 and described in the following steps. You can also watch this video for an overview of how to build the fountain. Remember, however, that this is an engineering design project, so your fountain does not have to look exactly like the one shown in the video.
/-/https/i.ytimg.com/vi/6vWprI6OPJo/maxresdefault.jpg)
/-/https/www.sciencebuddies.org/cdn/Files/18696/6/levitating-water-fountain.jpg)
The fountain has a rectangular plywood base and a vertical piece of wood with a horizontal piece extending to one side at the top. The frame supports tubing that is connected to a pump sitting in a container of water at the base. A C-clamp is placed over the tubing at the top of the frame. The end of the tubing is aimed down so water will drip back into the container.
Figure 3. A homemade "levitating water" fountain.
- Build a frame to support the tubing about one foot above a container of water. The frame can be made from scrap wood or other materials. Tip: Do not use cardboard, paper, or other materials that will lose their strength if they get wet, since the water tends to splash.
- Fill a container of water and place it at the bottom of the frame.
- Read the instructions for your pump. Some pumps are "submersible," meaning they are designed to be submerged in water, and other pumps are not. Some pumps are "self-priming," meaning they can initially suck water up through a tube, and others are not. This will determine where you place your pump. You might need to place the pump directly in the container of water, or you might need to place it next to the container with a tube going into the water.
- If needed, attach tubing to the inlet nozzle of your pump and run it into the container of water.
- Attach tubing to the exit nozzle of your pump, run it up along the frame, and point the end down into the container of water. Attach the tubing to the frame with tape to hold it in place. Tip: Small diameter tubing (about 1/8 inch) works well to create drops of water. If your pump has a larger nozzle, you can step down to smaller diameter tubing using adapters or pieces of tubing that fit inside each other (Figure 4).

The pump outlet attaches to the widest tube piece, which attaches to a medium-diameter piece, which attaches to a narrow tube the right size to create a stream of water droplets.
Figure 4. An intermediate piece of tubing used as an adapter to step down from the larger-diameter pump nozzle to smaller tubing. The largest piece of tubing is 5/16 inch ID and 7/16 inch OD. The middle piece of tubing is 3/16 inch ID and 5/16 inch OD. The smallest piece of tubing is 1/8 inch ID and 3/16 inch OD. The inner diameter of one piece matches the outer diameter of the next piece. - Make sure your pump is ready to pump water. (It should either be submersed in water or have a tube going into the water, depending on the type of pump.) Caution: Some pumps can overheat and be damaged if they run without water flowing through them.
- Connect the power supply to your pump. How you connect them will depend on the pump and power supply you purchased. Figure 5 shows one example. Your pump may have a red wire or a "+" sign to indicate the positive connection. The two wires of the wall adapter are stripped and connected to the pump's wires with alligator clips. Be careful, as your pump will turn on as soon as you connect the power supply. Tip: If your pump runs in reverse (it does not appear to suck up any water, or it blows bubbles into the water), or if does not run at all, the positive wire of your pump might be connected to the negative wire of your power supply. To correct this, switch the positive and negative wires.)
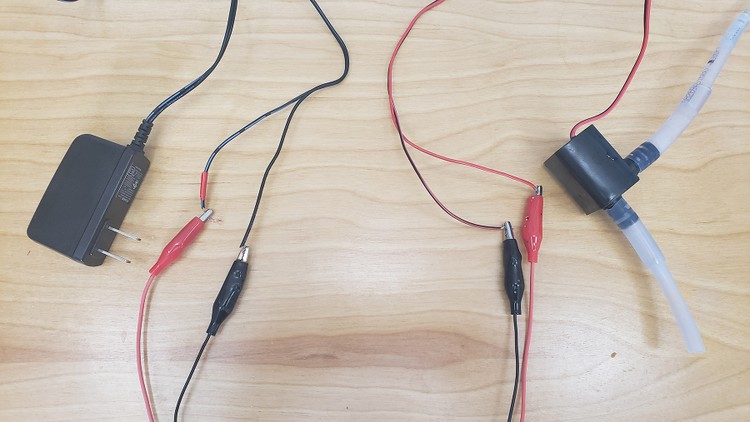
Figure 5. A pump's wires connected to the wires from a 12 V wall adapter. Red and black indicate the positive and negative wires, respectively. - Watch the water flowing out of the tubing. If the water comes out as a rapid series of drops, you are ready to move to the next section. If the water seems like a jet or continuous stream, you need to slow the water flow down. Place a C-clamp over the tubing as shown in Figure 6. Tighten the clamp to adjust the water flow rate until it falls as a rapid series of drops.

Figure 6. C-clamp placed over tubing to control the water flow rate.
/-/https/www.sciencebuddies.org/cdn/Files/18700/5/step-down-tubing-diameter.jpg)
/-/https/www.sciencebuddies.org/cdn/Files/18701/5/pump-power-supply.jpg)
/-/https/www.sciencebuddies.org/cdn/Files/18702/5/water-c-clamp.jpg)
Test the Stroboscopic Effect
Now that you have finished building your fountain, it is time to test it and fine-tune it to generate the "levitating water" illusion.
- Turn off all the lights in the room and close any window curtains or blinds.
- Turn on your pump.
- Open the strobe light app on your phone. Set the duty cycle to 10% and the frequency to about 30 Hz.
- Aim your phone at the water drops from the front. Slowly start increasing the frequency, 1 Hz at a time.
- Watch the water drops carefully. Which way do they appear to be moving? Does their apparent speed or direction change as the frequency of the strobe changes?
- Keep increasing the frequency of the strobe. If you see an illusion, does it disappear at some point?
- Continue to adjust the frequency. Can you find frequencies where the water drops appear to
- Move up slowly?
- Move down slowly?
- Hover in place?
- If needed, you can also try adjusting the frequency of the water drops by tightening or loosening the C-clamp. Tightening the clamp should lower the frequency (fewer drops per second) and loosening the clamp should increase the frequency (more drops per second). If you have trouble getting the illusion to work just by adjusting the strobe light, try adjusting the clamp, then try testing different strobe frequencies again.
- There are other things you can adjust to change the appearance of your fountain.
- If the room is still somewhat bright (for example, daylight is leaking in around curtains), try running the fountain at night.
- Try changing the angle at which you illuminate the water drops. What happens if you hold your phone above or to the side of the drops instead of in front of them? Just be careful not to drop your phone in the water!
- Try changing the background color of the fountain by putting it in front of a different-colored wall or by holding a piece of posterboard or other material behind it.
- Keep adjusting your fountain until you think you have the best conditions for your illusion. Then you are ready to show off your fountain to family or friends, or at a science fair! Can you convince people that water drops are falling up or hovering in mid-air? Can people figure out how the illusion works?
Ask an Expert
Variations
- Can you make a video of your fountain? Note that filming the stroboscopic effect can be tricky. You will probably need to manually adjust the camera settings instead of leaving it in automatic mode. Experiment until you find the settings that work best. Your phone might not let you run the strobe light app and use the camera at the same time, so you might need a separate phone or camera to film. Even then, the light from the strobe app on your phone might not be bright enough to record a good video. You could use a separate stroboscope, which will be much brighter. Stroboscopes are expensive, so see if you can borrow one from a science teacher at your school. You can also build your own brighter strobe light (see next point).
- You can build your own much brighter, strobe light using LED strips and an Arduino. You can program the Arduino to flash the LEDs at a specified frequency and duty cycle. See the RGB Time Fountain video for an example. This project will require prior experience with an Arduino or willingness to learn. See the Science Buddies How to Use an Arduino resource for help.
- Can you try out the stroboscopic effect on a rotating object, like a fan or wheel?
Careers
If you like this project, you might enjoy exploring these related careers:
/-/https/careerdiscovery.sciencebuddies.org/cdn/Files/1609/17/iStock-1007669236.jpg)
/-/https/careerdiscovery.sciencebuddies.org/cdn/Files/1616/17/iStock-1128670108.jpg)
/-/https/careerdiscovery.sciencebuddies.org/cdn/Files/1147/17/unsplash-fJebhGIP0P4.jpg)
/-/https/careerdiscovery.sciencebuddies.org/cdn/Files/19494/4/female-engineer-using-robot-hand-welding.jpg)

/-/https/img.youtube.com/vi/WPuzpggl9Z4/0.jpg)
/-/https/img.youtube.com/vi/ksG87OUZOkA/0.jpg)
/-/https/img.youtube.com/vi/ETtdNMbRwL4/0.jpg)