Abstract
Did you know you can make paintings or drawings using sunlight? You can do it by leaving objects on top of special sun print paper until the light creates an imprint of the objects. How does this process work? How long should you leave the paper in the sun to get the best result? What does any of this have to do with the process of making the microchips that power our phones and computers? Try this project to find out! Check out this page for more science projects related to this process.
Summary
None
Sun print paper, also called nature print paper or photosensitive paper, required.
No issues
/-/https/i.ytimg.com/vi/0QQAU5gB0fI/maxresdefault.jpg)
Objective
Find the exposure time that gives the best results for sun print paper.
Introduction
/-/https/www.sciencebuddies.org/cdn/Files/20186/11/sun-paper-exposure-time-thumbnail.jpg)
Sun print paper, also called nature print paper or photosensitive paper, is a special type of paper that you can use to make artistic prints with sunlight (Figure 1).
/-/https/www.sciencebuddies.org/cdn/Files/20185/11/sun-paper-exposure-time.jpg)
Figure 1. Left: A piece of sun print paper with a transparency sheet on top of it. Right: The sun print paper after it has been exposed to sunlight and rinsed with water.
The paper starts out with a greenish tint from a dye called Berlin green. Berlin green is light sensitive, meaning it undergoes a chemical reaction when exposed to light—specifically, ultraviolet light from the sun. This chemical reaction turns the light-exposed areas of dye dark blue (called Prussian blue). Areas that are blocked from the light—because they are covered by an opaque, or light-blocking, object—do not undergo this chemical reaction, so the Berlin green dye remains.
Berlin green dye is water soluble, meaning it washes away in water. Prussian blue dye is not; it is insoluble in water. When you rinse your sun print paper in water after exposing it to sunlight, the Berlin green dye is washed away, exposing the white paper underneath, but the Prussian blue dye remains. This leaves you with a blue piece of paper with white imprints of the objects that blocked the light, as shown on the right side of Figure 1.
This entire procedure is similar to a process called photolithography. Photolithography is a critical step in the process of making integrated circuits, the microchips that make up the "brains" of electronic devices like phones and computers. Integrated circuits are made from semiconductors, materials that can act like conductors some of the time and insulators some of the time. Watch this video to learn more about the semiconductor manufacturing process, including the photolithography step:
/-/https/i.ytimg.com/vi/g8Qav3vIv9s/maxresdefault.jpg)
The features of integrated circuits are so small that every step in the manufacturing process is critical. During photolithography, a slight misalignment of the mask (the opaque pattern used to create a shadow) or too much or too little exposure (the amount of time exposed to light) could ruin an entire batch of microchips.
In this project you will model this manufacturing process using your sun print paper. What will happen if you change the exposure time? Will a certain amount of time give you the best results? Get ready to find out!
Terms and Concepts
- Sun print paper
- Nature print paper
- Photosensitive paper
- Berlin green
- Light sensitive
- Chemical reaction
- Ultraviolet light
- Prussian blue
- Opaque
- Water soluble
- Insoluble
- Photolithography
- Integrated circuit
- Microchip
- Semiconductor
- Mask
- Exposure
Questions
- How does sun print paper work?
- How is the process for making sun prints related to the process for making microchips?
Bibliography
- Interesting Engineering. (2022, January 4). How are microchips made? [video]. YouTube. Retrieved February 6, 2024.
Materials and Equipment
- Sun print paper (at least 9 sheets). Also called nature print paper, cyanotype paper, or photosensitive paper. Important: Do not remove the paper from its opaque packaging until you are ready to start.
- Transparency sheets (at least 3)
- Black dry erase marker
- Paper clips or binder clips
- Sunny outdoor area
- Stopwatch
- Sink
- Ruler
- Lab notebook
Disclaimer: Science Buddies participates in affiliate programs with Home Science Tools®, Amazon.com, Carolina Biological, and Jameco Electronics. Proceeds from the affiliate programs help support Science Buddies, a 501(c)(3) public charity, and keep our resources free for everyone. Our top priority is student learning. If you have any comments (positive or negative) related to purchases you've made for science projects from recommendations on our site, please let us know. Write to us at [email protected].
Experimental Procedure
- Read the instructions for your sun print paper, including the recommended exposure time. Make sure your sun print paper remains in an opaque package for now and is not exposed to any sunlight.
- Prepare a data table like Table 1 in your lab notebook. Adjust the range of exposure times based on the instructions for your sun print paper.
| Line width (mm) | |||||
|---|---|---|---|---|---|
| Exposure time | Trial 1 | Trial 2 | Trial 3 | Average | Observations |
| 5 minutes | |||||
| 10 minutes | |||||
| 15 minutes | |||||
Table 1. Data table
- Draw a design on a transparency sheet using a dry erase marker.
- You can draw a variety of lines and shapes and write words or numbers. Include the exposure time (such as "5 minutes") on the sheet.
- Make two more copies of the same design on different sheets. Label them with the other exposure times (such as "10 minutes" and "15 minutes"). You will have a total of three marked transparency sheets.
- Use paper clips or binder clips to clip each transparency sheet to a piece of sun print paper, as shown in Figure 2. Make sure the transparency sheet is completely flat against the sun print paper, with no gap in between.
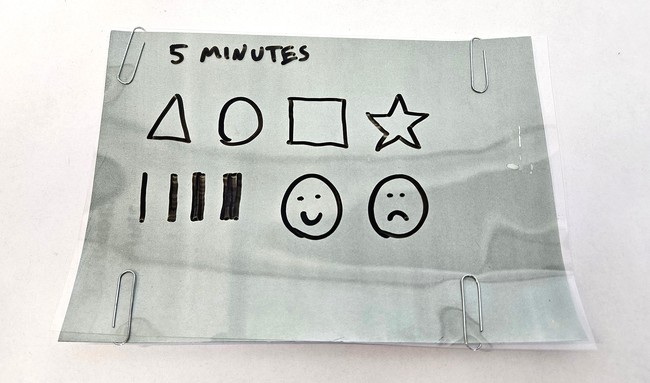
Figure 2. Transparency sheet attached to sun print paper. - Place your sun print papers outside in direct sunlight.
- If it is a windy day, use rocks or other heavy objects to weigh down the corners of the sheets (Figure 3).
- Make sure the transparency sheets are still completely flat against the sun print papers. Notice how there is a gap between the sheets on the left side of Figure 3—look closely and you can see the shadows of the lines on the transparency sheet projected onto the sun print paper.
- Start a timer.
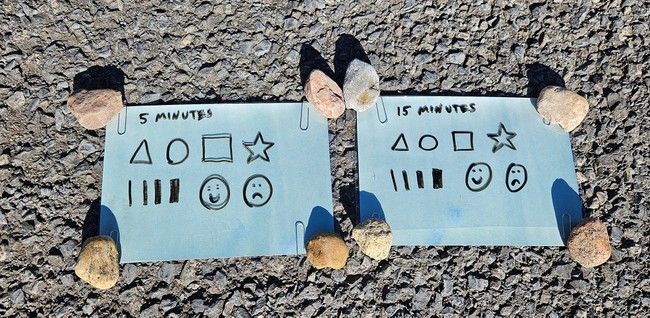
Figure 3. Sun print papers placed outside. Make sure your transparency sheets are flat against the sun print paper, unlike the sheet on the left. - After exactly 5 minutes (or the shortest time you selected based on your paper's instructions), bring the first sun print paper inside. Remove the transparency sheet and rinse the sun print paper under water. Most of the paper should turn blue, while the parts blocked by your design should turn white (Figure 4). Set the sheet aside to dry.
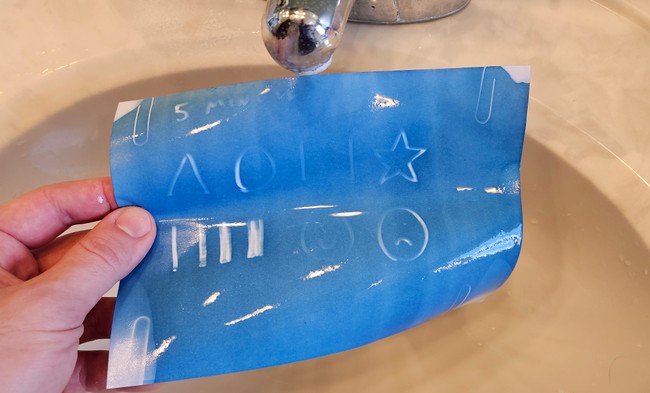
Figure 4. Sun print paper as it is rinsed under water. - Repeat step 6 for your other two sheets, bringing them inside once they have been exposed for 10 minutes and 15 minutes (or the times you selected based on your paper's instructions).
- While your first three sheets are drying, repeat steps 4–7 for your next trial. Use new pieces of sun print paper for each trial. You can reuse your transparency sheets.
- You should now have a total of nine sun prints. You can do more trials or add more times to test if you want.
- Examine each of your sun prints. Write down any qualitative observations in your data table. How well did your mask (the opaque design on the transparency sheet) transfer to the sun print paper? Are some shapes or lines harder to see than others? Do the results vary among the different exposure times?
- Pick a single spot on each print to measure the width of a solid white line (measuring the same location on each print). Record this value in your data table and calculate an average for each exposure time.
- If you do not see any differences in your results, try again with a wider range of exposure times. For example, you could add rows for 1 minute and 20 minutes to your data table.
- Can you find the best exposure time for your process? Is it possible to overexpose or underexpose your sun print? Are there other factors that can affect the quality of your results? See the Variations section for some suggestions for testing these factors as part of your project.
/-/https/www.sciencebuddies.org/cdn/Files/20187/11/sun-print-paper-clip.jpg)
/-/https/www.sciencebuddies.org/cdn/Files/20188/11/sun-print-papers-outside.jpg)
/-/https/www.sciencebuddies.org/cdn/Files/20189/11/sun-print-paper-rinse.jpg)
Ask an Expert
Global Goals
The United Nations Sustainable Development Goals (UNSDGs) are a blueprint to achieve a better and more sustainable future for all.
/-/https/www.sciencebuddies.org/cdn/Files/19752/5/E-WEB-Goal-09.png)
Variations
- How does the type of light affect your sun print? Can you create a print indoors using artificial light? Does the type of bulb (incandescent, CFL, LED, etc.) matter?
- What happens if you use colored dry erase markers instead of black? These markers will act like a filter, only letting certain colors of light through.
- How does misalignment affect the process? What happens if you bump or move the transparency sheet partway through the exposure?
- What happens if you try the experiment on a partially cloudy day or simulate cloud cover by temporarily blocking the sun print sheets to create a shadow?
- What happens if you intentionally create a gap between the transparency sheet and the sun print paper? You could do this by putting thin objects like toothpicks, coins, or bits of paper between them to act as spacers.
- Rising in water is one of the steps of your manufacturing process. What happens if you rinse for different amounts of time? Do you need to rinse for a certain minimum amount of time? Is it possible to rinse too much?
Careers
If you like this project, you might enjoy exploring these related careers:
/-/https/careerdiscovery.sciencebuddies.org/cdn/Files/20162/5/SemiconductorProcessorHeroImage.jpg)
/-/https/careerdiscovery.sciencebuddies.org/cdn/Files/17365/4/manufacturing-technician-main-Stock-1140837585.jpg)
/-/https/careerdiscovery.sciencebuddies.org/cdn/Files/20156/6/quality-control-inspector-worker.jpg)
/-/https/careerdiscovery.sciencebuddies.org/cdn/Files/20167/5/IndustrialProdManager_KeyPhoto.jpg)

/-/https/img.youtube.com/vi/mJCtvZskziI/0.jpg)
/-/https/img.youtube.com/vi/27vUFAI3NLM/0.jpg)
/-/https/img.youtube.com/vi/cd04o5yqSAU/0.jpg)