Abstract
Everyone loves the beautiful colors of fall, but where do they come from and how does the change in colors happen? In this project, you will uncover the hidden colors of fall by separating plant pigments with paper chromatography. What colors will you see?
Summary
None
A kit is available from our partner Home Science Tools®. See the Materials section for details.
Adult supervisions is required while using the stove and hot water. Alcohol is flammable and toxic. Adult supervision is recommended while working with the isopropyl alcohol.
Edited by Svenja Lohner, PhD, Science Buddies
/-/https/i.ytimg.com/vi/YxOSHj_kVlA/maxresdefault.jpg)
Objective
In this project, you will uncover the changing colors of fall leaves by separating plant pigments with paper chromatography.
Introduction
/-/https/www.sciencebuddies.org/cdn/Files/13046/8/thumbnail-color-leaves-PlantBio_p032.jpg)
Everyone loves the beautiful colors of fall, but where do they come from? What happens to make the leaves turn from green to yellow, orange, and red? Part of the answer is that tree leaves have pigments or colorful molecules, inside them. These pigments make food for the tree during warm, sunny months through the process of photosynthesis. Photosynthesis is when the energy of the sun is absorbed by the plant pigments and turned into glucose, or food energy, which keeps the leaves green. But winter brings colder, shorter days and without as much sunlight, the tree shuts down the food-making leaves for the winter. So what you see in the changing autumn colors is the gradual change of these pigments.
- Chlorophyll (green): Chlorophyll is necessary for photosynthesis, which is the chemical reaction that enables plants to use sunlight to manufacture sugars for their food. Trees in the temperate zones store these sugars for their winter dormant period and so do not need to actively make food during the winter. Tree leaves must constantly make chlorophyll when they need it for photosynthesis, so once they stop, the green goes away.
- Xanthophylls (yellow) and Carotenoids (orange): These pigments are also used for photosynthesis, and are there all summer long, you just don't see them because they are usually masked by the strong color of the green chlorophyll. These pigments do not break down as fast as chlorophyll, so they hang around longer during the fall. These pigments are also commonly found in such things as corn, carrots, and daffodils, as well as rutabagas, buttercups, and bananas.
- Anthocyanins (red): The anthocyanins are different, because they begin to appear after the plant stops making chlorophyll. So these pigments are not there during the summer, and they appear latest in the fall succession of color. Anthocyanins are very intense color molecules, and they also give color to such familiar things as cranberries, red apples, concord grapes, blueberries, cherries, strawberries, and plums. They are water soluble and appear in the watery liquid of leaf cells.
When you look at a leaf, you see the result of all of these colors mixing together. But if you separate the pigment molecules, you can see each individual pigment color on its own. One method for separating mixtures of different components is called paper chromatography. In this method, a mixture (such as your pigment mixture) is applied onto a chromatography paper. The paper strip is dipped into a liquid, called the solvent or mobile phase. The liquid will start traveling up the paper strip and carry all the components within the mixture (such as your different color pigments) along through the chromatography paper. While traveling up the paper, each component interacts with the paper and the solvent differently depending on its chemical properties. Some of them are more attracted to the paper whereas others prefer to stay in the mobile phase. As a result, each individual component travels along the paper at a different speed, as shown in Figure 1. This is how with paper chromatography a colorful mixture of pigment molecules can be separated into each individual pigment component.
/-/https/www.sciencebuddies.org/cdn/Files/3672/14/PlantBio_img025.jpg)
A homemade paper chromatography testing box is made from a tall box with a lid. A dowel spanning the width of the box is placed near the top with a binder clip to hold a paper strip that has been marked by colored pigments. The paper strip is long enough to reach the bottom of the box where there is a small pool of solvent. As the solvent is absorbed by the paper and moves upward, it brings some of the colored pigment markings with it.
Figure 1. Paper chromatography. Molecules are separated from each other, depending on how fast they migrate with the solvent up the chromatography paper. (Wikipedia, 2008.)
You can learn more about paper chromatography in the video below. The video gives an overview of what paper chromatography is, shows how it is done, explains the separation processes involved, and also provides tips and tricks for troubleshooting your experiment.
/-/https/i.ytimg.com/vi/TtAENPSThI4/maxresdefault.jpg)
In this science project, you will use paper chromatography to separate the colored pigment molecules from fall leaves. By collecting leaves at different stages of turning, you will be able to capture all of the colors of fall. Will you be able to uncover the hidden colors, and tell the full fall story?
Terms and Concepts
To do this type of experiment you should know what the following terms mean. Have an adult help you search the Internet or take you to your local library to find out more.
- Pigment
- Photosynthesis
- Chlorophyll
- Xanthophyll
- Carotenoid
- Anthocyanin
- Paper chromatography
- Solvent
Questions
- What makes a leaf look so colorful?
- Can I extract the pigment from a leaf?
- Why do leaves turn fall colors?
- Are plant pigments involved in leaves turning fall colors?
Bibliography
- This project was adapted from "How To Do Paper Chromatography With Leaves" at About.com: Chemistry: Helmenstine, A.M. (2007). How To Do Paper Chromatography With Leaves. About.com: Chemistry. The New York Times Company. Retrieved December 6, 2007.
- You can find out more from the SUNY College of Environmental Science and Forestry: Palm Jr., C.E. (2007). Why Leaves Change Color. SUNY College of Environmental Science and Forestry (ESF) E-Center. Retrieved December 6, 2007.
- Then find out more than you ever thought you could know at Harvard: O'Keefe, J., and Lee, D. (2004). Autumn Foliage Color. The Fisher Museum, Harvard Forest, Faculty of Arts and Sciences of Harvard University; and Florida International University, Department of Biological Sciences. Retrieved March 30, 2012.
- Clark, Jim. (2007). Paper Chromatography. Retrieved March 18, 2013.
These resources will give you more information about chromatography and teach you about the types of chromatography used in research labs today:
- Science Buddies. (n.d.). Paper Chromatography Resources. Retrieved January 14, 2018.
- Waters Corporation Staff. (2012). High Performance Liquid Chromatography. Retrieved November 29, 2012.
Materials and Equipment 
Recommended Project Supplies
/-/https/www.sciencebuddies.org/cdn/Files/9132/13/candy-chromotography-kit-2018.jpg)
- Candy Chromatography Science Kit, available from our partner Home Science Tools®. You will need these items from the kit:
- Chromatography paper strips; at least 5. The kit comes with 20 strips; additional chromatography paper can be purchased separately from our partner Home Science Tools®.
- 100 mL beaker
- 90% isopropyl alcohol
- Mini binder clips (2)
- Wooden splints
- Pipette
- Note: This kit contains additional items to do other chromatography science projects. See the kit instructions page for details. Downloadable materials safety data sheets (MSDS) are available for all kit chemicals if required by your science fair.
- You will also need to gather these items, not included in the kit:
- Leaves at different stages of turning colors (30-40, 10 per color group)
- Scissors
- Small, heat-resistant, strong glasses (3-4)
- Stove
- Pot
- Water
- Wooden spoon
- Fork
- Ruler
- Pencil
- Plate
- Resealable plastic bags (3)
/-/https/www.sciencebuddies.org/cdn/Files/17887/13/materials-leaf-color-chromatography.jpg)
Disclaimer: Science Buddies participates in affiliate programs with Home Science Tools®, Amazon.com, Carolina Biological, and Jameco Electronics. Proceeds from the affiliate programs help support Science Buddies, a 501(c)(3) public charity, and keep our resources free for everyone. Our top priority is student learning. If you have any comments (positive or negative) related to purchases you've made for science projects from recommendations on our site, please let us know. Write to us at [email protected].
Experimental Procedure
Before you start this project, it might be helpful to watch this video. The video goes through all the steps of this project and illustrates how each step is done.
- Go on a nice walk with an adult and collect some fresh leaves from different stages of color change during fall. It is best for all of your leaves to come from the same tree, so look for a tree with a variety of leaves at different stages. For the experiment, you ideally want to collect at least 20 leaves of each color. Figure 2 shows an example of some collected leaves:
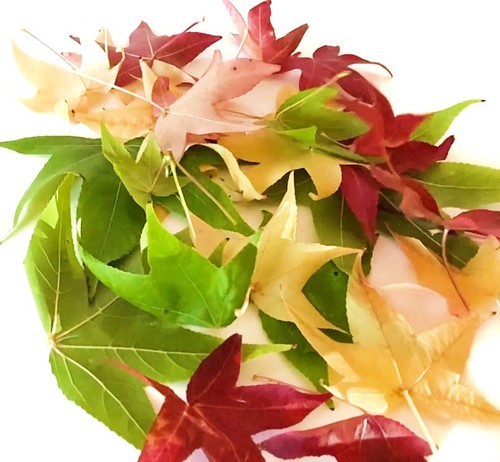 Figure 2. Red, green, and yellow leaves collected from a tree in the neighborhood.
 - Separate and group the leaves into color groups, with 10–30 good leaves in each group (unless you are using a tree with small leaves, like aspen or birch, then you should use a higher number of leaves). Try to form groups from colors that are as different as possible. For example, make a green group, a yellow group, and a red group, as shown in Figure 3. In each group, chose leaves in the deepest colors possible:
 Figure 3. All leaves are separated into a pile of yellow, red, and green leaves.
 - Cut the leaves into very small pieces with your scissors (all pieces should be smaller than about ¾ inch long).
- For each color, put 10 grams of cut leaves into a glass or jar.
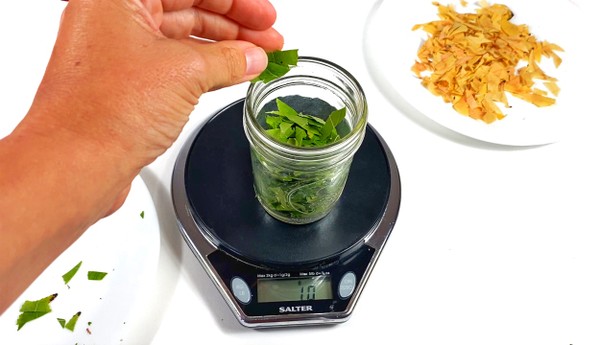 Figure 4. For each color, 10 grams of cut leaves are placed into a glass.
 - Add 1 Tbsp. of 90% isopropyl alcohol to each glass.
- Using the blunt end of a wooden spoon, macerate (soften) the chopped leaves by squashing them into the isopropyl alcohol at the bottom of the cup.
- As you squish the leaves, you will notice that the alcohol will start to turn the color of the leaves. This is called extraction, and the isopropyl alcohol is called the solvent.
- Continue until the liquid turns a deep shade of the color of the leaves, about 5 minutes per glass.
- Let the macerated suspensions sit for 30 minutes in a dark, room-temperature place to allow the color molecules to fully extract.
- Transfer the leaf-alcohol mixture into a resealable plastic bag. Do this for each leaf color separately. Close each bag but leave one end open. Then squeeze on the crushed leaves and collect the leaf extract through the opening of the bag in a small, heat-resistant container.
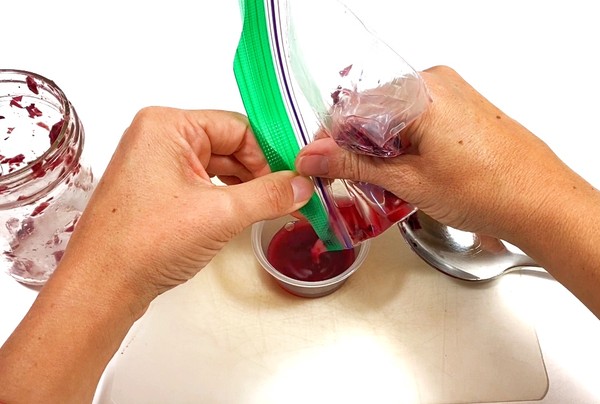 Figure 5. The crushed leaves are placed in a plastic bag and squeezed so the leaf extract can be collected in a small container.
 - Using a fork, lift out any remaining bits and pieces of leaf material from the leaf extract and set the small containers aside. You should be left with a dark suspension of leafy color in isopropyl alcohol.
- Pour some water into a pot and heat it up on the stove. Then switch off the stove and place the three heat resistant glasses with your extracts into the hot water. Let them sit in the hot water for about 20–30 minutes, or until the isopropyl alcohol has mostly evaporated. As the alcohol evaporates, your extracts should become thicker when stirred with a fork.
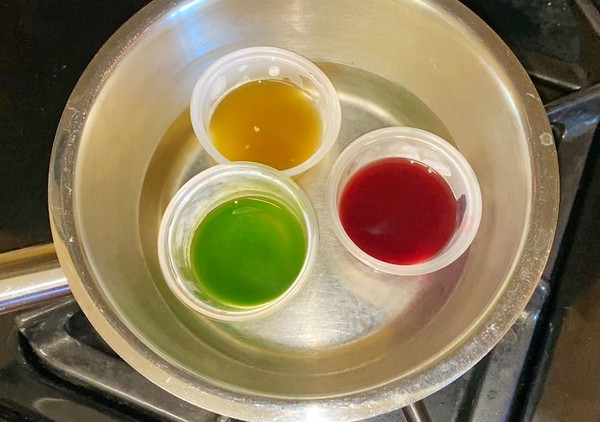 Figure 6. Three small cups are inside a pot. Each cup is filled with a different colored solution, green, yellow, and red.
- Concentrating the extracts should not require more than 30 minutes of evaporating off the isopropyl alcohol, although the extracts will become more concentrated the longer the alcohol is allowed to evaporate off.
- Stir each color thoroughly to blend and loosen any bits of dried up pigment from the side of the bowl. Be sure to use a clean fork for each color so you do not mix them!
- In the meantime, prepare your chromatography paper. Cut the chromatography paper into strips approximately 2 centimeters (cm) wide by 6.5 cm long. Prepare a total of 6 chromatography strips this way.
- Science Buddies Kit: The kit comes with 20 long strips of chromatography paper; two 6.5 cm strips can be cut from each long strip.
- Take one of the chromatography strips and use a ruler and pencil to draw a line across it horizontally 1 cm from the bottom. This is the origin line or baseline, see Figure 7 for details. Repeat this step for all 6 of the chromatography strips.
/-/https/www.sciencebuddies.org/cdn/Files/17901/8/leaf-pile.jpg)
/-/https/www.sciencebuddies.org/cdn/Files/17891/12/color-sorted-leaves.jpg)
/-/https/www.sciencebuddies.org/cdn/Files/17888/13/leaves-10-grams.jpg)
/-/https/www.sciencebuddies.org/cdn/Files/17889/13/squeeze-leaf-extract.jpg)
/-/https/www.sciencebuddies.org/cdn/Files/17890/13/evaporate-leaf-extract.jpg)
/-/https/www.sciencebuddies.org/cdn/Files/2166/12/FoodSci_img080.jpg)
Figure 7. Draw an origin line (baseline) on the chromatography strip. The leaf extract to be tested will be spotted in the middle of the origin line.
- When your color extracts are concentrated enough, use the pipette to place a small dot of extract at the center of the origin line of one chromatography strip as shown in Figure 7. The drop size should be about the size of a pencil eraser. The more extract you have on your paper towel strip the darker the chromatography will be. Some plant pigments can stain, so you should do this on a plate so that the color won't seep through and stain your work surface. Try to apply the extract as smoothly and evenly as you can along the line. Let the spot air dry. Then apply another layer of your sample on the paper strip. Ideally you want to repeat this step 5–10 times to increase the concentration of your sample on the paper. Repeat with 2-3 more strips, using the same color extract, so that you have triplicates for each color pigment.
- Use a pencil to label the chromatography strip "red extract, yellow extract, or green extract". Do not use a pen to label the strips: the ink might run when the alcohol passes through the strips.
- Allow the spot to dry. If the spot is still very faint, you will need to thicken your extract and repeat step 15 on a new strip.
- Repeat step 15 with the other colored extracts so that you have three paper strips for each color extract. Be sure to rinse the pipette between each color extract! Allow the strips to dry.
- Using your binder clips, clip two of the prepared chromatography strips to a wooden splint, as shown in Figure 8. Make sure the two strips do not touch each other and that the bottoms align.
- Rest the wooden splint on top of the 100 mL beaker so that the strips hang into the beaker and do not touch the sides of the beaker, nor the bottom of the beaker. Estimate the distance between the bottom of the beaker and the end of the chromatography strips.
- Remove the wooden splint with the chromatography strips and add 90% isopropyl alcohol to the beaker so the alcohol would just reach the end of the chromatography strips if they are placed back.
- Place the wooden splint back on top of the beaker. Do both strips touch the alcohol? The goal is to have the strip just touching the surface of the alcohol, as shown in Figure 8. As long as the alcohol touches the strips and the alcohol level is below the extract dots, you are good to go!
- If necessary, remove the paper strips from the beaker and add more 90% isopropyl alcohol to reach the desired alcohol level.
/-/https/www.sciencebuddies.org/cdn/Files/2168/12/FoodSci_img085.jpg)
Figure 8. Your setup should look similar to this example. The end of the chromatography strip should just touch the alcohol. Note: This picture does not show chromatography strips with plant extract. The colors on your paper strips should look different.
- Set the beaker aside and watch as the pigments separate along the length of the strip. As soon as one of the colors reaches the top of a strip, remove the strips and allow them to dry. Depending on the type of paper and the solvent, the separation process can take anywhere between 30 minutes to several hours.
- Repeat steps 17 to 21 with all your remaining paper strips.
- Compare the colors found in the different strips. What happened to the colors? Did the different groups of leaves have unique colors, or shared colors, or both? Is each color found in the same place along each strip, or in different places? Are the colors in the same order, or in a different order of separation along the strip?
- Tip: If you have a pale chromatography, next time try using more leaves, cutting them up into smaller pieces (in step 3), and/or adding more of your colored extract solution onto the pencil line on the chromatography paper (step 15). Alternatively, you can also try to use the extracts themselves as your solvent. Replace the isopropyl alcohol in your beaker with one of the extracts. Then hang the paper strips directly into the extract. Repeat with the other leaf extracts.
Ask an Expert
Global Goals
The United Nations Sustainable Development Goals (UNSDGs) are a blueprint to achieve a better and more sustainable future for all.
/-/https/www.sciencebuddies.org/cdn/Files/19758/6/E-WEB-Goal-15.png)
Variations
- If you find a really good tree, you can include all of the intermediate stages of leaf turning in your experiment. An especially good source of a wide variety of colors are aspen trees!
- There are many other natural sources of color, and you can use the same isopropyl alcohol extraction technique to see them. How do the color molecules of different plant sources compare? Some ideas to try are: red cabbage, blueberries, cranberries, carrots, beets, spinach, flowers, and practically any other intensely colored plant you can get a hold of.
- This experiment separated plant pigments using paper chromatography. If you are interested in what else paper chromatography can be used for, you might be interested in these additional Science Buddies resources and projects using paper chromatography:
Careers
If you like this project, you might enjoy exploring these related careers:
/-/https/careerdiscovery.sciencebuddies.org/cdn/Files/947/17/pexels-photo-3825412.jpg)
/-/https/careerdiscovery.sciencebuddies.org/cdn/Files/1662/17/unsplash-oz1NzV2xWXU.jpg)
/-/https/careerdiscovery.sciencebuddies.org/cdn/Files/860/17/pexels-photo-5230966.jpg)
/-/https/careerdiscovery.sciencebuddies.org/cdn/Files/940/18/pexels-photo-1267347.jpg)
Contact Us
Our kits are developed in partnership with Home Science Tools®. If you have purchased a kit for this project, Home Science Tools® is pleased to answer any questions.In your email, please follow these instructions:
- Include your Home Science Tools® order number.
- Please describe how you need help as thoroughly as possible:
Examples
Good Question I'm trying to do Experimental Procedure step #5, "Scrape the insulation from the wire. . ." How do I know when I've scraped enough?
Good Question I'm at Experimental Procedure step #7, "Move the magnet back and forth . . ." and the LED is not lighting up.
Bad Question I don't understand the instructions. Help!
Good Question I am purchasing my materials. Can I substitute a 1N34 diode for the 1N25 diode called for in the material list?
Bad Question Can I use a different part?
Contact Support

/-/https/img.youtube.com/vi/-vTBn11SE9c/0.jpg)
/-/https/img.youtube.com/vi/r7oWtcE6QQc/0.jpg)
/-/https/img.youtube.com/vi/m_K0zZHPrBs/0.jpg)