Abstract
Can humans grow food in space? Can we grow plants on the Moon or on a space station? This is an important question to answer as humans look to expand our existence to the Moon, Mars, and beyond. In this science project you will build a clinostat, a device that can simulate microgravity right here on Earth and use it to explore the effects of microgravity on plant growth.
Summary
Previous experience with Arduino is recommended.
A kit is available from our partner Home Science Tools®. See the Materials section for details.
No issues
/-/https/i.ytimg.com/vi/MIMBqH2o8vw/maxresdefault.jpg)
Objective
Build a clinostat and compare plant growth in regular gravity and simulated microgravity.
Introduction
If humans want to colonize the Moon or live on space stations, eventually we will need to grow food in space. It will become too difficult and expensive to bring all the supplies we need from Earth. However, normally plants grown on Earth rely on gravitropism (also called geotropism), the directional growth of an organism in response to gravity, to grow properly. In other words, gravitropism allows plants to always know which way is up, so they can make their roots grow down and shoots grow up.
This raises an interesting question: how do plants grow in space where there is little or no gravity? Scientists have conducted a variety of experiments on plants grown on the International Space Station (ISS), as shown in Figure 1. For example, they examined whether plants grown in space are more susceptible to disease. You can read more about these experiments in the NASA reference in the Bibliography.
/-/https/www.sciencebuddies.org/cdn/Files/18831/9/zinnia-ISS.jpg)
Gravitropism relies on a plant's perception, or the sensing of environmental stimuli. In more highly evolved plants, perception of gravity occurs in special cells called statocytes. These cells contain small particles, called statoliths, that sink to the bottom of the cell in response to gravity (Figure 2). The statocyte senses where the statolith touches the inside of the cell, so it "knows" which way is down.
The next step is for the statocyte to communicate this information to other parts of the root. The goal is to tell the part of the root that is growing which direction to go. To do this, it has to convert the signal generated by the statolith into a chemical signal. The term used for converting information from one form to another is transduction. The process of signal transduction is very important in biology. For example, your eyes transduce light energy into electrical signals that are sent to the brain for processing, which allows you to see your environment. In the case of the statocyte, the signal from physical contact of the statolith is "transduced" into a chemical signal that is able to communicate with other cells. The final step is the response of the growing cells to the signal indicating which way is down. Signal transduction from the statocytes to the root-tip cells results in a specific response: growth in the direction of the gravitational field.
/-/https/www.sciencebuddies.org/cdn/Files/3197/8/PlantBio_img022.jpg)
The cells in a plant root are protected by an outer layer called the root cap that is colored in red. The inner layer of cells are called statocytes (colored in yellow) and in each statocyte are small structures called statoliths (colored in white) that move in response to gravity.
Figure 2. This diagram of a plant root illustrates the regions of gravity perception. Within the root cap at the apex (red), some cells develop into the gravity-sensing cells called statocytes (yellow). These cells contain statoliths (small white dots) that move in response to the direction of the gravity (toward the bottom). (Drawing by David Whyte, 2008).
In a microgravity environment (with little or no gravity), there is no gravity to pull the statoliths to one side of the statocyte, so the plant does not know which way is down. Doing experiments in a true microgravity environment in space is difficult and expensive. Scientists can simulate a microgravity environment on Earth using a device called a clinostat. A single-axis clinostat rotates continuously about a horizontal axis. As long as it rotates quickly enough, the statoliths never have time to settle against one side of the statocytes, so the plant never knows which way is down. However, the plant may still rely on other processes, such as phototropism (directional response to light) to help determine its growth.
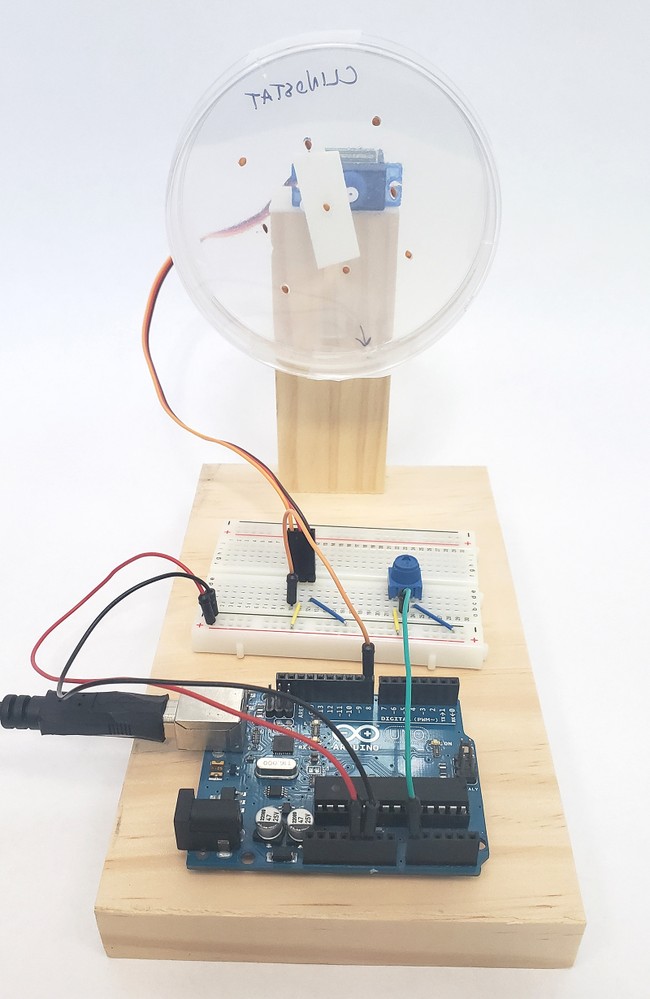
In this project you will build your own clinostat (Figure 3) and use it to conduct simulated microgravity experiments. Your clinostat will consist of a servo motor and an Arduino, which will control the speed of the motor. If you are not familiar with Arduino or building electronic circuits on a breadboard, see the references in the Bibliography.
/-/https/www.sciencebuddies.org/cdn/Files/18832/7/arduino-clinostat.jpg)
Figure 3. A simple homemade clinostat. The vertically-oriented petri dish containing plant seeds is attached to a rotating motor.
Terms and Concepts
- Gravitropism
- Geotropism
- Perception
- Statocyte
- Statolith
- Signal transduction
- Response
- Microgravity
- Clinostat
- Phototropism
- Servo motor
- Arduino
Questions
- How does gravitropism work in plants?
- How is a simulated microgravity environment created with a clinostat similar to a true microgravity environment in space? How are they different?
- What other environmental factors can plants respond to in addition to gravity? How do they affect a plant's growth?
Bibliography
- United Nations Office for Outer Space Affairs (2013, August). Teacher's Guide to Plant Experiments in Microgravity. Retrieved August 1, 2022.
- Heiney, A. (2021, July 12). Growing Plants in Space. NASA. Retrieved August 1, 2022.
- Science Buddies Staff (n.d.). How to Use an Arduino. Retrieved August 1, 2022.
- Science Buddies Staff (n.d.). How to Use a Breadboard for Electronics and Circuits. Retrieved August 1, 2022.
- Grusin, M. and Byron, J. (n.d.). Hobby Servo Tutorial. SparkFun Electronics. Retrieved August 1, 2022.
Materials and Equipment 
Recommended Project Supplies
/-/https/www.sciencebuddies.org/cdn/Files/19915/12/SB_ARDNSTR_web__01473.jpg)
To build the clinostat shown in the procedure, you will need the following materials.
-
Electronics Kit for Arduino, available from our partner Home Science Tools®.
- Note: This project will work with the Arduino UNO R3, UNO R4 Minima, UNO R4 WiFi, and compatible third-party boards.
- Continuous rotation servo motor (not included in kit, must be purchased separately). Note: this is different than a positional servo motor, which only rotates 180°. Look for a servo that says "360" or "continuous rotation."
- Small, cheap servos are readily available and popular to use with Arduino. However, some may burn out after continuous use, which can be a problem since this experiment may run for more than a day. The servos are usually sold in multi-packs anyway, but you should purchase several for this experiment. See procedure for more details about how to address this problem.
- Something to support the motor, such as scrap wood or a cardboard box
- Windows or Mac computer. See this page if you have a Chromebook. Your computer will need:
- Access to the Arduino IDE, either installed local version or web-based editor (note that Chromebooks can only use the web version). Watch this video for a comparison of the two options.
- USB port. The Science Buddies kit comes with a USB-A to B cable. The "B" end plugs into the Arduino and the "A" end plugs into your computer. You will need an adapter or different cable if your computer only has USB-C ports. Watch this video to learn about the different types of cables and adapters.
To conduct plant growth experiments, you will need the following materials. Cress is very fast-growing and convenient for experiments, but you can substitute other plants.
- Cress seeds
- Agar-agar powder
- Petri dishes
- Tweezers
- Recommended: magnifying glass
- Tap water
- Pot
- Stove
- Measuring cups and spoons
- Permanent marker
- Ruler
- Double-sided foam tape
- Block of wood or cardboard box to support vertical petri dish
- Kitchen scale with 0.1 g resolution
Disclaimer: Science Buddies participates in affiliate programs with Home Science Tools®, Amazon.com, Carolina Biological, and Jameco Electronics. Proceeds from the affiliate programs help support Science Buddies, a 501(c)(3) public charity, and keep our resources free for everyone. Our top priority is student learning. If you have any comments (positive or negative) related to purchases you've made for science projects from recommendations on our site, please let us know. Write to us at [email protected].
Experimental Procedure
Build Your Arduino Clinostat
- Make the following connections on the breadboard (Figure 4).
- Connect the Arduino's 5V pin to the power bus (+) on the breadboard.
- Connect the Arduino's GND pin to the (-) bus on the breadboard.
- Put the potentiometer in the breadboard. Make sure the three pins are in three different breadboard rows.
- Connect one of the potentiometer's outer pins to the power bus.
- Connect the other outer pin to the ground bus.
- Connect the middle pin to Arduino analog input pin A0.
- Important: since this experiment needs to run continuously for long periods of time, you will need to leave your Arduino plugged into external power. You can just leave it plugged into the USB port on your computer after uploading your code, or you can plug it into a separate USB charger. Do not use a 9 V battery for this project, as running the motor continuously will kill the battery quickly.
Figure 4. Breadboard diagram for the clinostat circuit.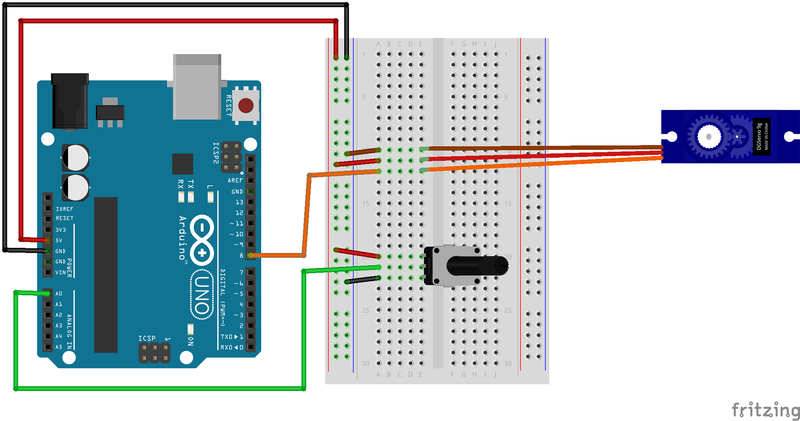
- Connect the servo motor to the circuit. Your servo motor has three wires. Check your servo motor's documentation to confirm the color coding for the wires. The servo shown in Figure 4 has the following connections. Your servo may be different.
- Orange: signal (Arduino pin 8)
- Red: power (breadboard power bus)
- Brown: ground (breadboard ground bus)
- Open the Arduino IDE.
- Plug your Arduino into your computer with the USB cable.
- Make sure you have the correct board and port selected under Tools.
- Copy and paste the following code into the IDE, save it, and upload the file to your Arduino.
/-/https/www.sciencebuddies.org/cdn/Files/18833/7/clinostat-circuit-breadboard-diagram.png)
// code to control continuous rotation servo with potentiometer

#include <Servo.h>

Servo myservo; // create servo object to control a servo

int pot;    // variable for potentiometer analog reading, 0-123
int speed;  // variable for servo speed, 0-180.
            // servo is STOPPED at speed = 90
            // full speed in either direction at 0 or 180.
            // this is NOT the servo's angular position

void setup() {
  // setup code that only runs once
  myservo.attach(8); // use pin 8 to control the servo
}

void loop() {
  // code that loops repeatedly
  pot = analogRead(A0);                // read analog voltage from potentiometer
  speed = map(pot, 0, 1023, 0, 180);   // convert analog reading 0-1023 to speed 0-180
  myservo.write(speed);                // send control signal to servo
}
- Turn the potentiometer. You should be able to use it to control the motor's speed.
- The motor should stop when the potentiometer is approximately in the middle (note that this means the
speedvariable is about 90 - the center of the 0-180 range - not 0). - Turning the potentiometer all the way in either direction should make the motor spin full-speed either clockwise or counter-clockwise (when the
speedvariable is either 0 or 180). - If your motor does not work, carefully double-check all of your wiring.
- The motor should stop when the potentiometer is approximately in the middle (note that this means the
- Turn the motor off for now.
- Build a frame or support for your clinostat. The frame should support the motor so it is mounted horizontally, high enough in the air that it can rotate a petri dish without the petri dish hitting the ground. Figure 5 shows an example.
- Make sure you press the servo horn onto the motor's shaft, as shown in Figure 6. You will use this to attach the petri dish.
- Important: test your servo before continuing with your experiment.
- Let your servo run continuously for 24 hours to make sure it does not burn out and stop spinning (since the servos are usually sold in 5-packs, you should have extras if this one breaks).
- If your servo burned out, it probably got too hot from running continuously. You can help keep the servo cooler by running it intermittently - for example, on for one second, off for one second, or on for 10 seconds, off for 10 seconds. The exact timing is not critical - the point is to give the servo some time to cool down, without waiting so long (minutes or hours) that the seeds start to experience a gravitropic response in a specific direction.
- You can do this by modifying the
loop()function in your Arduino program to alternate between running the servo and stopping it, like this. Thedelayvalues are in milliseconds (1,000 milliseconds = 1 second) - change them to change how long the motor goes/stops. - Re-upload your code and test a new servo with intermittent motion before you continue.
void loop() {
  // code that loops repeatedly
  pot = analogRead(A0);                // read analog voltage from potentiometer
  speed = map(pot, 0, 1023, 0, 180);   // convert analog reading 0-1023 to speed 0-180
  myservo.write(speed);                // turn servo on
  delay(1000);			       // wait
  myservo.write(90);                   // turn servo off regardless of potentiometer position
  delay(1000);                         // wait
}
/-/https/www.sciencebuddies.org/cdn/Files/18834/7/clinostat-frame.jpg)
Figure 5. A support frame for the clinostat made from scrap wood. The motor is attached to the tall piece of wood with double-sided foam tape.
/-/https/www.sciencebuddies.org/cdn/Files/18835/7/servo-horn.jpg)
Figure 6. Servo horn attached to the motor shaft.
Prepare Your Petri Dishes
/-/https/i.ytimg.com/vi/YfQXpzi8qno/maxresdefault.jpg)
- Note: it is best to do this experiment when you will be around to observe the seeds as they germinate. You do not want to miss a good observation period while you are at school or asleep. For example, you could prepare the seeds in the evening, let them start to germinate overnight, and then observe root development throughout the following day. The seeds we tested had ~1 cm roots after about 24 hours and developed shoots after about 36 hours, but your results may vary. Germination time can vary due to many factors like humidity and exposure to light.
- Print the seed placement template.
- Use a permanent marker to draw an arrow on the back side of four petri dishes. This arrow will indicate the "down" direction when you initially plant the seeds (Figure 7).
- Label the four petri dishes (write on the back side): 1. Constant gravity, 2. Rotated 90 degrees, 3. Clinostat, 4. Extra.
Figure 7. Labeled petri dishes

- Measure 1.5 g of agar-agar. Stir it into 100 mL of tap water in a pot.
- Boil the agar-agar solution until it is clear (approximately 1–2 minutes). Stir it while boiling to prevent lumps from forming (Figure 8).
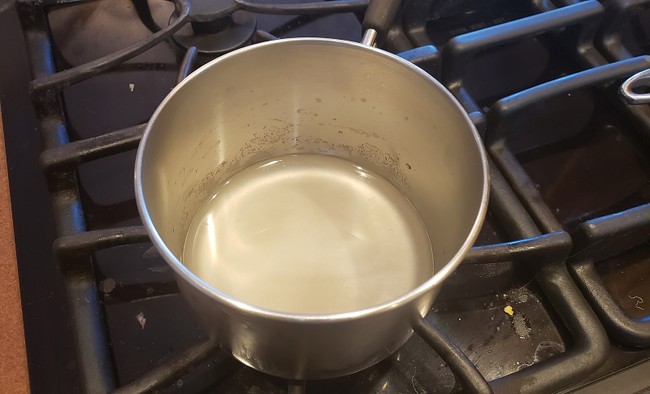 Figure 8. Top: the agar-agar solution will be cloudy when you first start to boil it. Bottom: the solution should become clear within a couple minutes.
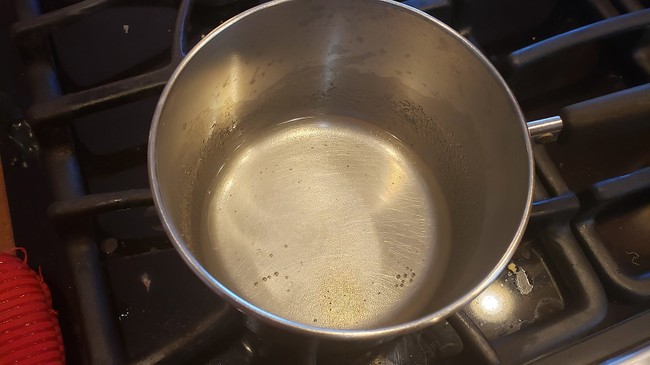
- Wait for five minutes for the solution to cool down.
- Fill the four petri dishes about halfway with the agar-agar solution. Make sure the complete bottom surface of each petri dish is covered (Figure 9).
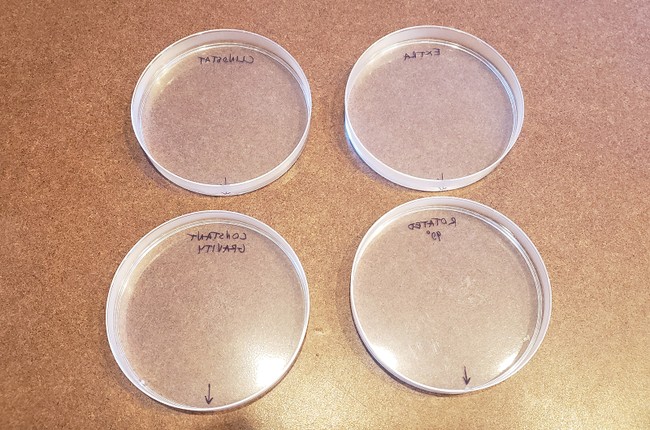 Figure 9. Top: Petri dishes filled with the agar-agar solution. Bottom: a side view of one of the petri dishes, showing the depth of the solution.
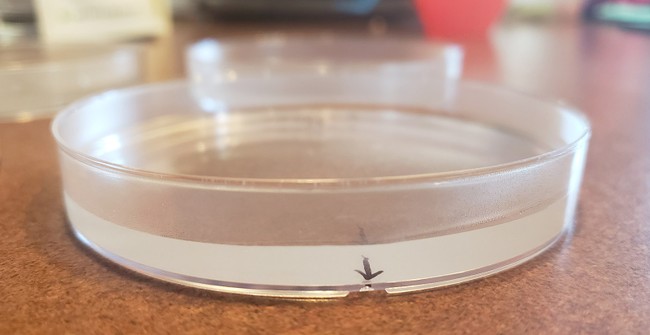
- Cover each petri dish with a lid.
- Wait until the agar-agar has become solid. This may take anywhere from a few minutes up to half an hour. You can test it by poking it with the tweezers.
- If there is condensation on the inside of the lids, gently wipe it off with a paper towel, or remove the lids briefly so it can evaporate.
- One at a time, place each petri dish on the seed placement template. The arrow you drew on the petri dish should point in the same direction as the arrow on the template.
- Use tweezers to gently embed nine cress seeds in the agar-agar. The seeds should only be partially submerged in the agar-agar, so they still have access to oxygen. The micropyle on each seed should point downward, in the direction of the arrow. When it germinates, the seed will split at the micropyle. Figure 10 shows a close-up of a seed with the micropyle labeled. Figure 11 shows a completed petri dish with nine embedded seeds. Note that cress seeds are very small. If you have difficulty seeing the micropyle, use a magnifying glass.
- Repeat steps 12–13 for each petri dish.
Figure 10. Close-up picture of a cress seed with an arrow pointing to the micropyle.
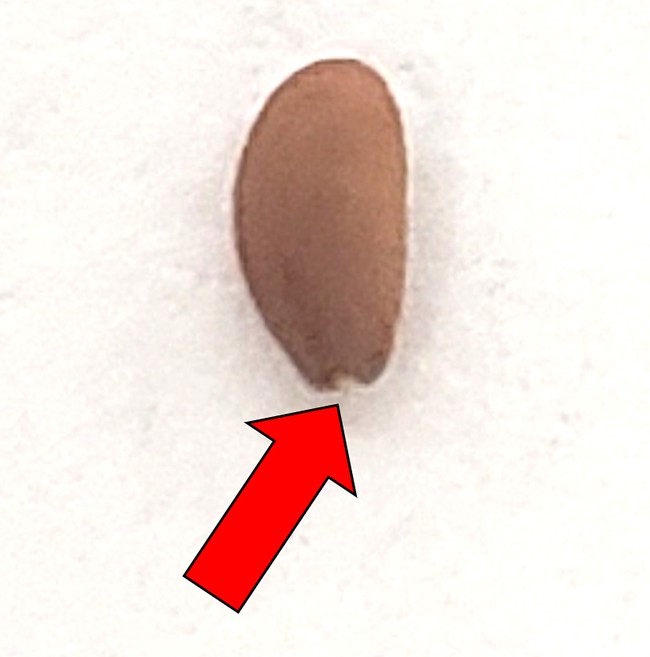
Figure 11. Petri dish with nine cress seeds embedded in the agar-agar.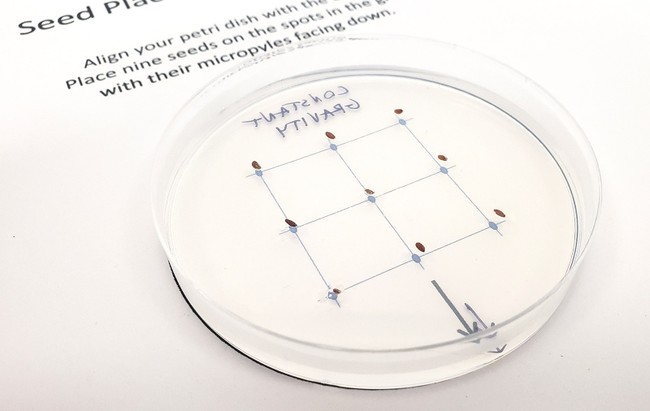
- Wait 10 minutes for the seeds to absorb some water in their outer layer and stick to the agar-agar.
- Try standing one of the petri dishes vertically to make sure the seeds do not fall out. If any of the seeds fall out, put them back into their place and wait longer before continuing.
- Use transparent tape to attach the petri dish lids. Only use a few pieces of tape, so the seeds can still get oxygen. Do not seal the entire perimeter with tape.
- You are now ready to begin your experiment. You should have four petri dishes prepared, with a total of 36 seeds.
/-/https/www.sciencebuddies.org/cdn/Files/18836/7/labeled-petri-dishes.jpg)
/-/https/www.sciencebuddies.org/cdn/Files/18837/7/agar-cloudy.jpg)
/-/https/www.sciencebuddies.org/cdn/Files/18838/7/agar-clear.jpg)
/-/https/www.sciencebuddies.org/cdn/Files/18839/7/petri-dishes-filled-agar.jpg)
/-/https/www.sciencebuddies.org/cdn/Files/18840/7/petri-dish-agar-side.jpg)
/-/https/www.sciencebuddies.org/cdn/Files/18842/7/petri-dish-9-seeds.jpg)
Run the Experiment
This section contains instructions to conduct a basic experiment to examine the effect of gravity on germination and root development in cress seeds. However, there are many other experiments you can do with your clinostat. See the Variations section for other experiment ideas.
For the basic experiment, you will use three of your petri dishes. You will keep one in a constant vertical orientation. You will start one out vertically, then rotate it once by 90 degrees partway through the experiment. You will attach the third petri dish to the clinostat so it rotates continuously. The fourth petri dish serves as a backup in case you drop or damage any of the others.
- Use double-sided foam tape to mount two of the petri dishes vertically to a support like a wood block or cardboard box. The arrows you drew on the petri dishes should point down (Figure 12).
Figure 12. Petri dishes mounted vertically to a support.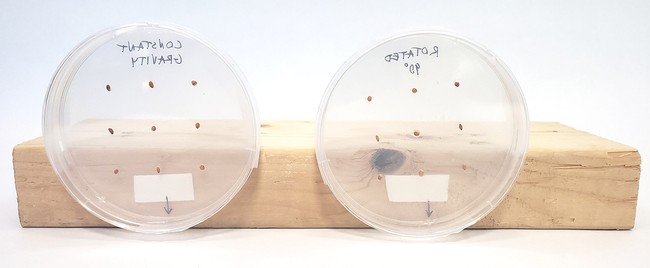
- Use double-sided foam tape to mount the third petri dish to the servo horn. Make sure the petri dish is centered on the servo horn (Figure 13).
- Immediately turn the motor on to the slowest speed you can achieve before it stops. Note that you do not want the petri dish to spin too fast, or the seeds may experience centrifugal effects (they are "flung" toward the outside of the petri dish). If it spins too slow, the seeds may experience gravitropic effects. A speed of approximately 10–15 RPM, easily achievable with common servo motors available for Arduino, should be sufficient.
-
Count the number of revolutions the petri dish makes in one minute. Write this number down (you can try varying the motor's speed for future experiments).Figure 13. Petri dish mounted to clinostat.
- Since light can also affect your seeds' germination and growth, make sure your petri dishes are all facing in the same direction. Ideally, your petri dishes will all face a window so they get natural light. If you use another source of light, make sure it shines on all the petri dishes in the same direction.
- Write down the time you started your experiment. If you have a camera available, take a picture of each petri dish (it is OK to briefly stop the motor to take a picture, but make sure you immediately start it again).
- It is time to watch and wait! How long it takes your seeds to germinate may depend on several factors, like the humidity of the air and exposure to light. If you started the experiment at night, go to bed and check on the plants first thing in the morning. If you started the experiment in the morning, check in every hour or so until you start to see roots develop.
- After the plants have started to develop roots, check in more frequently (every 30–60 minutes). Take pictures of each petri dish if possible. You can write the date and time on a sticky note and include it in the picture to make it easier to track the seeds' growth later.
- After most of the seeds have developed roots that are at least 1 cm long, rotate one of the fixed petri dishes by 90 degrees (so the "gravity" arrow now points sideways), draw a new arrow in the new "down" direction, label this arrow "after rotation," and re-mount it to the support.
- After most of the seeds have developed roots that are at least a few centimeters long, stop the motor, remove all the petri dishes from the tape, and remove their lids.
- Examine each petri dish.
- How many seeds germinated in each petri dish?
- Look at your pictures. When did seeds start to germinate in each dish?
- Measure the root length of each seed. You can do this by cutting a piece of string, laying it along the path of the root (curving if necessary), then measuring the string. You can also use an image analysis program (see the United Nations reference in the Bibliography and instructions for using a program called ImageJ).
- What do you notice about the orientation of the roots in each petri dish? Does the orientation seem related to the initial orientation of the seeds and/or the direction of gravity?
- Based on your analysis of the petri dishes, can you draw any conclusions about the effects of microgravity on seed germination?
/-/https/www.sciencebuddies.org/cdn/Files/18843/7/petri-dishes-vertical.jpg)
/-/https/www.sciencebuddies.org/cdn/Files/18844/7/petri-dish-clinostat.jpg)
Ask an Expert
Global Goals
The United Nations Sustainable Development Goals (UNSDGs) are a blueprint to achieve a better and more sustainable future for all.
/-/https/www.sciencebuddies.org/cdn/Files/19752/5/E-WEB-Goal-09.png)
Variations
- Let your experiment run longer until the seeds start to develop shoots. Does the direction of shoot growth correspond with the direction of root growth?
- How does phototropism affect seed germination and growth? Try mounting a grow light directly above your petri dishes or to one side. Put your plants in an otherwise dark room with no windows so sunlight does not affect their growth.
- How does the rotational speed of the clinostat affect seed germination? Note: it may be difficult to get your servo motor to spin slower than about 15 revolutions per minute (RPM). Try briefly stopping the servo motor using myservo.write(90) and "delay" commands in your Arduino code. It is best to use multiple short pauses (0.25 seconds or less). If you pause too long in one position, or repeatedly pause in the same position, your seeds may experience gravitropic effects.
- You can use your clinostat to simulate lower, but non-zero, gravity by tilting the motor so the axis of rotation is inclined. That way, the seeds will still experience a net effect from gravity, instead of gravity completely canceling out with each rotation. For example, lunar gravity is about 1/6th of Earth's gravity. To simulate lunar gravity, you need to tilt the motor's axis of rotation by about 10° (sin-1(1/6) = 10°). How does germination in lunar gravity compare to germination in microgravity or Earth gravity? Note that you can use the previous formula to calculate the required angle for other planetary bodies with gravity less than Earth's.
- If you want to run a bigger experiment, you can Figure out a way to mount multiple petri dishes to a single motor, or connect multiple motors to your Arduino and use each one to spin a separate petri dish. Be careful when using multiple motors, as you may not be able to power them directly from your Arduino. Your circuit may require a separate external power supply for the motors.
- Can you build a two-axis clinostat that rotates your seeds about two axes?
- In this project you needed to avoid spinning the clinostat too fast, in order to avoid centrifugal effects on the seeds. What if you spin the clinostat very fast on purpose, in order to simulate gravity higher than Earth's? Look up the formula for centripetal acceleration, and use it to calculate the required radius and rate of rotation to simulate different levels of gravity.
Careers
If you like this project, you might enjoy exploring these related careers:
/-/https/careerdiscovery.sciencebuddies.org/cdn/Files/1662/17/unsplash-oz1NzV2xWXU.jpg)
/-/https/careerdiscovery.sciencebuddies.org/cdn/Files/967/17/unsplash-d4KQc-ZqBrc.jpg)
/-/https/careerdiscovery.sciencebuddies.org/cdn/Files/947/17/pexels-photo-3825412.jpg)
/-/https/careerdiscovery.sciencebuddies.org/cdn/Files/1223/17/iStock-971549326.jpg)
Contact Us
Our kits are developed in partnership with Home Science Tools®. If you have purchased a kit for this project, Home Science Tools® is pleased to answer any questions.In your email, please follow these instructions:
- Include your Home Science Tools® order number.
- Please describe how you need help as thoroughly as possible:
Examples
Good Question I'm trying to do Experimental Procedure step #5, "Scrape the insulation from the wire. . ." How do I know when I've scraped enough?
Good Question I'm at Experimental Procedure step #7, "Move the magnet back and forth . . ." and the LED is not lighting up.
Bad Question I don't understand the instructions. Help!
Good Question I am purchasing my materials. Can I substitute a 1N34 diode for the 1N25 diode called for in the material list?
Bad Question Can I use a different part?
Contact Support

/-/https/img.youtube.com/vi/dC9uuHoIgXk/0.jpg)
/-/https/img.youtube.com/vi/2ymXk67MAcs/0.jpg)
/-/https/img.youtube.com/vi/bIfo0anMI98/0.jpg)