Abstract
Have you ever taken care of a plant? It can be tricky to get it right. You have to remember to water it regularly, and you also have to make sure to give it the right amount of water — not too much or too little. What if technology could help? In this engineering project, you will learn how to automate the entire process of watering a plant. Using a soil moisture sensor and a pump, you will build a circuit that will automatically detect when the soil is too dry, add water, and stop when the soil reaches the right moisture level. With this system, you can keep your plants healthy and use only as much water as you need. You can even expand the system to water multiple plants or an outdoor garden!
Summary
Previous experience with Arduino is recommended. See our How to Use an Arduino tutorial.materi
A kit is available from our partner Home Science Tools®. See the Materials section for details.
No issues
/-/https/i.ytimg.com/vi/ojhrVsBs0nM/maxresdefault.jpg)
Objective
Build, calibrate, and test an automatic plant-watering system.
Introduction
/-/https/www.sciencebuddies.org/cdn/Files/19600/8/arduino-soil-moisture-sensor-thumbnail.jpg)
Humans have used irrigation, the artificial application of water to plants (as opposed to natural application from rainfall), for thousands of years. Irrigation can help crops grow in areas that otherwise do not receive enough rainfall. It can also be used for home gardens and landscaping. It can be done manually — for example, using a hose or bucket — or automatically, by using sprinklers or another type of irrigation system (Figure 1).
/-/https/www.sciencebuddies.org/cdn/Files/19601/8/Irrigation-through-sprinkler.jpg)
Some irrigation systems just run on a timer. They apply a fixed amount of water for a certain period of time every day. While this is simple, it can also result in overwatering (which can harm plants) and wasting water, because the sprinklers will run even if it is raining or the soil is already wet. To avoid wasting water, irrigation systems can use an electronic rain sensor or soil moisture sensor. These sensors can detect rainfall or the soil's moisture level, and the irrigation system can be programmed to automatically adjust the amount of water applied or to skip watering altogether. This process requires careful calibration to avoid over- or under-watering the plants.
In this project, you will build your own automatic irrigation system for an indoor plant, like the one in Figure 2. This way, you do not need to worry about waterproofing your circuit for outdoor use, although that is an optional variation of the project. The circuit will use a soil moisture sensor, an Arduino, and a small pump. The Arduino will take readings from the soil moisture sensor and use those readings to automatically control the pump. You will need to calibrate the soil moisture sensor so the pump turns on and off at appropriate moisture levels for your plant and its soil.
/-/https/www.sciencebuddies.org/cdn/Files/19606/9/arduino-soil-moisture-sensor.jpg)
To do this project, you should be familiar with the basics of using an Arduino. See the How to Use an Arduino reference in the Bibliography if this is your first time using an Arduino. You will also need to learn how to use the soil moisture sensor and how to control a pump with your Arduino. These topics are covered in the following two videos.
/-/https/i.ytimg.com/vi/DgCP-3rSHCY/maxresdefault.jpg)
/-/https/i.ytimg.com/vi/To3DKP99-1U/maxresdefault.jpg)
Terms and Concepts
- Irrigation
- Rain sensor
- Soil moisture sensor
- Arduino
Questions
- What are some different uses for irrigation?
- How can irrigation result in overwatering?
- How can you prevent overwatering?
Bibliography
- Science Buddies. (n.d.). How to Use an Arduino. Retrieved April 5, 2023.
- Science Buddies. (n.d.). How to Use a Breadboard. Retrieved April 5, 2023.
- Al-Mutlaq, S. and Bartlett, J. (n.d.). Soil Moisture Sensor Hookup Guide. SparkFun Electronics. Retrieved April 5, 2023.
- Water Science School. (2018, June 7). Irrigation Water Use. United States Geological Survey. Retrieved April 6, 2023.
- US Environmental Protection Agency. (n.d.). Watersense Statistics and Facts. Retrieved April 6, 2023.
Materials and Equipment 
Recommended Project Supplies
/-/https/www.sciencebuddies.org/cdn/Files/19915/12/SB_ARDNSTR_web__01473.jpg)
- Circuit supplies:
-
Electronics Kit for Arduino, available from our partner Home Science Tools®.
- Note: This project will work with the Arduino UNO R3, UNO R4 Minima, UNO R4 WiFi, and compatible third-party boards.
- Soil moisture sensor. The circuit and example code provided in this project are for the SparkFun sensor, but many other Arduino-compatible soil moisture sensors are available.
- Additional LEDs (at least one each of three different colors, the Science Buddies kit only contains red)
- N-channel MOSFET (not required if you just want to water your plant manually)
- DC liquid pump with tubing (not required if you just want to water your plant manually). This is a very small pump with a maximum flow rate of 100 mL/min, but it can be powered directly from your Arduino. This pump should be sufficient for an experiment with a single small to medium-sized potted houseplant. For larger plants or multiple plants, you may need a larger pump, which will require an external power supply.
- If you do not want to leave your Arduino plugged into your computer's USB port for power, you will need a wall adapter or USB wall charger.
- Windows or Mac computer. See this page if you have a Chromebook. Your computer will need:
- Access to the Arduino IDE, either installed local version or web-based editor (note that Chromebooks can only use the web version). Watch this video for a comparison of the two options.
- USB port. The Science Buddies kit comes with a USB-A to B cable. The "B" end plugs into the Arduino and the "A" end plugs into your computer. You will need an adapter or different cable if your computer only has USB-C ports. Watch this video to learn about the different types of cables and adapters.
-
Electronics Kit for Arduino, available from our partner Home Science Tools®.
- Other supplies:
- Small indoor potted plant with soil
- Spoon
- Microwave- or oven-safe bowl
- Microwave
- Container of water (should hold enough to water your plant more than once)
- A container to secure your circuit so it does not get dirty or wet (such as a plastic food storage container)
- Small towel or rag
- Materials like tape or paper clips to secure the tubing to the pot
- Lab notebook
- Pen or pencil
Disclaimer: Science Buddies participates in affiliate programs with Home Science Tools®, Amazon.com, Carolina Biological, and Jameco Electronics. Proceeds from the affiliate programs help support Science Buddies, a 501(c)(3) public charity, and keep our resources free for everyone. Our top priority is student learning. If you have any comments (positive or negative) related to purchases you've made for science projects from recommendations on our site, please let us know. Write to us at [email protected].
Experimental Procedure
Calibrate Your Sensor
Before you build a full automatic watering system, you need to calibrate your soil moisture sensor for the soil you plan to work with.
- Build the circuit shown in Figure 3.
- For the soil moisture sensor:
- VCC to Arduino pin 8
- GND to the ground bus
- SIG to Arduino pin A0
- For the LEDs:
- Red LED and 220 Ω resistor to Arduino pin 2
- Yellow LED and 220 Ω resistor to Arduino pin 3
- Blue LED and 220 Ω resistor to Arduino pin 4
Figure 3. Breadboard diagram for the Arduino soil moisture sensor circuit.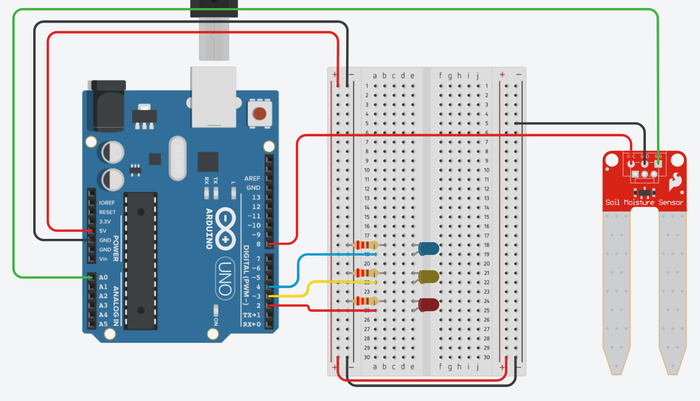
- For the soil moisture sensor:
- Download soil_moisture_sensor_calibration.ino. Read through the commented code so you understand how it works. A Tinkercad Circuits simulation with the code is also available.
- Upload the code to your Arduino and open the serial monitor (Tools→Serial Monitor). The serial monitor should read 0 and the red LED should be on when the probes are not touching anything. If you touch both probes at the same time with one finger, the reading in the serial monitor should change, since your skin is slightly conductive.
- Prepare a bowl of dry soil. You can leave the soil out in the sun or speed up the process by drying it in an oven or microwave. Try to make the soil as dry as possible.
- Prepare a data table like Table 1.
/-/https/www.sciencebuddies.org/cdn/Files/19603/8/arduino-soil-moisture-sensor-breadboard-diagram.png)
| Dry soil | Wet soil | |||
|---|---|---|---|---|
| Trial | Initial reading | Final reading | Initial reading | Final reading |
| 1 | ||||
| 2 | ||||
| 3 | ||||
| Average | ||||
Table 1. Table for recording sensor calibration data.
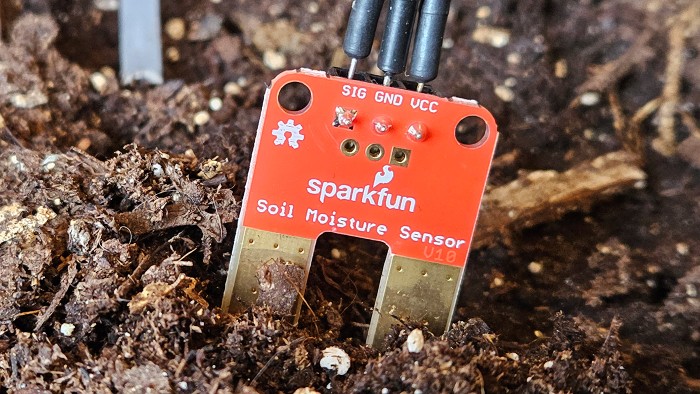
- Push the sensor firmly into the soil, so the probes are almost completely submerged (Figure 4).
- Watch the serial monitor and immediately write down the sensor's initial reading.
- The sensor reading may fluctuate at first. Wait five minutes for the reading to stabilize, then write down the final reading. If the reading is still changing, wait another five minutes, then check again.
Figure 4. Close-up picture of the soil moisture sensor in the soil.
- Pull the sensor out of the soil. Dry it off with a clean towel.
- Put the sensor in a different location in the soil. The measurement will depend on the contact area between the sensor probes and the soil, so make sure you test it at the same depth each time.
- Repeat steps 7–10 as needed for at least two more trials with dry soil.
- Slowly add water to the soil until it is completely saturated (cannot absorb any more water).
- Repeat steps 6–11 for at least three trials with wet soil.
- Calculate average initial and final readings for both the wet and dry soil.
- In the code, adjust the values for the
wetanddryvariables. You will need to pick appropriate values based on your calibration, your soil, and your plant. For example, you might not want to wait until the soil is completely dry to start watering, and you might not want to apply water until the soil is saturated. You may wish to set values in the code that are somewhere between the calibration values you recorded. - Finally, adjust the
delayTimevariable. This variable defaults to 1 second (1,000 milliseconds) to make the calibration process quick, but you probably do not need to check the moisture level of your plant's soil every second! You should think about what value makes the most sense for your plant, but be careful not to make the delay too long. For example, if you only check the sensor once per hour, then when the soil gets dry, the pump will run continuously until the Arduino checks the sensor value again an hour later. This could result in overwatering or even water spilling out of the pot!
/-/https/www.sciencebuddies.org/cdn/Files/19604/8/soil-moisture-sensor-in-soil.jpg)
Set Up Your Automatic Watering System
Now you are ready to connect a pump and start automatically watering your plant.
- Connect the pump to your circuit as shown in Figure 5. Note: This image uses a DC motor to represent the pump, because Tinkercad does not have a separate "pump" part, but the wiring is the same.
- Put the MOSFET in the breadboard with its pins in three different rows.
- Connect the MOSFET's gate (the pin on the left when the writing is facing you) to Arduino pin 11.
- Connect the MOSFET's drain (the middle pin) to the pump's negative wire.
- Connect the MOSFET's source (the pin on the right when the writing is facing you) to ground.
- Connect the pump's positive wire to 5 V.
Figure 5. Pump (represented by a DC motor in this diagram) connected to the circuit. The pump is controlled by a MOSFET since the Arduino's pins cannot supply enough current to drive the pump directly.
- Put the MOSFET in the breadboard with its pins in three different rows.
- Download soil_moisture_sensor_pump.ino and upload it to your Arduino. A Tinkercad Circuits simulation is also available.
- Now you need to physically set up the system for your plant. Your exact setup will depend on your situation, but here are some things to consider. (Figure 2 shows an example.)
- How will you power the Arduino? You might not want to leave it plugged in to your computer's USB port for weeks at a time. You can power the Arduino using a wall charger or a USB wall adapter and the USB cable (see materials list).
- How will you protect the Arduino and circuit from dirt and moisture? Will you put them in a container? Where will you put the container?
- Where will you put your reservoir of water?
- How will you connect the pump's tubing from the reservoir of water to the plant? Will you need something to hold the tubing in place? Where will you put the outlet tube? At the edge of the pot or at the base of the plant? Somewhere in between?
- Where will you put the soil moisture sensor? Does it matter? For example, do you want to take readings near the base of the plant, or at the edge of the pot? If you put the sensor right next to the pump's outlet tube, what effect could this have?
- Do you need to do anything to protect the entire system — for example, from pets or small children?
- Once your system is set up, you are ready to monitor its performance and your plant. Depending on how often you normally water your plant, this process could take days or weeks. Note that you might not be there to observe when the pump is running (you could be at school or asleep). Keep an eye on both the soil and the plant. Does the soil look too dried out or oversaturated? Does the plant look wilted? If so, you may need to adjust the
wetanddryvariables in your code. - Even when it is only powered on intermittently, the sensor's probes can oxidize over time. If you notice any drift in the system's performance, like a trend toward over- or under-watering, you may need to recalibrate your sensor. Your plant could also be growing and consuming more water. Continue to monitor the soil and your plant's health, and adjust the
wetanddryvariables as needed. - Can you get to a point where the automatic system can reliably water the plant for you? (You will still need to refill the external container of water occasionally.) Since this is an engineering design project, there are many other features you could add to your automatic watering system. See the Variations section for some ideas.
/-/https/www.sciencebuddies.org/cdn/Files/19605/8/soil-moisture-sensor-with-motor.png)
Ask an Expert
Global Goals
The United Nations Sustainable Development Goals (UNSDGs) are a blueprint to achieve a better and more sustainable future for all.
/-/https/www.sciencebuddies.org/cdn/Files/19745/5/E-WEB-Goal-02.png)
Variations
- Can you build a circuit with multiple soil moisture sensors to take readings from different locations in the pot?
- Can you make your circuit waterproof and use it with outdoor plants?
- Can you use the Arduino's
analogWrite()function to run the pump at variable speeds instead of only turning it fully on or off? - Can you do an experiment to compare the performance of manual watering, watering with a timer, and automatic watering with a soil moisture sensor? You can monitor plant health, size, yield, etc., and see how the different methods compare. You can also keep track of the total amount of water used in order to monitor water waste.
- Can you add potentiometers and a display to your circuit so you can adjust the wet/dry variables without needing to re-upload the code?
- The soil moisture sensor in this project is resistive. The probes of a resistive moisture sensor can oxidize over time, requiring you to recalibrate the sensor. This is why you only power the sensor intermittently when you take a reading, instead of connecting it directly to the Arduino's 5 V and leaving it on all the time. Alternatively, you can use a capacitive soil moisture sensor, which avoids some of the problems faced by resistive sensors. Can you do an experiment to compare the performance of the two types of sensors over time?
- Can you design a larger automatic irrigation system with multiple soil moisture sensors, either for multiple potted plants or different locations in a garden bed? Can you use multiple pumps, or electronic valves to control the flow from a single pump, to only water the plants or areas that need it?
Careers
If you like this project, you might enjoy exploring these related careers:
/-/https/careerdiscovery.sciencebuddies.org/cdn/Files/1783/17/nrcseprd423668.jpg)
/-/https/careerdiscovery.sciencebuddies.org/cdn/Files/1378/17/iStock-1170131622.jpg)
/-/https/careerdiscovery.sciencebuddies.org/cdn/Files/1662/17/unsplash-oz1NzV2xWXU.jpg)
/-/https/careerdiscovery.sciencebuddies.org/cdn/Files/1223/17/iStock-971549326.jpg)
Contact Us
Our kits are developed in partnership with Home Science Tools®. If you have purchased a kit for this project, Home Science Tools® is pleased to answer any questions.In your email, please follow these instructions:
- Include your Home Science Tools® order number.
- Please describe how you need help as thoroughly as possible:
Examples
Good Question I'm trying to do Experimental Procedure step #5, "Scrape the insulation from the wire. . ." How do I know when I've scraped enough?
Good Question I'm at Experimental Procedure step #7, "Move the magnet back and forth . . ." and the LED is not lighting up.
Bad Question I don't understand the instructions. Help!
Good Question I am purchasing my materials. Can I substitute a 1N34 diode for the 1N25 diode called for in the material list?
Bad Question Can I use a different part?
Contact Support

/-/https/img.youtube.com/vi/gmeCY7ANrog/0.jpg)
/-/https/img.youtube.com/vi/g0Y6yKlDNdM/0.jpg)
/-/https/img.youtube.com/vi/8h7UZ8pE_Q0/0.jpg)