Abstract
Drones come in all shapes and sizes. In this engineering project you will design and 3D-print your own frame for a miniature drone.
Summary
None
Access to a 3D printer or online 3D printing service required.
No issues
LEGO® is a registered trademark of The LEGO Group.
/-/https/i.ytimg.com/vi/bj0fVIqGAds/maxresdefault.jpg)
Objective
Design and 3D-print the frame for a miniature drone.
Introduction
/-/https/www.sciencebuddies.org/cdn/Files/17691/9/3d-print-drone-chassis.jpg)
Drones come in all shapes and sizes. A quadcopter is a popular type of drone that has four propellers (Figure 1). Each propeller is driven by a motor. Drones have many other parts, like a battery for power and a circuit that helps steer the drone. Some drones also have a camera. Many drones have legs or landing gear that helps them land upright. All of these parts are held together by the drone's frame, also called the chassis (pronounced "chassee," the last "s" is silent).
/-/https/www.sciencebuddies.org/cdn/Files/17035/14/quadcopter.jpg)
Figure 1. A DJI Phantom, a popular type of consumer drone.
Drone frames can be made from many different materials. They can be made from metal, plastic, or materials like carbon fiber. Some people have even built drone frames using wood or building toys like LEGO®. However, in general, most drone frames serve the same purpose. They need to hold all the parts of the drone together. The frame should be lightweight so it does not weigh the drone down too much, but also strong so it does not bend too much as the drone flies, or break easily if the drone crashes. Some drone frames are a fixed size and shape, while others fold up to make the drone more compact for easy transport. Finally, many consumers might want a drone that looks cool, and the frame is an important part of the drone's appearance.
In this project, you will design your own frame for a miniature drone using a computer-aided design (CAD) program. You will make the frame using 3D printing, then add real motors and connect them to a battery so you can test the drone. You should follow the engineering design process to design, build, and test your drone frame. You can read more about the engineering design process in the Bibliography.
Terms and Concepts
- Drone
- Quadcopter
- Propeller
- Motor
- Battery
- Circuit
- Camera
- Frame
- Chassis
- Computer-aided design (CAD)
- 3D printing
- Engineering design process
Questions
- What are the main parts of a drone?
- What are some important features of a drone frame?
Bibliography
- Foundation Structures, Inc. (n.d.). 10 Drone Parts Everybody In Construction Should Know. Retrieved July 13, 2021.
- Autodesk Tinkercad. (n.d.). Learn how to Tinker. Retrieved July 13, 2021.
- Kiddle. (n.d.). 3D printing facts for kids. Retrieved July 13, 2021.
- Science Buddies Staff. (n.d.). The Engineering Design Process. Science Buddies. Retrieved July 13, 2021.
Materials and Equipment 
Recommended Project Supplies
/-/https/www.sciencebuddies.org/cdn/Files/18890/21/SB-MNIDRON_1000x1000.jpg)
- Access to a computer-aided design (CAD) program. Tinkercad is a free option that runs in a web browser and is good for beginners.
- Access to a 3D printer or online 3D printing service such as Shapeways, Sculpteo, or i.materialise.
- All the materials from the DIY Mini Drone Kit, except for the popsicle sticks and straw, which you will replace with a 3D-printed frame in this project.
- Lab notebook
Disclaimer: Science Buddies participates in affiliate programs with Home Science Tools®, Amazon.com, Carolina Biological, and Jameco Electronics. Proceeds from the affiliate programs help support Science Buddies, a 501(c)(3) public charity, and keep our resources free for everyone. Our top priority is student learning. If you have any comments (positive or negative) related to purchases you've made for science projects from recommendations on our site, please let us know. Write to us at [email protected].
Experimental Procedure
- If you have not already, watch this video before you continue:
- Make a list of things to consider when designing your drone frame. For example:
- How will you attach the motors and wires to the frame? (Note: the motors in our materials list have a 6 mm diameter and are 15 mm long.)
- Will the frame have landing gear or legs?
- How can you make your frame lightweight and durable? (If the frame is too heavy, your motors may not be able to lift it.) Will the parts break if you make them too thin?
- What shape do you want the frame to be? What should it look like?
- Will your frame include a guide for vertical flight on a guide pole, or will your drone be free-flying? If you decide not to include a guide, you can always glue on a piece of straw later (see step 6).
- Is there a way to strategically use holes in the design to use less material and make the drone lighter?
- Design your frame in a CAD program like Tinkercad (Figure 2). You can start your own design from scratch, or you can copy and modify one of the designs from the Science Buddies Tinkercad page (drone frame 1, drone frame 2, drone frame 3). You might end up with multiple CAD files, so keep track of which is which (for example, include "version 1" in the filename).

Figure 2. A screenshot of a drone frame designed in Tinkercad. - Carefully review your design before you continue. While the engineering design process is often iterative (meaning you might repeat some of the steps and re-design or re-build something), too much iteration with 3D printing can be time-consuming and expensive. If you are using an online 3D printing service, it might take days or weeks for your printed frame to arrive. If you have your own 3D printer, it might take several hours for your frame to print, but you do not want to waste lots of printer filament if you need to re-print the frame to correct mistakes.
- Print your frame (Figure 3) and complete any required post-processing. For example, depending on the type of printer used, you might need to clean or break off support material.
- Does your frame look like you thought it would, based on the CAD design?
- Does your frame feel sturdy enough if you try to gently squeeze it or bend it?
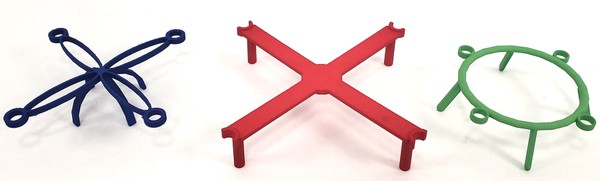
Figure 3. Several different 3D-printed drone frames. - Follow the instructions in this video to assemble and test your drone, using your 3D-printed frame instead of popsicle sticks and straws (Figure 4). You can also follow the written instructions.
- Do all the parts fit together like you thought they would?
- Do you have any problems when assembling your drone?
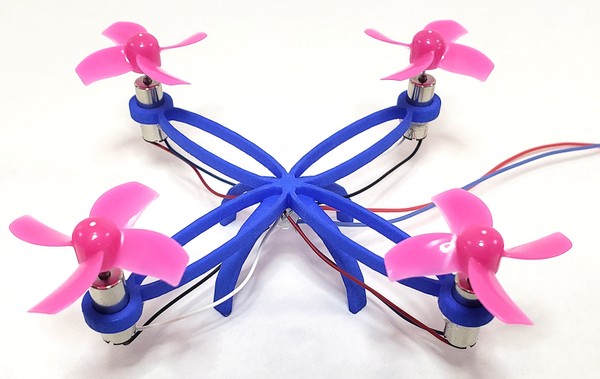
Figure 4. Assembled mini drone with 3D-printed frame. - Test your drone! Turn on the motors and observe what happens when the drone flies. After your drone lands, inspect the frame for damage.
- Did any parts of the drone fall off?
- Did the frame break anywhere?
- Based on your answers to the questions in steps 5–7, think about how you could change your frame's design to improve it. Make a list of the changes and improvements you want to make. For example, maybe it was too hard to attach the motors, and you need to change the size or shape of the motor attachment points. Maybe your drone was too heavy to lift off, and you need to make the frame lighter. Or maybe your frame was too thin and broke easily, so you need to make it sturdier.
- Make a copy of your CAD design and save it with a new name (for example, include "version 2"). Make changes to your design using the list you wrote in step 8.
- If you have the time and budget, you can print and test a second (or even a third) version of your frame. If you do not have the time and budget to print more than one frame, then for your project you can still show "version 2" of your CAD file and explain how the changes you made would improve the frame.
/-/https/i.ytimg.com/vi/bj0fVIqGAds/maxresdefault.jpg)
/-/https/www.sciencebuddies.org/cdn/Files/17689/8/drone-frame-tinkercad-screenshot.png)
/-/https/www.sciencebuddies.org/cdn/Files/17688/9/3D-printed-drone-frames.jpg)
/-/https/i.ytimg.com/vi/Q-BluEJBHLw/maxresdefault.jpg)
/-/https/www.sciencebuddies.org/cdn/Files/17690/8/3D-printed-mini-drone.jpg)
Ask an Expert
Global Goals
The United Nations Sustainable Development Goals (UNSDGs) are a blueprint to achieve a better and more sustainable future for all.
/-/https/www.sciencebuddies.org/cdn/Files/19752/5/E-WEB-Goal-09.png)
Variations
- Can you 3D-print working propellers for your mini drone?
- If you want to build a larger, fully functional drone, see the Build Your Own RC Drone project.
Careers
If you like this project, you might enjoy exploring these related careers:
/-/https/careerdiscovery.sciencebuddies.org/cdn/Files/1725/18/4161_Michelle_Easter_and_Curiousity_Clone.jpg)
/-/https/careerdiscovery.sciencebuddies.org/cdn/Files/1384/20/unsplash-4T-02pK0jUg.jpg)
/-/https/careerdiscovery.sciencebuddies.org/cdn/Files/1450/21/iStock-1227179796.jpg)
/-/https/careerdiscovery.sciencebuddies.org/cdn/Files/835/18/msfc-202000343.jpg)
/-/https/careerdiscovery.sciencebuddies.org/cdn/Files/19369/4/machinist-manufacturing-tool-die-maker-iStock-879134734.jpg)
/-/https/careerdiscovery.sciencebuddies.org/cdn/Files/20167/5/IndustrialProdManager_KeyPhoto.jpg)
Contact Us
Our kits are developed in partnership with Home Science Tools®. If you have purchased a kit for this project, Home Science Tools® is pleased to answer any questions.In your email, please follow these instructions:
- Include your Home Science Tools® order number.
- Please describe how you need help as thoroughly as possible:
Examples
Good Question I'm trying to do Experimental Procedure step #5, "Scrape the insulation from the wire. . ." How do I know when I've scraped enough?
Good Question I'm at Experimental Procedure step #7, "Move the magnet back and forth . . ." and the LED is not lighting up.
Bad Question I don't understand the instructions. Help!
Good Question I am purchasing my materials. Can I substitute a 1N34 diode for the 1N25 diode called for in the material list?
Bad Question Can I use a different part?
Contact Support

/-/https/img.youtube.com/vi/tSsKYdh9_7w/0.jpg)
/-/https/img.youtube.com/vi/6RA9x4wlnW8/0.jpg)
/-/https/img.youtube.com/vi/O-EUEFXbrmE/0.jpg)