Abstract
Can you build a robot that hops like a frog? In this engineering project, you will learn how to build a simple robot that uses the energy stored in a stretched rubber band to jump. You will use the engineering design process to try to make your robot jump higher and farther. How far can you make it jump?Summary
/-/https/i.ytimg.com/vi/jjgXGTaKTxE/maxresdefault.jpg)
Objective
Design, build, and test your own jumping robot.
Introduction
/-/https/www.sciencebuddies.org/cdn/Files/19422/5/jumping-robot-thumbnail.jpg)
If you wanted to build a robot that could move horizontally across a relatively smooth surface, you might give it wheels. But what if you wanted your robot to run, climb, swim, fly—or jump? Where would you look for inspiration? If you are like many engineers, you would look to nature. Robots that are modeled after animals and other organisms are called biologically inspired or bio-inspired robots.
Jumping is one type of motion that is common in the animal world but uncommon for robots. Engineers are learning how to make robots jump by observing animals and bugs, then finding ways to mimic or improve on their methods. Watch this video to see a robot that can jump over 30 meters into the air!
/-/https/i.ytimg.com/vi/daaDuC1kbds/maxresdefault.jpg)
Jumping robots like the one in the video need to store up elastic potential energy before they jump. This is the kind of energy that is stored in a stretched or bent material, like a spring or rubber band. When this energy is released, it is converted to kinetic energy, the energy of motion, and the robot jumps up into the air. As the robot moves higher, its kinetic energy converts to gravitational potential energy, the energy an object has due to its height above the ground. The gravitational potential energy is converted back to kinetic energy as the robot falls back to the ground. When the robot lands, the energy is dissipated as sound and heat.
There is a basic engineering challenge when building a jumping robot: You have to figure out how to first store elastic potential energy, then release it very quickly so the robot can jump. In this project, you will build a robot (Figure 1) that uses a motor to stretch a rubber band, as shown in this video.
/-/https/www.sciencebuddies.org/cdn/Files/19409/5/jumping-robot.jpg)
Figure 1. An example of the type of robot you will build in this project.
Each motor has two wheels attached (made from plastic bottle caps). Each wheel has a high-friction material (such as hot glue or a rubber band) on one half of its outer surface. The other half is smooth plastic. When the wheels spin, contact with the high-friction surfaces pulls the entire motor down along the wooden dowels, stretching the rubber band and storing energy. As the motor continues to rotate, the smooth plastic parts of the wheels slip against the dowels, allowing the rubber band to quickly contract, launching the robot into the air (Figure 2).
/-/https/www.sciencebuddies.org/cdn/Files/19410/5/jumping-robot-diagram.png)
The robot starts with a motor that has an axel through. Attached to the axel are two plastic bottle cap wheels that have a grippy surface on half their circumference and a smooth surface on the other half. The motor has pieces of a straw glued to its sides. There is a base with two feet made of popsicle sticks, and dowels rise at an angle out of the base and go through the straw pieces on the motor. Another dowel attaches the two upright pieces across the top. A rubber band attaches to the front of the motor, then up and over the crossbar, and down to attach again on the back of the motor. Stage 1. As the wheels turn, the grippy half of the wheel rolls along the dowels, pushing the motor downward. Stage 2. The motor continues to move downward until the rubber band is fully stretched. Stage 3. The smooth part of the wheel starts to slip against the wooden dowel. Stage 4. As the wheel slips, the rubber band rapidly contracts, pulling the motor up and launching the robot into the air.
Figure 2. Diagram of the robot's jumping motion.
Your robot needs a battery for power. You form a circuit when you connect the motor to the battery. Your circuit can include a switch so you can easily turn the robot on and off. Figure 3 shows a diagram of the circuit. The battery, switch, and motor are connected in series, meaning the parts are connected end-to-end and the same electrical current flows through each part of the circuit.
/-/https/www.sciencebuddies.org/cdn/Files/19411/5/jumping-robot-circuit.png)
The battery is connected to the switch by a red line. The switch is connected to the motor by another red line. The motor is connected to the battery by a black line.
Figure 3. Circuit diagram for a battery, switch, and motor connected in series.
In the procedure section of this project, we will show you how to build the jumping robot pictured in Figure 1 (not the one from the Veritasium video—that is a much more advanced project!). However, there is no guarantee that our initial design is the "best." You will use the engineering design process to see if you can make your robot jump farther and higher. How far will your robot jump?
Terms and Concepts
- Biologically inspired
- Bio-inspired
- Elastic potential energy
- Kinetic energy
- Gravitational potential energy
- Motor
- Battery
- Circuit
- Switch
- Series
- Current
Questions
- Why do engineers build biologically inspired robots?
- What are some different types of biologically inspired robots?
- Can you find other examples of jumping robots?
- What forms of energy are involved in the operation of a jumping robot? How are they converted from one to another?
- How do you think you can build and improve your own jumping robot?
Bibliography
- Henderson, T. (n.d.). Potential Energy. The Physics Classroom. Retrieved March 2, 2023.
- Science Buddies staff (n.d.). The Engineering Design Process. Science Buddies. Retrieved March 2, 2023.
Materials and Equipment
Note: This project follows the engineering design process, so there is not a specific list of materials you must use. The list below will get you started to build one copy of the design shown in the procedure, but you can substitute or add other materials. You will need additional supplies to build more than one robot. You can also find electronics supplies from other online vendors, such as SparkFun or Adafruit.
- Electronics:
- Geared DC motor
- Lithium batteries and charger Note: This is just one example. Experimenting with different battery sizes and types is one of the things you can try with your robot.
- Switch, so you can easily turn your robot on and off without disconnecting wires. Many different switches are available, such as mini rocker switches, which require soldering, or breadboard-compatible slide switches.
- Depending on how you plan to build your circuit and the tools you have available, you may need different connectors, such as jumper wires, mini breadboards, or JST connector cables.
- Craft supplies:
- Popsicle sticks (2)
- Straw (1)
- Wooden dowel that fits through the straw without getting stuck
- Rubber bands of different lengths and thicknesses
- Toothpick
- Plastic bottle caps (2)
- Double-sided tape
- Optional: Decorations (stickers, googly eyes, etc.)
- Tools:
- Hot glue gun (or super glue)
- Scissors or wire cutters
- Drill or sharp knife
- Optional: Wire strippers
- Optional: Soldering iron
- Pen or pencil
- Lab notebook
Disclaimer: Science Buddies participates in affiliate programs with Home Science Tools®, Amazon.com, Carolina Biological, and Jameco Electronics. Proceeds from the affiliate programs help support Science Buddies, a 501(c)(3) public charity, and keep our resources free for everyone. Our top priority is student learning. If you have any comments (positive or negative) related to purchases you've made for science projects from recommendations on our site, please let us know. Write to us at [email protected].
Experimental Procedure
Remember, the steps in this procedure are a general guide. You can modify them as you decide how to build your own robot. You may also wish to build parts of the robot in a different order. Adult supervision is recommended for steps that involve drilling, cutting, or using hot tools like a soldering iron or hot glue gun.
- If you are using rechargeable batteries, make sure you charge them so they are ready when you are done building your robot.
- Start by making a small hole in the center of each bottle cap. The hole should be about the same diameter as the motor shaft, so the bottle caps can be pressed snugly onto each side of the shaft (Figure 4). You can make the holes using a drill bit or a sharp knife. Once the bottle caps are snugly pressed onto the motor shaft, secure them with glue. After the glue dries, you should be able to spin the bottle caps and make the motor shaft spin along with them. They should not spin freely on the shaft.
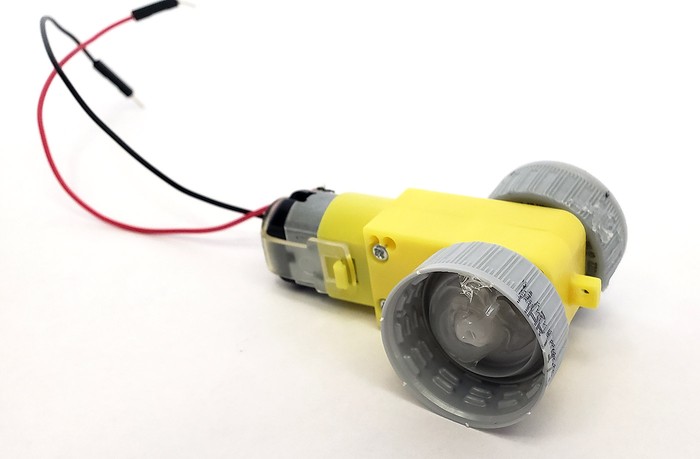
Figure 4. Bottle caps pressed onto the motor shaft and glued in place. - Build a base for your robot. Figure 5 shows a design made from a cut-up popsicle stick, with two "feet" that are glued together using a third piece.
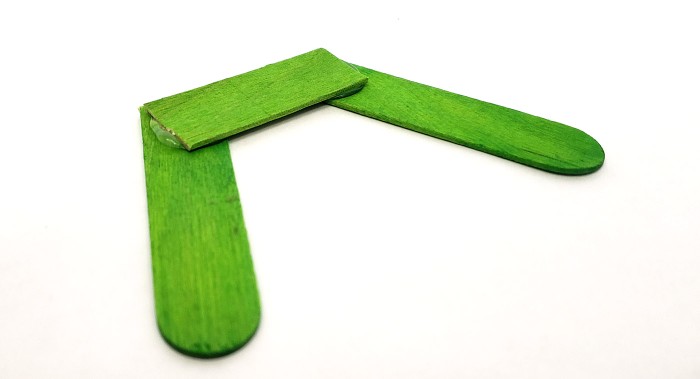
Figure 5. Example robot base. - Cut two pieces of wooden dowel, each roughly 10–12 cm long.
- Cut two pieces of straw, each roughly 3–4 cm long.
- Make sure the straw pieces can slide smoothly up and down the dowels without getting stuck. If they get stuck, you may need to use sandpaper to smooth out the dowels (or get smaller dowels or bigger straws).
- Now for the tricky part. You need to glue a straw piece to one side of the motor, such that when you place a wooden dowel through the straw, it is in contact with the bottle cap, as shown in Figure 6. You will repeat this on the other side of the motor. It is important to make sure the straws and dowels are aligned and parallel to each other, and that the dowels are in firm contact with the bottle caps.
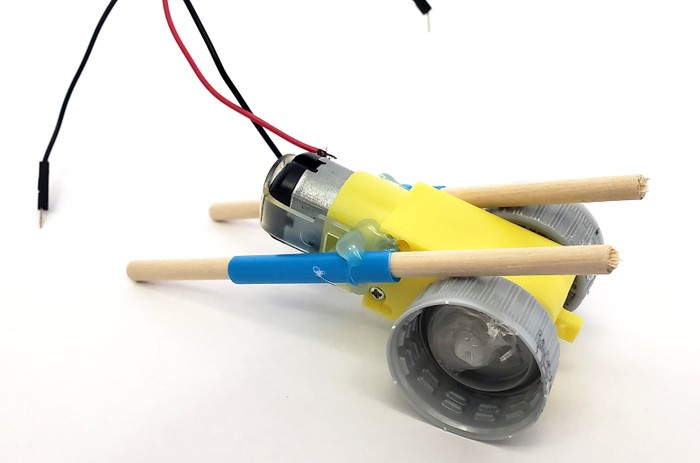
Figure 6. Straws glued to the sides of the motor such that the wooden dowels touch the bottle caps when placed through the straws. - After gluing both straws to the motor, you need to glue the dowels to the base of the robot such that the motor can slide up and down the dowels, as shown in Figure 7. It is important to make sure the dowels are well-secured and parallel to each other. You should attach an additional crosspiece (made from a dowel or popsicle stick) at the top to hold them together. You may wish to use additional pieces at the bottom to help secure them to the base and hold them at an angle. What angle, you ask? Why, that is up to you! The dowels should not point straight up, because you want your robot to jump up and move forward when it jumps. Make sure the motor still slides smoothly up and down the dowels before you continue.
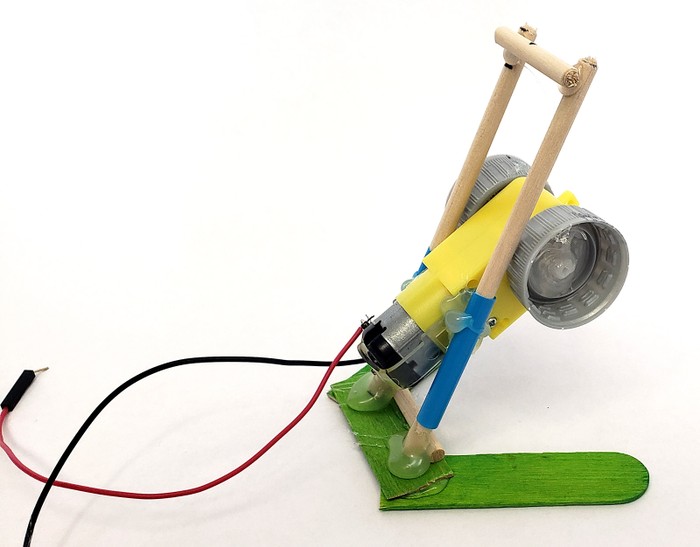
Figure 7. Dowels attached to the robot base, with a crossbar connecting them at the top. The motor slides smoothly up and down the dowels. - Loop a rubber band over the top crossbar and connect the ends to opposite sides of the motor. You can do this by, for example, gluing a small piece of toothpick through the hole at one end of the motor to make a hook, then wrapping the rubber band around the other end of the motor (Figure 8). Make sure the rubber band is not too tight or too loose. It should pull the motor up toward the crossbar. When you press down on the motor, the rubber band should stretch without breaking. When you release the motor, the rubber band should pull it back up without getting stuck. If it does not work, try a different rubber band.
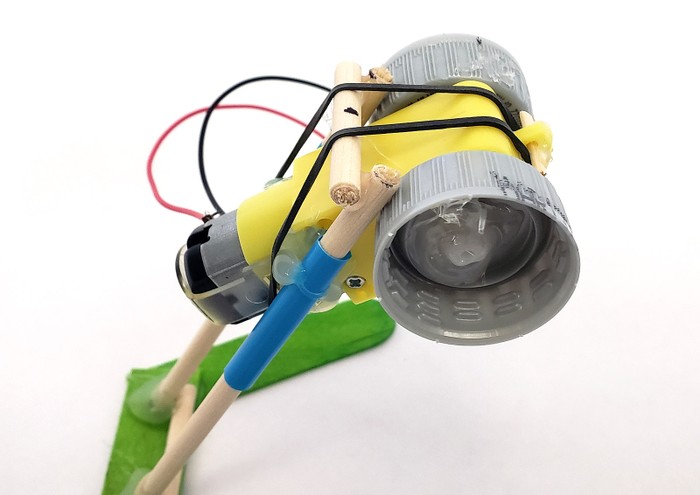
Figure 8. Rubber band attached to the motor. - Now you need to cover half of the outer surface of each wheel with a high-friction material, like a strip of rubber band or a bead of hot glue (Figure 9). The strips should be aligned on the two wheels. Wait for your glue to dry, then make sure you can spin the wheels by hand, and that the high-friction surface "grips" the wooden dowels. This part of the robot is very important. If there is not enough friction, the wheels will just slip against the dowels. If there is too much friction (for example, because the high-friction layer is too thick), the wheels can get stuck.
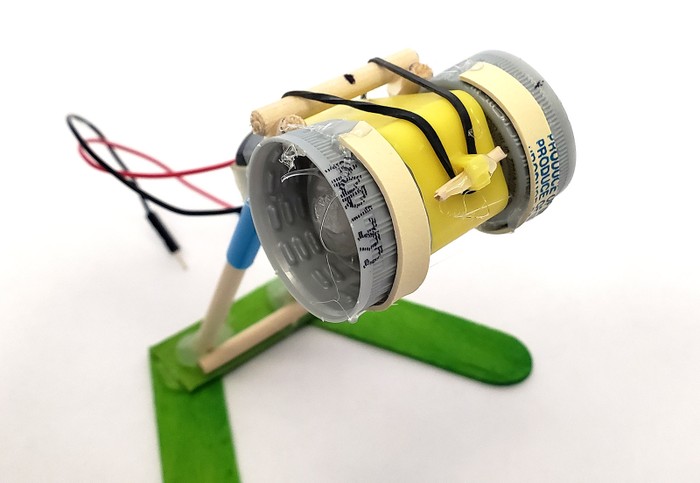
Figure 9. Strips of rubber band glued along half of the outer surface of each wheel. - You are ready to connect a battery and test your robot! Note: If your motor stalls (gets stuck), it may start to get hot. Disconnect the battery if your motor gets stuck.
The simplest way to connect the motor and battery is to plug the motor's pins directly into the battery's connector (Figure 10), but you can also build a more permanent circuit with a switch (see step 13). The motor will start spinning as soon as the pins are connected. To turn it off, just disconnect one of the wires. Make sure your motor is spinning in the right direction—it should pull itself down along the dowels, not push itself up. If your motor spins the wrong way, reverse the connections with the battery wires. Ideally, the motor will pull down and stretch the rubber band. Then the smooth plastic part of the bottle caps will come into contact with the dowels, allowing the motor to slip. The rubber band will contract, pulling the motor up and causing the robot to jump. You want to make sure your robot can move with the added weight of the battery, so you can use double-sided tape to attach the battery to the motor, as shown in Figure 11. (We do not recommend using hot glue on lithium batteries.)
It is OK if your robot does not work on the first try! This is where the engineering design process really starts to come into play. Move on to the next step for more information.
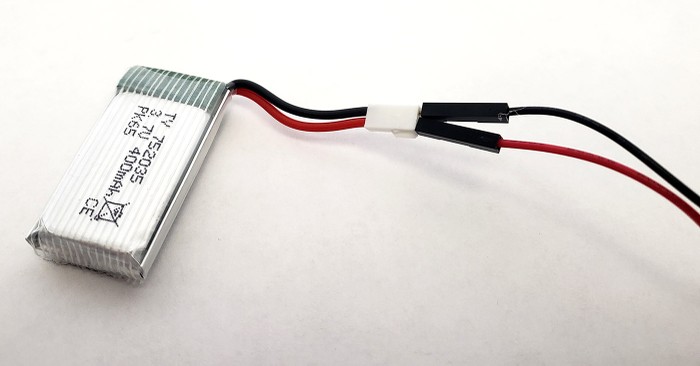
Figure 10. Motor wires plugged directly into the battery connector. If your motor spins the wrong way, you can reverse the red and black wires.
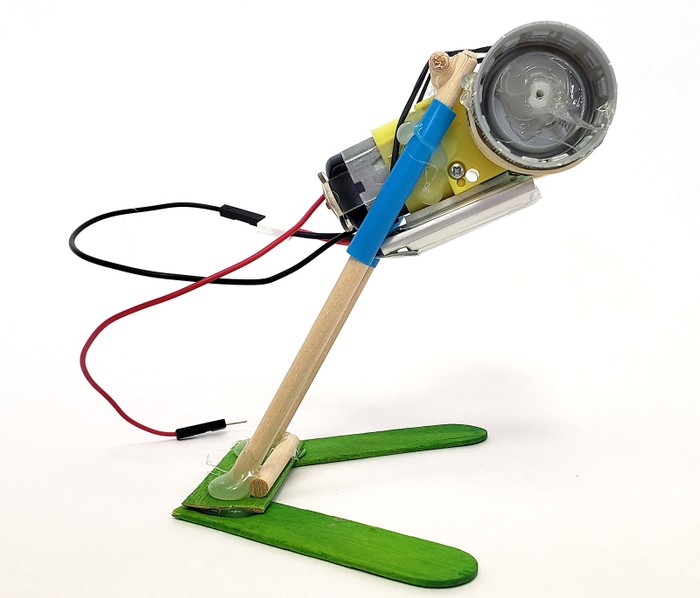
Figure 11. Battery taped to the bottom of the motor. - If your robot worked on the first try, great! You are ready to try to improve its performance. If not, do not worry. It can be difficult to get the robot to work at first. The design is particularly sensitive to the gap between the bottle caps and wooden dowels and to the thickness of your "grippy" layer. If the gap is too big, the wheels may simply spin against the dowels without enough friction to pull the motor down. If the gap is too small (or the grippy layer is too thick), the wheels may get stuck. There are several things you can adjust without having to take your whole robot apart or start over:
- Experiment with different rubber bands.
- Try changing the thickness of your grippy layer. You can try adding more material (like another layer of glue or rubber band), or cutting/peeling off some material. You can also pry off the bottle caps and start over with new ones.
- You can connect one more battery in series (Figures 12 and 13) to give your motor more power. This may be useful if your motor is getting stuck. We do not recommend connecting more than two batteries in series, as this can exceed the motor's power rating and may cause damage.
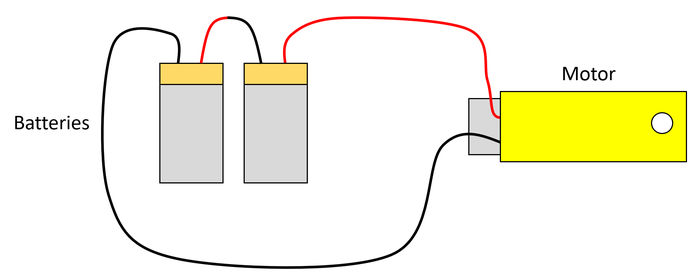
Figure 12. Circuit with two batteries connected in series. Note that to connect two batteries in series, you connect the red (positive) wire from one battery to the black (negative) wire of the next battery.
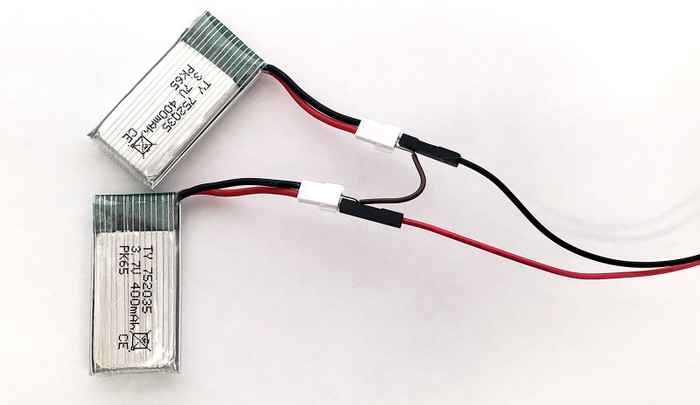
Figure 13. Picture of two batteries connected in series (using a jumper wire) and connected to the motor. - You may wish to build a more permanent circuit with a switch that lets you easily turn your robot on and off without disconnecting wires. Depending on the parts and equipment you have available, there are different ways to do this. For example, you can use a mini breadboard with a breadboard-compatible switch (see our breadboard tutorial if you do not know how a breadboard works), or you can solder the circuit if you have a soldering iron.
- Once you have a working robot, you can continue to apply the engineering design process to improve its performance. Can you establish metrics to measure your robot's performance, like how high or how far it goes in a single jump? You can set up obstacles for the robot to jump over, or use a phone to film it from the side in slow motion and set up a ruler to measure the jumps. There are also many different things you can change about your design. Some of them can be changed without building a new robot, like the rubber band or the number or location of the batteries. Other things, like the angle of the wooden dowels, may require building a new robot. Keep going, and maybe one day you can build a world record-breaking jumping robot!
/-/https/www.sciencebuddies.org/cdn/Files/19412/5/motor-bottle-caps.jpg)
/-/https/www.sciencebuddies.org/cdn/Files/19413/5/popsicle-stick-base.jpg)
/-/https/www.sciencebuddies.org/cdn/Files/19414/5/straw-glued-motor.jpg)
/-/https/www.sciencebuddies.org/cdn/Files/19415/5/dowels-base-crossbar.jpg)
/-/https/www.sciencebuddies.org/cdn/Files/19416/5/rubber-band-motor.jpg)
/-/https/www.sciencebuddies.org/cdn/Files/19417/5/bottle-cap-rubber-bands.jpg)
/-/https/www.sciencebuddies.org/cdn/Files/19418/5/battery-motor-wires-connected.jpg)
/-/https/www.sciencebuddies.org/cdn/Files/19419/5/battery-taped-robot.jpg)
/-/https/www.sciencebuddies.org/cdn/Files/19420/5/two-batteries-series.png)
/-/https/www.sciencebuddies.org/cdn/Files/19421/5/batteries-motor-series.jpg)
Ask an Expert
Global Goals
The United Nations Sustainable Development Goals (UNSDGs) are a blueprint to achieve a better and more sustainable future for all.
/-/https/www.sciencebuddies.org/cdn/Files/19752/5/E-WEB-Goal-09.png)
Variations
- Can you build a jumping robot with a completely different design? Do more research online about the different types of jumping robots. Can you build one inspired by one of the designs you find?
- Can you further explore the physics of your jumping robot? Measure your robot's mass and estimate the location of its center of mass. Take a slow-motion video of it from the side with a ruler in the frame for scale. Using the video, can you calculate the robot's kinetic energy right after it jumps? What about the gravitational potential energy at the peak of the jump? Can you use this information to calculate the amount of energy stored in the stretched rubber band? Can you tell how much energy is lost between each conversion?
- Science Buddies has many other robotics projects you can choose from.
Careers
If you like this project, you might enjoy exploring these related careers:
/-/https/careerdiscovery.sciencebuddies.org/cdn/Files/1725/18/4161_Michelle_Easter_and_Curiousity_Clone.jpg)
/-/https/careerdiscovery.sciencebuddies.org/cdn/Files/1731/17/iStock-1187291213.jpg)
/-/https/careerdiscovery.sciencebuddies.org/cdn/Files/1450/21/iStock-1227179796.jpg)
/-/https/careerdiscovery.sciencebuddies.org/cdn/Files/1223/17/iStock-971549326.jpg)

/-/https/img.youtube.com/vi/lW-mS-4qUz8/0.jpg)
/-/https/img.youtube.com/vi/To3DKP99-1U/0.jpg)
/-/https/img.youtube.com/vi/k8I2YvKS0AM/0.jpg)