Abstract
Snuggling a dog or cat can make you feel better even when you are not lonely or sick. Therapy and companion animals are also used for patients in health care settings, but sometimes you cannot always have access to a real live animal. Can a robot serve the same purpose? Find out in this project when you add an Arduino to a stuffed animal to build a purring companion robot.
Summary
We recommend going through the first few tutorials on our How to Use an Arduino page before you try this project.
A kit is available from our partner Home Science Tools®. See the Materials section for details.
No issues
/-/https/i.ytimg.com/vi/SAce4dOaGgk/maxresdefault.jpg)
Objective
Modify a stuffed animal to turn it into a purring companion robot.
Introduction
Engineers have developed companion robots like Paro, the robotic seal in Figure 1, that can help provide therapy to patients in hospitals and nursing homes. These robots use sensors to react to a person and can do things like make sounds, move their heads, and blink their eyes in response.
/-/https/www.sciencebuddies.org/cdn/Files/19976/10/paro-robot.jpg)
Figure 1. Paro, a robotic seal developed by researchers in Japan (image credit Aaron Biggs, CC BY-SA 2.0).
In this project you will modify a stuffed animal to make your own companion robot. At minimum, you will embed one flex sensor under the stuffed animal's skin so you can detect when a person pets it. You will also include a vibration motor to simulate the robot purring. The following two videos cover flex sensors and vibration motors in more detail.
/-/https/i.ytimg.com/vi/_tXWoplbqWo/maxresdefault.jpg)
/-/https/i.ytimg.com/vi/3hoBwa0ccys/maxresdefault.jpg)
There are many other things you could add to your robot, like buzzers for sound, LEDs for light, or servo motors for moving parts. Check out the How to Use an Arduino reference in the Bibliography to learn more about these parts. Now, get ready to build your own cute and fuzzy companion robot!
Terms and Concepts
- Companion robot
- Flex sensor
- Vibration motor
Questions
- What are some uses for therapy or companion robots?
- What are some advantages of using a robot instead of a live animal? What are some disadvantages?
- What features would you want to include in a companion robot?
Bibliography
- Finio, B. (n.d.). How to Use an Arduino. Science Buddies. Retrieved November 6, 2023.
- Science Buddies Staff (n.d.). The Engineering Design Process. Science Buddies. Retrieved November 6, 2023.
Materials and Equipment 
Recommended Project Supplies
/-/https/www.sciencebuddies.org/cdn/Files/19915/12/SB_ARDNSTR_web__01473.jpg)
This is an engineering design project. The materials list below shows all the parts required to build a robot with one flex sensor and one vibration motor, but you may need to purchase additional parts depending on how you design your robot.
-
Electronics Kit for Arduino, available from our partner Home Science Tools®.
- Note: This project will work with the Arduino UNO R3, UNO R4 Minima, UNO R4 WiFi, and compatible third-party boards.
- Flex sensor
- Vibration motor (make sure you get the "pancake" kind, which has no external moving parts)
- N-channel MOSFET, such as the RFP30N06LE, IRF510, or similar
- 100kΩ resistor (can be purchased as part of a resistor kit)
- 22 AWG solid core wire
- Screw terminals for the flex sensor (there are multiple ways to connect the flex sensors to a breadboard, see this helpful SparkFun guide for options)
- Soldering iron
- Heat shrink tubing
- Heat gun
- Hot glue gun
- Scissors
- Stuffed animal
- Volunteers to test your companion robot
Disclaimer: Science Buddies participates in affiliate programs with Home Science Tools®, Amazon.com, Carolina Biological, and Jameco Electronics. Proceeds from the affiliate programs help support Science Buddies, a 501(c)(3) public charity, and keep our resources free for everyone. Our top priority is student learning. If you have any comments (positive or negative) related to purchases you've made for science projects from recommendations on our site, please let us know. Write to us at [email protected].
Experimental Procedure
- This is an engineering design project. Refer to the Engineering Design Process guide in the Bibliography before you start. This procedure shows you how to build a basic robot with one flex sensor and one motor, but you can do more than that. You should specify requirements and make a sketch of your design before you start building anything. For example:
- How many and what type of sensors will your robot include?
- Where and how will the sensors be mounted on the robot?
- How many motors will your robot include?
- Where and how will the motors be mounted on the robot?
- How will the robot react to the sensors and simulate "purring" behavior or other actions?
- Prototype your circuit with your Arduino before you mount anything on the stuffed animal. It will be easier to test your code and make changes this way if you run into trouble. Figures 2 and 3 show the breadboard diagram and circuit diagram for a circuit with one flex sensor and one motor. You can also open a Tinkercad Circuits simulation of the circuit here.
- Flex sensor
- One pin to ground
- One pin to analog input A0
- 100 kΩ resistor
- One lead to 5 V
- One pin to analog input A0
- MOSFET
- Gate (leftmost pin when the writing on the MOSFET is facing you) to Arduino pin 8
- Source (rightmost pin) to ground
- Motor
- Positive wire to 5 V
- Negative wire to MOSFET drain (center pin)
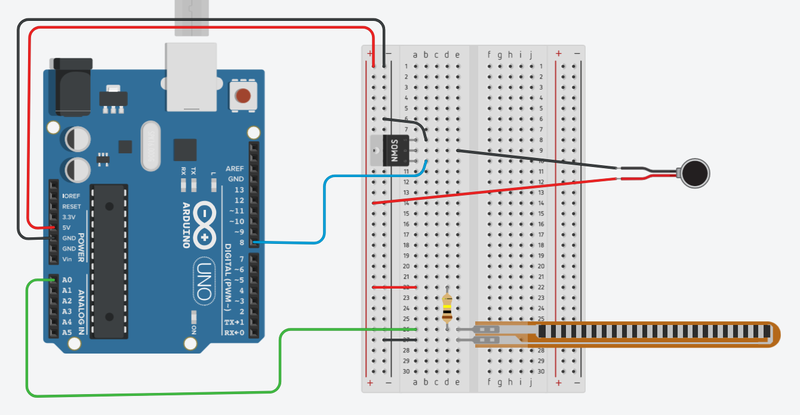
Figure 2. Breadboard diagram for the companion robot circuit.
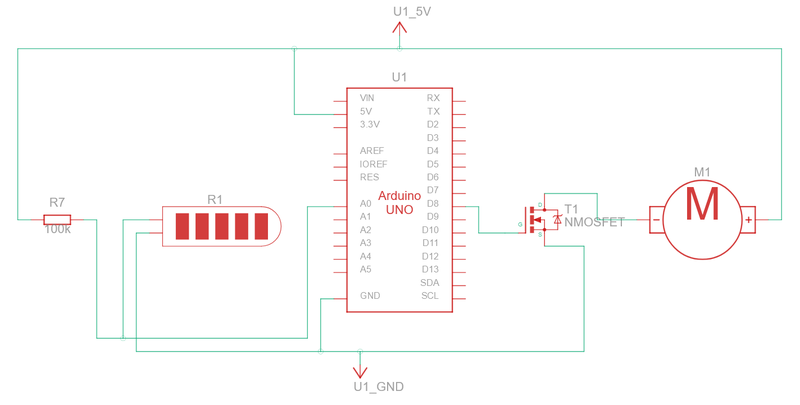
Figure 3. Circuit diagram for the companion robot circuit. - Flex sensor
- Download the companion_robot.ino starter code. Read the commented code to make sure you understand how it works. Modify the code as needed to control additional sensors or motors.
- Upload the code to your Arduino and test it. Make sure the motor activates when you bend the sensor.
- Mount the sensors and motors inside your stuffed animal. How you do this will depend on your stuffed animal and where you want to place the parts. You may need to reinforce the connections to the sensors and motors with soldering and heat shrink tubing, as shown in Figures 4 and 5. Note that soldering directly to the flex sensors may damage them, so it is better to use connectors like screw terminals. You can cut small slits in the stuffed animal to insert the electronic components, as shown in Figure 6.
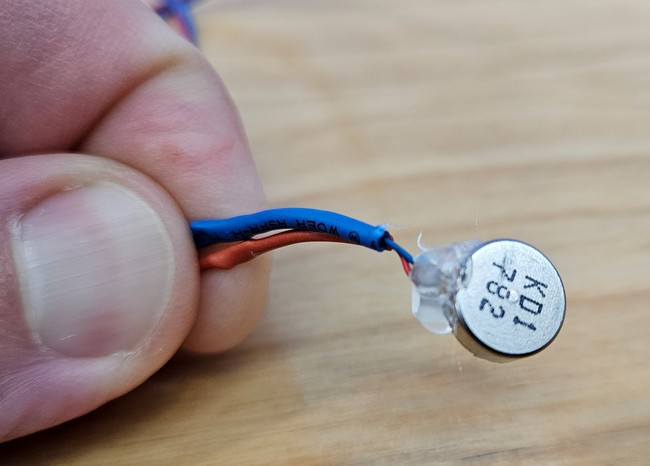
Figure 4. Thicker wires soldered to the thin wires on the vibration motor, then covered in heat shrink tubing. A dab of hot glue helps reinforce the thin wires where they connect to the motor.
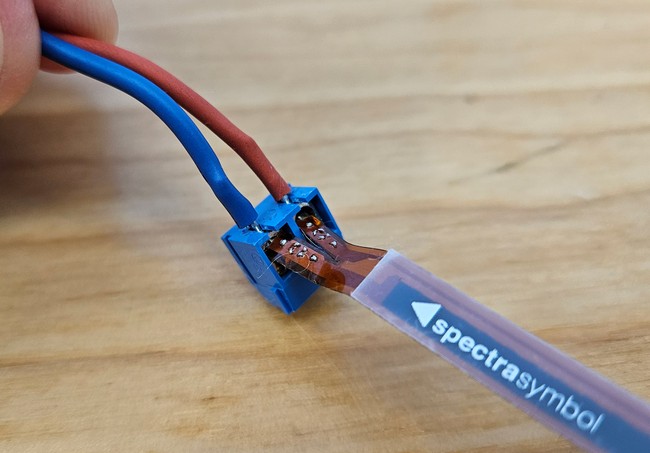
Figure 5. Tabs of the flex sensor inserted into screw terminals. Wires are soldered to the pins on the screw terminals instead of directly to the flex sensor.
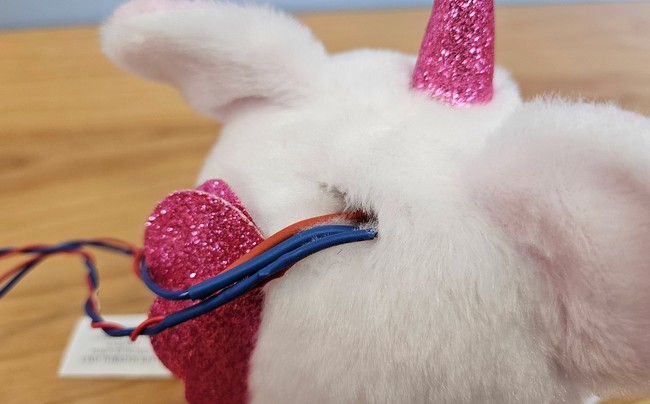
Figure 6. Wires inserted into a slot in the back of the stuffed animal's head. - Test your circuit again once you have mounted all the parts on the stuffed animal. You will need to pay particular attention to loose wires and connections, which may prevent individual sensors and motors from working.
- You may need to re-calibrate your flex sensors by adjusting the threshold variable (or variables, if you added more sensors) in your code. Try pressing on the stuffed animal and "petting" it while watching the serial monitor in the Arduino IDE. You will need to decide on a reasonable threshold value. You do not want the response to be so sensitive that the robots starts purring every time it gets bumped or tapped gently, but you do not want someone to have to push or squeeze the robot too hard to activate it. There is no "correct" value. The value that works best will depend on the design of your robot and the placement of the sensors.
- Conduct some real-world testing with your robot! Ask volunteers to try out the robot and give you feedback about the design. For example, do you need to make any physical changes to make the robot more durable? Can you change the code that controls the motors to modify the "purring" behavior? What behavior is the most realistic? Keep iterating and improving your robot's design. See the Variations section for even more ideas.
/-/https/www.sciencebuddies.org/cdn/Files/19977/10/arduino-companion-robot-breadboard-diagram.png)
/-/https/www.sciencebuddies.org/cdn/Files/19978/10/arduino-companion-robot-circuit-diagram.png)
/-/https/www.sciencebuddies.org/cdn/Files/19979/10/vibration-motor-wires.jpg)
/-/https/www.sciencebuddies.org/cdn/Files/19980/10/flex-sensor-screw-terminal.jpg)
/-/https/www.sciencebuddies.org/cdn/Files/19981/10/stuffed-animal-electronics.jpg)
Ask an Expert
Global Goals
The United Nations Sustainable Development Goals (UNSDGs) are a blueprint to achieve a better and more sustainable future for all.
/-/https/www.sciencebuddies.org/cdn/Files/19746/5/E-WEB-Goal-03.png)
Variations
- Once you have finalized your design, can you conduct human trials with your robot? Design a survey to measure your volunteers' mood before and after spending time with the robot. Does the robot help people feel better?
- Can you do an experiment where you compare the effects of the robot to the effects of a real therapy or companion animal? Which has a bigger effect? What are the pros and cons of each?
- Can you make your robot battery-powered so it does not need to be plugged in?
- Can you program additional realistic behaviors for your robot, like "yelping" if someone squeezes it too hard?
- Can you make your robot respond to voice commands?
Careers
If you like this project, you might enjoy exploring these related careers:
/-/https/careerdiscovery.sciencebuddies.org/cdn/Files/1725/18/4161_Michelle_Easter_and_Curiousity_Clone.jpg)
/-/https/careerdiscovery.sciencebuddies.org/cdn/Files/1223/17/iStock-971549326.jpg)
/-/https/careerdiscovery.sciencebuddies.org/cdn/Files/1450/21/iStock-1227179796.jpg)
/-/https/careerdiscovery.sciencebuddies.org/cdn/Files/1147/17/unsplash-fJebhGIP0P4.jpg)
Contact Us
Our kits are developed in partnership with Home Science Tools®. If you have purchased a kit for this project, Home Science Tools® is pleased to answer any questions.In your email, please follow these instructions:
- Include your Home Science Tools® order number.
- Please describe how you need help as thoroughly as possible:
Examples
Good Question I'm trying to do Experimental Procedure step #5, "Scrape the insulation from the wire. . ." How do I know when I've scraped enough?
Good Question I'm at Experimental Procedure step #7, "Move the magnet back and forth . . ." and the LED is not lighting up.
Bad Question I don't understand the instructions. Help!
Good Question I am purchasing my materials. Can I substitute a 1N34 diode for the 1N25 diode called for in the material list?
Bad Question Can I use a different part?
Contact Support

/-/https/img.youtube.com/vi/cd04o5yqSAU/0.jpg)
/-/https/img.youtube.com/vi/qfara8ci2oE/0.jpg)
/-/https/img.youtube.com/vi/RgT1dzIwpWY/0.jpg)