Abstract
Growing crops takes a huge amount of water. That same water is also needed for drinking, bathing, and other industries. In dry climates or lands experiencing drought, there is a big push to conserve (save) water as much as possible. In this project you will experiment with creating environmentally friendly jelly-like materials called hydrogels and see if they can help soil retain water thus reducing the amount of water needed to grow crops.
Summary
None
A few specialty materials are needed. See the materials list for details.
Adult supervision with boiling water and hot gels is recommended.
/-/https/www.sciencebuddies.org/cdn/Files/19616/6/agricultural-hydrogel-plant.jpg)
Objective
Create and evaluate how three different biodegradable hydrogels help soil retain moisture.
Introduction
Water is crucial to farming: too little water and seeds do not germinate, plants wilt and turn brown, and the harvest is small or even non-existent. Too much water, on the other hand, can wash away important plant nutrients and cause roots to rot, damaging the plants and leaving them more susceptible to disease. That is why scientists and engineers involved in agriculture are always looking for better ways to make sure crops get just the right amount of water at the right times. One interesting solution being investigated is hydrogels.
/-/https/www.sciencebuddies.org/cdn/Files/19611/9/water-use-irrigation-crops.jpg)
Figure 1. Irrigating crop fields like this one can take thousands of liters of water, a portion of which is lost to evaporation. Farmers and scientists look for ways to conserve water while maximizing crop yields.
Hydrogels are a type of material that easily absorbs and holds on to water. On a molecular scale ( too small to see even with a light microscope) hydrogels are a network of polymers. The polymers are long chains of large, repeating molecules. The polymers intersect and attach chemically to each other; these regions are called crosslinks. Together, the crosslinked polymers form a sort of cage that traps the water molecules (see Figure 2). This ability to hold on to water makes hydrogels useful for many products like baby diapers, hydrating face masks, and soft contact lenses.
/-/https/www.sciencebuddies.org/cdn/Files/19612/9/hydrogel-structure.jpg)
Figure 2. The crosslinked polymers in a hydrogel hold on to water well.
In agriculture, hydrogels can be added to soil to help the soil retain more moisture. When it rains or the crops are irrigated (watered), the hydrogel pieces in the soil absorb the water, reducing water runoff and evaporation. Over time, the hydrogel slowly releases water to the plants, thus reducing the amount and frequency of irrigation. These actions by the hydrogel help conserve water, which is a goal in farming, as agriculture is one of the biggest uses of water worldwide. Agricultural water conservation is particularly important in areas that are arid (naturally dry) or experiencing drought.
Many of the commercially available hydrogels are made of polyacrylamide or polyacrinolintrile. Neither is fully biodegradable, and they contain trace (extremely small) amounts of acrylamide, which is a neurotoxin and carcinogen (cancer-causing chemical at high enough doses). While it is unclear if the acrylamide or any other unwanted chemicals accumulate in the soil from these polyacrylamide and polyacrinolintrile hydrogels, researchers are working on developing environmentally friendly hydrogels made of ingredients which break down harmlessly in the soil.
In this science project, you will make three different biodegradable hydrogels and evaluate how well they work. The first hydrogel will be made from agar, a powder which comes from seaweed. The second hydrogel will be made from hydroxyethyl cellulose (HEC), a powder made from cellulose, the main component found in plant cell walls. The third hydrogel will be made of a combination of agar and HEC. All three hydrogels will contain citric acid, the acid that makes citrus fruits like lemons and limes sour, as a slightly acidic environment helps create a network in the hydrogel that holds on to water better. As a scientist, your job will be to evaluate each of the hydrogels' consistency, water absorption, resistance to evaporation, and soil hydration. You can also check out the variations section for additional ideas on how to expand this science project.
Terms and Concepts
- Hydrogel
- Polymer
- Water conservation
- Agar
- Cellulose
- Citric Acid
- Tare
- Percent change (also called relative change)
Questions
- Why is there an interest in water conservation in agriculture?
- What are hydrogels?
- What are hydrogels made of?
- How are hydrogels used in agriculture?
- What makes agar and cellulose biodegradable?
- How do you use a scale to measure weight accurately?
Bibliography
- UT News Staff. (2020, November 2). Self-Watering Soil Could Transform Farming. UT News, The University of Texas at Austin. Retrieved April 11, 2023.
- California Agricultural Technology Institute Staff. (2014). New Hydrogel Product Aims to Aid in Reduction of Turf Water Use. Jordan College of Agricultural Science and Technology, Fresno State. Retrieved April 11, 2023.
- Todman, Will and Mauvais, Lyse. (2021, November 9). Hydrogel: A Promising Solution for Water Scarcity in the Middle East? Center for Strategic and International Studies. Retrieved April 11, 2023.
Materials and Equipment
- Kitchen scale accurate to at least the gram
- Agar powder, (60 grams); available at some grocery stores.
- Hydroxyethyl cellulose (HEC) powder, (60 grams). Note: reagent-grade powder is not required; the project should work with other grades.
- Citric acid, (30 grams); available at some grocery stores.
- Water; tap or well water work fine.
- Kettle or device for boiling and easily pouring water
- 4-cup (1-liter) Pyrex measuring cup or other similar sized heat-resistant container with a spout for pouring
- Fork
- Spoon
- 90 x 15 mm petri dishes (30)
- Paper towel
- Containers or bowls than can hold at least 1 cup of water (12)
- Potting soil, preferably without vermiculite or perlite (water-holding agents); enough to fill up to 16 pots
- Small pots (16); seedling pots work well
- Graduated cylinder, 50 mL (optional)
- Lab notebook
Disclaimer: Science Buddies participates in affiliate programs with Home Science Tools®, Amazon.com, Carolina Biological, and Jameco Electronics. Proceeds from the affiliate programs help support Science Buddies, a 501(c)(3) public charity, and keep our resources free for everyone. Our top priority is student learning. If you have any comments (positive or negative) related to purchases you've made for science projects from recommendations on our site, please let us know. Write to us at [email protected].
Experimental Procedure
This project is broken into three parts:
- Making the three biodegradable hydrogel recipes.
- Testing how much water the hydrogels can absorb and how quickly they lose it to air over time.
- Testing how well the hydrogels keep water in soil over time.
Parts two and three will happen at the same time and require daily measurements for two weeks.
In every part of this project, you will need to take accurate measurements with a scale. This means knowing how to zero and tare your scale. Watch this video about kitchen scales to learn what zeroing and taring are. Even though the video is about using a kitchen scale for baking, the same concepts apply to using a scale for science experiments.
/-/https/i.ytimg.com/vi/Zxu0T3RNkKI/maxresdefault.jpg)
Making the Hydrogels
You will be making three types of biodegradable hydrogels by following the recipes in Table 1. The amount of citric acid is constant in each recipe as is the total amount of the gelling agent (agar and HEC are both gelling agents). Each recipe makes about 500 mL (or ten petri dishes worth) of hydrogel.
| Type of Hydrogel | Agar | HEC | Citric Acid | Boiling Water |
|---|---|---|---|---|
| Agar | 40 g | 0 g | 10 g | 500 mL or g |
| HEC | 0 g | 40 g | 10 g | 500 mL or g |
| Agar + HEC | 20 g | 20 g | 10 g | 500 mL or g |
- Start by making the agar hydrogel. Label the outside bottom of ten petri dishes with the word "Agar". (We label the bottom rather than the lid as lids can easily get mixed up.)
- Follow the recipe in Table 1 and weigh out 40 grams (g) of agar and 10 g of citric acid. Mix those dry ingredients in a heat-resistant measuring cup that can hold at least four cups (one liter) of liquid.
- Heat more than 500 mL of water in a kettle to boiling.
- Place the measuring cup with the agar and citric acid on the scale and tare it (watch the video if you do not know how to tare a scale).

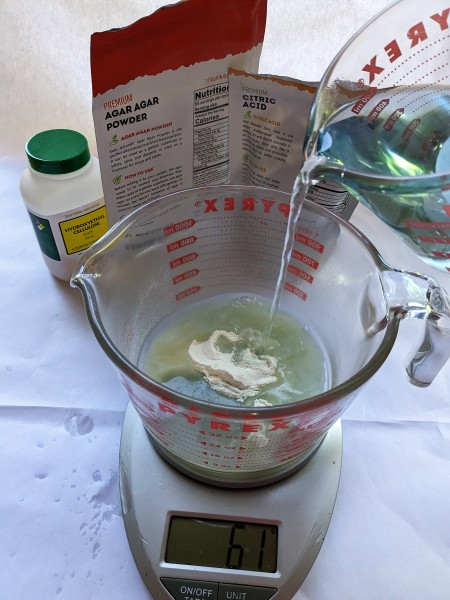
Figure 3. Hydrogels are made by mixing biodegradable polymers with boiling water.- Take the measuring cup off of the scale and mix the solution for several minutes until all clumps are gone. The hydrogel mixture will be very thick and it will take a lot of mixing.
- When the hydrogel has been thoroughly mixed, place a petri dish on the scale and tare the scale. Pour or spoon 50 grams of the hydrogel into a labeled petri dish. Repeat this step until you have filled all ten petri dishes.
- Repeat steps 1-8 for the HEC and Agar + HEC hydrogel recipes.
- Record your observations about each recipe in your lab notebook.
- In the end you should have ten petri dishes of each hydrogel recipe. If you have less because you found the hydrogel hard to pour into the petri dishes, do not worry. You will use eight petri dishes of each recipe in the next parts of this project; the extras can be used if you run into problems, make a mistake, or as additional repeats.
- Once cooled, put the lids on the petri dishes. Give the hydrogels several hours (at least three, but no more than forty-eight hours) before moving on to testing.
/-/https/www.sciencebuddies.org/cdn/Files/19613/9/making-biodegradable-hydrogels.jpg)
Testing Hydrogel Water Absorption and Desiccation
You will be setting up and taking measurements to determine how much water each type of hydrogel can absorb and how well each hydrogel holds on to its water when exposed to air.
- Label four containers for each hydrogel recipe for a total of twelve containers. For example: Agar 1, Agar 2, Agar 3, Agar 4, HEC 1, HEC 2 etc.
- Record the weight of each empty container in a data table in your lab notebook. Table 2 shows an example data table.
- Carefully, using a butter knife or similar utensil, remove one agar hydrogel from its petri dish and place it in the container labeled Agar 1. Try to remove the hydrogels in one large piece. Repeat this step until you have placed one hydrogel in each of the labeled containers. Make sure the labels match the type of hydrogel.
- Record your observations about the consistency of each type of hydrogel as you work. Is it firm, soft, sticky, smooth? How else can you describe it?
- It may be difficult to remove all or some of the hydrogels. That is okay. Do your best to remove them in as few pieces as possible. You may need to do some problem solving.
- Weigh each hydrogel with its container. Record the weight in your data table.
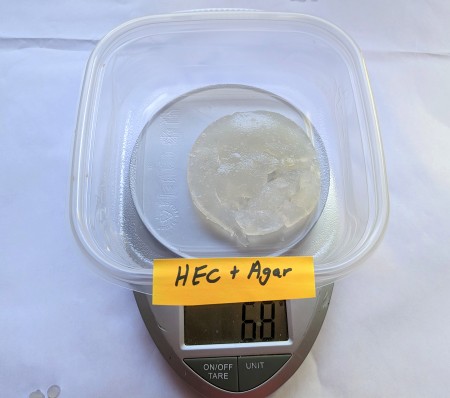
Figure 4. The dry weight of the hydrogel and container should be recorded before soaking the hydrogel. - Next, you will see how much water each hydrogel can absorb. Add water to each container until the hydrogel is fully submerged. Wait an hour for maximum absorption.
- After an hour, drain each container. Carefully, without touching the hydrogel, use a dish towel or paper towel to blot any excess water from the containers.
- Weigh the soaked hydrogels and containers one at a time. Record the weight for each one in your data table in the "day 0" column.
- Weigh every hydrogel in its container once a day for ten to fourteen days. Record the weights in your data table. Also record your observations and take pictures to document the changes.
/-/https/www.sciencebuddies.org/cdn/Files/19614/9/hydrogel-starting-weight.jpg)
| Hydrogel | Empty Container Weight (g) |
Before Soaking: Hydrogel + Container Weight (g) |
After Soaking: Hydrogel + Container Weight (g) |
||||
|---|---|---|---|---|---|---|---|
| Day 0 | Day 1 | Day 2 | Day... | Day 14 | |||
| Agar 1 | |||||||
| Agar 2 | |||||||
| ... | |||||||
| Agar + HEC 4 | |||||||
Testing Soil Moisture Retention With and Without Hydrogels
You will be setting up and taking measurements to determine how well each type of hydrogel helps conserve (save) moisture in the soil over time.
- Label four pots for each hydrogel recipe. For example: Agar 1, Agar 2, Agar 3, Agar 4, HEC 1, HEC 2 etc. Also label four more pots Control 1, Control 2, Control 3, and Control 4. You should have sixteen labeled pots in total.
- Using the scale, add 75 g of potting soil to each pot. Remember to tare the scale after placing each empty pot on the scale!
- Add 25 g of hydrogel to the twelve pots labeled for them.
- Use a butter knife or spoon to cut the hydrogels into pea-sized pieces in the petri dish.
- Using the scale, add 25 g of each hydrogel into the pots with hydrogel labels. Make sure to check that you are adding the right hydrogel type to each pot.
- Carefully mix the hydrogel and soil in each pot until the hydrogel is spread throughout the soil.
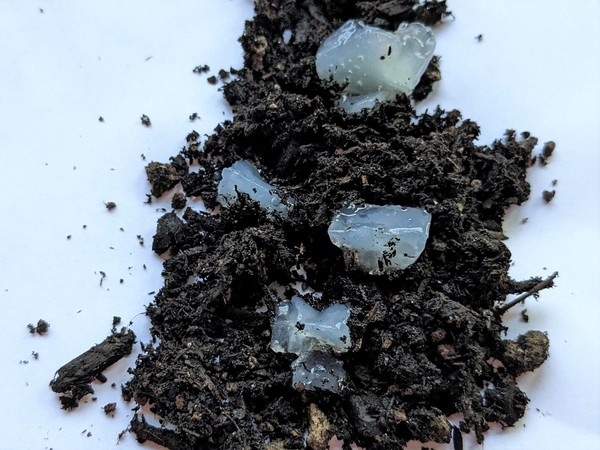
Figure 5. Pea-size chunks of the biodegradable hydrogels are mixed with potting soil. - Add 50 mL of water to each of the sixteen pots.
- Option 1: Use the graduated cylinder to measure 50 mL of water and pour it into each pot.
- Option 2: Use a measuring cup or other container with a spout to weigh out 50 g of water (remember, 1 mL of water weighs 1 g) and pour it into each pot.
- If your pots have drainage holes, some of the water may drain out. That is fine. Make sure you are working over a sink or on a surface where the drained water is easy to clean up.
- Get an initial weight for each prepared pot.
- Using the scale, weigh each pot. Record the weight for each pot in a data table, like Table 3, in the "Day 0" column.
- The pots with hydrogel labels contain soil, hydrogel, and water and weigh more than the control pots which have only soil and water.
- Weight each prepared pot daily for ten to fourteen days. Record the weights in your data table. Also, write down any observations you have.
/-/https/www.sciencebuddies.org/cdn/Files/19615/9/hydrogel-in-soil.jpg)
| Pot | Weight (g) | ||||
|---|---|---|---|---|---|
| Day 0 | Day 1 | Day 2 | Day... | Day 14 | |
| Agar 1 | |||||
| Agar 2 | |||||
| ... | |||||
| Control 4 | |||||
Data Analysis
The data you have collected and the questions you want to answer are all about change:
- The question "How well does each type of hydrogel absorb water?" Is answered by looking at the change between a hydrogel's weight before and after soaking.
- The question, "How quickly does each type of hydrogel lose water to the air?" is answered by looking at the change between the hydrogel's soaked weight and it's weight each day.
- The question, "How well does each type of hydrogel help conserve water in the soil?" is answered by looking at the change between a pot of soil's starting weight and its weight each day.
You will need to calculate percent change, also called relative change, to answer each of these questions. Watch the video to understand what percent change is and how it is calculated.
/-/https/i.ytimg.com/vi/sCSgDcBiyUA/maxresdefault.jpg)
How well does each type of hydrogel absorb water?
- Using the data you collected, create a new table like Table 4.
- Calculate and record the weight of each hydrogel before soaking using this formula:
- Calculate and record the weight of each hydrogel after soaking using this formula:
- Calculate and record the relative amount of water absorbed by each hydrogel using this formula:
- Make a bar graph showing the average relative percentage of water absorbed for each type of agar. How well did each type of hydrogel absorb water?
| Hydrogel | Empty Container Weight (g) | Before Soaking | After Soaking | Relative % Water Absorbed | ||
|---|---|---|---|---|---|---|
| Hydrogel + Container (g) | Hydrogel (g) | Hydrogel + Container (g) | Hydrogel (g) | |||
| Agar 1 | ||||||
| Agar 2 | ||||||
| ... | ||||||
| Agar + HEC 4 | ||||||
How quickly does each type of hydrogel lose water to the air?
- Calculate the cumulative percent change in water for each hydrogel for each day of the experiment. To do this, use the weights of the soaked container and hydrogel you recorded for each day in Table 2 and plug them into this general formula: To do this, you will use the water loss for each hydrogel for each day of the experiment. You can follow this general formula:
- The hydrogels are losing water to evaporation, so the percent change should be negative.
- Make a line graph showing the average cumulative percent change in water for each type of hydrogel. Time, in days, should be on the x-axis and percent change should be on the y-axis. Make sure to start your graph at 0 percent change on day 0. How quickly did each type of hydrogel lose water to evaporation?
How well does each type of hydrogel help conserve water in the soil?
- Calculate the cumulative percent change in water for each pot of soil for each day of the experiment. To do this, use the weights of the pots you recorded for each day in Table 3 and plug them into this general formula:
- The pots of soil are desicating (drying out) over time, so the percent change should be negative.
- Make a line graph showing the average cumulative percent change in the pots of soil for each type of hydrogel and the control. Time, in days, should be on the x-axis and percent change should be on the y-axis. Make sure to start your graph at 0 percent change on day 0. How did the pots with the hydrogels compare to the control pots? Did any of the hydrogels help retain water in the soil?
- When looking at the hydrogels' abilities to absorb water, hold on to it in the face of evaporation, and retain moisture in the soil, which hydrogel performed the best? Based on your results, do you think any of these biodegradable hydrogels would help conserve water in an agricultural setting?
Troubleshooting
For troubleshooting tips, please read our FAQ: Can Biodegradable Hydrogels Help Conserve Water in Farming?.
Ask an Expert
Global Goals
The United Nations Sustainable Development Goals (UNSDGs) are a blueprint to achieve a better and more sustainable future for all.
/-/https/www.sciencebuddies.org/cdn/Files/19745/5/E-WEB-Goal-02.png)
Variations
- Trying growing plants in soil with an without hydrogel. Make a minimal watering schedule for your plants as if they were in a drought condition. Do the plants in the hydrogel soil grow better, the same, or worse than the ones in plain soil? Our guide to measuring plant growth, outlines several scientific ways of evaluating how well a plant is growing.
- Hydrogels are sometimes used to help seeds germinate. Try using these recipes to cover some seeds then plant them and see how quickly they germinate compared to seeds in soil without any hydrogel coating.
- Do some research about hydrogels. Is there another biodegradable hydrogel recipe you think might perform better? Try it out as an engineering project.
- Hydrogels have many applications ranging from medicine to cosmetics to packaging materials. Try your hand at a different hydrogel science project.
Frequently Asked Questions (FAQ)
If you are having a lot of trouble and the hydrogel has begun to solidify, you can place the measuring cup inside a larger bowl of hot water and keep mixing. The heat of the water will transfer through the glass to the hydrogel making it a bit easier to mix.
Careers
If you like this project, you might enjoy exploring these related careers:
/-/https/careerdiscovery.sciencebuddies.org/cdn/Files/1775/17/iStock-1156278309.jpg)
/-/https/careerdiscovery.sciencebuddies.org/cdn/Files/860/17/pexels-photo-5230966.jpg)
/-/https/careerdiscovery.sciencebuddies.org/cdn/Files/1662/17/unsplash-oz1NzV2xWXU.jpg)
/-/https/careerdiscovery.sciencebuddies.org/cdn/Files/1783/17/nrcseprd423668.jpg)

/-/https/img.youtube.com/vi/6fLh8eswOn0/0.jpg)
/-/https/img.youtube.com/vi/R6G7lHHeROM/0.jpg)
/-/https/img.youtube.com/vi/XrEN1oszq_Y/0.jpg)