Abstract
Do you live someplace where you get to experience the full glory of all four seasons? If so, you know well the heady blossoms and dramatic skies of spring; the long, sun-drenched days of summer; the trees shaking in crimson and gold in fall; and the sparkling, brittle snows of winter. But you might not know why we have these seasons, over and over again, in a cycle as predictable as the rising and setting of the Sun. The reasons for the seasons are surprising and have to do with Earth's tilt and its big companion Moon—both of which have made life here on Earth possible. Try this astronomy science fair project to find out more!Summary
Kristin Strong, Science Buddies
The procedure for this science fair project was adapted from an activity outlined in the following source:
- Harcourt Science. (2000). Lesson 3: What Causes Earth's Seasons? pp. B16-B21.
- Scotch® is a registered trademark of 3M.

Objective
To investigate how axial tilt affects how the Sun's rays strike Earth and create seasons.
Introduction
Where most people live on Earth, summers are hot and filled with many hours of strong sunlight, while winters are cold due to shortened hours of daylight and weak sunlight. You might think that the extreme heat of summer and the icy cold of winter have something to do with how close Earth is to the Sun, but actually, Earth's orbit is almost circular around the Sun, so there is very little difference in the distance from Earth to the Sun throughout the year. So, what are the reasons for the seasons, if it is not the distance from the Sun? One big part of the answer is that Earth is tilted on an axis.
What is an axis? Picture an imaginary stick going through the north and south poles of Earth. Earth makes a complete rotation about this axis every 24 hours. However, this axis is not straight up and down as Earth goes through its orbit about the Sun. Instead, it is tilted approximately 23 degrees. The degree of tilt varies by about 1.5 degrees every 41,000 years, which you can read more about in the Bibliography, below. We can thank our relatively big Moon for keeping this degree of tilt so stable. Without the influence of our Moon's gravity, the tilt would vary dramatically, like that of a wobbling top, resulting in rapidly changing seasons that would make it difficult for life to exist on Earth. Planetary scientists think that our relatively big Moon, and the axis tilt itself, were created by enormous collisions Earth experienced early in its formation 4.5 billion years ago.
How does the tilt of the axis create seasons? The tilt changes how the sunlight hits Earth at a given location. As shown in Figure 1, Earth's axis (the red line) remains fixed in space. It always points in the same direction, as Earth goes through its orbit around the Sun.
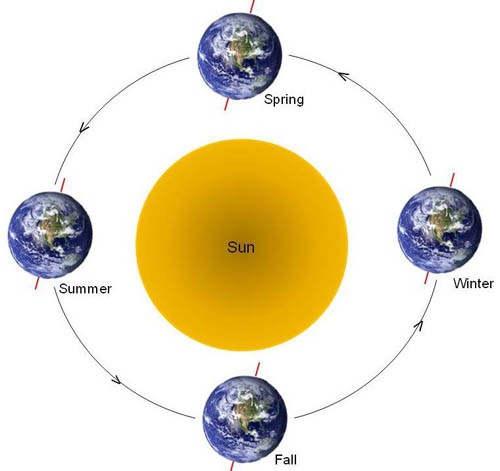
Figure 1. This drawing shows how Earth's axis remains fixed in space (pointing in the same direction) as Earth goes through its orbit around the Sun.
When it is summer in North America, the top part of the axis (the north pole) points in the direction of the Sun, and the Sun's rays shine directly on North America; while in South America, the axis is tipped away from the Sun and the Sun's rays hit Earth on a slant. So, when it is summer in North America, it is winter in South America. When it is winter in North America, the north pole is tipped away from the Sun, and the Sun's rays hit the Earth on a slant there; meaning it is summer in South America, because the Sun's rays hit Earth more directly in that hemisphere. As for the intermediate seasons, spring and fall, these are seasons when neither the top, nor the bottom, of Earth's axis are pointed in the direction of the Sun, days and nights are of equal length, and both the top half and the bottom half of Earth get equal amounts of light.
Slanted rays are weaker rays because they cover a larger area and heat the air and surface less than direct rays do, as shown in Figure 2, below. You can see this if you shine a flashlight on a large ball. If you point the flashlight directly at the ball, it makes a bright, circular spot on the ball; however, if your point the flashlight at the edge of the ball, the light makes a duller, more oval-looking spot on the ball. The same thing happens with Earth and the Sun—imagine the ball is Earth and the flashlight is the Sun. In this astronomy science fair project, you will investigate how tilting a surface affects how light rays hit that surface.
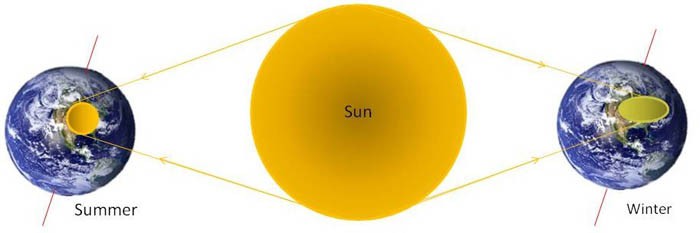 Image Credit: Kristin Strong, Science Buddies / Science Buddies
Figure 2. This drawing shows the different shapes and brightness produced by rays of sunlight that hit Earth more directly (in summer), and rays that hit Earth at a slant (in winter).
Terms and Concepts
- Orbit
- Axis
- Stable
Questions
- How does Earth's tilt create seasons?
- What is a significant feature of the Moon?
- Why is the Moon important to life on Earth?
- What are the seasons like in the southern hemisphere, as compared to seasons in the northern hemisphere?
- Why do slanted rays from the Sun feel weaker than direct rays from the Sun?
Bibliography
This source describes how our relatively large Moon stabilizes Earth's tilt, thereby controlling the seasons:
- Wilford, J. N. (1993, March 2). Moon May Save Earth From Chaotic Tilting of Other Planets. The New York Times, Inc.. Retrieved January 7, 2009.
This source describes Earth's tilt and how it creates the seasons:
- The National Aeronautics and Space Administration (NASA). (2013, February 13). What Causes the Seasons? The Space Place. Retrieved January 23, 2014.
This source provides a plot showing how Earth's tilt has changed over the past 750,000 years:
- Berger, A. and Loutre, M.F. (1991). Graph of the tilt of the Earth's axis. Retrieved January 9, 2009.
For help creating graphs, try this website:
- National Center for Education Statistics, (n.d.). Create a Graph. Retrieved June 25, 2020.
Materials and Equipment
- Sealed-shut cardboard box, stepping stool, brick, or large block of wood
- Flashlight
- Masking tape
- Scotch® tape
- Large, firm book or a cutting board
- Ruler, metric
- Protractor
- Optional: Camera
- Optional: Light meter, such as the Light Meter LX1010B,50,000 Lux Luxmeter with lcd display, available at Amazon.com
- Helper
- Graph paper (3 sheets). Graph paper with lines spaced 5 mm apart should work well. You can use this website to print free graph paper.
- Different-colored pens or pencils (5)
- Lab notebook
Disclaimer: Science Buddies participates in affiliate programs with Home Science Tools, Amazon.com, Carolina Biological, and Jameco Electronics. Proceeds from the affiliate programs help support Science Buddies, a 501(c)(3) public charity, and keep our resources free for everyone. Our top priority is student learning. If you have any comments (positive or negative) related to purchases you've made for science projects from recommendations on our site, please let us know. Write to us at scibuddy@sciencebuddies.org.
Experimental Procedure
Preparing the Light Source
- Place the sealed-shut cardboard box, stepping stool, brick, or block of wood on a table, or on the flat, firm floor.
- Lay the flashlight on its side on top of the cardboard box (or other object) and line up the edge of the flashlight so it is close to the edge of the box. Use masking tape to tape the flashlight down so it cannot roll around. Your setup should now look like the one shown in Figure 3, below.
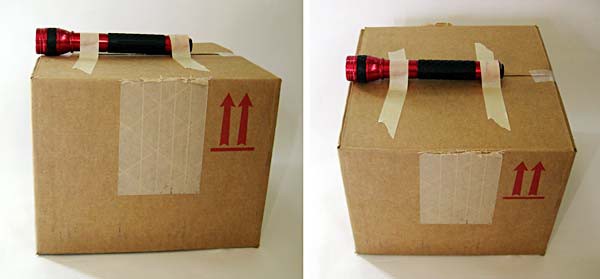 Image Credit: Teisha Rowland, Science Buddies / Science Buddies
Figure 3. Place the cardboard box, stepping stool, brick, or block of wood on a firm surface and tape the flashlight to the top so that the flashlight's edge is close to the box's edge.
Preparing the Surface
- Tape a sheet of graph paper to a firm surface, like a cutting board or a large book, as shown in Figure 4, below, so that the paper will be stiff enough to tilt, and so that you can draw on it. Ask your parents if it is okay if you use Scotch tape on the surface you have chosen.
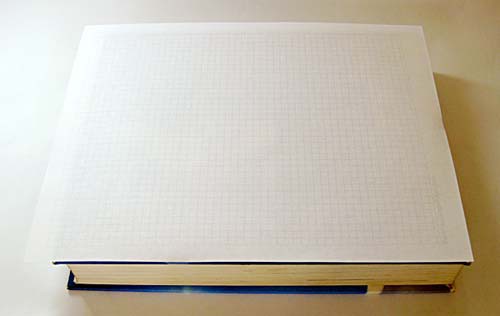 Image Credit: Teisha Rowland, Science Buddies / Science Buddies
Figure 4. Tape a sheet of graph paper to a firm surface, like a large book.
- Put the graph paper vertically in front of the flashlight, as shown in Figure 5, below.
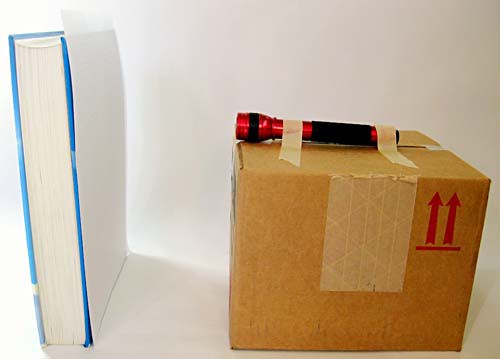 Image Credit: Teisha Rowland, Science Buddies / Science Buddies
Figure 5.. Place the graph paper vertically in front of the flashlight. You may need to hold the surface upright that the paper is taped to (e.g., the book).
-
Turn on the flashlight. Move the graph paper closer or farther away from the flashlight until the light on the paper forms a medium-sized, sharp circle 5 – 6 centimeters (cm) in diameter, as shown in Figure 6, below. Have a helper help you measure the distance from the edge of the graph paper to the cardboard box and write down this starting distance in your lab notebook. You will keep the graph paper at this starting distance for all testing.
- Note: Make sure you have at least 5 cm of graph paper lines above the top of the circle of light on the graph paper. You will need this space to collect data. If needed, raise the graph paper (by taping it higher up on a large book or cutting board) and/or lower the flashlight (by taping it to a shorter box, stool, brick, or block of wood) so that there is at least 5 cm of graph paper lines above the top of the light's circle.
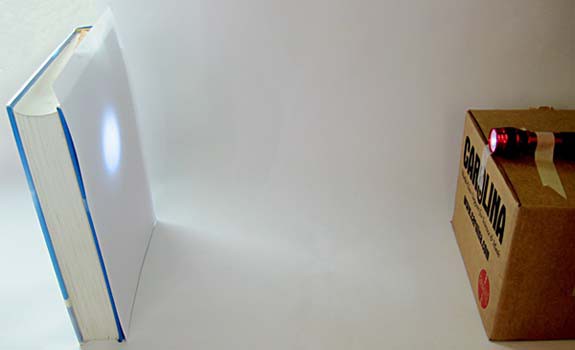 Image Credit: Teisha Rowland, Science Buddies / Science Buddies
Figure 6. Move the graph paper further from, or closer to, the flashlight until a crisp, 5 - 6 cm diameter circle of light forms on the graph paper.
Testing the Surface
- Have a helper hold the graph paper vertically (straight up and down) at the starting distance in front of the flashlight.
-
Use a colored pen or pencil to draw around the outline of the light on the graph paper. Draw a line from the circle and note that the graph paper is at 0 degrees for this outline (no tilt).
- An alternative to drawing around the outline is to take a picture of the graph paper with a camera.
- Observe the brightness of the light inside this outline and record your observation in your lab notebook, or (optionally) measure the brightness with a light meter held at a fixed distance from the graph paper.
- Place a protractor at the bottom of the graph paper (i.e., at the bottom of the book or cutting board, where it meets the table or floor). This is shown in Figure 7, below. Then tilt the graph paper back, away from the flashlight, by 10 degrees (tip the book or cutting board from the 90-degree mark to the 100-degree mark).
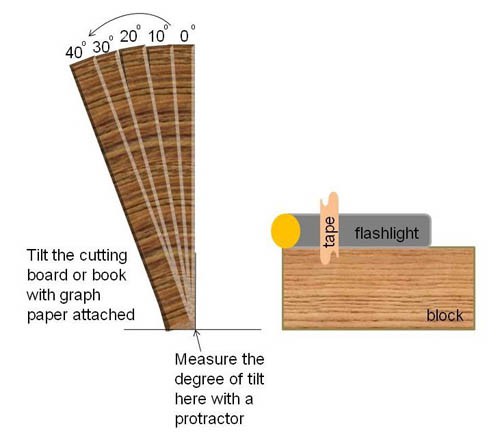 Image Credit: Kristin Strong, Science Buddies / Science Buddies
A drawing shows an experimental setup with a flashlight lying on its side and taped to the top of block. The flashlight shines onto a cutting board with a piece of graph paper attached that is being tilted at 0, 10, 20, 30, and 40 degrees from its base and away from the light. The protractor measurement for the degree of tilt is taken at the point where the cutting board contacts the floor.
Figure 7. This drawing shows how to measure the angle that the graph paper is tilted using a protractor. (In your setup, you may be using a book instead of a cutting board, or a cardboard box or other object instead of a wood block.)
- Repeat steps 2–3 using a different colored pen or pencil to draw around the outline of the light on the same piece of graph paper. Compare the brightness of the light inside this outline to the light inside of the previous outline. Be sure to record your observations in your lab notebook.
- Repeat steps 4–5 for tilt angles of 20, 30, and 40 degrees. Use a different colored pen or pencil each time so each outline is in a different color.
- Remove the sheet of graph paper and attach a new one.
- Repeat steps 1–7 two more times.
Analyzing the Graph Paper
- If you used a camera instead of drawing around the light outlines, print out your photographs so you can analyze them.
- For each sheet of graph paper, count the approximate number of squares inside each different-colored light outline. For partial squares, estimate how much of the square is lit up; for example, if it looks like one-fourth of the square is lit up, add 0.25; if it looks like half of the square is lit up, add 0.5; if it looks like three-fourths of the square is lit up, add 0.75. Enter your counts in a data table, like Table 1, below.
| Degree of Tilt | Graph Paper 1 | Graph Paper 2 | Graph Paper 3 | Average Number of Squares |
| 0 | ||||
| 10 | ||||
| 20 | ||||
| 30 | ||||
| 40 |
-
Calculate the average number of squares inside each outline for each degree of tilt and enter your calculations in the data table.
- For example, if for the 10 degree tilt you counted 145.5 squares on graph paper 1, 153.25 squares on graph paper 2, and 138.5 on graph paper 3, the average for the 10 degree tilt would be 145.75 squares (since 145.5 + 153.25 + 138.5 = 437.25, and 437.25 ÷ 3 is 145.75).
- Make a line graph of your results. Plot the degree of tilt on the x-axis (the horizontal axis) and the average number of squares illuminated on the y-axis (the vertical axis). You can make the line graph by hand or use a website like Create a Graph to make the graph on the computer and print it.
- Analyze your results. How did the numbers of squares inside the outline change as the degree of tilt increased? How did the brightness change? What degree of tilt produces light similar to what North America experiences in summer? What degree of tilt produces light similar to what North America experiences in winter?
Ask an Expert
Global Connections
The United Nations Sustainable Development Goals (UNSDGs) are a blueprint to achieve a better and more sustainable future for all.

Variations
- Investigate the axial tilts and the presence or absence of seasons on other planets. Can you predict which planets have seasons, based on their axial tilts?
- You can repeat this experiment using a light meter. When you graph your results, put the degree of tilt on the x-axis and the illuminance (in lux), from light meter readings, on the y-axis.
Careers
If you like this project, you might enjoy exploring these related careers: