Wily Waves: Build an Oscillating Water Column to Extract Energy from Ocean Waves
Abstract
The ocean is a wondrous force of nature. It affects the weather, and provides us with food and renewable energy to power our lives. How can the ocean provide us with renewable energy? One way is to extract the energy that is in the waves. There are many kinds of power systems that can be installed to extract energy from the waves, depending on the location. In this energy and power science project, you will build and test a simple model of an oscillating water column device to create power. How many of these oscillating water columns will it take to power a lightbulb? If you want the answer, read on!Summary
Michelle Maranowski, PhD, Science Buddies
This science project is based upon the following Science Buddies Clever Scientist Award winning project:
Dreszer, Natalya. (2010). Catching the Wave.

Objective
To build a simple and functional oscillating water column device.
Introduction
It's a beautiful day and you're walking along the beach, when an ocean wave hits the shore and almost pushes you over. Just like your high-energy friend who runs over to tag you as "it," moving water also has energy. But from where does this energy, in the form of ocean waves, come? Waves are generated by disturbances, ranging from underground earthquakes to a boat moving through the water, but the wind is the most common source of waves. The wind causes ripples on the surface of the ocean, but the strength of the wind, the distance in which the wind blows, and the duration of the wind gust all determine how big the ripples will become.
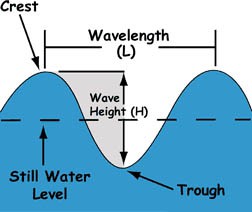 Image Credit: Office of Naval Research / Public domain
A wavelength is the distance between 2 crests of a wave, the wave height is measured from the bottom of the trough to the top of the crest.
Figure 1. This figure shows some of the characteristics of a wave. (Courtesy of the Office of Naval Research, 2009.)
Waves are characterized by their wavelength and their height. Every kind of wave—whether it is a sound wave, a light wave, or an ocean wave—has a crest and a trough. The crest is the highest point of the wave and the trough is the lowest point of the wave. The wavelength is the distance between two consecutive wave crests. The height is the difference between the wave crest and the next wave trough. Another important characteristic of waves is the wave period. This is defined as the time between two consecutive crests (or troughs) as the crests (or troughs) pass a stationary point. Figure 1 depicts these characteristics of waves.
As ocean waves move forward, you might think that the water is moving forward; however, this is not the case. The water actually moves in vertical circles and there is little forward motion of the individual water particles in a wave. A wave is just forward motion of energy or momentum. Scientists gather data from the oceans—such as water temperature, wind speed, wind direction, wave height, and wave period—using ocean buoys, which are devices that float in the oceans.
How can we capture the energy associated with the waves and convert it to something we can use, like electricity? According to the U.S. Department of Energy (U.S. DOE), at any given moment, there is enough energy in the oceans' waves around the world to provide up to 2 trillion watts (W) of electricity! Since the oceans will always provide waves, wave energy is a renewable and sustainable form of energy. There are certain parts of the world that are especially rich in wave power. These include the western coasts of Scotland, Australia, South Africa and northern Canada. The northeastern and western coasts of the United States are also good locations to extract wave energy.
The U.S. DOE separates wave energy power systems into two categories: onshore systems and offshore systems. Onshore wave energy power devices include oscillating water columns, tapchans, and pendulor devices. In an oscillating water column, a partially submerged structure has an opening below the waterline to the ocean. It encloses a column of air on top of a column of water. As the column of water rises, due to incoming waves, the column of air is compressed and is forced past a turbine. This causes the turbine to rotate and generate electricity. When the wave recedes, the column of air is depressurized and air rushes past the turbine in the other direction. This causes the turbine to rotate again and generate more electricity. This is illustrated in Figure 2.
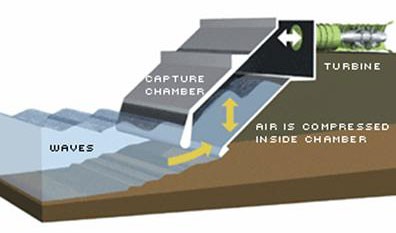
Air is trapped in a column by a wall that goes into a body of water. Water is allowed to pass under the wall and when it rises the air within the column is pushed upwards into a turbine at the top of the column. As the air is pushed and then pulled by the waves, the turbine is spun and generates electricity.
Figure 2. This image shows how an oscillating water column functions. (Energy Futures: MIT Energy Initiative, 2009.)
This video shows several different types of wave energy-harvesting devices, including an oscillating water column:
In this energy and power science project, you will build and test an oscillating water column device. You will build the oscillating water column from readily available parts and a computer cooling fan, then test it by submersing part of the column into a deep body of water. The fan will create a voltage (measured in volts) and a current (measured in amperes) that you will be able to detect with a multimeter when air pushes past it. You can read more about voltage and current in the Science Buddies Electricity, Magnetism, & Electromagnetism Tutorial. Will your oscillating water column create enough energy to light a compact fluorescent lightbulb?
Terms and Concepts
- Energy
- Crest
- Trough
- Wavelength
- Period
- Momentum
- Renewable
- Sustainable
- Oscillating water column
- Turbine
- Submerse
- Voltage (measured in volts, V)
- Current (measured in amperes, A)
- Multimeter
- Skew
Questions
- How does a tapchan device work? How does a pendulor device work?
- What are some devices that can be used to extract energy from ocean tides?
- Can all of the devices discussed in the introduction function efficiently at any location? Why or why not?
Bibliography
- U.S. Department of Energy: Energy Efficiency & Renewable Energy. (2009, February 24). Renewable Energy: Exploring Ways to Use Ocean Energy. Retrieved May 19, 2010.
The following sites discuss power and energy. You should review these sites to help you determine how much power and energy your oscillating water column harnesses.
- Rathjen, D. (2001). Science Wire: Watt's a Joule?. Retrieved May 19, 2010.
Materials and Equipment
You will need the following materials, available from a hardware store or Jameco Electronics:
- ABS pipe, 4-in. diameter x 10-ft. length
- Tape measure
- Rubber band
- ABS pipe saw
- Volunteer
- Safety goggles (2 pairs)
- Gloves
- ABS cap hub, 4-in. diameter
- Drill with a set of drill bits, including a 1 3/8-in. step bit
- Ruler
- Crayon, white or yellow
- ABS cement, 4 ounces (oz.)
- Rubber gasket material or rubber packing; available in the plumbing repair aisle of a hardware store or home improvement center, such as Home Depot model # 59849
- Scissors
- Computer cooling fan, 80 mm x 80 mm, available from Jameco Electronics
- Wire strippers, available at a hardware store or Jameco Electronics
- Digital multimeter. See our multimeter tutorial if you do not know how to use a multimeter.
- Electrical tape in a variety of colors, at least 4 (such as red, yellow, green, and white)
- Alligator clip cables (2), available from Jameco Electronics
- Lab notebook
- Graph paper
Disclaimer: Science Buddies participates in affiliate programs with Home Science Tools, Amazon.com, Carolina Biological, and Jameco Electronics. Proceeds from the affiliate programs help support Science Buddies, a 501(c)(3) public charity, and keep our resources free for everyone. Our top priority is student learning. If you have any comments (positive or negative) related to purchases you've made for science projects from recommendations on our site, please let us know. Write to us at scibuddy@sciencebuddies.org.
Experimental Procedure
Building the Oscillating Water Column
-
Find a location where you can easily dunk or submerse the oscillating water column into water, such as a pool, lake, or ocean.
- The water depth should be at least 8 feet.
- You should find a location at a boat slip, edge of a swimming pool, or a pier so that while you are dunking the oscillating water column, you can lean against or hold onto something.
- There shouldn't be a lot of other people wandering around while you do your experiment.
- Once you have found an acceptable location, use your tape measure to measure the distance between the boat slip, pool edge, or pier and the surface of the water. You can imagine that the length of the whole tape measure will be the length of the oscillating water column. Mark the distance down in your lab notebook. Record the distance as a minimum of 5 feet in your lab notebook, even if the actual distance is less than 5 feet. This is the minimum value required to construct a functioning oscillating water column for this science project.
- Once you've returned home, use the tape measure and mark the value that you recorded in step 2 on the ABS pipe with the rubber band. Now add 3 feet to where the first rubber band is placed. Place a second rubber band at this location. Remove the first rubber band. The purpose of this extra few feet is to give you something to hold on to while you are dunking the oscillating water column.
- Now cut the ABS pipe at the rubber band with the ABS saw. Put on your safety goggles and gloves. Your volunteer should put on a pair of goggles, too. Have your volunteer hold the pipe on the ground so that you can cut the pipe.
- Measure out a 3-in. hole in the top, flat part of the ABS cap hub. Mark the hole with the crayon and make sure that it is in the center of the cap hub. Place the cooling fan on top of the hole to make sure that the hole is about the same size as the fan. There are four screw holes in each corner of the fan case. Make a mark in the cap to match each of the corner holes in the fan case.
-
Put your safety goggles back on and drill each of the four corner holes and the 3-in. hole with the drill and the appropriate drill bit.
- Your volunteer should also put back on his or her safety goggles and then help by holding the cap while you carefully drill the hole.
- Use a smaller bit like a 1/4-in bit for the four corner screw holes.
- Use a larger bit, like a 1/2-in drill bit, to make a pilot hole in the center of the 3-in hole. Then use the 1 3/8-in step bit to widen the hole. Go back to the 1/2-in bit and carefully shave off the extra material until the hole is 3 inches wide. Remember to stay within the crayon marking that you made in step 5.
- Make sure that the drilled screw holes are not too big or too small for the screws.
- Cut the gasket rubber with the scissors. Make a hole in the center where you marked with crayon, the same size as the hole in the cap hub. Also cut out the four holes to accommodate the fan's four corner screw holes. The purpose of the gasket is to make a seal between the cap and cooling fan.
- Cut off the connectors from the end of the wires of the fan with the wire strippers. Use the wire strippers and strip off ½ in. of plastic from both ends of the wires.
- Place the gasket material over the holes in the cap hub and then the fan, face-side down, on top of the gasket. Cut any excess gasket material off with the scissors. The gasket should make a good seal between the cooling fan and the cap hub. Make sure to place the fan wires in the case groove, located on the front face, and bring them back behind the fan through the hole. Once you are sure that the fan, gasket, and cap hub are aligned, attach the fan by screwing it down in each corner. Figure 4 shows what a completed fan and cap hub assembly should look like.
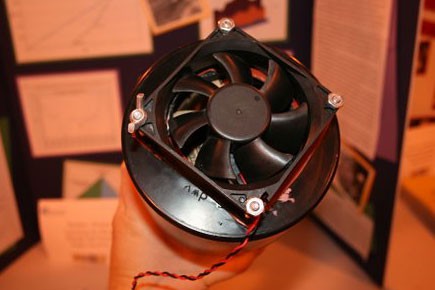 Image Credit: Sandra Slutz, Science Buddies / Science Buddies
Figure 4. Completed fan and cap hub assembly. (Device made by Natalya Dreszer, 2010.)
- Now glue the fan and cap hub assembly together with the pipe that you cut in step 4, as follows. Read the directions for the ABS cement. Spread the cement around the outside top end of pipe and the inside of the fan and cap hub assembly. Note: Make sure that you don't get any cement on the fan. Attach the two pieces together and let it harden for the recommended amount of time. The oscillating water column is now complete. Figure 5 depicts a completed version of a test oscillating water column.
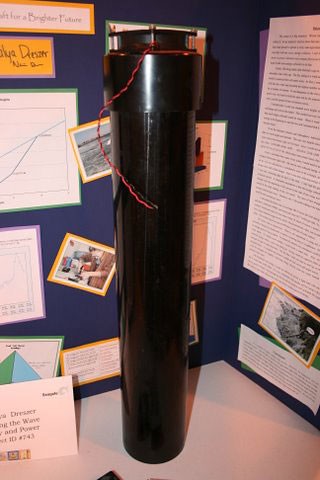 Image Credit: Sandra Slutz, Science Buddies / Science Buddies
Figure 5. A completed version of the test oscillating water column. (Device made by Natalya Dreszer, 2010.)
Testing the Oscillating Water Column
- Prepare the oscillating water column for testing. Wrap a piece of red electrical tape around the oscillating water column, 2 ft. from the open end. Wrap a piece of yellow electrical tape 4 ft. from the open end. Wrap a piece of green electrical tape 5 ft. from the open end of the tube. Wrap a piece of white electrical tape 6 ft. from the open end of the tube.
- Open the multimeter and read the included instructions. You must get familiar with the multimeter and learn how to measure voltage and current before you begin testing. If you need help using a multimeter, check out the Science Buddies reference How to Use a Multimeter.
- Clip each of the wires from the fan to the leads of the multimeter with the alligator clip cables. Your volunteer will hold onto the multimeter and monitor the readings while you dunk the oscillating water column in the following steps.
- Go to the location by the water that you found earlier. Submerge the open end of the oscillating water column 2 ft. into the water (to the red tape mark on the tube). Turn on the multimeter and monitor the voltage.
- Then practice quickly dunking the water column in and out 2 ft. from the red tape on the tube to the yellow tape. When you feel confident doing this, start recording the peak voltage readings from the multimeter in your lab notebook. Quickly dunk the tube from the red tape to the yellow tape 12 times and with each dunk, record the peak voltage reading in your lab notebook. Dunking the water column 2 ft. represents a 2-ft. wave.
- Repeat step 4, but this time, record the peak current readings in your lab notebook.
- Repeat steps 4–6, dunking the water column 3 ft., moving from the red tape to the green tape. Dunking the water column 3 ft. represents a 3-ft. wave. Record all data in your lab notebook.
- Repeat steps 4–6, dunking the water column 4 ft., moving from the red tape to the white tape. Dunking the water column 4 ft. represents a 4-ft. wave. Record all data in your lab notebook.
Analyzing Your Data
- Now plot your data on graph paper. First plot the voltage data for each wave height. Label the x-axis Wave. You will have 12 data points for waves, since you dunked the water column 12 times. Label the y-axis Volts. You can plot the data for all three wave heights on the same plot.
- Now plot the current data for each wave height. Label the x-axis Wave. You will have 12 data points for waves since you dunked the water column 12 times. Label the y-axis Amperes. You can plot the data for all three wave heights on the same plot. Note: Keep in mind that your current measurements will not be in the full ampere range, but more likely in the milliampere range and you will have to account for this in your plot.
- Now average the peak voltage data and the peak current data for each wave height. For each set of data, remove the highest and lowest reading before averaging to prevent skewing the data too high or low. Once you have calculated the average voltage and current for each wave height, calculate the average peak power. Equation 1 shows how to calculate the average peak power that the water column harnessed.
Equation 1:
- P = Average peak power, in watts (W)
- I = Average current, in amperes (A)
- V = Average voltage, in volts (V)
- Plot the average power that the water column harnessed at each wave height. Label the x-axis Wave Height and the y-axis Watts.
- Review the references in the Bibliography to understand what power and energy are. How much energy does your oscillating water column harness in a day? How much energy does a typical lightbulb use in a day? How many oscillating water columns would you have to build to use a typical lightbulb for a day?
Ask an Expert
Global Connections
The United Nations Sustainable Development Goals (UNSDGs) are a blueprint to achieve a better and more sustainable future for all.
Variations
- How big would your oscillating water column have to be to completely provide energy to run your house for a day? Look at your family's electric bill to find out how much energy your house uses in a day.
- Build an oscillating water column using a 3-in.-diameter tube. What is the difference in power and energy harnessed between the 3-in. oscillating water column and the 4-in. oscillating water column?
Careers
If you like this project, you might enjoy exploring these related careers:


