Abstract
3... 2... 1... 0— blastoff! In this science project, you will use a bottle rocket launcher to launch your own bottle rocket. You will load it with water and pressurized air, make several launches, and find out what makes your rocket soar the highest.
Summary
None
Readily available
Adult supervision is required at all times. See the safety note at the beginning of the Procedure for details.
- Aquapod is a trademark of Great American Projects, Inc.
- ALTITRACK is a trademark of Larsen & Brusgaard, Denmark.
/-/https/i.ytimg.com/vi/c4Iu_-jqegw/maxresdefault.jpg)
Objective
Investigate how the air pressure you create in a bottle rocket before launching changes the maximum height it reaches once launched.
Introduction
/-/https/www.sciencebuddies.org/cdn/Files/15722/4/rocket-blastoff-thumbnail.jpg)
Ever wondered why rockets create a powerful blast at liftoff? Explore for yourself with this science project! While you will not be able to create a blast like the one shown in Figure 1, you will create a smaller blast, one you will control.
/-/https/www.sciencebuddies.org/cdn/Files/6711/10/rocket-liftoff.jpg)
Figure 1. The STS-124 rocket lifts off with a powerful blast. (NASA courtesy photo)
Rockets are vehicles that obtain their forward thrust from a reaction engine. In other words, rockets push themselves forward by ejecting mass (that shoots backward) at high speed from their rear end. This mechanism does not rely on the atmosphere and works very well in space. It is illustrated in Figure 2.
/-/https/www.sciencebuddies.org/cdn/Files/6712/10/rocket-action-reaction-easy.jpg)
Figure 2. Rockets eject mass backward at high speed to achieve a forward push.
Did a firefighter ever let you squirt water out of his fire hose? If so, you probably experienced the same thing. As the water squirts out at a high speed, the hose (and the person holding it) feels a strong push backwards. Note the push is in the opposite direction of the water flow. The more pressure that is put on the water (from its source, such as a water tank or a pump), the faster the water comes out and the bigger the backward push gets. At full force, two firefighters are needed to hold the hose, as shown in Figure 3.
/-/https/www.sciencebuddies.org/cdn/Files/6713/11/rocket-hose-analogy.jpg)
Figure 3. Water being squirted out of a water hose at high speed creates a strong push in the opposite direction on the hose and on the person(s) holding the hose.
You will use this push to your advantage to launch a bottle rocket. Your rocket will be partially filled with water, which it will squirt out at its rear end to lift itself up in the air. But how can you make the water come out fast (at high speed) so it gets lifted high in the sky? A special water bottle launcher allows you to add air to your bottle rocket. The more air you add, the more this air pushes on the water. Air pressure, or how hard the air presses outward on the inside walls of the bottle as well as on the liquid in the bottle, builds up in the bottle and you might even see the bottle bulge out a little. Figure 4 illustrates this.
/-/https/www.sciencebuddies.org/cdn/Files/6714/15/bottle-air-pressure.jpg)
Figure 4. As you add air to a water bottle, pressure will build up inside. As a result, the plastic walls and the liquid inside the bottle will feel a bigger push.
Just like with the fire hose, the more pressure that is put on the water, the faster the water comes out and the bigger the push on your bottle rocket.
Scientists use several units to quantify pressure. In this science project, you will measure the pressure in the bottle in pounds per square inch (psi) because that is the units of measurement on a bicycle pump. However, psi is not a metric unit and in science the metric system is used. If your teacher would like you to use the metric system, then you will need to record the pressure in pascals (Pa) also known as newtons per square meter (N/m2). You can use an online calculator, like this one to make the conversion between pounds per square inch and pascals.
Terms and Concepts
- Rocket
- Reaction engine
- Air pressure
- Pound per square inch
Questions
- What mechanism do rockets use to lift themselves off the ground, resulting in a forward motion?
- Why would you have water (which is quite heavy) in addition to air in your water bottle rocket before liftoff?
- Why would you have air (which has little mass but can be compressed to create more pressure) in addition to water in your water bottle rocket before liftoff?
Bibliography
For more on water rockets, see:
- Benson, T. (n.d.). Water Rocket. Retrieved October 29, 2014.
For an explanation of air pressure, see:
- Netting, R. (2003, January 22). It's a Breeze, How Air Pressure Affects You. Retrieved October 24, 2014.
For more on how to measure the height a rocket reaches, see:
- University of Illinois, Department of Physics. (n.d.). Height of a water rocket. Retrieved October 29, 2014.
For help converting units of pressure, see:
- The Engineering Toolbox. (n.d.). Pressure Units Online Converter. Retrieved November 6, 2014.
For help creating graphs, try this website:
- National Center for Education Statistics, (n.d.). Create a Graph. Retrieved June 25, 2020.
Materials and Equipment
- Bottle rocket launcher available from Amazon.com
- Soda bottle (2 L)
- Choose a bottle of a carbonated beverage or iced tea, as other bottles might not be strong enough.
- An altitude-tracker available from Amazon.com
- Water (4 gallons)
- (Optional) Empty 1 gallon bottles, helpful in case you need to transport water to the open space.
- Measuring cup (1 L)
- A cup or beaker with volume marks in milliliters (mL) like this measuring cup available from Amazon.com is preferred, but not essential.
- Funnel (to fill the 2 L bottle)
- Permanent marker
- Bicycle pump with pressure gauge, like this pump, available from Amazon.com.
- (Optional) Measuring tape.
- Petroleum jelly
- Open outdoor space, like a park or athletic field, in which to launch your rocket
- Dimensions: At least 40 m (130 ft) long and 40 m wide
- Ground cover: Soft ground so the U peg to secure the launcher can be pushed into the ground.
- Helper
- Adult supervision
- Lab notebook
Disclaimer: Science Buddies participates in affiliate programs with Home Science Tools®, Amazon.com, Carolina Biological, and Jameco Electronics. Proceeds from the affiliate programs help support Science Buddies, a 501(c)(3) public charity, and keep our resources free for everyone. Our top priority is student learning. If you have any comments (positive or negative) related to purchases you've made for science projects from recommendations on our site, please let us know. Write to us at [email protected].
Experimental Procedure
Caution: Here are some general safety guidelines you should read before you start this project.
- Select your observation spot such that you do not look toward the sun as you observe your launch. Looking into the sun can damage your eyes.
- Keep the pressure in the launch bottle below 50 psi at all times.
- Always use the U peg to secure the bottle rocket launcher to the ground before launching.
- Never lean over the bottle rocket while it is under pressure.
- Keep a safety zone of 4.5 m (about 15 ft) around the launcher clear of bystanders before each launch.
- Give the launch string a gentle, quick tug; a powerful yank might cause the launcher to come loose and launch in an unsafe direction.
- Important: In case launching fails, ask an adult to help you remove the bottle by following the launch failure procedure described in the bottle rocket launcher manual.
Preparations at Home
- Empty a 2 L soda bottle and rinse it with water. Remove and dispose of the outside wrapper and the cap.
- Check if the bottle fits the launcher:
- Put your empty bottle on the launcher. Push the bottle down so it goes over the thin black ring, as illustrated in Figure 5.
- Pull the bottle back up as far as you can. The launch release latch should hold it in place, as shown in Figure 6. You might have to move the metal clip attaching the launch cord to the release handle out of the way.
/-/https/www.sciencebuddies.org/cdn/Files/6715/10/rocket-mounting-under-ring.jpg)
Figure 5. The bottle rocket needs to be pushed over the thin black ring of the launcher, as shown in the figure on the right. In the image on the left, the bottle is not pushed down far enough.
/-/https/www.sciencebuddies.org/cdn/Files/6716/10/rocket-mounting-latch.jpg)
Figure 6. The launch release handle needs to touch the bottle rocket to create a successful launch, as shown in the figure on the right.
- Make a mark to indicate the initial water/air ratio for your rocket launches.
- In this science project, you will keep the initial ratio of water to air in your bottle rocket constant. One-third of the volume will be filled with water and two-thirds of your bottle rocket will be filled with air. To facilitate launching, indicate this level on your bottle, as described in the next steps.
- One-third of a volume of 2 L is about 0.7 L or 700 mL. Measure 0.7 L of water in your measuring cup. Note: If your measuring cup does not have metric volumes, measure 3 C.
- Remove the bottle from the launcher once you have ensured it fits. Use your funnel to carefully pour the water in your bottle. Note: If you accidentally spill any, empty the bottle and measuring beaker and repeat steps b. and c.
- Place your bottle on a flat surface and wait for the water to stop moving, then trace the water line around the entire bottle with a permanent marker, as shown in Figure 7. Empty out the water once you have traced the line.
/-/https/www.sciencebuddies.org/cdn/Files/6717/10/bottle-rocket-water-level.jpg)
Figure 7. After filling the bottle to one-third of its volume, the water line is traced with a permanent marker.
- Copy the following table in your lab notebook; you will use it to record your measurements.
| Measured angle (°) | |||||
|---|---|---|---|---|---|
| Air pressure (psi) | Trial 1 | Trial 2 | Trial 3 | Average | Observations |
| 10 | |||||
| 20 | |||||
| 30 | |||||
| 40 | |||||
Table 1. A table like this will be used to record measurements and observations.
- Learn how to use the altitude finder.
-
In this science project, you need to measure the maximum height your rocket reaches. With the altitude finder, you will measure the angle between a horizontal line and a line to the highest point on your rocket flight track, as shown in Figure 8. Figure 9 illustrates that the bigger this angle is, the higher your rocket went. Note that for this to be valid, it is important that the observer (the person holding the altitude finder) stays at a fixed distance from the launcher.Figure 8. Person using the altitude finder to measure the height a rocket reaches. (Left) The rocket barely comes off the ground. (Middle) The rocket goes to medium height. (Right) The rocket goes very high. Note how the measured angles get bigger as the rocket goes higher. The angle between the arrows in red shows the measured angle, the angle between the altitude finder and the horizontal.
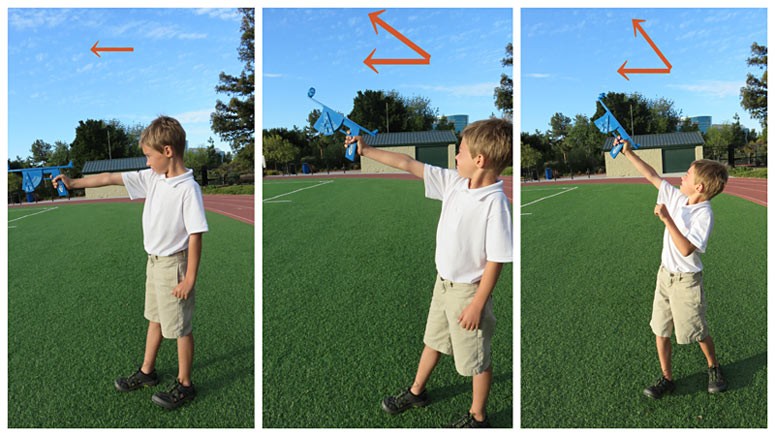 Figure 9. Higher points result in bigger measured angles. Note the observer is indicated by an orange dot in the figure.
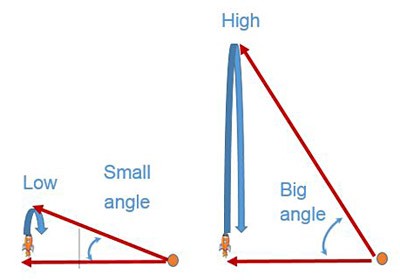
- Read the instructions on how to use the altitude finder, found on the box of the altitude finder. You will follow these instructions, except you will place yourself at a distance 23 m (not at 152 m) from the launcher. This distance provides a good precision for the heights reached in this science project.
- Note: The altitude finder allows measurements between 0° and 70°. Readings above 70° will result in inaccurate measurements. In case your rocket does go higher, increase the distance between the observer and the bottle rocket launcher for all your measurements. Note that if you do so, you will no longer be able to use Table 2 to convert angles to height. Instead, you can use a graphical method, as explained in the Variations to convert angles to height, or ask a mathematics-savvy person to create a conversion table for you.
Technical Note:
Keeping the observer at a fixed distance from the launcher allows you to convert angles measured with the altitude finder (expressed in degrees) into heights (expressed in m). The mathematics to do this is above the difficulty level of this science project, so we have included Table 2 to help you make the conversions. The table lists the height for an observer placed at 23 m from the object for angles 0° through 70°.
Table 2. This table allows you to convert measured angles (expressed in degrees) into height (expressed in m) for an observer placed at 23 m from the object.Angle (°) Height (m) Angle (°) Height (m) Angle (°) Height (m) Angle (°) Height (m) 0 0 20 8.4 40 19.3 60 39.8 2 0.8 22 9.3 42 20.7 62 43.2 4 1.6 24 10.2 44 22.2 64 47.1 6 2.4 26 11.2 46 23.8 66 51.6 8 3.2 28 12.2 48 25.6 68 56.8 10 4.1 30 13.3 50 27.4 70 63.1 12 4.9 32 14.4 52 29.4 14 5.7 34 15.5 54 31.6 16 6.6 36 16.7 56 34.0 18 7.4 38 18.0 58 36.8 Note that as the observer is placed closer to the launcher, the height corresponding to an angle (e.g. 20° shows a height of 8.4 m) is much smaller than the height indicated on the altitude finder box (20° shows a height of 55 m).
You can choose to leave your measurements as angles for this project, or to convert angles into the height expressed in meters.
- Stand at a reasonable distance (like 23 m or 75 ft) from a relatively high object (e.g. a multistory house or a tall tree). Hint: Since the launch string of your rocket launcher is 15 ft long, you can measure out a distance of 75 ft or 23 m by laying it out back-to-back five times.
- Obtain a measure of the height of this object using the altitude finder.
- Point the altitude finder to the highest point of the object.
- Push the trigger of your altitude finder and wait until the swing arm hangs still before you release the trigger, freezing the swing.
- Read the angle indicated by the swing from your altitude finder. This angle is a measure of the height of the object.
- Write down your measured angle in your lab notebook.
- Standing on the same observation spot, repeat step e. to measure the height of part of this same object (e.g. the height of the first story or the trunk of the tree). Note that the distance between you as observer and the object has not changed.
- Write down your measured angle in your lab notebook.
- Ensure the measured angle of your lower object (measured in step g.) is smaller than the measured angle of your higher object (measured in step e.).
- Optional: Use Table 2 to convert the measured angles into heights expressed in meters. Write your results down in your lab notebook next to the measured angles.
- If your measurements seem incorrect:
- Check if the distance between you as observer and the objects you measured (the high and the low objects) is identical for both measurements.
- Retry, making sure to wait for the swing arm to hang still before you release the trigger, freezing the swing.
- Read the instructions that come with the altitude finder, especially the explanation on how to use the trigger and how to read the angle, making sure you follow the instructions.
- If all of the above fail, ask an adult to help you learn how to use the altitude finder.
-
/-/https/www.sciencebuddies.org/cdn/Files/6718/16/angle-versus-height-pictures.jpg)
/-/https/www.sciencebuddies.org/cdn/Files/6719/12/angle-versus-height.jpg)
Securing Your Observation Spot and Preparing for Launch
You are all set to go outside, find a good location and prepare for launching! Note: In case your location has no access to water, take about 4 gallons of water with you. Check the Materials list for other objects you need to bring.
- Find a launch area.
- A clear space of 40 m (130 ft) long and 40 m wide.
- Search for a good launch location:
- The launcher should rest on a flat area.
- The ground should be soft so the U peg to secure the launcher can be pushed in the ground.
- Find the direction at a right angle to the wind. You can skip this step if you can barely feel wind.
- Place yourself at the launch location, turning yourself so the wind blows in your face.
- Stretch your arms out next to you so they form a straight line, as shown in Figure 10.
- Both arms point in a direction at a right angle to the wind. You will use these directions in step 4.
/-/https/www.sciencebuddies.org/cdn/Files/6720/14/bottle-rocket-observer-direction.jpg)
Figure 10. When the wind blows in your face, your stretched out arms will point in directions at a right angle to the wind.
- Find the observation spot associated with this launch location. Measure off 23 m, starting from the launch location in the direction at a right angle to the wind (choose one of the two direction in which the person's arms were pointed when stretched out) found in step 3. If you can barely feel wind, all directions are fine.
- Hint: Since the launch string of your rocket launcher is 15 feet long, laying it out back-to-back five times allows you to measure off a distance of 75 ft or 23 m.
- Mark this spot with a heavy object, like your backpack or a filled bottle of water. This is the spot for the observer who will be using the altitude finder.
- Make sure the observer does not look into the sun as he or she follows the rocket. If he or she does, pick up your heavy object and measure 23 m on the other side of your launch pad (the second direction you found in step 3).
- If, for any reason, you are not pleased with your observation spot, repeat steps 2–4 until you find satisfying launch and observation spots.
- Secure your launcher to the ground with the U peg, as indicated in the manual. Figure 11 illustrates a well-secured launcher.
/-/https/www.sciencebuddies.org/cdn/Files/6721/10/rocket-launcher-upeg.jpg)
Figure 11. The launcher is held in place by a U peg going over the launcher and pushed into the ground.
Test Run
Ready to have a blast? It is time to give your rocket a try!
- Fill the bottle rocket to the indicated water level with clean water.
- Put your bottle on the launcher. You will need to do this in a fast movement in order to spill only a little water. If this is too hard, you can also:
- Loosen the U peg so you can pick up the launcher,
- Place it upside down on the bottle, as shown in Figure 12 and
- Secure the launcher with the bottle to the ground with the U peg.
/-/https/www.sciencebuddies.org/cdn/Files/6722/10/push-launcher-in-rocket.jpg)
Figure 12. Placing the bottle rocket on the ground and pushing the launcher upside down in the bottle spout allows you to attach the rocket without spilling any water.
- Lay out your launch string.
- Attach the bicycle pump to the launcher.
- Add a little air to the bottle rocket.
- Pump until your pressure meter indicates 20 psi.
- Clear the area of bystanders and move away from the rocket launcher, out to the end of your launch string.
- Signal the observer to prepare for a measurement.
- Launch the rocket by giving a quick gentle tug to the launch string.
- WOW! Did you see your rocket fly? If not, go to the FAQ section and perform a new test run as soon as you identify and fix the issue.
- Note that real rocket launches come with launch procedures, including a long list of safety checks. Write down a launch procedure for your launches in your lab notebook:
- Include all of the safety tips listed in the Caution section in your procedure.
- Include hand signals to inform the observer to prepare for a launch, a failed launch, etc.
Taking Measurements
- You will measure the maximum height your rocket reaches for four different air pressures (10, 20, 30, and 40 psi).
- Prepare your rocket as you did in the Test Run steps 1–4.
- Add air to the bottle rocket until your pressure meter indicates 40 psi.
- Go through your launch procedure.
- The observer uses the altitude finder to measure the angle representing the maximum height the rocket reaches. See section Learn how to use the altitude finder if you need to refresh your memory on how to use the altitude finder.
- Write down the measured angle in your table like Table 1.
- Repeat steps 2–6, for 30 psi, 20 psi, then 10 psi.
- This concludes one set of measurements (one trial). You can take a break here if you like.
- Rub some petroleum jelly on the black ring of the launcher to keep it in good condition.
- Repeat steps 2–9 two more times for a total of three sets of measurements (trials). Do not forget to execute step 9 in between trials.
Analyzing Your Data
- Calculate the average angle for each pressure.
- Start with the measurements for a pressure of 10 psi. The following example may help you. Say you measured 10° in your first trial, 15° in your second trial, and 13° in your last trial. To calculate the average, you first add up these measurements (yielding 38° in this case) and divide the result by the number of measurements (3 in this case). The average angle for a pressure of 10 psi would be 13° (because 38/3 is 12.66, which can be rounded to 13).
- Continue with the measurements for 20, 30, and 40 psi.
- Do not forget to record your calculated values in the table like Table 1.
- Optional: If you decide to convert your angles to height expressed in meters:
- Make an extra table, like Table 3.
- Use Table 2 to look up the height corresponding to your average angles, and record them in your table.
| Air pressure in bottle rocket (psi) |
Average measured angle (°) |
Corresponding height (m) |
|---|---|---|
| 10 | ||
| 20 | ||
| 30 | ||
| 40 |
Table 3. Table in which to record average angles measured and corresponding height.
- Optional: Convert pressure expressed in pounds per square inch to the metric system unit pascals (Pa). Consult the Introduction for more information on units used to express pressure.
- Make a line graph of your average angle data versus air pressure. Put the pressure (in psi or Pa) on the x-axis (the horizontal axis going across) and put the average angle (in degrees) on the y-axis (the vertical axis going up and down).
- You can make a graph by hand or make a graph using a computer program, such as Create a Graph , and print it out.
- Optional: If you converted angles to heights, make a line graph of your height data versus air pressure. Put the pressure (in psi or Pa) on the x-axis (the horizontal axis going across) and put the height (in m) on the y-axis (the vertical axis going up and down).
- Look at your data table, your graph, and your observations and try to draw conclusions from your results. Remember that bigger angles imply a rocket that reaches a higher point.
- Can you explain your results in terms of what happens as you create more pressure in the bottle rocket and what creates the upward motion of your rocket, which is explained in the Introduction?
Troubleshooting
For troubleshooting tips, please read our FAQ: Bottle Rocket Blast Off!.
Ask an Expert
Global Goals
The United Nations Sustainable Development Goals (UNSDGs) are a blueprint to achieve a better and more sustainable future for all.
/-/https/www.sciencebuddies.org/cdn/Files/19752/5/E-WEB-Goal-09.png)
Variations
- In this science project, you study how the pressure in the bottle rocket influences the maximum height the rocket reaches. You can also keep the pressure constant (e.g. 40 psi) and study how the ratio of water to air influences the maximum height the rocket reaches. You can make measurements for 1/8 volume of water (.25 L); 1/4 water (.5 L); 1/2 water (1 L), and 3/4 water (1.5 L). Note the volumes of water are listed for a 2 L bottle rocket.
- As an addition to your science project, you can add a drawing to scale showing how the average measured angle corresponds to reached heights. A brief description of what to do:
- Choose a horizontal on the lower end of your drawing.
- Place the observation spot and the launch location on the horizontal with 23 units distance between them. The 23 units distance represent the 23 m between the observer and the launch spot in your real-life test. This implies that one unit distance on your drawing represents 1 m.
- Draw a vertical line through the launch location. You will measure the obtained maximum height on this line.
- Measure the average angles (the results of your test) with respect to the horizontal with a protractor placed at the observation spot. Figure 13 shows how to place the protractor to measure the angles.
- Draw lines at these angles, starting at the observer and through the vertical line from the launch location (the red, blue, and yellow lines in Figure 13). The location where this line crosses the vertical indicates the maximum height the rocket reached.
- You can measure the heights reached by the rockets on the vertical using your scale (one unit distance on your drawing equals 1 m.)
- Make sure to name the axes, and add a legend and a scale indication to your drawing. Not all of these are shown in Figure 13.
Figure 13. A scale drawing showing how the average measured angle relates to the attained height. The angle is measured with a protractor. Note the legend and scale are omitted in this graph.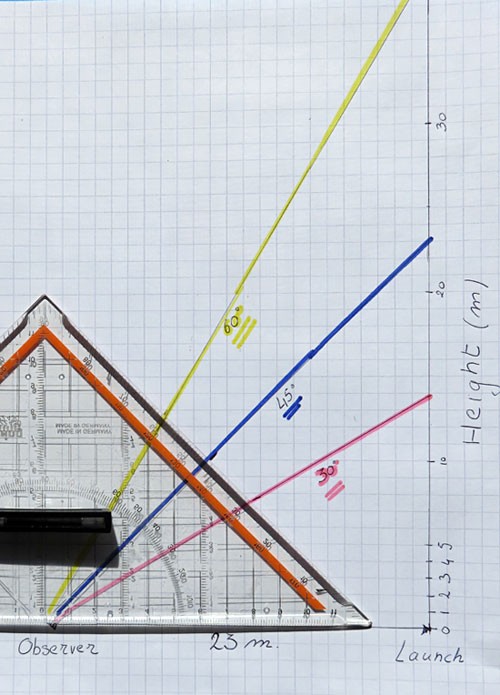
Note you can find the mathematical formula linking distance, angle and height in the Bibliography.
- Study the effect of adding wings or making your rocket more aerodynamic on the maximum height reached.
- See the Rocket Science: How High Can You Send a Payload? project idea for ideas on how to create an aerodynamic bottle rocket and use it to study how the maximum height reached reduces when your rocket lifts a payload.
/-/https/www.sciencebuddies.org/cdn/Files/6723/14/angle-vs-height-graph.jpg)
Frequently Asked Questions (FAQ)
- Check if you placed your bottle rocket properly on the launcher. The pictures in the section Preparations at Home can help you identify if the bottle is pushed down far enough and ensure the release latch is holding the bottle securely in place.
- Check if your bottle fits snugly on your launch tube. When your rocket is loaded with some water and placed on the launch tube, some water might trickle out. If water continues to stream out, see if rubbing the black ring with some petroleum jelly solves the issue. If the spout of your bottle is too wide, you might have to buy a new bottle.
- Ask an adult to remove the bottle from the launcher, following the instructions from the bottle rocket launcher manual.
- Rub some petroleum jelly on the black ring of your launch tube.
- Check if your bottle rocket fits the launcher. The pictures in the section Preparations at Home can help you identify problems.
- Ensure your bottle fits snugly, but not extremely tightly, around the launch tube. If the spout of your bottle is too tight, you might have to buy a new bottle.
- The launch latch should be able to grab the bottle as soon as some pressure is added to the bottle rocket. You can test this by putting an empty bottle rocket on the launch tube, pushing it completely down, and then pulling it back up. The bottle should come up a tiny bit, until the release latch stops it.
- The altitude finder allows measurements between 0 and 70°. Readings above 70° will result in inaccurate measurements. In case your rocket does go higher, increase the distance between the observer and the bottle rocket launcher for all your measurements.
- Note that if you do change the distance between the observer and the launcher, you will no longer be able to use Table 2 to convert angles to height. Instead, you can use a graphical method, as explained in the Variations to convert angles to height or ask a mathematics-savvy person to create a conversion table for you. You can find the mathematical formula linking distance, angle and height in the Bibliography.
Careers
If you like this project, you might enjoy exploring these related careers:
/-/https/careerdiscovery.sciencebuddies.org/cdn/Files/835/18/msfc-202000343.jpg)
/-/https/careerdiscovery.sciencebuddies.org/cdn/Files/842/17/unsplash-Bt9HIKC0Nus.jpg)
/-/https/careerdiscovery.sciencebuddies.org/cdn/Files/1450/21/iStock-1227179796.jpg)
/-/https/careerdiscovery.sciencebuddies.org/cdn/Files/1640/26/Fyysikot_tyossaan.jpg)

/-/https/img.youtube.com/vi/aJhYQsL0-kI/0.jpg)
/-/https/img.youtube.com/vi/p2yaFh5kuvw/0.jpg)
/-/https/img.youtube.com/vi/a9Nn3ppWhK0/0.jpg)