Summary
/-/https/www.sciencebuddies.org/cdn/Files/18417/6/3D-printed-fabric-thumbnail.jpg)
/-/https/i.ytimg.com/vi/TYDNBvP5dyk/maxresdefault.jpg)
Introduction
When you think of 3D printing, you probably think of solid objects. But did you know that you can use a 3D printer to make a flexible fabric? This activity will show you how to design and 3D print your own fabric.
Materials
- Computer with Internet access and/or computer-aided design (CAD) software. Tinkercad® is a good beginner-friendly CAD program.
- Access to a 3D printer or online 3D printing service
Prep Work
/-/https/www.sciencebuddies.org/cdn/Files/18418/6/3D-printed-mesh-circles.jpg)
Another approach is to print thicker, rigid pieces connected by thinner, more flexible pieces made from the same material. Alternatively, if you have access to a two-material printer, you can print the connecting pieces from a more flexible material.
/-/https/www.sciencebuddies.org/cdn/Files/18419/6/3D-printed-fabric-triangles.jpg)
The design consists of small, fairly rigid flat triangles connected by thinner, more flexible strips.
To choose an approach, you will need to know what your 3D printer can handle. Different 3D printers and materials have different limitations. For example, some 3D printers cannot print interlocking parts or parts with too steep an overhang angle. Other printers can accommodate steep overhangs only through the use of support material or support struts, which must be removed after printing.
/-/https/www.sciencebuddies.org/cdn/Files/18420/6/overhang-angle.png)
Imagine a stack of books, with each book offset from the one below it to create a leaning tower. The angle at which the stack leans from vertical is the overhang angle.
Most printers have minimum required sizes for certain features. Parts that are too thin may not print properly—or they may break easily after printing.
This is a general overview and not an exhaustive list. For specific information, you will need to read the manual for your 3D printer. If you are using an online 3D printing service, read about the properties and limitations of the available materials. If you know the limitations, you will not waste time designing a part that will not print properly (or at all).
Finally, decide what CAD program you will use. The examples in this activity show Tinkercad, a CAD program for beginners, but you can use a more advanced CAD program. The instructions for this activity assume you already know how to make basic shapes in a CAD program of your choice. If you do not, you may need to do some tutorials for your program before you try this activity.
Instructions
- Think about what type of 3D printed fabric you want to make. Do you want your fabric to be very flexible or even feel soft? Do you want it to be able to hold its shape? Should it let lots of light (or air) through? What could your fabric be used for? In addition to the two examples shown in the Prep Work section, the following image shows another example of a fabric. This one consists of a grid of squares that can be pulled apart, increasing the gaps between them, to let more air or light through.

- Decide on the basic design for your fabric (i.e., whether it will be interlocking pieces or rigid pieces connected by flexible pieces). You can browse the models on the Science Buddies Tinkercad page if you need some ideas to help you get started (circle mesh, square grid, triangle grid). You can start by making copies of those designs to edit, or you can start your own new designs. Remember to consider the limitations of your 3D printer, as described in the Prep Work section.
- Your 3D printed fabric will consist of a pattern of repeating units. This means that, in a CAD program, you only need to create one of these units, then use an array or pattern feature to make copies of it. For example, here is a corner unit of a rectangular grid fabric in Tinkercad, made from a square piece and two rectangle pieces. The larger square piece will be more rigid since it is thicker, and the smaller pieces will be more flexible. Create a single unit of your fabric design, starting in a corner.
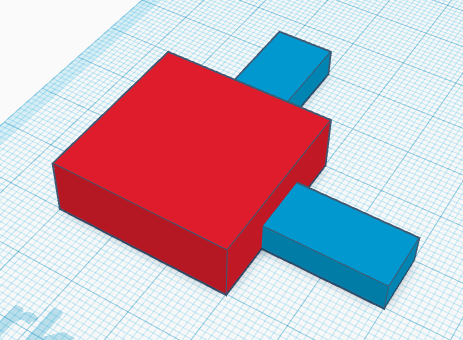
The unit consists of a large square block with two thinner rectangular blocks projecting out from it on adjacent sides
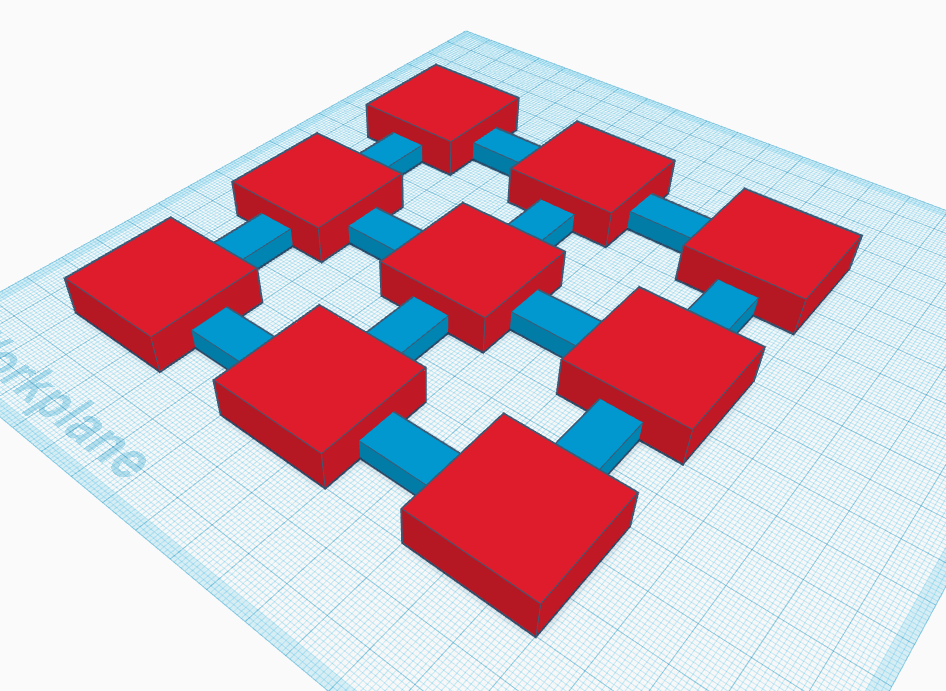
- After designing a single unit of your fabric, make copies of it to form the complete sheet of fabric. Make sure the adjacent units align or interlock properly and that the entire piece of fabric will fit in the bounding box of your printer. In Tinkercad you can make multiple copies using the "duplicate and repeat" button (watch the video for a detailed walkthrough). Note: One disadvantage of using Tinkercad is that if you want to change your design, changes you make to the original unit will not propagate to the copies. You will need to delete the copies and start the process over. More advanced CAD programs will allow you to make changes to the original feature and then automatically update the rest of the pattern.
- Once your design is ready, follow the instructions for your printer or online 3D printing service to print your fabric. For example, you may need to export your design as an STL file to send it to your printer.
- Wait for your print to be done, or for your parts to arrive if you used an online service. If necessary, remove support material from your print.
- Now test your fabric. Be careful not to break it!
 How flexible is the fabric when you pick it up? Does it feel soft? What happens when you bend it, twist it, or wrap it around your fingers? What does it look like?
 - If you have time, try to improve your fabric design and print another version. Rather than changing many things at once, focus on a specific aspect that you want to improve. For example, can you make your fabric more flexible? Can you make it stronger? If you had difficulty printing it (e.g., parts were too small or the overhang was too steep), can you change the design to make it easier to print?
/-/https/www.sciencebuddies.org/cdn/Files/18416/6/3D-printed-fabric.jpg)
/-/https/www.sciencebuddies.org/cdn/Files/18422/6/3D-printed-fabric-corner.png)
/-/https/www.sciencebuddies.org/cdn/Files/18423/6/3D-printed-fabric-grid-complete.png)
Cleanup
What Happened?
What happened depends on the exact design of your fabric. In general, most consumer 3D printers print hard plastics and cannot print features much smaller than about one millimeter. This means that, while you can print a material that is flexible, it will be nowhere near as flexible or soft as more traditional fabrics, like the cotton used in t-shirts. However, 3D printing allows you to make some interesting designs that would be difficult to make with regular fabrics.
Digging Deeper
3D printing is still a relatively new technology, and people are still finding new uses for it. 3D printing allows engineers to make things that would be difficult or impossible to make with other tools. There are many different types of 3D printers that can print different types of materials, all of which have their own advantages and disadvantages. Each material has different properties, like its strength or melting temperature.
Applications for 3D printed fabrics range from fashion design to flexible heat-resistant materials designed by NASA. To learn more about some of these potential applications, check out the links in the Related Resources section. What uses can you think of for your 3D printed fabric?
Ask an Expert
For Further Exploration
- Try developing quantitative tests for your 3D printed fabric. For example:
- Measure how flexible it is by tightly wrapping it around cylinders of different diameters, like a drinking glass and a pencil. Is there a limit to how tightly your fabric can bend?
- Measure how stiff your material is by bending or folding it into a certain shape. If you let go, does the fabric maintain its shape? Can your fabric switch between flexible and rigid states depending on how you fold it?
- Test your fabric's strength by breaking it. For example, try tearing it or hanging weights from it. Only do this if you are willing to sacrifice part of your fabric in the name of science!
- Instead of printing a sample-sized sheet of material, try printing a useful object, like an article of clothing. Depending on the build volume of your printer, you may need to figure out how to print multiple pieces of fabric and attach them to each other. See the video in the Additional Resources section for some ideas about how you can do this.
Related Resources
Project Ideas
/-/https/www.sciencebuddies.org/cdn/Files/17691/9/3d-print-drone-chassis.jpg)
/-/https/www.sciencebuddies.org/cdn/Files/6390/14/artbot-tinkercad-insect.jpg)
Links
- All3DP: 3D Printed Fabric: The Most Promising Projects
- All3DP: NASA Develops Functional 'Space Fabric' With Metal 3D Printing
- Make Anything: Experimenting with 3D Printed Fabric (Video)
/-/https/careerdiscovery.sciencebuddies.org/cdn/Files/19368/6/female-engineer-industrial-technologist-istock-1300259755.jpg)
/-/https/careerdiscovery.sciencebuddies.org/cdn/Files/19369/4/machinist-manufacturing-tool-die-maker-iStock-879134734.jpg)
/-/https/img.youtube.com/vi/z4Az6-MwPJ4/0.jpg)
/-/https/img.youtube.com/vi/QUNM-QyM5PA/0.jpg)
/-/https/img.youtube.com/vi/c3iip7aKxwU/0.jpg)