Summary
/-/https/www.sciencebuddies.org/cdn/Files/7697/9/earthworms-digging-in.jpg)
Introduction
Earthworms are important for the soil and a lot of fun to study. Few people know there are over 2,000 types of earthworms. Some like to burrow deep in the soil, while others stay near the surface. Do you know what they eat, or what their eating and burrowing habits are? Fill a pot with moist dirt, add a few worms, and observe your worms to find out.Materials
- Clear plastic pot or deli container, 32 oz or more, at least 12 cm high; like these, available from Amazon.com
- Push pin
- Scissors or nail
- Loose dirt; potting soil works well (enough to fill 1 pot)
- Optional: Water spray bottle (1); like this one, available from Amazon.com. If you do not have one available, you can wring out a wet cloth over the dirt to moisten the soil.
- Newspaper (1 sheet)
- Earthworms (15)
- Red wigglers (composting worms) can be found locally in a composting pile, or at well-equipped garden stores. You can also purchase them from numerous online vendors, including Amazon.com or Carolina Biological.
- You can also use other earthworms found in your yard or local bait shop, or buy them from an online vendor, like Carolina Biological. You will need fewer worms if your worms are long (on average more than 7 cm). Note that some species require special care (like refrigerator temperatures.) Make sure you can give your worms the care they need (like storing your pots with worms in a refrigerator).
- Brown paper bag or cardboard box (1)
- Fine-tip permanent marker
- Cutting board
- Knife for cutting food
- Fruit; melon or melon rinds work well. Harder fruits like apples are good, but might take a little more time to start decaying. This will increase the total time to observe what worms do when food is around by a few days. Avoid citrus fruits, as worms do not like these.
- Optional: lab notebook
Disclaimer: Science Buddies participates in affiliate programs with Home Science Tools®, Amazon.com, Carolina Biological, and Jameco Electronics. Proceeds from the affiliate programs help support Science Buddies, a 501(c)(3) public charity, and keep our resources free for everyone. Our top priority is student learning. If you have any comments (positive or negative) related to purchases you've made for science projects from recommendations on our site, please let us know. Write to us at [email protected].
Prep Work
- Prepare your pot for your worms.
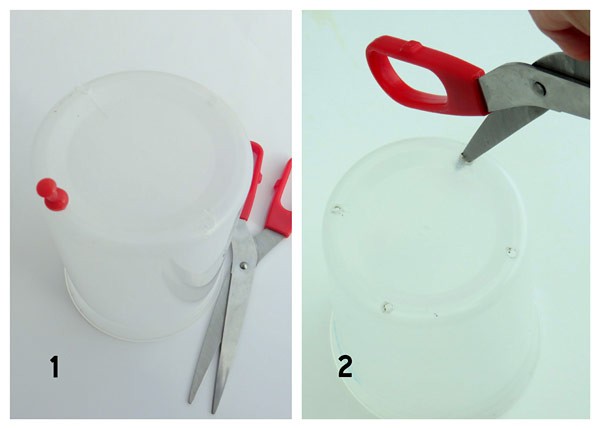
- Use a push pin to carefully poke four tiny holes, spread out, over the bottom of the pot. Ask an adult to enlarge the holes. A nail or the tip of scissors can help. The holes will allow extra water to drain.
- Fill the pot with loose, moist dirt.
- Add a few squirts of water if the soil feels dry. A moist environment is needed for worms. They dry out and die if the dirt is too dry. Do not overdo it though. If the soil is too wet, the holes in the soil fill with water, leaving no air for the worms to breathe. In moist environments, there is just the right balance between water and air for the worms to thrive.
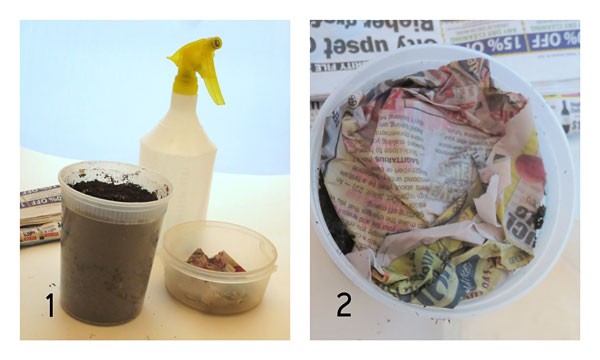
- Add a layer of damp newspaper on top of the dirt. This helps keep the dirt moist.
- Use a push pin to carefully poke four tiny holes, spread out, over the bottom of the pot. Ask an adult to enlarge the holes. A nail or the tip of scissors can help. The holes will allow extra water to drain.
- Choose a place where you will keep your worms. The ideal temperature will depend on the type of worm you study.
- We suggest room temperature (about 70°F or 21°C) for red wigglers. The cupboard below the sink or a corner of the kitchen might work well.
- Other types of worms might need a cooler environment. If you found worms in your garden, the garage or outside might work well.
- Do some research if you are unsure about the temperature at which your worms thrive.
/-/https/www.sciencebuddies.org/cdn/Files/7685/13/make-drainholes.jpg)
/-/https/www.sciencebuddies.org/cdn/Files/7698/10/worm-home-add-newspaper.jpg)
Instructions
- Add the worms to your pot.
- Select a number of healthy looking worms; we recommend 15 smaller worms (about 5 cm long) or 5–10 if your worms are bigger. The figure shows small worms (left) and huge worms (right).
- Remove the damp newspaper for now and place your worms on the moist soil.

 What happens? Do the worms stay on top or bury themselves?
 - Put your pot away:
- Check the dirt and newspaper, if one or both feel dry, add a few squirts of water.
- Place the damp newspaper back on top of the dirt.
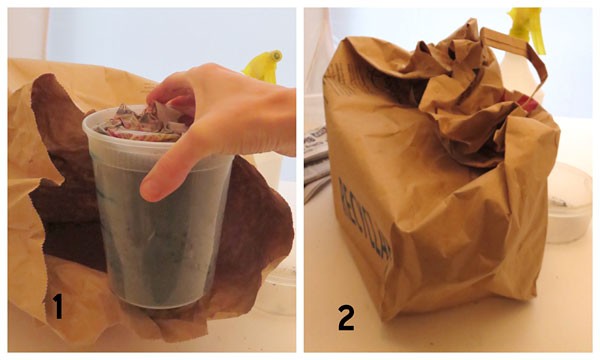
- Put your pot in a brown paper bag or cardboard box, fold over the top or close the box so it is dark inside. Keeping the pots in a dark environment is essential for this experiment. Note: An airtight plastic pot should not be used. Air needs to flow between the surroundings and the pots.
- Place your pot in the spot you selected (see Prep Work section).
- Note: You will go over these four steps after each observation session.
- Two days later, take the pot out of the bag and observe.What can you see from the side of the pot? Do you see burrows or worms? If so, do you see a lot of worms or just a few? Are they spread out or grouped in a specific area?
- Some worm types make permanent burrows—or tunnels—others make temporary burrows. To find out what your worms do, trace the burrows you see with a fine-tip permanent marker. Put your pot away for another three or more days and observe again.Do you see more burrows compared to the last observation? Do you see the same burrows, or did some break down and new ones form?
- Repeat the previous step a few times to confirm your findings.
- Worms eat organic material. Organic material is any material that comes from plants or animals or byproducts of these, like paper. In the next couple of steps, you will study whether they like fresh fruits or decaying— meaning rotting or decomposing—fruits.
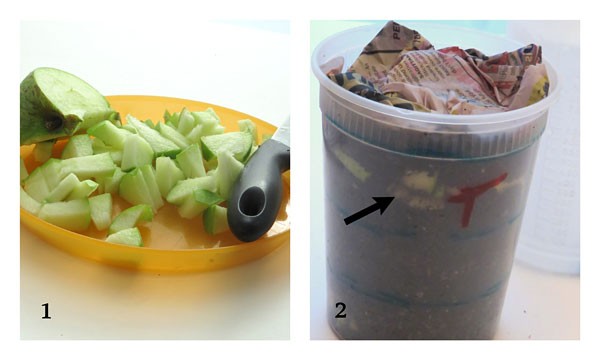
- Ask an adult to help cut an apple, melon, or melon rinds in small pieces. Caution: Be careful! Knives are sharp!
- Hide the fruit pieces in your pot under the dirt, against the side wall of the pot, so you can see it from the outside, as shown in the figure. You can choose whether to hide the food in the middle layer or near the top, but always make sure you can see the fruit from the outside.
- If you have several pots, hide it in different spots and indicate on the pot where you hid the food, like the "T" on the pot in the figure indicating the food is hidden near the top of the pot.
- Place your pot away and wait for one day.
- After one day, take the pot out and observe.Do you see changes in the worms' burrowing patterns? Do you see worms from the outside of the pot? Would you say the worms are attracted to the fresh fruit?
- Put your pots away for another 2–3 days, and observe again.Do you observe changes in their burrowing patterns? Do you see worms from the outside of the pot attracted to the food? Your fruit is probably starting to decay; are the worms attracted to the decaying fruit?
- Some types of worms (like composting worms) live in the top soil and stay around their food. Other types (like nightcrawlers) like to take the food with them in their burrows. Repeat the previous step a few times and see if you can identify what your worms do.Do you see a pattern in your observations? Do your worms like to stay around the food or take the food with them in their burrows?
/-/https/www.sciencebuddies.org/cdn/Files/7691/13/worms-dig-in.jpg)
/-/https/www.sciencebuddies.org/cdn/Files/7693/13/store-pots.jpg)
/-/https/www.sciencebuddies.org/cdn/Files/7696/8/worms-hide-food.jpg)
Cleanup
- Once you are done observing your worms, release them into nature. To increase the survival rate of your worms, release them at the place you found them or try to mimic the habitat your worms like. As an example, you could release composting worms in an area with lots of decaying dead material, or use them to start a composting farm, as described in the Science Buddies project Get Rid of Those Leftovers: How Much Organic Waste Can Composting Worms Eat?.
What Happened?
All earthworms make burrows. Some types make permanent burrows; others make temporary burrows. This is why some of you might have seen burrows change and others might have seen burrows stay the same. All earthworms feed on decaying organic material. This is why the worms were not attracted to the fresh fruit. After a few days, as the fruit starts to decay, the worms like to go and feed and you probably saw worms from the outside of the pot near the decaying fruit. Some might have seen their worms stay around the food, others might have seen them come and go. This depends on the type of worm you are studyingDigging Deeper
There are three types of earthworms: epigeic worms living on the surface of the earth, endogeic worms living in the top layer of the earth, and anecic living deep in the earth. The environment in which earthworms live is linked to their characteristics.
- Epigeic worms live inside and around decaying organic material found at the surface, on which they feed. They are relatively small, quick, and tend to have darker skin. All of these features provide protection against predators. Their burrows are temporary. An example is the red wiggler, a composting worm, often used in composting farms to create rich compost.
- Endogeic worms make semi-permanent burrows in the upper layer of soil. We usually notice them after a heavy rain. Heavy rain saturates the upper layer of the soil, filling the air holes in the soil with water. Worms usually breathe the air in the soil. When there is none available, they come up to find air. These worms are, on average, a little larger than the epigeic worms; they are also slower and are often found in grasslands and farmlands.
- Anecic worms make very deep permanent burrows. They take food (decaying organic matter) from the surface into their burrows. These worms can get long (over 1 m) and big; they have a pale skin color and are quite slow. The bait worm and nightcrawler are anecic worms.
The figure illustrates the three types of earthworms. (Diagram courtesy of the Science Learning Hub. Figure adapted from Fraser and Boag; photos of earthworms copyright Ross Gray.)
/-/https/www.sciencebuddies.org/cdn/Files/7703/8/earthworm-three-types.jpg)
Diagram of a cross-section of soil with blue lines indicating the burrowing path of three types of earthworms. Epigeic earthworms burrow near the surface of the soil on the left side of the diagram. Endogeic earthworms burrow deeper into the soil in the middle of the diagram. Anecic earthworms burrow straight down into the deepest parts of the soil on the right side of the diagram. To the right of the diagram there are three images of an epigeic, endogeic and anecic earthworms. The anecic earthworm is almost twice the length of the other two kinds of earthworms.
Ask an Expert
For Further Exploration
- Experiment with your worms to find out if they make organic material decompose faster. To do this, prepare two identical pots. Cut up some organic material and hide half of it in one pot, the other half in the other pot. Remember to hide the food against the walls. Add worms to only one pot. Keep both pots in the same environment, water them equally, and observe how fast the food decays and disappears in both pots. Remember to store your pots in a dark place between observations. You can make drawings or pictures of your disappearing food as a record, and make a bar graph of your final data to make the results visual.
- Experiment with different organic materials to see if they disappear at a different rate, or if worms are attracted to one more than the other. Some good options for organic material are moist, shredded newspaper; apple pieces; and straw.
- You can compare habits of different types of worms. To do this, prepare two or more identical pots in a similar way. Host one type of worm in each pot and observe their burrowing and feeding habits.
- Observe what happens after a downpour. Place your pot in a sink or outside on a place that can take some extra watering. Use a watering can to simulate a downpour and observe what happens. Remember to let the water leak out. Worms need a moist environment to thrive, and air to breathe. If all the air holes in the dirt are filled with water, the worm can no longer breathe and will suffocate!
- Check out the project ideas listed in the "Additional Resources" section. These contain some interesting test ideas. Some require an extended observation period; others take less than an hour (once you have the materials).
/-/https/www.sciencebuddies.org/cdn/Files/7683/9/earthworm-different-types.jpg)
/-/https/www.sciencebuddies.org/cdn/Files/4033/5/Zoo_img054.jpg)
/-/https/www.sciencebuddies.org/cdn/Files/4069/5/EnvSci_img056.jpg)
/-/https/careerdiscovery.sciencebuddies.org/cdn/Files/1900/17/iStock-1191167137.jpg)
/-/https/careerdiscovery.sciencebuddies.org/cdn/Files/967/17/unsplash-d4KQc-ZqBrc.jpg)
/-/https/careerdiscovery.sciencebuddies.org/cdn/Files/1783/17/nrcseprd423668.jpg)
/-/https/careerdiscovery.sciencebuddies.org/cdn/Files/865/17/iStock-1097314556.jpg)
/-/https/img.youtube.com/vi/BTiCgA8cufA/0.jpg)
/-/https/img.youtube.com/vi/6vWprI6OPJo/0.jpg)
/-/https/img.youtube.com/vi/ojhrVsBs0nM/0.jpg)