Summary
/-/https/www.sciencebuddies.org/cdn/Files/15684/5/bacteria-art-agar-plates-thumbnail.jpg)
/-/https/i.ytimg.com/vi/gCBo4t8inAQ/maxresdefault.jpg)
Introduction
Did you know that you can change the genetic code of an organism? This technology is called gene editing or genetic engineering. Using gene editing tools, researchers can delete or modify existing genes in an organism, or even add new ones! With this ability, they can alter the way an organism—such as a bacteria, a plant, or an animal—looks or functions. For example, crops can be modified to become more drought-resistant, or bacteria can be engineered to produce medicine such as insulin. In this activity, you will use genetically modified bacteria to create a painting. Can you guess why the same bacteria species can have different colors?
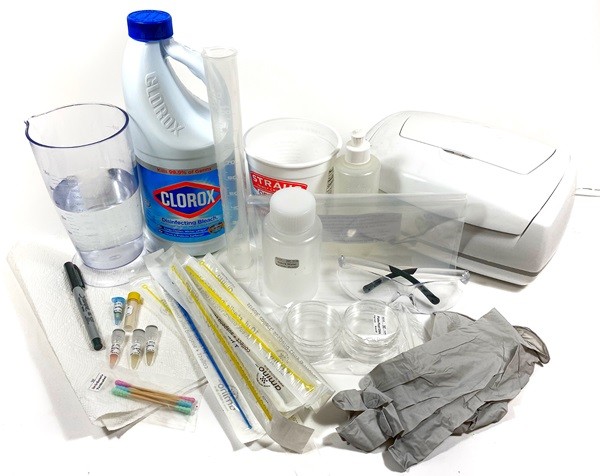
Materials
- Safety goggles
- Apron or lab coat
- Nitrile or latex gloves
- Measuring cup or measuring cylinder (100 mL)
- Concentrated bleach
- Tap water
- Spray or squirt bottle (about 250 mL)
- Disposable container in which to collect your trash (about 1 L, such as a large, empty yogurt container)
- Warm environment or a 37°C incubator. Note: A baby wipe warmer makes a good incubator for at-home use. You can also place the agar plates near a clothes dryer to keep them in a warm place.
- Paper towels
- Permanent marker
- Microwave
- Timer
- Measuring spoon (tsp)
- Optional: Resealable bag (0.5 gallon), if you are storing your agar petri dishes overnight
- Optional: Black light or UV light
- Optional: Thermometer
- Printed Streaking and Art Template
- Resealable bag (0.5 gallon)
- Petri dishes, 6-cm diameter (4)
- LB agar powder (1.6 grams)
- Sterile water (50 mL)
- Antibiotics (chloramphenicol). Note: If you do not use the Canvas Kit, you will need to use the antibiotics, which work as selective marker for your bacteria.
- Inoculation loops (small and large)
- Sterile swabs and sterile toothpicks
- Colored Escherichia coli bacteria (cyan, magenta, purple). Note: The Escherichia coli strains used in this experiment are non-hazardous and non-pathogenic.
/-/https/www.sciencebuddies.org/cdn/Files/15685/5/bacteria-art-all-materials.jpg)
Prep Work
- Put on your safety goggles and an apron, or lab coat if you have one. Prepare your disinfectant or bleach solution. In your spray bottle, mix concentrated bleach with tap water in a ratio of 1:9, as follows. Carefully add 20 mL or 4 teaspoons of concentrated bleach solution to your spray bottle. Be careful not so splash the bleach! Add 180 mL of tap water to the bleach. Put the spray bottle lid on, then gently swirl the solution and set it aside.
- Place a resealable plastic bag (at least 0.5 gallon) in a disposable 1-L container. You will use this bag to collect all your contaminated trash.
- Switch on the incubator if you have one. Make sure to set it to 37°C.
/-/https/www.sciencebuddies.org/cdn/Files/15686/6/prepared-trash-bag.jpg)
Instructions
Day 1
Pouring the Selective LB Agar Plates
- You will start by making your selective LB agar plates. For four 6-cm petri dishes, you need about 50 mL of agar solution.
- Put on your gloves, safety goggles, and apron or lab coat.
- Wipe down your work area with the prepared bleach solution and paper towels.
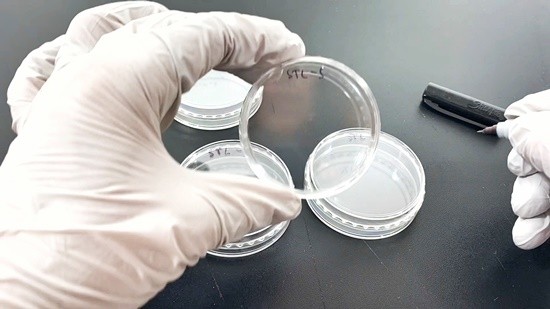
- With a permanent marker, label the bottom of all four petri dishes. Write your name or initials and an "S," which stands for "selective" plates. This means that the agar contains an antibiotic that only lets bacteria grow that are resistant to this antibiotic (your colored bacteria are resistant) and ensures that no unwanted bacteria grow on the plates at the same time.
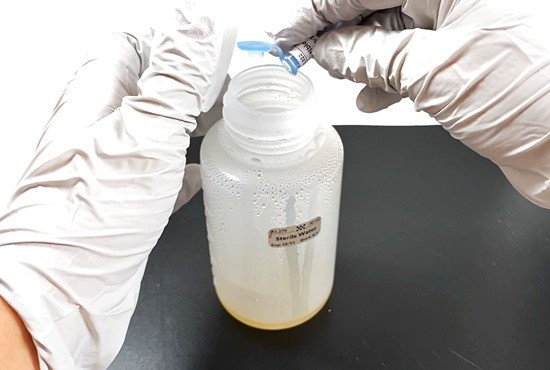
- Unscrew the lid from the sterile water bottle, but do not take the lid off completely. Keep it loosely on top of the bottle so that no contaminants can get inside. Note: The bottle that comes with the Canvas Kit is microwave-safe. If you use a different bottle, make sure it is safe to use in the microwave. Do not fill it up too much, otherwise it will boil over.
- Heat the water up in the microwave until you see it boil. It needs to come to a rolling boil, otherwise the agar will not dissolve. Start with 45 seconds (s) on the highest power setting and continue in 5-s intervals after that.
- Once the water is boiling, carefully add the LB agar powder (1.6 g) to the water. Then swirl the bottle gently.
 What do you think the purpose of the LB agar is?
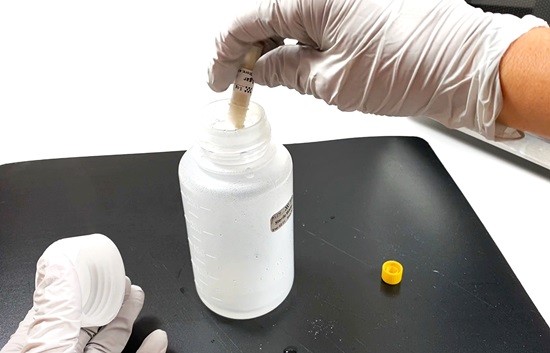
- Bring the LB agar mixture to a boil in the microwave. Heat it up in 4-s intervals (no longer!) until you see foam forming on top of the liquid. Swirl the solution for 10 seconds.
- Add the antibiotics to the LB agar solution. If you are using the Canvas Kit, add the antibiotic pill to the hot agar solution. Then swirl it for a few minutes until the pill and its contents are completely dissolved. Note: The Canvas Kit comes with the antibiotic that works for the bacteria provided in the same kit. If you are using different bacteria, you have to select an antibiotic that your specific bacteria are resistant to. You also have to find the right antibiotics concentration that works for your bacteria. If you use an antibiotics solution instead of a pill, let the agar cool down a bit (until you can touch the bottle with your hand) before adding the antibiotics.
Why do you have to add antibiotics to the agar?
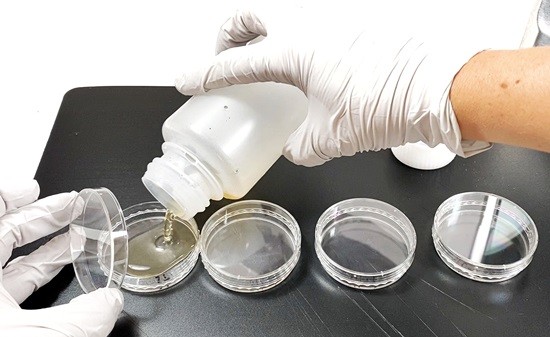
- Pour the molten LB agar into the four petri dishes. Make sure to cover the bottom of each petri dish. They should be about half full of agar.
- Do not put the lids back onto the petri dishes. Instead, place the lids ¾ of the way back on so that the agar can cool and harden. This can take up to 20 minutes.
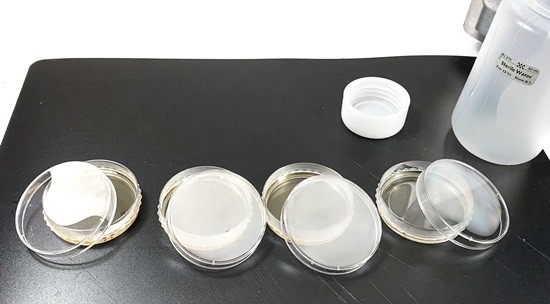
- After about 20 minutes, your plates should be solid and clear, which means you should be able to see through them clearly. If they are cloudy or do not harden, you might not have boiled the water long enough. You can rescue the agar by pouring the agar from the petri dishes back into the sterile water bottle and heating it up again. This time, bring the solution to a rolling boil before you re-pour the plates.
- If you do not have time to continue the activity on the same day, you can store your plates in the refrigerator for a couple of days. Place them into a resealable bag (upside down) and put them in the refrigerator until you are ready to continue.
/-/https/www.sciencebuddies.org/cdn/Files/15687/5/labeling-plates.jpg)
/-/https/www.sciencebuddies.org/cdn/Files/15688/5/add-LB-agar.jpg)
/-/https/www.sciencebuddies.org/cdn/Files/15689/5/add-antibiotics.jpg)
/-/https/www.sciencebuddies.org/cdn/Files/15690/5/pouring-agar.jpg)
/-/https/www.sciencebuddies.org/cdn/Files/15691/5/drying-agar-plates.jpg)
/-/https/www.sciencebuddies.org/cdn/Files/15692/5/clear-agar-plate.jpg)
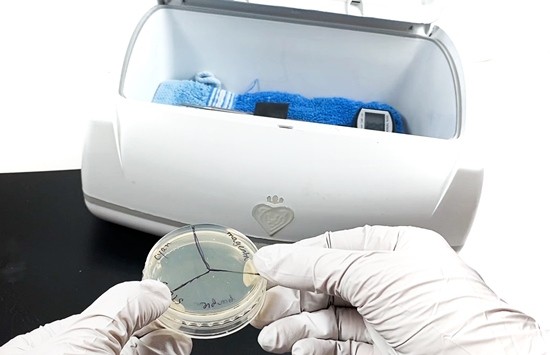
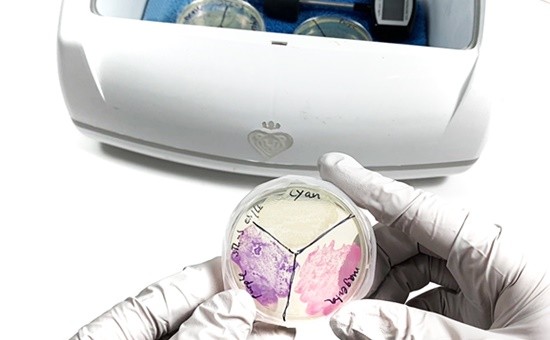
Streaking the Colored Bacteria (Creating the Color Palette)
- Take one of the prepared agar plates and make sure the agar is dry. You do not want any condensation liquid on the plate. If there is condensation on the lid of the petri dish, you can carefully wipe it off with a paper towel.
Why is condensation liquid on the agar problematic?
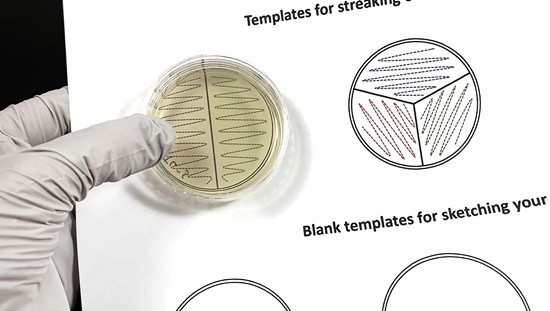
- With a permanent marker, divide the bottom of your petri dish into as many sections as you have colored bacteria, like you would divide a pie. The Canvas Kit comes with three different colors (cyan, magenta, purple).
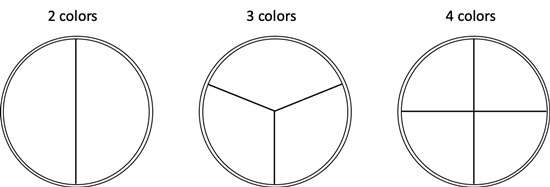
- Place the petri dish on top of the matching stencil on the Streaking and Art Template. Then label each section on the petri dish with one of the colors.
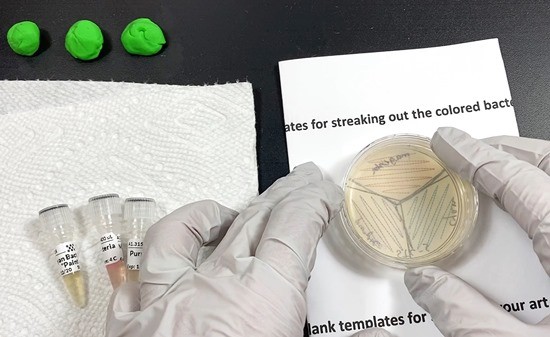
- Open one of the sterile inoculation loops. Make sure not to touch anything with the loop end.
- Open the first colored bacteria tube. Dip the loop end into a tube of colored bacteria.
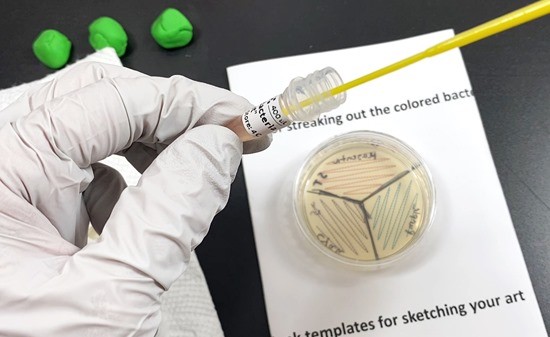
- With the same loop end, gently trace the zigzag line of the stencil on the agar surface. Be careful not to press too hard on the agar, as you do not want to puncture it.
- Discard the loop in your prepared trash bag.
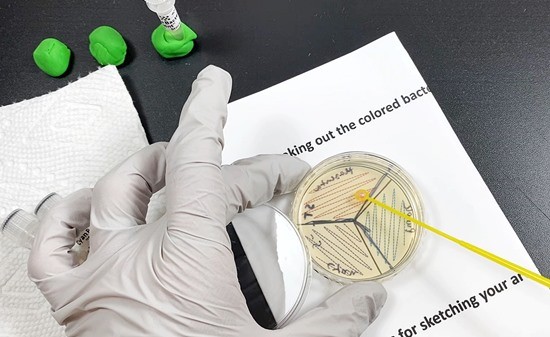
- Repeat steps 4–7 for each colored bacteria tube you have. Make sure to use a fresh inoculation loop for each tube. This plate will be your "color palette plate."
- Put the lid back onto the petri dish and close all bacteria tubes if you have not done so yet. If you want to reuse the bacteria, put the tubes in a resealable bag and store them in the refrigerator.
- Turn the plate upside down, so you have the agar on top. Place it into the incubator this way. The plate needs to incubate at around 37°C for 24–48 hours. If you do not have an incubator, put the plate in a warm place. In this case, the incubation period can take up to 5 days.
Why does the plate ideally have to be incubated at 37°C?
- Check on your plate every 12 hours. Once you see lots of brightly colored bacteria on the plate, you are ready to continue with the next step. The bacteria will not become as brightly colored when incubated at room-temperature.
When do your bacteria start to grow?
- If you do not see any bacteria growth on your plate after 24 hours, check that your incubator is set to 37°C and incubate the plate for another 24 hours. If you still have no bacteria on your plate after 48 hours, you might not have had any colored bacteria on your inoculation loop when you streaked them. Repeat the streaking process (steps 1–10) on a new plate. If you have bacteria on your plate that are the wrong color or if there is mold on your plate, immediately inactivate it and clean your workspace (see Cleanup section).
Can you explain why the bacteria have different colors?
/-/https/www.sciencebuddies.org/cdn/Files/15693/5/plate-color-sections.png)
/-/https/www.sciencebuddies.org/cdn/Files/15694/5/labeled-plate-on-stencil.jpg)
/-/https/www.sciencebuddies.org/cdn/Files/15695/6/loop-in-tube.jpg)
/-/https/www.sciencebuddies.org/cdn/Files/15696/5/trace-zigzag-bacteria.jpg)
/-/https/www.sciencebuddies.org/cdn/Files/15697/5/plate-in-incubator.jpg)
/-/https/www.sciencebuddies.org/cdn/Files/15698/5/grown-bacteria.jpg)
Day 2 or 3
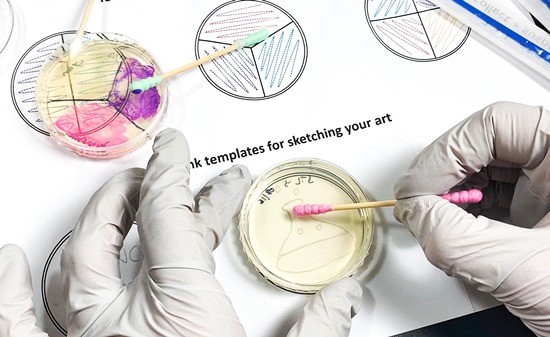
Making a Bacteria Painting
- Put on your gloves, safety goggles, and apron or lab coat.
- Before you draw on another agar plate, make a sketch of your artwork in one of the blank stencils on the Streaking and Art Template.
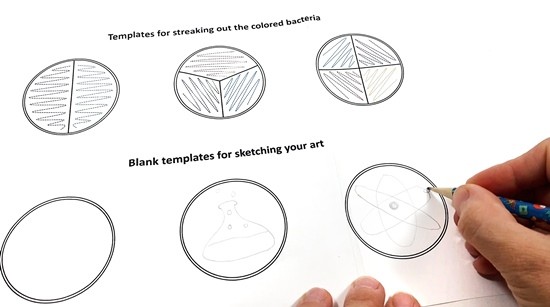
- Place one of your prepared selective plates on top of your sketched stencil. Make sure there are no condensation droplets on top of the agar.
- Use sterile loops or swabs, or toothpicks to paint your art on top of the agar. Your "color palette plate" is the petri dish of colored bacteria that you created, and each type of bacteria is a different "paint." Assign one inoculation loop "paintbrush" to each bacteria color, then dip it into the colored bacteria on your color palette plate and trace the image by gliding on top of the agar. Again, make sure not to puncture the agar. In between uses, set the "paintbrushes" down on the edge of the color palette plate and be careful not to touch anything else with them.
- When you are done with your painting, close the lid of the petri dish and turn it upside down. Place it into the incubator this way. As before, the plate needs to incubated at around 37°C for 24–72 hours. If you do not have an incubator, put the plate in a warm place. In this case, the incubation period can take up to 5 days.
What is the purpose of flipping the plate upside down?
- Discard all the "paintbrushes" in your trash bag and close the lid of the "color palette plate." If you want to reuse it, put it in a resealable plastic bag and store it in the refrigerator. Do the same with any unused agar plates that you have. You can keep them in the refrigerator for about one week. However, if you see mold or other bacteria growing on the plates that look different from your original color palette, immediately inactivate the plates!
/-/https/www.sciencebuddies.org/cdn/Files/15699/5/sketch-drawing-streaking-bacteria.jpg)
/-/https/www.sciencebuddies.org/cdn/Files/15700/5/make-bacteria-painting.jpg)
Day 3, 4, or 5
Reviewing your Artwork
- Check on your plate after 24 hours and every 12 hours after that.
What do you see on your plate?
- If you have a black light or UV light, shine it onto your plate.
What happens when you shine UV light onto your plates?
- Do not forget to take pictures of your artwork to document your success!
- If you do not see any growing bacteria at all after 72 hours of incubation at 37°C, do not be discouraged. This happens to many scientists, especially when they work with microorganisms for the first time! Try to make a new painting on a fresh plate using the color palette plate or repeat the experiment from the beginning.
- Once you are done reviewing your artwork, continue with the cleanup.
Cleanup
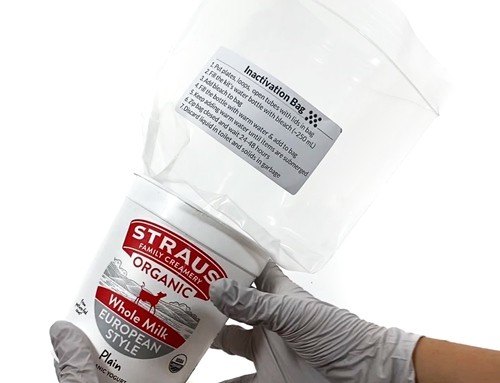
- Open all the tubes and place them (including the lids) into the trash bag. Put all the loops, paintbrush swabs, petri dishes, and any other non-paper materials that could be contaminated with bacteria, such as gloves, into the trash bag as well.
- Leave the trash bag open, and place the trash bag in a secondary container in case of any spills or leaks. The inactivation solution you will make is a mixture of 1 part concentrated bleach to 4 parts water. Start by adding 100 mL of concentrated bleach to the bag. Make sure to avoid splashes and wear gloves, safety goggles, and an apron or lab coat. Then carefully pour 400 mL of warm tap water into the bag. If this is not enough water to submerge all the items in the bag, add more bleach and water.What does the bleach do to the bacteria?
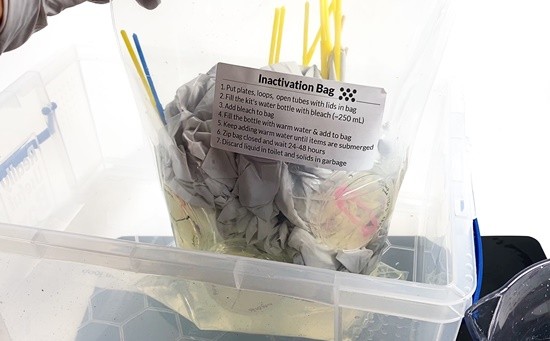
- Close the bag tightly and let it sit for 24–48 hours. Then dispose of the liquid in the toilet and discard the solids (including the trash bag) in the garbage.
- Clean your workspace with the bleach solution that you prepared in the beginning.
/-/https/www.sciencebuddies.org/cdn/Files/15701/5/inactivation-bag.jpg)
What Happened?
Hopefully, you got some colorful bacteria paintings at the end of your experiment! The LB agar plates that you poured in the beginning of the experiment served as growth media for the colored bacteria. LB stands for Lysogeny Broth, which contains yeast, vitamins, and minerals that the bacteria use as food and need to grow. The antibiotics that you added to the agar made your LB plates "selective." In the process of changing the bacteria so that they become colored, specific genes have been added into their genome to make the bacteria create colored pigments. At the same time, a "selective marker" (antibiotic resistance) has been added to the bacteria's genetic code. This allows for selection of the gene-modified bacteria on the selective agar plate. This means that only the cells that have been modified are able to grow on the plate with the antibiotics.
After spreading the colored bacteria onto the agar with the inoculation loop, you probably did not see any bacteria on the plates right away. They first needed to grow. Each bacteria species has an optimal growth temperature. The colored bacteria that you used in this experiment grow best at 37°C, which is why you had to incubate the plates in a warm place. If you did not use an incubator, you had to wait longer for your bacteria to grow. This is because their growth rate slows down with decreasing temperature. After 24–48 hours of incubation, you probably noticed that surface bacteria grew only where the loop touched the agar. You might have seen colored dots, which were individual bacteria colonies or a colored smear of many bacteria on top of or next to each other. Once the bacteria grew, you could transfer them onto a fresh agar plate to do your painting. Again, the bacteria used the LB in your agar plate as food to grow over the course of 72 hours.
You might wonder where the different colors of the bacteria come from. Each of the bacteria strains have been genetically modified. This means scientists have added new genes into their genetic code. These new genes make the bacteria produce colored pigments, such as cyan, purple, or magenta that change the color of the bacteria. Even though all the bacteria are the same species (E. coli), they differ in their properties because of their modifications. If you want to know more about genetic engineering, read the Digging Deeper section in Explore More.
Digging Deeper
Bacteria are small, single-celled microorganisms that can be found almost everywhere on the planet. They live in soil, water, air, on our skin, in the deep sea, and even inside our bodies. It is fascinating what bacteria can do, like eating rocks or garbage, degrading pollutants, digesting food, cleaning up water, generating energy, or causing diseases. Because they play a major role in many processes on Earth, researchers have taken bacteria into the laboratory to study them. But it is not possible to study every single bacteria species, as some of them will not grow in the laboratory. For that reason, some specific microorganisms have been selected as model organisms. These model organisms are extensively studied, in place of other bacteria species, to understand the fundamental aspects of how microorganisms grow and function. The expectation with model organisms is that the knowledge gained from their research can be applied to other species as well.
/-/https/www.sciencebuddies.org/cdn/Files/15702/5/Escherichia-Coli-NIAID.jpg)
Figure 1. An Escherichia coli culture viewed with a scanning electron microscope.
One of the most common model organisms used to study bacterial genetics and metabolism is Escherichia coli (E. coli), shown in Figure 1. An ideal model organism is well-researched, meaning that its genome is fully known and studied, it can easily be genetically manipulated, it is easy to culture, it grows relatively fast, and it is non-pathogenic (does not make people sick). E. coli fulfills all these requirements. It is a bacterium that naturally occurs in the human gut and grows very well in the laboratory.
In order to study molecular processes in a model organism such as E. coli, it is often necessary to alter its original genetic material. This is achieved by using genetic engineering techniques, such as molecular cloning or genome editing. Such techniques allow researchers to knock out or delete a particular gene to study its specific function. It is also possible to add new genes into a bacteria cell to change its properties or to create novel metabolic pathways. To get a new gene into a bacteria's genome, plasmids are often used, as shown in Figure 2. Plasmids are circular DNA molecules that naturally occur in bacteria. They are usually small, separate from the chromosomal DNA of the cell, and often carry genes that provide a benefit for the bacteria, such as antibiotic resistance. For molecular cloning, artificial plasmids are created and the target gene or DNA sequence is incorporated into the plasmid DNA. This way the plasmid, including the new or modified gene, is introduced into the bacteria cell.
/-/https/www.sciencebuddies.org/cdn/Files/15703/6/plasmid-DNA-bacteria.png)
Figure 2. Artificial plasmids are used to transport DNA, such as new genes into bacteria cells.
With genetic engineering, it is possible to modify an organism such as E. coli in many different ways, which results in many different E. coli strains. Each of these strains can then, for example, have a different color or perform a different function, even though all bacteria cells within these strains are still E. coli cells. It is the modified genetic material inside the different E. coli strains that sets them apart from each other. Today, many genetically engineered organisms exist, and are used for many purposes, including to produce large amounts of proteins for industrial or medical use. For example, genetically engineered E. coli strains are used to produce human insulin that can be supplied to people who have diabetes.
Ask an Expert
For Further Exploration
- Read about what other organisms can be modified, besides bacteria. What plants or animals have been genetically engineered so far? Do you find evidence of genetic engineering in humans?
- Review the Science Buddies "CUT! How Does CRISPR Work?" Lesson Plan to learn more about the most recent gene editing tool called CRISPR.
- Although gene engineering is a technology with many promising uses, there is also a lot of controversy around it. Look into the bioethics of gene editing to find out what proponents and opponents of gene editing say about this technology.
Related Resources
Project Ideas
Lesson Plans
/-/https/www.sciencebuddies.org/cdn/Files/15495/8/how-CRIPSR-Cas9-works.png)
- MS-LS4-5. Gather and synthesize information about technologies that have changed the way humans influence the inheritance of desired traits in organisms.
- HS-LS1-1. Construct an explanation, based on evidence, for how the structure of DNA determines the structure of proteins, which carry out the essential functions of life through systems of specialized cells.
/-/https/careerdiscovery.sciencebuddies.org/cdn/Files/962/18/pexels-photo-4299436.jpg)
/-/https/careerdiscovery.sciencebuddies.org/cdn/Files/1177/17/unsplash-WsYamymQIxk.jpg)
/-/https/careerdiscovery.sciencebuddies.org/cdn/Files/1463/18/iStock-1156456853.jpg)
/-/https/careerdiscovery.sciencebuddies.org/cdn/Files/1486/17/pexels-photo-4033018.jpg)
/-/https/img.youtube.com/vi/74RnO_wHX7k/0.jpg)
/-/https/img.youtube.com/vi/WdCBoRW-J2I/0.jpg)
/-/https/img.youtube.com/vi/9ZQz2IUEtO8/0.jpg)