Summary
/-/https/www.sciencebuddies.org/cdn/Files/13151/4/mini-golf-physics.jpg)
Introduction
Have you ever played mini golf? It might seem like just a game, but there is a lot of science behind it! Learn about the physics behind a rolling, bouncing mini golf ball and design your own mini golf course in this fun science activity.
Materials
- Paper
- Scissors
- Pencil
- Ruler
- Tape
- Large table or counter
- Rubber bouncy ball
- Assorted small but heavy household items like canned food, a metal stapler, a roll of duct tape, etc. The objects should be heavy enough that the ball can bounce off them without moving them.
Prep Work
Instructions
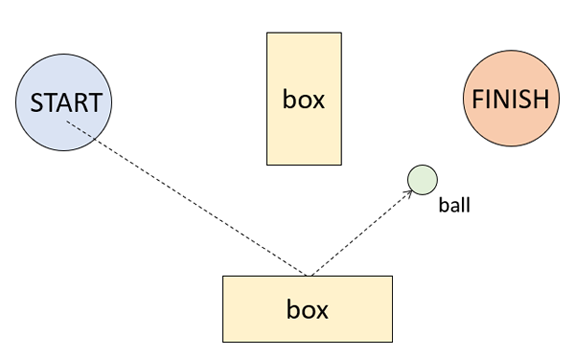
- Make a few sketches of different mini golf hole designs before you start building. Draw the start location, finish location, and any obstacles you want to put in between them. Try to include at least one obstacle that blocks the direct path from start to finish.
- Is it still possible to get a hole in one in your designs by bouncing the ball off obstacles or walls? Use the ruler to draw a series of straight lines representing the ball's path from start to finish. How many times does the ball have to bounce to make it to the finish location?
- Now build one of your mini golf holes by assembling the obstacles and taping down the start/finish circles, and try it out. Put the ball on the start circle, and roll or flick it with your finger. Can you get a hole in one by following the path you drew on paper?

- If you do not get a hole in one, keep rolling the ball until you get it to the "finish" spot. Then, go back to the start and try again. Can you get a hole in one if you keep practicing? How closely does the actual path match your predicted path?
- Repeat the process for some of your other designs. Are some designs easier than others?
/-/https/www.sciencebuddies.org/cdn/Files/13150/4/mini-golf-diagram.png)
What Happened?
You might have found that getting a hole in one was more difficult than it looked! On paper, it might be pretty easy to draw some shapes and then a line representing the ball's path from start to finish. But in practice, you have to worry about friction and a spinning ball. Your ball does not rebound perfectly off the obstacles—it slows down a bit and can alter its spin, changing its direction. If you tried to design a very complex hole that required multiple bounces to get from start to finish in one shot, this may have been too ambitious. However, with practice, you could probably get a hole in one on a hole that only required one or two bounces. Real golf course designers have to take these same principles into account. They do not want the course design to be too easy—holes in one would not be very exciting if they happened all the time! Conversely, they do not want the game to be too difficult and frustrating for players, or it would not be any fun.
Digging Deeper
In most mini golf courses, there is no direct path to the hole from where you start the ball. You often have to get the ball around, over, or under one or more obstacles. Your goal is to get the ball into the hole by hitting it as few times as possible—this can be difficult with all that stuff in the way! One way to accomplish this is to bounce the ball off walls or other obstacles. By carefully planning out the ball's path, you could even get a hole in one!
If you watch the ball carefully when it hits a wall, you will probably notice that the angle of incidence (as the ball moves towards the wall) is nearly identical to the angle of reflection (after the ball bounces off the wall). These angles are measured between the ball's path and an imaginary line perpendicular to the wall. When light bounces off a mirror, the angles of incidence and reflection are exactly equal. With a rolling ball, it is a little more complicated than that since the ball is spinning. Friction between the wall and the ball can change how it spins, so the angles might not be exactly equal. But, they are close enough that you can still use this assumption to plan the path of the ball. If you bounce the ball off a wall at a certain angle, it should rebound at the same angle. This allows you to get the ball around obstacles.
Eventually, your golf ball slows down and stops. The kinetic energy of the ball is gradually converted to heat due to friction with the ground as it rolls. The ball can also lose energy during collisions. The coefficient of restitution measures how much energy is lost during a collision. For a perfectly elastic collision, the coefficient of restitution is 1, meaning no energy is lost. The ball's velocity immediately after hitting the wall will be equal to its velocity immediately before hitting the wall. For a perfectly inelastic collision, the coefficient of restitution is 0, and the ball's velocity after the collision is zero (it "sticks" to the wall). For a real golf ball colliding with a wall, the coefficient of restitution is close to, but not exactly, 1. Again, even if you do not know the exact value, you can use this information to plan the path of your ball by assuming the ball will be going almost as fast after it bounces off the wall.
Ask an Expert
For Further Exploration
- Get a few friends to play against, and keep score!
- Try a larger version of the game on the floor using a tennis ball or bigger rubber ball. Use heavier objects like furniture or plastic bins filled with toys for your obstacles and walls.
- Instead of rolling the ball with your hand, build your own golf club. See the link in the More to Explore section below.
/-/https/www.sciencebuddies.org/cdn/Files/2950/3/Sports_img045.jpg)
/-/https/careerdiscovery.sciencebuddies.org/cdn/Files/1450/21/iStock-1227179796.jpg)
/-/https/careerdiscovery.sciencebuddies.org/cdn/Files/1457/17/pexels-photo-3861938.jpg)
/-/https/careerdiscovery.sciencebuddies.org/cdn/Files/1640/26/Fyysikot_tyossaan.jpg)
/-/https/img.youtube.com/vi/sjfjXDOExcU/0.jpg)
/-/https/img.youtube.com/vi/UupWNWZPR_Y/0.jpg)
/-/https/img.youtube.com/vi/DgCP-3rSHCY/0.jpg)