Summary
/-/https/i.ytimg.com/vi/gCHW7f88bAc/maxresdefault.jpg)
/-/https/www.sciencebuddies.org/cdn/Files/15927/7/punch-leaf-disks.jpg)
Introduction
Do you know how plants get the energy they need to grow and reproduce? They do not eat like humans and animals do; they make their own food with a process called photosynthesis. During photosynthesis, plants convert light, water, and carbon dioxide from the air into oxygen and sugars. In this activity, you will be able to observe the oxygen production in leaves by doing a floating leaf disk experiment. You can also find out how quickly plants produce oxygen, and what variables affect photosynthesis. How much do you think light matters?
Materials
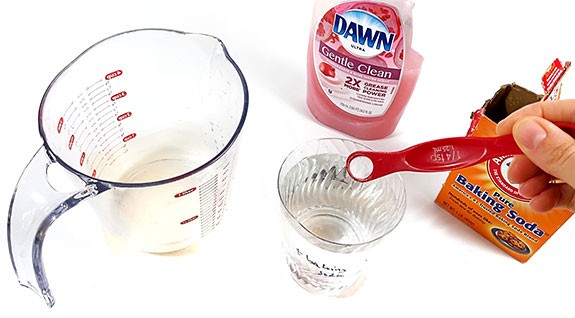
- Transparent cups, 4 or more
- Permanent marker
- Baking soda
- Measuring cup
- Water
- 1/8 or 1/4 teaspoon
- Dish soap
- Light source (a bright light works best)
- Single-hole puncher
- Plant leaves (spinach or ivy leaves work best)
- Plastic syringe, 10-mL or bigger (without the needle)
- Aluminum foil
- Paper towels
- Timer
- Lab notebook
- Pencil or pen
- Optional: Adult helper
/-/https/www.sciencebuddies.org/cdn/Files/15928/6/photosynthesis-disk-leaf-assay-materials.jpg)
Prep Work
- Find a workspace that can get a little wet.
- Label two cups with "+ baking soda" and two cups with "- baking soda."
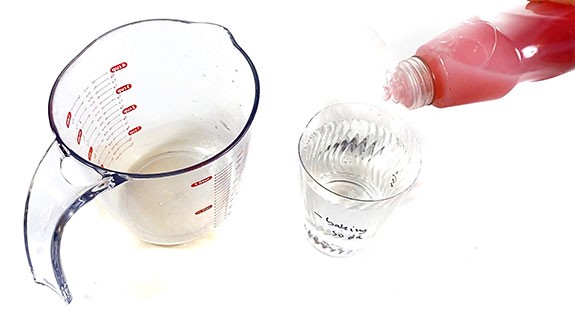
- Prepare the baking soda solution by filling one of the "+ baking soda" cups with 300 milliliters (mL) room-temperature water. Then add about 1/8 teaspoon (tsp.) of baking soda to the water and mix until the baking soda has dissolved. Note: If you are using a 1/4 teaspoon, you need to fill only half of it.
 What is the purpose of the baking soda?
- Add one drop of dish soap to the baking soda solution and gently stir until it has dissolved. Avoid foam formation in your cup.Why do you need to add the soap to the baking soda solution?
- To one of the "- baking soda" cups, add 300 mL water and one drop of dish soap.
- Set up your light source so it shines straight down onto your workspace.
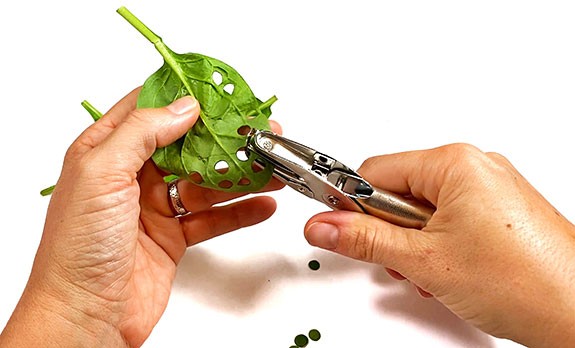
- With the hole puncher, cut 20 leaf disks from the plant leaves. Make sure they are all the same size and a complete circle. Avoid punching through major leaf veins.
- In your lab notebook, prepare a data table with three columns. Column 1 is the time, in minutes (min). In columns 2 and 3 you will record the results of your leaf disk assay—the laboratory procedure you are using to investigate photosynthesis—both with baking soda and without baking soda.
/-/https/www.sciencebuddies.org/cdn/Files/15929/6/add-baking-soda.jpg)
/-/https/www.sciencebuddies.org/cdn/Files/15930/6/add-dish-soap.jpg)
/-/https/www.sciencebuddies.org/cdn/Files/15931/7/light-set-up.jpg)
/-/https/www.sciencebuddies.org/cdn/Files/15932/6/punch-leaf-disks.jpg)
Instructions
- Remove the plunger from the syringe and place 10 leaf disks into the syringe. Place the plunger back into the syringe and push it down until only a small volume of air is left in the syringe. Be careful not to crush the leaf disks. You might want to ask an adult to help with these steps.
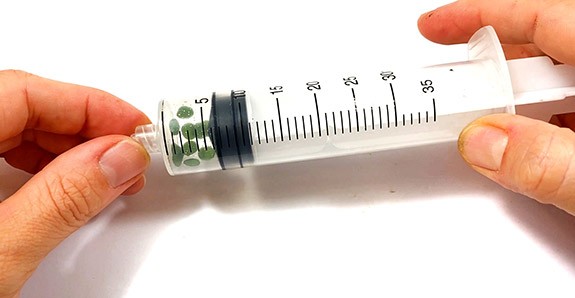
- Suck up a small volume of the baking soda solution into the syringe with the leaf disks.What do you notice about the leaf disks in the syringe?

- Carefully push all the air out of the syringe.
- Close the opening of the syringe with a finger and draw back on the plunger to create a vacuum. Hold the vacuum for 10–15 seconds and swirl the leaf disks to suspend them in the solution.What does the vacuum do?
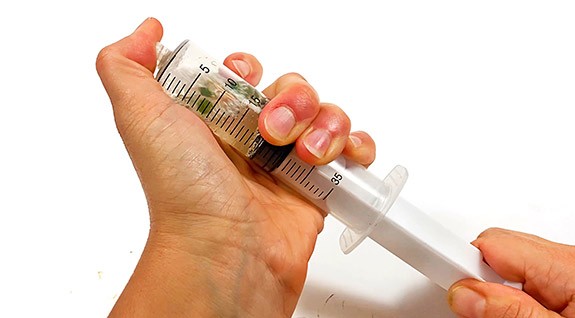
- Release the plunger and remove your finger from the syringe opening to release the vacuum. Observe the leaf disks.What happens to the leaf disks?
- Repeat step 4 and 5 until all the leaf disks have sunk to the bottom of the solution.
- Remove the plunger from the syringe and pour all 10 leaf disks and the solution into the second "+ baking soda" cup. Fill the cup with baking soda solution, up to a depth of about 3 cm.

- Cover the cup with aluminum foil so no light can get in the top. You want to keep the leaf disks in the dark until your other cup is ready.
- Repeat steps 1–7 but this time use the soap solution without baking soda for all steps. Place the leaf disks in the second "- baking soda cup."
- Remove the aluminum foil from the "+ baking soda cup" and place both cups under your light source. Make sure the light shines straight onto the cups from above.
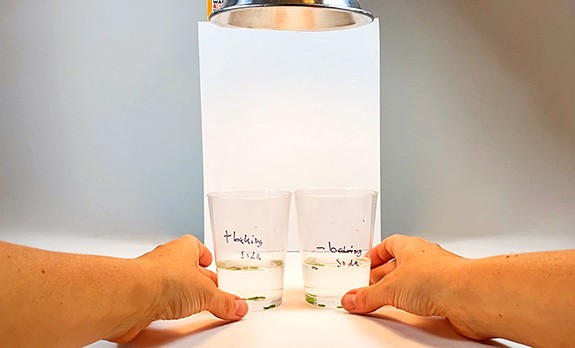
- Start a timer. At the end of each minute, record the number of floating leaf disks for both cups in your data table. Briefly swirl the disks to prevent them from getting stuck to the bottom or sides of the cup.Why do you think the leaf disks start floating?
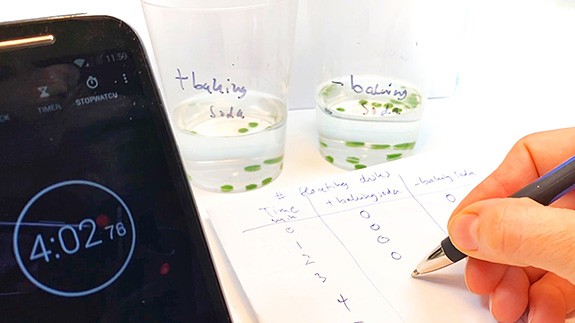
- Continue the experiment until all leaf disks are floating in one of the cups.How are your results different in the cups with and without baking soda?
- Graph your data. Plot the time on the x-axis and the number of floating leaf disks on the y-axis.When do 50% (5) of your leaf disks float? Can you explain your results?
/-/https/www.sciencebuddies.org/cdn/Files/15933/6/plunger-leaf-disks-syringe.jpg)
/-/https/www.sciencebuddies.org/cdn/Files/15934/6/solution-in-syringe.jpg)
/-/https/www.sciencebuddies.org/cdn/Files/15935/6/vacuum-syringe.jpg)
/-/https/www.sciencebuddies.org/cdn/Files/15936/7/leaf-disks-in-cup.jpg)
/-/https/www.sciencebuddies.org/cdn/Files/15937/6/cups-under-light.jpg)
/-/https/www.sciencebuddies.org/cdn/Files/15938/6/record-floating-disks.jpg)
Cleanup
What Happened?
The leaf disk assay measures the rate of oxygen production in the leaf disks, which is a representation for the rate of photosynthesis. When you placed the leaf disks in your syringe, you probably noticed that they all floated on top of the solution. This is because leaves have air pockets within their structure to facilitate gas exchange between different parts of the leaf. The vacuum you applied in the syringe sucked the air out of the leaves, which then got replaced with the solution in the syringe. Without the air pockets, the leaves should have all sunk to the bottom of the syringe. Once you placed the cup with the leaf disks under the light, the chloroplasts within the leaves started to photosynthesize. As a result, oxygen gas was produced, which accumulated within the leaf disks or on its surface. You might have seen the tiny bubbles of oxygen on top or underneath the leaf disks. The oxygen bubbles are proof that photosynthesis is occurring inside the leaf disk!
The oxygen gas bubbles change the buoyancy of the leaf. The more gas bubbles that accumulate over time, the more buoyant the leaves get. This is similar to a diver who can change his buoyancy by putting air into his vest (with a buoyancy control device) or by releasing it. More air in the vest makes the diver float to the top, and less air makes the diver sink to the bottom. As the leaf disks accumulate more oxygen gas, they will eventually float to the top. The first leaf disks in the cup with the baking soda should have come up within a couple of minutes. However, in the cup without the baking soda, no leaf disks should have floated during the whole experiment. This is because the baking soda, which is sodium bicarbonate, provides the plant leaf with the carbon dioxide that it needs for photosynthesis. Without carbon dioxide, photosynthesis is not possible. How long it takes for all the leaf disks to float up depends on many different factors. If you did some of the experiments suggested in the Explore More section, you should have noticed that more light, higher temperatures, and more carbon dioxide all increased the rate of photosynthesis. Leaves that have more chloroplasts and more green chlorophyll pigments should also be able to photosynthesize better than other leaves.
Digging Deeper
Every living organism needs energy to grow and reproduce. Humans and animals eat foods with carbohydrates, proteins, and fats to produce the energy they need to survive. But plants do not eat. They make their own energy source in the form of energy-rich carbohydrates (sugars) through a process called photosynthesis. Photosynthesis is a multistep, enzyme-mediated process that converts light energy into chemical energy. During photosynthesis, plant cells use light energy (such as light emitted from the sun), water (H2O), and carbon dioxide (CO2) as reactants to produce sugar molecules (C6H12O6) and oxygen (O2) (Figure 1):
/-/https/www.sciencebuddies.org/cdn/Files/15939/10/photosynthesis-3498260_1920.jpg)
Figure 1. During photosynthesis, plants convert water (H2O), carbon dioxide (CO2), and light into oxygen (O2) and glucose (C6H12O6).
Photosynthesis takes place in the chloroplasts within the plant's cells. The chloroplasts contain special pigments that react to light. Chlorophyll is one of the pigments that can absorb light in the blue and red spectrum from the visible light spectrum. Chlorophyll does not absorb light in the green spectrum of light but reflects it instead. This is why leaves with chlorophyll usually appear green. During the first part of photosynthesis—the light-dependent reaction—chlorophyll and other pigments harness the light energy to produce NADPH and ATP, which are two types of energy-carrier molecules. At the same time, water is split into oxygen (O2) and protons (H+). The next stage is light-independent and is often referred to as the dark reaction. In this step, the two energy-carrier molecules, NADPH and ATP, are utilized in a series of chemical reactions called the Calvin cycle. In the Calvin cycle, the plants take carbon dioxide (CO2) from the air and use it to ultimately make sugars such as glucose or sucrose. These sugars can be stored for later use by the plant as an energy source to fuel its metabolism and growth.
Photosynthesis is responsible for replenishing Earth's atmosphere with oxygen that we breathe. Thus, it is not only crucial for plants, but also for all organisms that rely on oxygen for their survival. Many factors affect how quickly plants are able to conduct photosynthesis. Without enough light or water, for example, a plant cannot photosynthesize very quickly. Similarly, the concentration of carbon dioxide—another reactant in photosynthesis—affects how fast photosynthesis can occur. Temperature also plays a significant role, as photosynthesis is an enzyme-mediated reaction. This is because at high temperatures, enzymes can get damaged and thus become inactivated. Other factors that affect the rate of photosynthesis are the light intensity, the amount of chlorophyll and other color pigments in a plant, and the color of light.
Similar to any other chemical reaction, the rate of photosynthesis can be determined by either measuring the decrease of its reactants or the increase of its products. You could, for example, measure the production of oxygen or the consumption of carbon dioxide over time. Without the use of extensive laboratory equipment, the rate of photosynthesis can be determined indirectly by conducting a floating leaf disk assay to measure the rate of oxygen production (Figure 2). In the floating leaf disk assay, 10 or more leaf disk samples are punched out of a leaf. In the next step, a vacuum is used to replace the air pockets within the leaf structure with a baking soda (bicarbonate) solution. The baking soda provides the carbon dioxide that the leaf needs for photosynthesis. The leaf disks are then sunk in the baking soda solution and exposed to light. As the plant leaf photosynthesizes, oxygen is produced that accumulates as oxygen gas bubbles on the outside of the leaf disk. The attached oxygen gas changes the buoyancy of the leaf disk and once enough oxygen has been produced, the leaf disk will rise to the surface of the baking soda solution. The time until the leaf disk rises to the top of the solution is a measure of how much oxygen has been produced and thus a proxy for the rate of photosynthesis.
/-/https/www.sciencebuddies.org/cdn/Files/15940/9/leaf-disk-assay.jpg)
Figure 2. Leaf disk assay picture.
In the leaf disk assay usually 10 disks are placed in the baking soda solution at the same time. A good way to collect data is to count the number of floating disks at the end of a fixed time interval; for example, after every minute until all disks are floating. The time required for 50% of the leaves to float represents the Effective Time (ET50). ET50 can be determined by graphing the number of disks floating over time, as shown in Figure 3. An ET50 of 11.5 minutes, for example, as shown in Figure 3, would mean that after 11.5 minutes, 50% of the leaves (5 out of the 10) floated on top of the baking soda solution. In the context of oxygen production, you could also say that an ET50 value of 11.5 minutes means that it took 11.5 minutes to produce enough oxygen to make 50% of the leaf disks float.
/-/https/www.sciencebuddies.org/cdn/Files/15941/9/example-graph-leaf-disk-assay.jpg)
The x-axis shows time in minutes. The y-axis shows the number of floating leaf disks. After 7 minutes the first leaf disk floats, after 11 minutes 4 leaf disks float, at 12 minutes 7 leaf disks float, at 13 minutes 8 leaf disks float, and after 14 minutes all 10 leaf disks float. A red line indicates at what time 50% (5) leaf disks float (at about 11.5 minutes). This time is labeled Effective Time ET50.
Figure 3. Example results for the floating leaf disk assay. The graph shows the time on the x-axis and the number of floating leaves on the y-axis. The Effective Time (ET50) represents the time required for 50% of the leaves to float. By extrapolating from the graph, the 50% floating point in this graph is about 11.5 min.
If you determine the Effective Time (ET50) under different environmental conditions, you can find out which variables affect the rate of photosynthesis. You could, for example, change the light source, the brightness of the light, the color of the light, the temperature, the type of plant, or the color of the plant leaves.
Ask an Expert
For Further Exploration
- There are many factors that affect the rate of photosynthesis or how fast plants make oxygen. For example, you can change the temperature of the baking soda solution. Do your leaf disks start to float sooner in a colder or a warmer baking soda solution?
- Test how the intensity of the light affects photosynthesis. Place the cup closer to your light source and farther away. How do your results change?
- Different plants have different amounts of chlorophyll, which are the pigments that absorb the sunlight during photosynthesis. How do different plants compare in your leaf disk assay?
- Plants need carbon dioxide for photosynthesis that you provide in the baking soda solution. Find out if changing the baking soda concentration has an effect on photosynthesis!
Related Resources
Project Ideas
/-/https/www.sciencebuddies.org/cdn/Files/21374/4/blobid1753972400445.jpg)
Activities
/-/https/www.sciencebuddies.org/cdn/Files/13340/5/flower-dissection-stem-activity-thumbnail.jpg)
/-/https/www.sciencebuddies.org/cdn/Files/17891/12/color-sorted-leaves.jpg)
Lesson Plans
/-/https/www.sciencebuddies.org/cdn/Files/13940/7/bi-colored-carnation.jpg)
- 2-LS2-1. Plan and conduct an investigation to determine if plants need sunlight and water to grow.
/-/https/www.sciencebuddies.org/cdn/Files/13975/5/plant-basic-needs-lesson-plan.png)
- K-LS1-1. Use observations to describe patterns of what plants and animals (including humans) need to survive.
/-/https/careerdiscovery.sciencebuddies.org/cdn/Files/1662/17/unsplash-oz1NzV2xWXU.jpg)
/-/https/careerdiscovery.sciencebuddies.org/cdn/Files/947/17/pexels-photo-3825412.jpg)
/-/https/careerdiscovery.sciencebuddies.org/cdn/Files/962/18/pexels-photo-4299436.jpg)
/-/https/img.youtube.com/vi/l_kIbu1kOwo/0.jpg)
/-/https/img.youtube.com/vi/aAuN5ZnL4yE/0.jpg)
/-/https/img.youtube.com/vi/hZ6IJOLaIyI/0.jpg)