Wearable RGB LED Unicorn Horn
Summary
/-/https/www.sciencebuddies.org/cdn/Files/18709/6/unicorn-horn-finished.jpg)
/-/https/i.ytimg.com/vi/OKJmI8Ap5L8/maxresdefault.jpg)
Introduction
Sewable circuits are a fun way to mix electronics and arts and crafts by sewing circuits into clothing or fabric. This sewable circuit focuses on creating a unicorn horn with a programmable red-green-blue (RGB) LED in the tip that changes colors. You will use conductive thread to make the circuit, but your stitched lines will also form the spiral lines of the unicorn horn.
Materials
- Needles
- Scissors
- Hot glue gun with refills
- Ballpoint pen
- Needle-nose pliers
- Access to printer
- Access to computer
/-/https/www.sciencebuddies.org/cdn/Files/18706/5/unicorn-horn-materials.jpg)
Disclaimer: Science Buddies participates in affiliate programs with Home Science Tools®, Amazon.com, Carolina Biological, and Jameco Electronics. Proceeds from the affiliate programs help support Science Buddies, a 501(c)(3) public charity, and keep our resources free for everyone. Our top priority is student learning. If you have any comments (positive or negative) related to purchases you've made for science projects from recommendations on our site, please let us know. Write to us at [email protected].
Prep Work
- Print out the activity template.
- Make sure you have the Arduino IDE installed on your computer.
- If this is your first time using an Arduino, see the Science Buddies How to Use an Arduino page. That page is for the Arduino UNO, but the process is similar for a TinyLily board.
Instructions
Setting up your circuit
- Connect your RGB LED to your TinyLily mini processor using the jumper wires and male header pins as shown. These are temporary connections that allow you to test the circuit before you do any sewing with conductive thread:
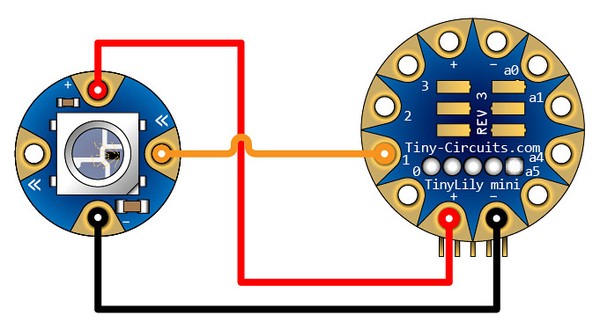
- Connect the + pin on the TinyLily to the + pin on the LED board.
- Connect the - pin on the TinyLily to the - pin on the LED board.
- Connect pin 1 on the TinyLily to the pin with the arrow pointing into the LED board.
- To use the male header pins, use your needle nose pliers to gently twist or snap off one of the pins from the long row of pins.
- To connect the jumper wires through your board, loosely thread the male wire into the pin hole. For the female end of the jumper wire, sandwich the board between the female jumper wire and the male header pin, as shown in the following figures.
- Launch the Arduino IDE.
- Connect your TinyLily to the computer using the TinyLily mini USB adapter and a micro USB cable.

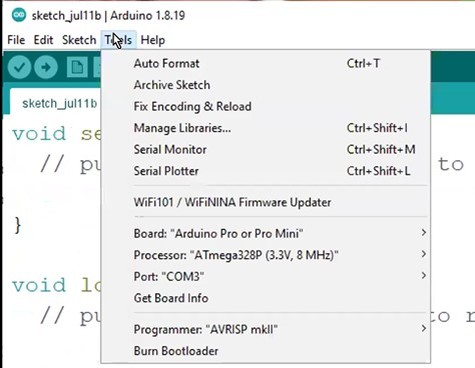
- In the Arduino IDE, go to the top bar: Tools → Board. Click the drop-down menu and select "Arduino Pro or Pro Mini."
- Select Tools→ Processor. Select "ATmega328p (3.3V, 8MHz)." Note: this option will not appear until you have selected "Arduino Pro or Pro Mini" for the board.
- Select Tools→ Port. Select the available port. This should be "COM" followed by a series of numbers on a PC or "dev/cu.usbserial" followed by a series of numbers on a Mac.
- Download RGB_LED.ino and open it in the Arduino IDE.
- Download and install the FastLED Library. To do so, navigate to the top bar and click: Tools→Manage Libraries. This should bring you to the window shown below.
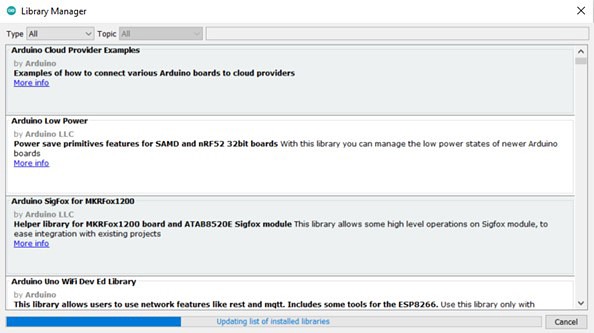
- Using the search bar at the top, search "FastLED". Install the first result's most recent version of FastLED by Daniel Garcia. There should be an install button that appears when you hover over the option.
- Upload the code onto your TinyLily. Do this by clicking on the arrow pointing right on the top bar.

- Once your Arduino code has been successfully uploaded onto your TinyLily, you should see the LED light up and cycle through the colors of the rainbow. If not, double-check your wires' connection pins and their fit. The jumper wires are a loose fit, so wiggling your wires around may result in a better connection.
- Switch your USB adapter with your battery adapter to power the TinyLily with the LiPo battery.
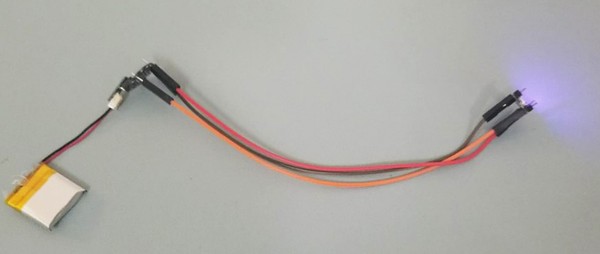
- The circuit should perform the same.
/-/https/www.sciencebuddies.org/cdn/Files/18713/5/schematic-tinylily.jpg)
/-/https/www.sciencebuddies.org/cdn/Files/18714/5/breakaway-pins.jpg)
/-/https/www.sciencebuddies.org/cdn/Files/18715/5/male-jumper-female-jumper.jpg)
/-/https/www.sciencebuddies.org/cdn/Files/18716/5/computer-connection-usb.jpg)
/-/https/www.sciencebuddies.org/cdn/Files/18717/5/ArduinoIDE-screenshot.jpg)
/-/https/www.sciencebuddies.org/cdn/Files/18718/6/library-manager-screenshot.jpg)
/-/https/www.sciencebuddies.org/cdn/Files/18719/5/Arduino-IDE-upload-button.jpg)
/-/https/www.sciencebuddies.org/cdn/Files/18720/5/lithium-polymer-circuit.jpg)
Preparing your unicorn horn
- Cut out the shapes on the printout. You can leave a bit of space around each shape.
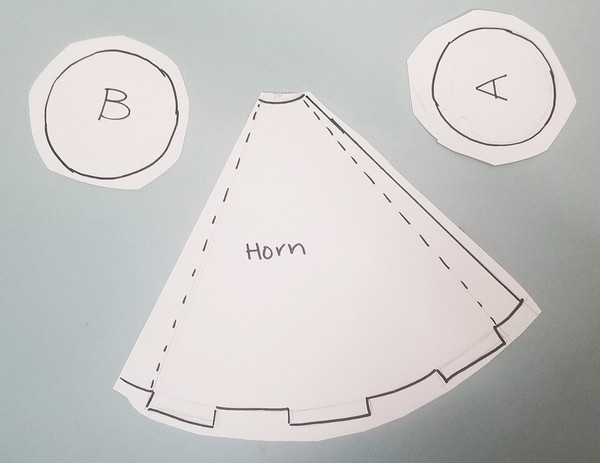
- Using double-sided tape or rolled up one-sided tape, tape the shapes down to the felt sheet that you want to use for the horn.
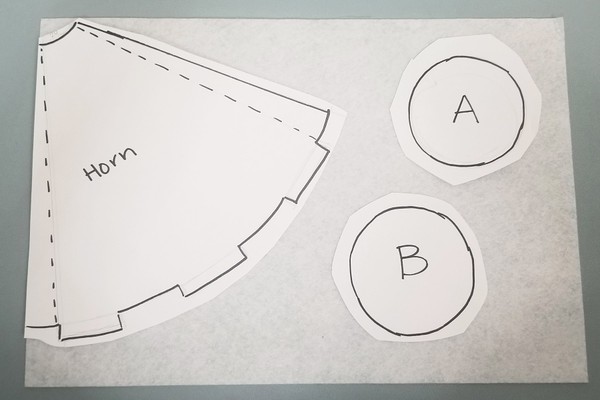
- Cut out the shapes from the felt.
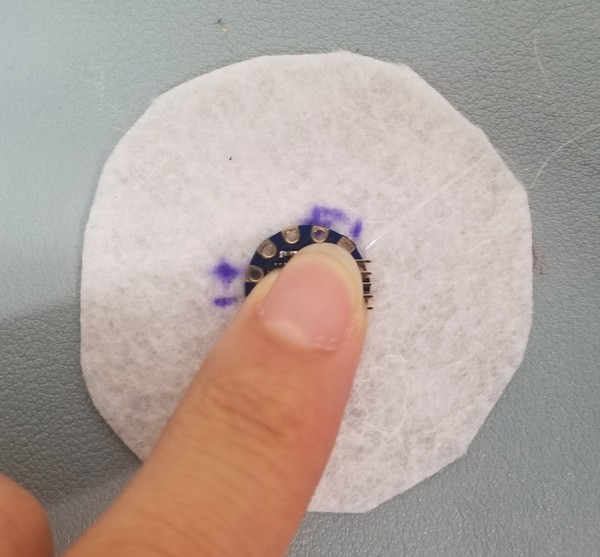
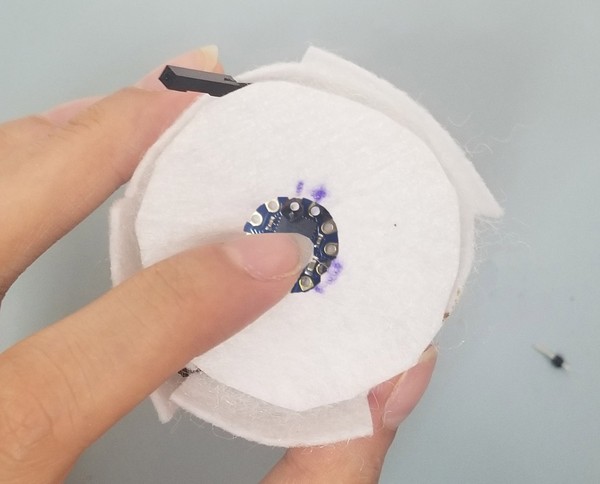
- Lay the TinyLily face-down (writing facing down) on felt piece A. Use a marker to label the + and − holes and pin 1 (briefly flip the board over to check the labels if you need to but be careful not to get the holes mixed up when you put it face-down again).

- Hot glue your TinyLily down onto the felt piece. Avoid hot gluing the pin holes.
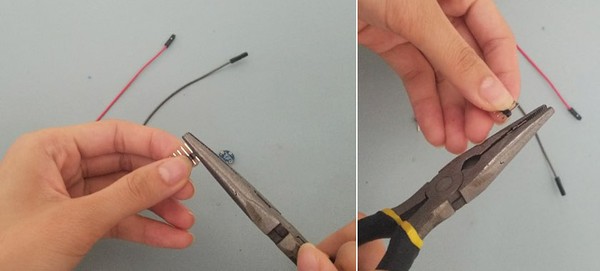
- Next you will prepare connections to your RGB LED. Note that in some sewable circuit projects you can use conductive thread for all the connections. In this project you will use regular jumper wires for two of the connections because that makes it easier to avoid short-circuits in the narrow tip of the unicorn horn. Alternatively, you could use conductive thread for all of the connections if you cover the thread in an insulating material like tape or fabric paint. You will need two of your male headers and a pair of scissors. Remove the metal pins from the plastic by pinching the black plastic piece between your fingers and pulling the metal piece with your scissors. You can also use your needle nose pliers to hold the plastic piece and pull with your scissors.
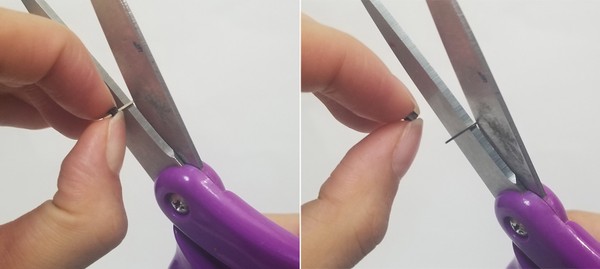
You should be left with small black pieces with holes, as shown. This plastic part is what you need.
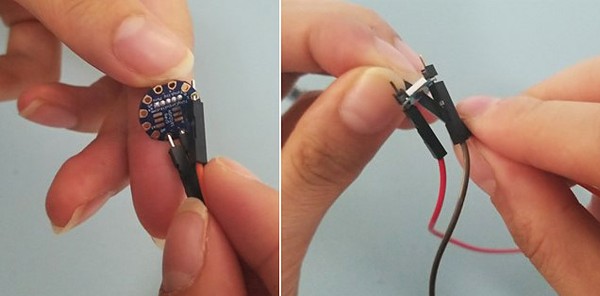
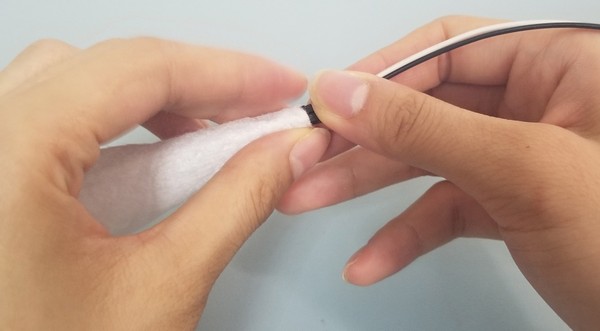
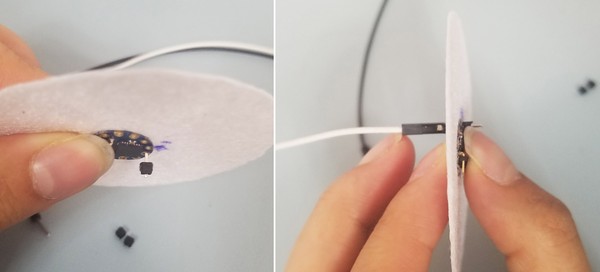
- Thread your two jumper wires of different colors through the positive and negative pins on your RGB LED (from the flat side to the LED side). The long metal piece should stick out past your LED and sit flush against the flat side of the RGB LED. Note which jumper wire color corresponds to which pin. In this case, the white jumper wire corresponds to the positive (+) pin on the RGB LED, and the black jumper wire corresponds to the negative (-) pin.
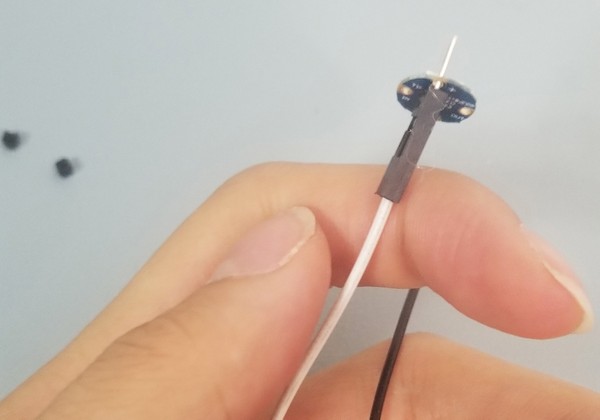
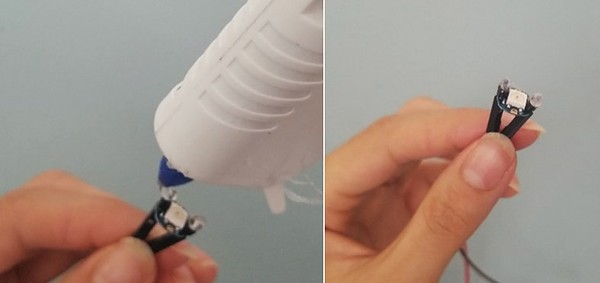
- Cap both metal wires with the two black plastic pieces from step 5. Thread them all the way through.
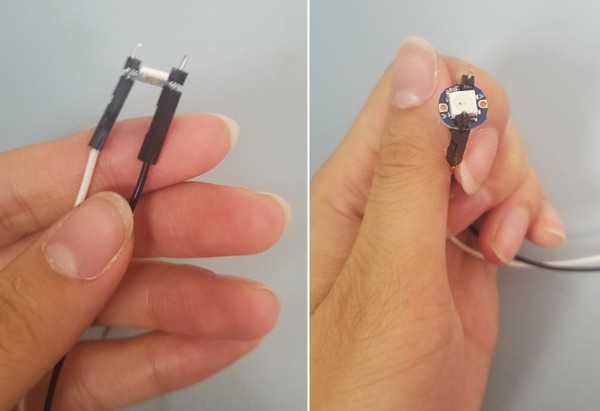
- Place hot glue over the exposed metal wires for extra security.
/-/https/www.sciencebuddies.org/cdn/Files/18721/5/cutout-unicorn-horn-template.jpg)
/-/https/www.sciencebuddies.org/cdn/Files/18722/5/cut-felt.jpg)
/-/https/www.sciencebuddies.org/cdn/Files/18723/5/lilypad-felt.jpg)
/-/https/www.sciencebuddies.org/cdn/Files/18724/5/hot-glue-tinylily.jpg)
/-/https/www.sciencebuddies.org/cdn/Files/18725/5/remove-header-pins.jpg)
/-/https/www.sciencebuddies.org/cdn/Files/18726/7/male-jumper-to-LED.jpg)
/-/https/www.sciencebuddies.org/cdn/Files/18727/6/jumper-wires-capped.jpg)
/-/https/www.sciencebuddies.org/cdn/Files/18728/5/hot-glue-LEDs.jpg)
Making your unicorn horn
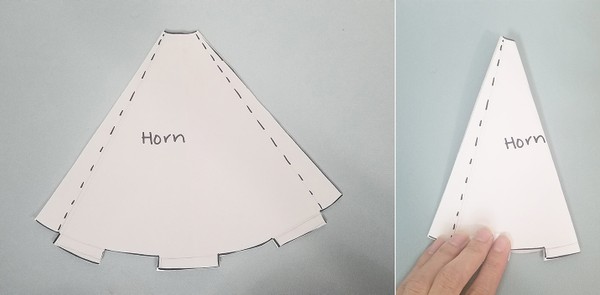
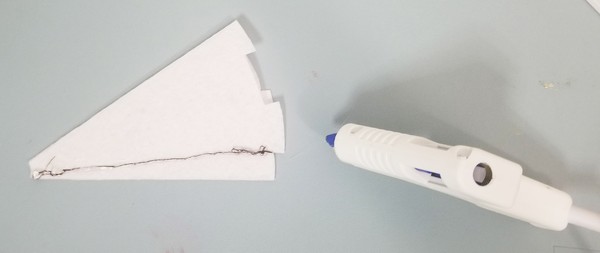
- Take your horn cutout piece (a layer of paper taped onto a layer of felt) and fold it in half vertically down the middle.
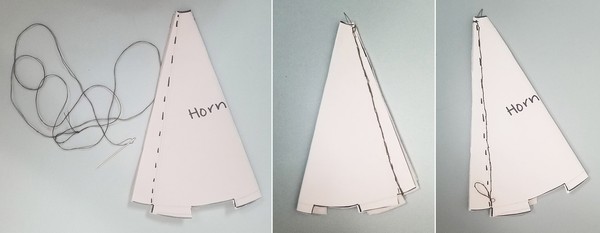
- Using a regular (not conductive thread) thread similar in color to your felt, sew the paper and felt layers together along the dotted line using a
double-threaded backstitch. In the demonstration, I will be using a contrasting thread color so you can see it better. If you run out of thread, remember to leave about two inches so you can knot the ends. Then grab a new piece of regular (non-conductive) thread and continue the stitches.
- Carefully tear off the paper from the felt. Your stitches should hold strong enough for your paper to easily come off. If not, wet the paper around the stitches to make it easier to remove.
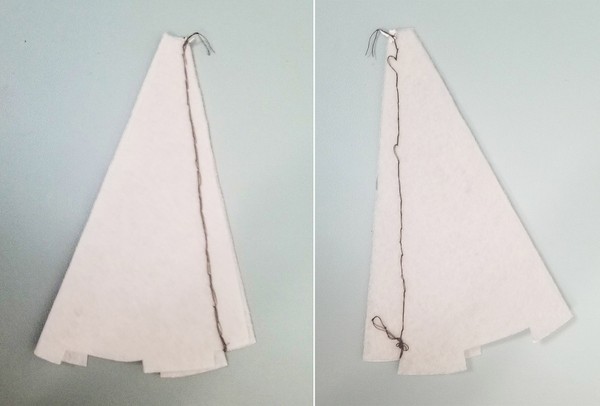
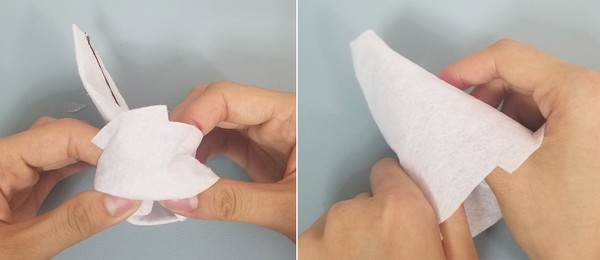
- Glue down your stitches with a little bit of hot glue on both sides. Wait for the glue to cool. This is to secure the threads down so that it does not get tangled with the threads and wires in future steps.
- Once the glue is cool, turn your unicorn horn inside out. If it is difficult to invert the narrower part of the horn, carefully use a pen to help push it through.
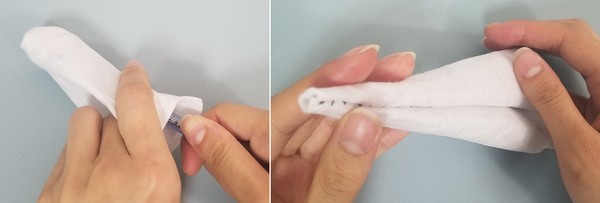
- Thread the jumper wires connected to your RGB LED through the small hole at the top of the horn. If the hole at the top is too small, cut a little bit of felt off the top to make the hole bigger. Be careful not to make the hole too big, or the LED at the tip won't be secure.
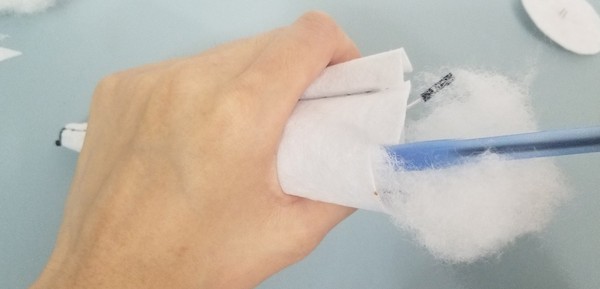
- Once the jumper wires are threaded through the horn, carefully stuff the unicorn horn with stuffing or cotton balls. Take a little bit of stuffing at a time and poke it into your horn using a pen. Stuff until there is about half an inch of room at the bottom of the horn free of stuffing.
- Trim felt piece A so that it is slightly smaller than the bottom of the horn opening.
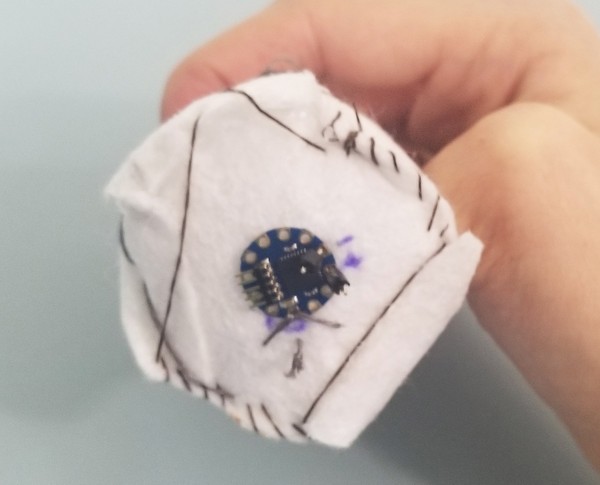
- On the A piece, poke the two male headers (that you used when you initially set up your circuit) through the felt piece and through the positive (+) and the negative (-) pins on the TinyLily. Connect the female leads on the jumper wires (connected to the RGB LED on the other side of the unicorn horn) to the long metal pieces that are sticking through the TinyLily.
- Push the A piece into the unicorn horn base so that the TinyLily is facing outwards. Firmly fold the flaps around the base onto the A piece. Hot glue the flaps onto the felt piece.

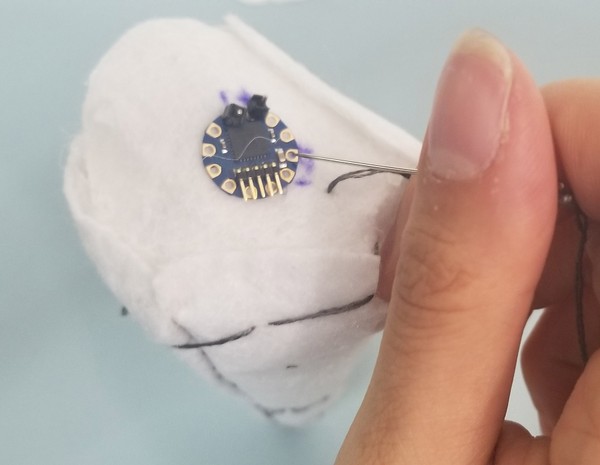
- Now it is time to connect pin 1 on the TinyLily to the input pin on the RGB LED. Prepare the needle and the conductive thread. Stitch in a spiral pattern around the horn from the LED down to the TinyLily using a double-threaded backstitch.
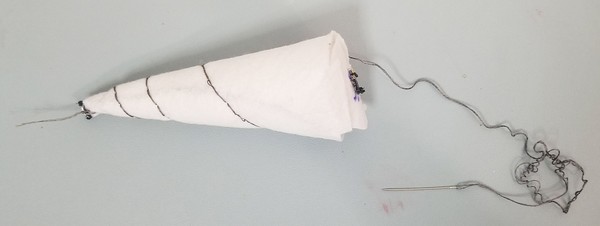
When stitching the TinyLily to the bottom of the horn at pin 1, make sure to not touch the positive or negative pins on the TinyLily. You can add additional decorations later to the horn to cover your stitching mistakes.
- Use a double-threaded whipstitch to firmly stitch felt piece A to the horn with normal thread (not conductive thread).
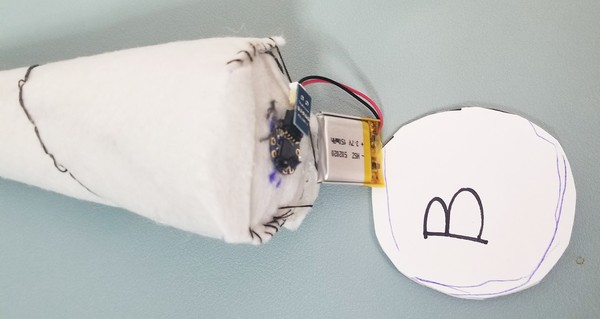
- Once you have confirmed your circuit is complete, connect your LiPo battery using the battery adapter.
/-/https/www.sciencebuddies.org/cdn/Files/18729/5/horn-unfold-horn-fold.jpg)
/-/https/www.sciencebuddies.org/cdn/Files/18730/5/thread-horn-stitched-horn.jpg)
/-/https/www.sciencebuddies.org/cdn/Files/18731/5/paperless-horn-front-back.jpg)
/-/https/www.sciencebuddies.org/cdn/Files/18732/5/hot-glue-stitches.jpg)
/-/https/www.sciencebuddies.org/cdn/Files/18733/5/inverting-horn-1-2.jpg)
/-/https/www.sciencebuddies.org/cdn/Files/18734/5/inverting-horn-3-final.jpg)
/-/https/www.sciencebuddies.org/cdn/Files/18735/5/RGB-LED-thread.jpg)
/-/https/www.sciencebuddies.org/cdn/Files/18736/5/stuffing-horn.jpg)
/-/https/www.sciencebuddies.org/cdn/Files/18737/5/trim-felt-A.jpg)
/-/https/www.sciencebuddies.org/cdn/Files/18738/5/male-female-tinylily-felt.jpg)
/-/https/www.sciencebuddies.org/cdn/Files/18739/5/hot-glue-flaps.jpg)
/-/https/www.sciencebuddies.org/cdn/Files/18740/5/spiral-unicorn-horn.jpg)
/-/https/www.sciencebuddies.org/cdn/Files/18741/5/completed-circuit-tinylily.jpg)
/-/https/www.sciencebuddies.org/cdn/Files/18742/6/whipstitch-unicorn-horn.jpg)
/-/https/www.sciencebuddies.org/cdn/Files/18743/5/LiPo-horn.jpg)
Finalizing your unicorn horn
- Trace the bottom of your final unicorn horn onto the paper side of felt piece B.
- Trim felt piece B so it is slightly bigger than the traced shape. Remove the guiding paper piece.
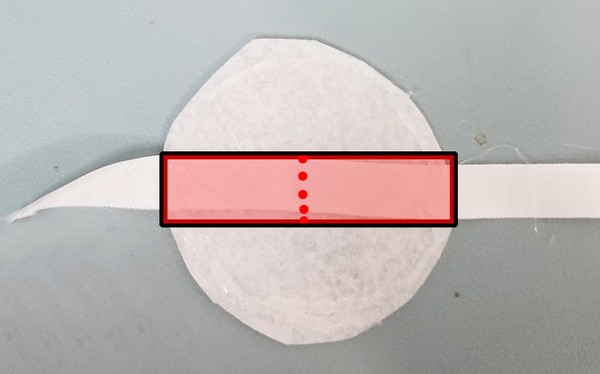
- Cut a piece of ribbon approximately 3 feet long. Hot glue the ribbon's midpoint onto piece B. In the diagram below, the dotted line indicates the midpoint of the ribbon, and the shaded red area is where hot glue should be applied on felt piece B.
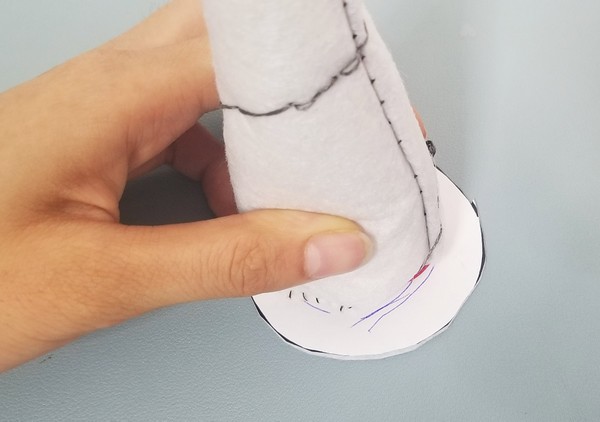
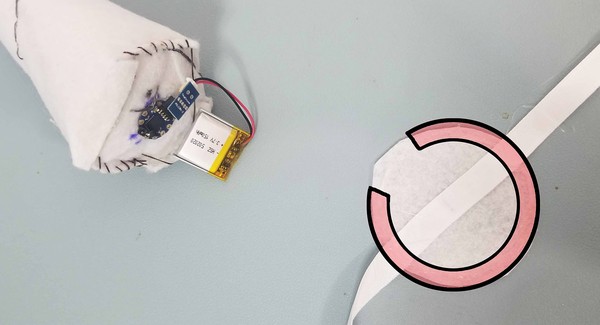
- Hot glue the bottom of the unicorn horn onto Felt Piece B so that the ribbon side is facing up. Leave a gap in the hot glue ring for easy access to the LiPo battery. The shaded area in the picture below shows where the hot glue should be placed.
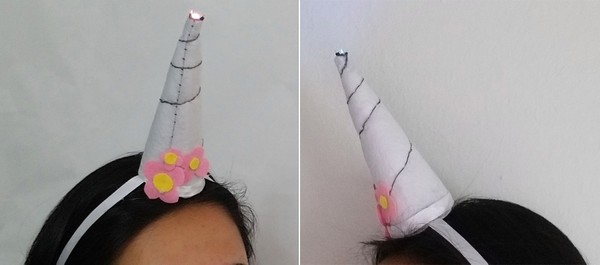
- Decorate! You can glue or sew other elements onto your horn. Trim any excess threads flying around. Optionally, you can hide the seam of the unicorn horn with ribbon as well.
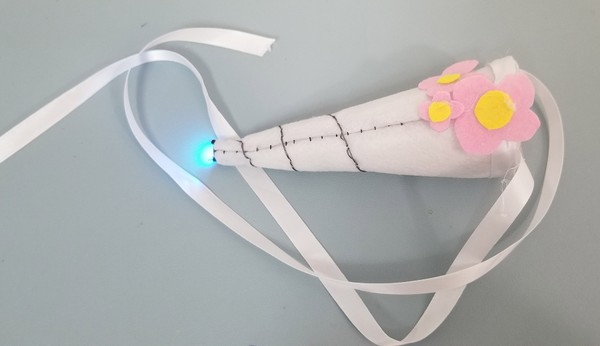
- To wear your unicorn horn, place the horn gently on your head and wrap the ribbon around the back of your ears and under your chin. Tie firmly. This is better done with some assistance.
/-/https/www.sciencebuddies.org/cdn/Files/18744/5/trace-unicorn-horn-B.jpg)
/-/https/www.sciencebuddies.org/cdn/Files/18745/5/midpoint-felt-B.jpg)
/-/https/www.sciencebuddies.org/cdn/Files/18746/5/hot-glue-locate-B.jpg)
/-/https/www.sciencebuddies.org/cdn/Files/18747/5/finished-unicorn-horn-LED-on.jpg)
/-/https/www.sciencebuddies.org/cdn/Files/18748/5/front-side-unicorn.jpg)
Cleanup
- Unplug your battery by gently removing the LiPo battery cord from the battery adapter on the bottom of your horn through the small gap in the hot glue ring.
- You can recharge your LiPo battery as needed.
What Happened?
Were you able to make your LED light up? Did your LED change colors as it lit up? You connected three wires from the TinyLily to the RGB LED. Two of these wires provide power to the LED. The third wire (the one you made with conductive thread) sends a control signal to the LED. This signal tells the RGB LED what color to be.
If the LED was correctly wired (positive to positive, negative to negative, and pin 1 to the input pin) the LED should have lit up in different colors. If you accidentally connected the positive wire to the input pin of the RGB LED, it would have been bright white all the time instead of changing colors.
Digging Deeper
RGB LEDs are made up of three colors: red, green, and blue. By controlling the different amounts of the three colors, you can create a large array of colors. This process is called additive color mixing. For example, red and green light combined make yellow light. All three colors of light combined make white light. Note that this process is different from subtractive color mixing, which you may have experienced when mixing paints (if you mix all your paints together, you will get brown or black).
In this project you used a microcontroller (the TinyLily) to electronically control the brightness of the red, green, and blue LEDs. You connected the microcontroller to the LED board with wires. Two of the wires were regular wires, used to provide power to the LED. The third wire was a conductive thread, which has the same electrical function as the regular wires but can be sewn into fabric. This wire provided the control signal to change the LED colors. The example program automatically provides that control signal. You can modify the example program to change the speed at which the colors fade. You can also write different programs to make the LED blink or stay a single color. To modify the program, you will need to replace the battery adapter attached to your TinyLily (which is secured at the base of the horn) with the mini USB adapter and reupload the code. See the Further Exploration section for additional example programs.
Ask an Expert
For Further Exploration
- Try changing the pace at which the LED changes colors. Can you make it faster? What about slower? Hint: uncomment the "delay" command in the example program and try changing the number.
- Can you try changing the LED so that it does not change colors and stays one color?
- How about trying to make the LED blink a certain pattern?
- Can you try adding more LEDs?
/-/https/www.sciencebuddies.org/cdn/Files/5721/7/squishy-circuit-butterfly.jpg)
/-/https/www.sciencebuddies.org/cdn/Files/6868/6/paper-circuit-flowers.jpg)
/-/https/img.youtube.com/vi/tP-LgiwMYok/0.jpg)
/-/https/img.youtube.com/vi/XwJQJnY6iUs/0.jpg)
/-/https/img.youtube.com/vi/g0Y6yKlDNdM/0.jpg)