Summary
/-/https/www.sciencebuddies.org/cdn/Files/5721/7/squishy-circuit-butterfly.jpg)
Introduction
Do you like arts and crafts? How about making sculptures with Play Doh® or modeling clay? Imagine how cool it would be if you could add lights to your creations? That is exactly what you will get to do in this activity! Keep reading to learn how you can make any light-up sculpture you imagine, such as a house with lights in the windows, an animal with light-up eyes, or a colorful butterfly.Materials
- Electric Play Dough Kit, available from our partner
Home Science Tools®.
You will need these items from the kit:
- 4xAA battery holder
- Piezoelectric buzzer
- Jumbo LEDs (25 total — 5 each in red, green, white, yellow, and blue)
- White insulating dough (3.5 oz)
- Red, blue, and green conductive dough (3.5 oz each)
- You will also need to gather these items, not included in the kit:
- AA batteries
Optional: in addition to the dough included in the kit, you can make your own conductive and insulating dough (for example, if you want other colors). See Electric Play Dough Recipes for materials and directions for making your own dough. You can also use store-bought Play-Doh® (replaces conductive dough) and modeling clay (replaces insulating dough).
/-/https/www.sciencebuddies.org/cdn/Files/6080/6/materials-build-squishy-circuits.jpg)
Prep Work
- Before you begin, watch the following short instructional video on squishy circuits.Video may be seen at: http://www.youtube.com/watch?feature=player_embedded&v=gvfT95Q9YqE
Instructions
- Remove the cover from the battery pack and insert four AA batteries. Make sure the "+" symbols on the batteries line up with the "+" symbols inside the battery pack. Replace the cover once you have inserted all four batteries. Safety Note: Do not let the metal terminals at the end of the battery pack wires touch each other directly. This will create a short circuit and can cause the wires to get very hot.

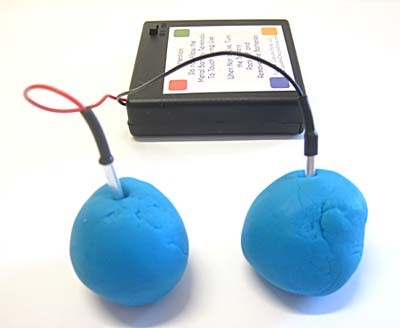
- Prepare two lumps of conductive dough, each about the size of a golf ball. Push the metal rods from the battery pack into the two lumps.
- Take a single light-emitting diode (LED) from the kit. Bend the LED's metal legs apart slightly.
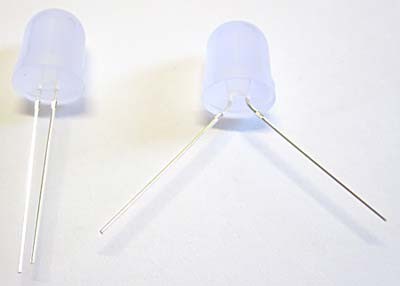
- If you look closely, you can see that one of the LED's legs is slightly longer than the other. Push the longer leg into the lump of dough connected to the battery pack's red wire. Push the shorter leg into the lump connected to the black wire.
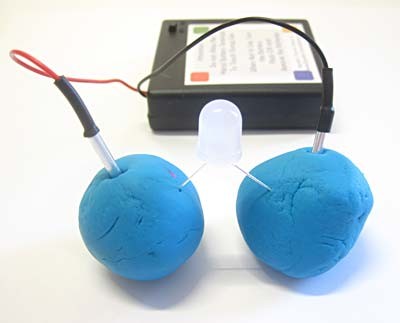
- Turn your battery pack on (slide the power switch from OFF to ON).Your LED should light up; congratulations, you just made your first squishy circuit!
 What happens when you turn it on?
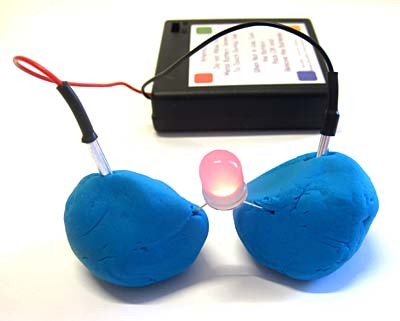
- If your LED does not light up, you probably just plugged it in backwards. Flip the LED around (switch the lumps of dough that the legs are plugged into) and try again. If you are still having trouble, refer to our Squishy Circuits FAQ for more help.
- While your LED is on, push the two lumps of dough together so they touch.The LED goes out because you created a short circuit. Electricity flows right through the conductive dough without going through the LED. You do not want this to happen, because then your LEDs will not light up!What happens?
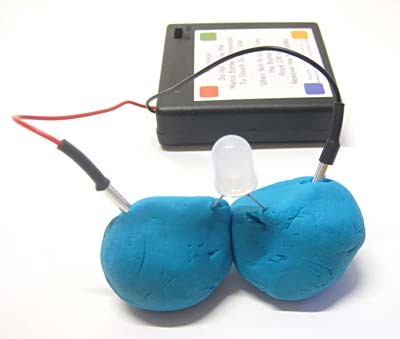
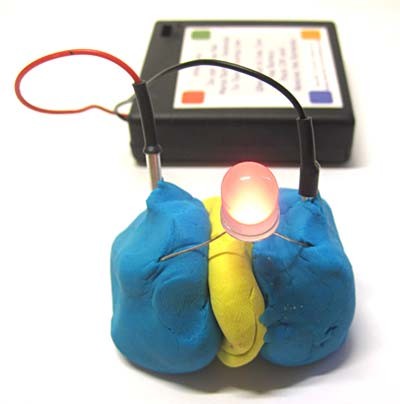
- You can prevent short circuits by using insulating dough as an insulating layer between the lumps of conductive dough. Since insulating dough (yellow in the picture below) does not conduct electricity, you can use it to help prevent short circuits in more complicated sculptures.
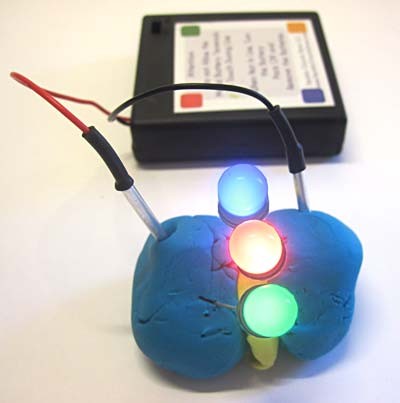
- If you want to add multiple LEDs, just plug more LEDs in right next to your first one. If any individual LED does not light up, remember to try flipping it around.How many LEDs can you light up? If you put 10 or more LEDs in a row, how does the brightness of the one closest to the battery pack compare to the one farthest away?
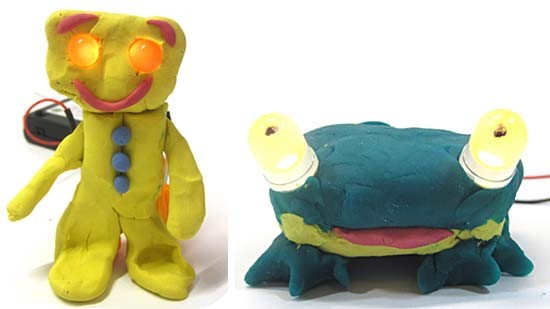
- Now that you know the basics of how to make a squishy circuit, try making your own sculpture! Here are some ideas to get you started.
/-/https/www.sciencebuddies.org/cdn/Files/5722/6/AA-battery-pack.jpg)
/-/https/www.sciencebuddies.org/cdn/Files/5723/6/play-doh-batteries.jpg)
/-/https/www.sciencebuddies.org/cdn/Files/5724/6/LED-bend-leads.jpg)
/-/https/www.sciencebuddies.org/cdn/Files/5725/6/squishy-circuit-LED-off.jpg)
/-/https/www.sciencebuddies.org/cdn/Files/5726/6/squishy-circuit-LED-on.jpg)
/-/https/www.sciencebuddies.org/cdn/Files/5727/6/squishy-short-circuit.jpg)
/-/https/www.sciencebuddies.org/cdn/Files/5728/7/squishy-circuit-insulator.jpg)
/-/https/www.sciencebuddies.org/cdn/Files/5729/6/squishy-circuit-multi-LEDs.jpg)
/-/https/www.sciencebuddies.org/cdn/Files/5732/6/squishy-circuit-robot-frog.jpg)
Cleanup
- Put all of your dough back in sealed plastic containers or plastic bags so it does not dry out.
- Make sure you turn the battery pack off. Remove the batteries if you will not be using your Squishy Circuits kit again anytime soon.
- Use a damp paper towel to wipe any dough residue from the LEDs' legs and from the battery pack's metal rods. This will help ensure that the metal does not corrode. Use a dry paper towel to completely dry the metal before you store everything back in your Squishy Circuits kit.
What Happened?
Were you able to make a sculpture with multiple LEDs in it? Did it light up when you turned on the battery pack?
As long as the LED was facing the proper direction (long leg connected to the conductive dough with the red wire, short leg connected to the dough with the black wire), it should have lit up. If you pushed the lumps of dough together, this created a short circuit and made the LED go out.
You can connect many LEDs to the battery pack (more than 10), but as the LEDs get farther and farther away from the battery pack's wires, they become slightly dimmer. This is because the electricity has to travel through more dough to reach the LEDs, and even conductive dough has some resistance, meaning that it slightly resists the flow of electricity.
Digging Deeper
When you plug the LED into the conductive dough, you created a circuit. A circuit is a path through which electricity can flow. Circuits need to be made out of conductors, or materials that let electricity flow easily. The most common and best conductors are usually made out of metals like copper, but your conductive dough is also a conductor. While it is fun to use dough for squishy circuits, it is not a very good conductor; you would not want all the wiring inside your house to be made out of dough.
Materials that do not let electricity flow easily are called insulators. As you saw in the activity, your insulating clay is an insulator. Wires on electronic devices are usually insulated by materials like rubber or plastic. These help prevent you from shocking yourself if you touch the wires!
Ask an Expert
For Further Exploration
- Try connecting even more LEDs or using the buzzer that came in your kit.
/-/https/www.sciencebuddies.org/cdn/Files/8239/7/squishy-circuits-1-thumb.png)
/-/https/www.sciencebuddies.org/cdn/Files/7422/6/parallel-long.jpg)
/-/https/www.sciencebuddies.org/cdn/Files/4897/13/squishy-circuits-LED-frog.jpg)
/-/https/www.sciencebuddies.org/cdn/blog/graphics/thumb/2013-blog-squishy-circuits-electric-dough_strip-thumb.png)
/-/https/careerdiscovery.sciencebuddies.org/cdn/Files/1223/17/iStock-971549326.jpg)
/-/https/careerdiscovery.sciencebuddies.org/cdn/Files/1907/18/pexels-photo-3153207.jpg)
/-/https/careerdiscovery.sciencebuddies.org/cdn/Files/1242/20/iStock-113511101.jpg)
/-/https/careerdiscovery.sciencebuddies.org/cdn/Files/1725/18/4161_Michelle_Easter_and_Curiousity_Clone.jpg)
/-/https/img.youtube.com/vi/41RzGwZINOk/0.jpg)
/-/https/img.youtube.com/vi/ugv0iWn4G2U/0.jpg)
/-/https/img.youtube.com/vi/XCFCEadgXIA/0.jpg)