/-/https/www.sciencebuddies.org/Files/21464/5/sb-logo.png)
/-/https/www.sciencebuddies.org/Files/21464/5/sb-logo.png)
Create Shade to Protect from the Sun
Summary
/-/https/www.sciencebuddies.org/Files/12379/8/animals-protected-from-sun-thumbnail.jpg)
/-/https/www.sciencebuddies.org/Files/12377/8/animals-protected-from-sun.jpg)
Overview
Students will enter this lesson knowing that materials get warm in the sun. In this fun follow-up activity, your students will get creative with craft materials. They will figure out how to protect an "animal" and its territory from getting too hot in the sun. What will they build to keep their animals cool?
This lesson connects effortlessly with the How Sunlight Warms the Earth lesson.
Learning Objectives
- To explain the problem to solve, their solution, and whether that solution solves the problem.
- To explain that blocking sunlight or providing shade causes a solution to have the desired effect (less warming of the surface.)
NGSS Alignment
This lesson helps students prepare for these Next Generation Science Standards Performance Expectations:- K-PS3-2. Use tools and materials to design and build a structure that will reduce the warming effect of sunlight on an area.
|
Science & Engineering Practices
Constructing Explanations and Designing Solutions.
Use tools and materials provided to design and build a device that solves a specific problem or a solution to a specific problem.
Developing and Using Models. Compare models to identify common features and differences. Develop a simple model based on evidence to represent a proposed object or tool |
Disciplinary Core Ideas
PS3.B: Conservation of Energy and Energy Transfer
Sunlight warms Earth's surface.
|
Crosscutting Concepts
Cause and Effect.
Events have causes that generate observable patterns.
|
Materials
/-/https/www.sciencebuddies.org/Files/12378/8/materials-protect-from-sun-lesson.jpg)
For each group of 2–3 students, you will need:
- Cups partially filled with dry soil, sand, or rocks, one per student. The cups from the previous lesson can be reused for this lesson. If you do so, replace the water with soil, sand, or rocks so each student has one cup filled with a dry material.
- Craft materials like:
- Construction paper
- Transparent and opaque container lids, plastic bags, etc.
- Pipe cleaners, craft sticks, etc.
- Small toy animal, one per student, or materials to craft a small animal. The animal needs to fit in the cup with room to spare. Animals can be made from a pompom with googly eyes, modeling clay, or drawn on cardboard or paper. See Figure 4 in the Lesson section for more examples.
- Scissors
- School glue or tape
For the entire class, you will need:
- One additional cup of each type of dry material that the students have.
- A place in the sun to leave the cups, preferably indoors (e.g. a window sill). If you place the cups outside, try to find an area protected from wind. If this is not available, a place under an incandescent light source of 60 watts or higher is fine too.
Disclaimer: Science Buddies participates in affiliate programs with Home Science Tools®, Amazon.com, Carolina Biological, and Jameco Electronics. Proceeds from the affiliate programs help support Science Buddies, a 501(c)(3) public charity, and keep our resources free for everyone. Our top priority is student learning. If you have any comments (positive or negative) related to purchases you've made for science projects from recommendations on our site, please let us know. Write to us at [email protected].
Background Information for Teachers
This section contains a quick review for teachers of the science and concepts covered in this lesson.The Sun—the closest star to Earth—is essential for life on Earth. It is gigantic (more than 1 million times the volume of Earth), massive (about 330,000 times heavier than Earth) and, most importantly, is our main source of light and heat. Take the Sun away, and Earth would become a dark, frozen, lifeless ball floating around in space.
/-/https/www.sciencebuddies.org/Files/12326/11/orange-sunset-sun-warms-earth.jpg)
Figure 1. The Sun provides Earth with light and warmth.
The light radiated by the Sun carries energy. When this light hits a surface, part of it gets absorbed and transformed into heat. This is why surfaces placed in the sun warm up. Once warmed up, these surfaces radiate heat. Earth's atmosphere retains and distributes this heat. This, together with the redistribution of heat by the oceans, keeps our planet at a temperature that supports life.
On a smaller scale, the warming of surfaces that receive direct sunlight can be uncomfortable or even dangerous. On a sunny day, a surface (e.g. rocks, soil, or concrete) in the sun can get extremely hot—too hot for some animals (like farm animals, cats, and dogs) and people. In the lesson How Sunlight Warms the Earth, students were taught that surfaces in the sun warm up. In this lesson, your students are challenged to protect a surface (an imaginary meadow) from this warming effect. They are given a variety of craft supplies including opaque and translucent materials. The key is to block visible light from reaching that surface. People and animals do this by seeking shelter from the sun in burrows or caves, under trees, under tents or umbrellas, or in buildings.
Additional Background Links
- 6 Creative Ways to Add Shade Outdoors, Elizabeth Lilly of ThisOldHouse.com
- Do I need to provide shade and shelter for my horse?, RSPCA
- Warm in the Sun, Science Buddies
Prep Work (5 minutes)
- In the days preceding the lesson, identify an area (preferably inside) where you will be leaving the cups in the sun. Whether you can do this depends on your geographic location, the time of year, and the orientation/size of windows in your classroom, as well as the weather. If you cannot get enough direct sunlight, then you can use a 60 watt or greater incandescent light bulb instead.
- Store the cups with soil, sand, or rocks in the shade and away from a direct heat source prior to the lesson.
- If students will craft their animal, craft an example animal.
Teacher Tool Box
Engage (10 minutes)
Show the students Figure 2, which is also included in the slideshow.
/-/https/www.sciencebuddies.org/Files/12380/8/beach-umbrella-shelter.jpg)
Figure 2. People seeking shelter under beach umbrellas on a sunny day.
/-/https/www.sciencebuddies.org/Files/14174/23/note-question-mark-30.png) | What do you think when you see this picture?
Possible follow-up questions are:
|
/-/https/www.sciencebuddies.org/Files/14175/24/conversation-bubbles-30.png) | Listen to the students' thoughts and questions.
Guide the discussion so students mention the following:
|
| We still have our cups with soil, water, and rocks. How did these feel after being in the sun for a while? Why was that? |
| They felt warm or hot because they had been in the sun.
The Sun sends out light, which heats the surfaces of materials that it hits.
In time, these materials feel warm or even hot.
|
| Do you think the sand in the picture feels warm or cold? Why? |
| The sand that is in the sun probably feels warm. The sand that is in the shade probably feels a little cooler because sunlight does not fall onto it.
|
Note: This lesson assumes students have learned that sunlight warms Earth's surface. If they did not learn this yet, this is a good place to explain it.
Sometimes, the sand gets so warm that it is uncomfortable to walk on. In this lesson, you will protect a space from getting so hot.
Explore (40 minutes)
- Show Figure 3 or the third slide of the slideshow.
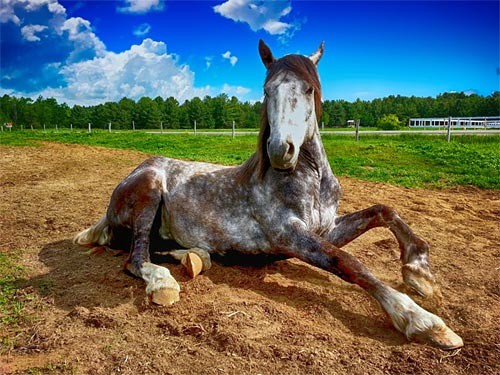
Figure 3. Horse in a meadow. Do you see the horse? The meadow can get very hot on a sunny day. The horse does not like that! Can you give the farmer ideas to keep the meadow cool?
 Listen to the students' ideas.
We will not build a shelter for the horse in this picture, but we will create a small version to explain our ideas. Scientists call these models. Instead of a real horse, you will have your own animal like this one (show your example animal). Instead of a real meadow, you will get a cup with soil or rocks (show a cup half filled with soil or rocks). This is my animal in the meadow (show the example animal on the surface of the soil or rocks).
- Allow students to craft their own toy animal or provide them with one. If students make their own animals, tell them the animal must fit in the cup, as shown in Figure 4.
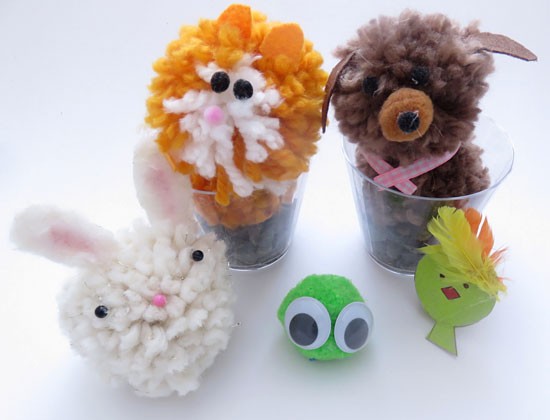
Figure 4. Example craft animals.
- Divide the class in groups of 2 to 3 students.
- Provide a cup to each student, and let them place their animal on the soil, sand, or rocks. Explain that the animal is now in the meadow, and students need to find a solution so that the sun cannot warm this space or the animal too much, even if their cups are placed in a sunny spot (show a sunny spot in the classroom). Show the materials they can use to find a solution.
/-/https/www.sciencebuddies.org/Files/12381/8/horse-in-meadow.jpg)
/-/https/www.sciencebuddies.org/Files/12382/8/craft-animals.jpg)
/-/https/www.sciencebuddies.org/Files/11870/13/icon-experiment-45.png)
Give the groups craft materials. Encourage students within groups to share ideas and help each other. Make sure your students work in the shade and all cups are stored in the shade, away from any heat source.
Let the students construct their designs. Go around and ask students to explain the problem they are trying to solve and their ideas on how to solve it. Encourage students to identify why their idea will work. For example, if they build a tent from paper, it should work because the paper blocks sunlight, providing shade on the surface underneath it. Sunlight will not hit the surface, so it will not warm it up.
Ask students to draw their idea on the worksheet.
After they had time to draw, go over following checklist:
- Did you draw what is in the cup (soil, sand, or rocks)?
- Did you draw your construction or solution?
Some possible drawings are shown in Figure 5.
/-/https/www.sciencebuddies.org/Files/12383/8/sun-protection-sketch.jpg)
Figure 5. Sketches for constructions that can keep the tiny red fuzzy animal cool: a tent, a burrow, and encapsulating the cup.
If students are ready early, allow them to decorate their construction and color their worksheet, or pair up groups that are ready and have them explain their constructions to each other.
Regroup the class and explain that they need to make sure their constructions solve the problem. To test, they will place the cups with the constructions in a sunny place. Discuss with your students the need to add a similar cup without a construction so, after some time, they can feel how the protected meadow feels compared to the unprotected meadow. Note that the animals are not in the construction during the testing, as the presence of the animal could obstruct the measurement.
| How should the surfaces of the cups feel if the solution worked?
|
| The surface (meadow) with the construction should feel cooler.
|
Ask students to place their cups with the constructions in a sunny place. Add one extra cup of the same material (without protection from the sun). Make sure it stays in the sun so it can be reused by each group. Note that if students use different dry materials in their cups, you will need an extra cup for each material used.
After some time (at least 15 minutes if the sun is bright), allow each group, one by one, to feel if their construction solved the problem by touching the protected and unprotected meadows (touch the surface of the dirt/rocks/sand in both cups) and feeling if the protected meadow has an area that feels cooler.
Ask students to show their construction and announce their findings to the class.
Reflect (10 minutes)
| Now we will find out what
causes a construction to keep the meadow cool.
Show the students one construction that keeps the meadow cool and ask why it keeps the surface cooler. |
| Listen to their answers and repeat the part where they state the reason.
The following are clear answers:
|
| Show the students another construction that keeps the meadow cool. Does this construction also "..." (repeat the answer of the previous question).
Repeat this for a few constructions that keep the meadow cool. |
| Yes, this is true in this case as well. |
| Would that be the one thing needed to keep the meadow cool? Can you find evidence in other constructions that if this is there, the construction keeps the meadow cool? |
| This should be true for all constructions that keep the meadow cool. |
| Why did some constructions not work so well? |
| Answers will vary. Maybe they used transparent plastic in the constructions, which does not block sunlight, maybe they provided partial shade, or maybe the construction provided shade but not over the meadow. |
| After this lesson, what do you think when seeing this picture? Why do you think the people are where they are in the picture? |
| People look for shade under the umbrellas because it is a sunny day and they like to find a spot where the surface is not as hot. |
Assess
Assess students' understanding from the explanations they provide for their solutions.Make Career Connections
Discussing or reading about these careers can help students make important connections between the in-class lesson and STEM job opportunities in the real world.
/-/https/careerdiscovery.sciencebuddies.org/cdn/Files/896/17/pexels-photo-3761508.jpg)

/-/https/careerdiscovery.sciencebuddies.org/cdn/Files/1396/17/iStock-473199834.jpg)
/-/https/img.youtube.com/vi/h2eMJwvsr4g/0.jpg)
/-/https/img.youtube.com/vi/74RnO_wHX7k/0.jpg)
/-/https/img.youtube.com/vi/OgRzJmu03VY/0.jpg)