/-/https/www.sciencebuddies.org/Files/21464/5/sb-logo.png)
/-/https/www.sciencebuddies.org/Files/21464/5/sb-logo.png)
Make a Hygrometer to Measure Humidity
Summary
/-/https/i.ytimg.com/vi/NF_nanpcQ9c/maxresdefault.jpg)
/-/https/www.sciencebuddies.org/Files/20511/4/google-classroom.png)
/-/https/www.sciencebuddies.org/Files/20512/4/ms-teams.png)
/-/https/www.sciencebuddies.org/Files/20469/4/Canvas_Bug_Color_RGB.png)
/-/https/www.sciencebuddies.org/Files/20470/5/Schoology-Logo.png)
/-/https/www.sciencebuddies.org/Files/20471/4/lms.png)
/-/https/www.sciencebuddies.org/Files/20469/4/Canvas_Bug_Color_RGB.png)
/-/https/www.sciencebuddies.org/Files/20470/5/Schoology-Logo.png)
/-/https/www.sciencebuddies.org/Files/20471/4/lms.png)
/-/https/www.sciencebuddies.org/Files/13732/9/hygrometer-lesson-plan.jpg)
Overview
What do a crazy hair day, a wooden door stuck in its frame, and the weather have in common? Humidity! In this fun hands-on weather lesson students explore surprising information about human hair, the air around them, and the weather by building a hygrometer from a strand of hair, a straw, a wooden panel, and two nails. A great way to make humidity visible!
Learning Objectives
- Explain what humidity and evaporation of water are
- Understand and give examples of processes that increase and decrease humidity
- Record qualitative humidity data taken with a hygrometer
NGSS Alignment
This lesson helps students prepare for these Next Generation Science Standards Performance Expectations:- 3-ESS2-1. Represent data in tables and graphical displays to describe typical weather conditions expected during a particular season.
- 3-ESS2-2. Obtain and combine information to describe climates in different regions of the world.
|
Science & Engineering Practices
Constructing Explanations and Designing Solutions.
Use evidence (e.g., measurements, observations, patterns) to construct or support an explanation or design a solution to a problem.
|
Disciplinary Core Ideas
ESS2.D: Weather and Climate.
Scientists record patterns of the weather across different times and areas so that they can make predictions about what kind of weather might happen next.
|
Crosscutting Concepts
Cause and Effect.
Cause and effect relationships are routinely identified, tested, and used to explain change. Events that occur together with regularity might or might not be a cause and effect relationship.
|
Materials
/-/https/www.sciencebuddies.org/Files/13731/8/materials-humidity-STEM-lesson.jpg)
Per group of 2 to 3 students:
- 1 tsp rubbing alcohol (70% isopropyl alcohol works well)
- Measuring spoons
- Small bowl
- Water
- Two long strands of human hair (about 20 centimeters each), one to use and another as backup (strands from straight, wavy or curly hair are fine, frizzy hair makes it a little more difficult).
- Cotton swab
- Drinking straw (preferably a wide, non-bending straw)
- Scissors
- Metric ruler
- Glue (fast drying glue or a glue gun work best)
- Scrap piece of wood (about 25 cm long and 15 cm wide)
- Two short nails (must be longer than the diameter of the straw)
- Marker, pencil, or pen
One for every other group:
- Resealable bag (large enough to fit the wood inside and have a little room to spare)
- Wet sponge or small towel (either paper or cloth)
To be shared among several groups:
- Hammer
- Hair dryer
- Optional: windows that face a colder area (e.g. outside on a not too hot day), or drinking glass cooled by ice-cubes.
- Optional: waterproof paint, paint brushes and other materials to decorate their hygrometer.
For the class:
- Plate
- 1/4 cup measuring cup
Background Information for Teachers
This section contains a quick review for teachers of the science and concepts covered in this lesson.Humidity is a measure of how much water vapor is in the air. Evaporation from large bodies of water like oceans, streams and lakes, as shown in Figure 1, is a large contributor of water vapor in the air. Living organisms are another large contributor. Plants and animals breathe out water vapor. As reference, a human breathes out about 300 to 50 milliliters of water in the form of water vapor per day.
/-/https/www.sciencebuddies.org/Files/13733/6/evaporation-precipitation-diagram.jpg)
Figure 1. Evaporation contributes to water vapor in the air.
The specific humidity is defined as the mass of water vapor in one kilogram of air. Because warm air can hold more water vapor than cold air, meteorologists —scientists who study weather and climate— prefer to use the relative humidity, or the amount of water vapor in the air compared to the maximum amount the air can hold at that temperature. Relative humidity is expressed in percentages; a relative humidity of 100% means the air cannot hold any more water vapor, and any additional water vapor condenses.
Warm air can hold more water vapor. One kg of air at 0°C can hold about five grams of water, the same kg of air at 38°C can hold almost 50 grams of water. That is ten times more! You can demonstrate this with the help of one small cup and one big cup (see Figure 2). The small cup represents the amount of water (in the form of vapor) cold air can hold; the larger cup represents the amount of water the air can hold after it has been heated. The second cup is much larger because warmer air can hold much more water vapor.
/-/https/www.sciencebuddies.org/Files/13734/6/model-relative-humidity-temperature-change.jpg)
Figure 2. Glasses of different sizes filled with the same quantity of water can help explain how the relative humidity drastically changes with changing temperature.
Because warmer air can hold much more water vapor than cold air, the relative humidity decreases with rising temperature. You can demonstrate this by filling the small cup to the rim with water (see Figure 2). Because the cup is 100% full, it cannot hold more water. This illustrates that air with a relative humidity of 100% cannot hold more water vapor. Pour the water from the small cup in the big cup and observe how only a small percentage of the cup is filled. There is space to add water in the big cup. This demonstrates how a quantity of water that saturates cold air (relative humidity = 100%) leads to a much lower relative humidity if the air is warmer.
A hygrometer is a device that measures the humidity of the air surrounding it. Some hygrometers use a strand of hair to measure humidity. This works because a hair shows a small (a few percent at maximum) but reliable change in length with changing humidity. Hair is made of proteins called keratins, and chemical bonds hold the keratin particles together. The keratins in strands of hair have many such bonds, making a strand strong and flexible. Some of these bonds can be disrupted by water vapor in the air, which causes hair strands to expand and contract in humid and dry air, respectively. The change is small but hygrometers magnify the change so it becomes observable to the human eye. A hair hygrometer measures relative humidity. A more detailed explanation of the effect of humidity on hair can be found in the introduction of the project Make a Hygrometer with Strands of Hair.
Humidity is an important variable of the weather. High humidity can lead to cloud formation and precipitation. Continued low humidity can lead to drought. This becomes very clear in the weather cycle. This lesson introduces the concept of humidity by letting your students build a hair hygrometer and use it to measure humidity in the classroom and outside. Precipitation and/or the water cycle can be studied in a different lesson.
Additional Background Links
- Relative Humidity Lesson for Kids, Study.com
- The Water Cycle for Schools: Intermediate ages, USGS
- Make a Hygrometer to Measure Humidity, Science Buddies
Prep Work (5 minutes)
- About a week before the lesson, pour 1/4 cup of water onto a plate and leave it where the students can see it. Mention the plate to the students and ask them not to touch it or the water. Make a mental mark of the water level or mark the initial water level on the plate.
- Identify people who can donate a few strands of 20 cm long hair.
- Optional: Build a hygrometer yourself to gain familiarity with the steps.
- Optional: If you want the students to paint the wooden panel on which they will build their hygrometer, plan on executing step 1 of the instructions in advance.
- Optional: Clean the hair strands with diluted rubbing alcohol before the lesson. Details are given in step 2 of the instructions on how to make a hygrometer.
- Optional: If you think your students will have difficulty making the pointers, you can prepare them in advance. Details are given in step 3 of the instructions on how to make a hygrometer.
Teacher Tool Box
Engage (30 minutes)
Introduce the phenomenon
/-/https/www.sciencebuddies.org/Files/14174/23/note-question-mark-30.png) | Do you remember that I left this plate out [fill in the place where you left the plate] last week? When I left it, it had water to about [indicate how far the water extended]. There is [less/no] water in it now.
I did not clean up the water. I asked the janitor and he/she did not touch the plate, and probably none of you touched the water. If nobody touched it, where did the water go? |
/-/https/www.sciencebuddies.org/Files/14175/24/conversation-bubbles-30.png) | Give students a few minutes to draw or write down their ideas on the worksheet before letting a few students share their ideas. Listen to the answers and elicit the reasoning that led to their conclusion. Do not correct or add. We will get back to this question at the end of the lesson. |
Introduce the lesson
| Today, we will learn about humidity. Can someone tell me what humidity means? |
| Listen to the students. Correct or add as needed and introduce the term water vapor. |
Humidity tells us how much water vapor is in the air. Often it compares how much water vapor is in the air to how much water vapor the air can hold.
Water can come in the form of a solid, a liquid or a gas. Water that is frozen into a solid is called ice. The water particles in ice are stuck to each other. The water we drink is liquid; its particles move over and alongside each other, but they stay together. Water that has evaporated or became a gas is called water vapor. Water vapor is water particles floating around in the air.
| Most often, we do not see the water vapor in the air, but sometimes, you can see it. Can anyone give me an example? |
| Examples could be:
|
If the class has a cold window, ask students to go to the window and breathe out through their mouth against the window pane.
If there is no accessible cold window (a window that faces a colder area), you can use a drinking glass cooled by ice-cubes instead. If needed, skip this experience and continue with the next step.
| What do you see? |
| Where you breathe onto the glass, it becomes slightly white and translucent; it looks like fog. |
| Run your finger through the area. How does it feel? What else do you observe? |
| It feels wet and disappears quickly. |
| Hold your open hand close in front of your mouth. Then breathe out through your mouth on your hand. What do you feel? |
| It feels damp and warm. |
Explain to the students that the air we breathe out is humid, it contains a lot of water vapor. We usually do not see this vapor, but we feel it on our hand. When we blow against a cold window, the water vapor condenses or turns into a liquid as it touches a cold surface. What you saw on the glass was tiny water drops. It makes the glass look foggy and when you touch it, it feels wet.
A hygrometer is a device that measures how much water vapor is in the air, or more specifically, it measures how much water vapor can be added to the air. When the air is very humid and cannot hold more water vapor, the hygrometer will show it is 100% humid. When the air is dry and could hold a lot more water, the hygrometer will show a much lower number.
| Has anyone heard someone talking about humidity or seen humidity levels written somewhere? If so, where and in what context? |
| Listen to student's experiences. If needed, add that the humidity of the air plays an important role in the weather. A weathercaster needs to know how humid the air is in order to make accurate weather predictions. Humidity also plays a role in how we perceive the weather. If you travel, you might look up what temperatures to expect. In addition, you could look up how humid it is at your destination. Hot with high humidity feels sweaty and sticky; hot with low humidity feels dry and may be more comfortable. |
| Scientists measure humidity with a hygrometer, but how do you think we can measure humidity? Are there things that change when it is humid that we might be able to use for measuring humidity? |
/-/https/www.sciencebuddies.org/Files/11870/13/icon-experiment-45.png)
We will make a hygrometer from a strand of hair! Hair is one of those things that changes with changing humidity. Curly hair might frizz and straight hair might feel limp on a humid day. What is remarkable is that your hair always changes in the same way as a response to a change in humidity. That is why we can use it to create a hygrometer.
Explore (90 minutes with 30 minutes wait time)
Tell the students they will make a hygrometer in small groups.
If you use the video, stop the video at 1:30 to let the students predict how the hygrometer will react to humid and dry conditions.
Prepare to assemble a hygrometer
- Optional: If you want your students to paint the wood, do it before you start. Final decorations can be added once your hygrometer is built.
- To clean the hair:
- Mix one tablespoon of water with one teaspoon of rubbing alcohol in a small bowl.
- Dab a cotton swab in the diluted rubbing alcohol solution and wipe down each strand of hair. This removes any residual oils and allows water to permeate the hair more easily.
- Set the hair strands aside somewhere you will not lose them.
- To prepare the pointer:
- If your straw has a bendable part, trim it off.
- Lay the straw next to the long side of the wooden panel. The panel should be at least few centimeters longer than the straw. Trim the straw if needed.
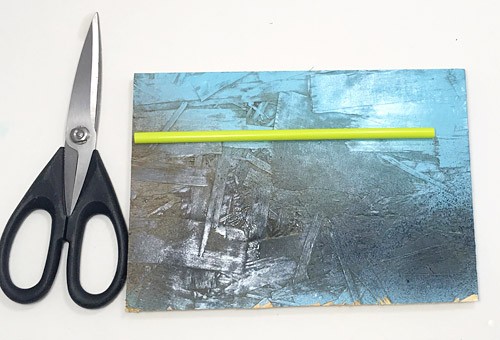
Figure 3. Adjust the length of the straw to be slightly shorter than the wooden panel.
- Cut one end of the drinking straw on an angle so it becomes a pointer.
- Cut a slit about 1 cm away from the other end of the straw about halfway through from the top.
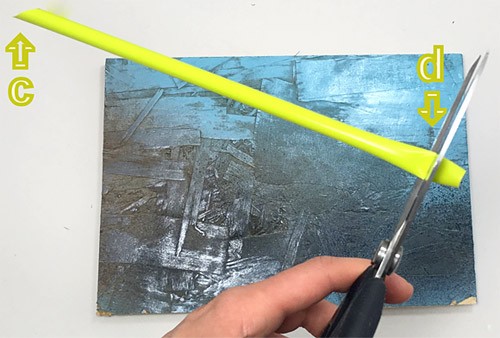
Figure 4. One end of the straw is cut into a pointer. A slit near the other end of the straw will be used to attach the hair.
- Slip one end of a clean strand of hair through the slit you just cut. Glue that end of the hair to the straw.
- Wrap the other end of the hair twice around one of the nails. Fasten this end with glue as well.
- Make sure the glue has dried before assembling your hygrometer.
Discussion
 We felt and saw that water gets in the air by us breathing out. Do you know any other processes that add water vapor to the air?
 Some of the many correct answers students might give:
- Water in rivers, lakes, and oceans evaporates (becomes vapor) and floats around in the air
- Boiling water or soup adds water vapor to the air
- Some of the hot water in your bath or shower evaporates and floats around in the air
- Surface water from the puddles and swimming pools evaporates and floats around in the air
- A swimsuit or hair drying in open air adds water vapor to the air
- Animals and plants breathe, this adds water vapor to the air
- Ice or snow on mountain tops sublimates into water vapor (Sublimation means the substance changes from the solid phase directly to the gas phase without passing through the liquid phase.)
Make sure students have some examples they can relate to, and mention evaporation of water from rivers, lakes, and oceans as a contributor of water vapor in the air.
I mentioned that humidity is an important aspect of the weather. Can you list some weather conditions that might be related to humidity?Let students shout out answers. Possible answers are rain, snow, hail, drizzle, fog, muggy for humid weather or dry air for dryer weather conditions.Ask students to list at least three weather conditions that are humid (a lot of water vapor in the air) and at least one that is dry (fewer water vapor in the air) on their worksheet.
Make sure students have examples of experiences they can relate to, like a foggy morning, a sweaty hot summer day, etc. If students have difficulty relating to humid conditions, maybe they can relate to the humidity in a bathroom after someone has taken a hot bath or shower or the humidity in an indoor swimming pool.
Assemble the hygrometer
Assembling the hygrometer may be challenging for some 3rd grade students. You might want to walk your class through the process and show them what is done in each step, or play the video step by step. Displaying Figure 5 (included in the slideshow) can help as well.
- The picture below (which is also included in the slideshow) shows the hygrometer you are building. Keep this picture in mind as you follow the directions. A yellow line is drawn on the wooden panel to show where the hair is strung.
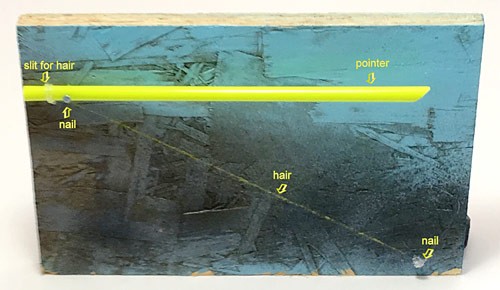
Figure 5. The hygrometer you are about to build.
- Place the wooden panel before you in landscape orientation (so that it is wider than it is tall). Position the straw on the wooden panel so it points to the right, about 5 cm below and parallel to the top edge of the wood. Align the left side of the straw with or near the left side of the wooden panel. Make sure that the strand of hair is not wrapped around the straw other than where it is glued (it should hang straight down from the straw).
- Poke the unused nail (without the attached hair) through the center of the straw, about 2 cm from the left side and hammer it in. The nail must go through the straw to the right of where the hair is glued. Make sure the nail is securely attached to the wood. Be sure to only use the hammer on a surface that can safely withstand the force and is resistant to damage.
- Wiggle the straw up and down until the pointer moves snugly, but without friction around the nail.
What happens to your pointer if you move the left side of the straw (where the hair is attached) slightly up and down? Why does this happen? How can this help us observe small changes?Moving the left side a tiny bit makes the pointer end move a lot. This happens because the point around which the straw rotates is skewed to the left. This can help us observe small changes because a small change is made way bigger, way easier to see.
- Ask a helper to hold the pointer so it stays pointed straight to the right. You can also place something heavy on each side the pointer to prevent it from moving up and down.
- Take the nail with the hair strand attached and move it towards the lower right corner of the wooden panel until the hair is tight. Hammer the nail in the wood at that spot. The hair needs to be stretched tight when the straw is horizontal. It is important that the nail is securely attached to the wood. Take your time—this step is not easy! If you notice the hair hangs a little loose when your nail is halfway in, try to hammer your nail a little sideways so the hair is stretched tight. If the hair is too long, wind it around the nail before hammering the nail in.
- Your helper can now release the pointer, or you can remove the objects that kept the pointer in place. Stand your hygrometer upright. Now you are ready to measure!
What keeps the pointer from falling down?The hair pulls on the left side of the pointer, keeping it from falling down. If the hair is not stretched tight enough, the pointer sags or falls down. When it is stretched too much, it points up. It does not need to be perfectly horizontal, but it needs room to point more up and more down so it can adjust for dryer and wetter conditions.
While your students work on the next two questions, go around and check each hygrometer to ensure both nails are securely attached. Correct or ask students to correct where necessary. Changes in humidity make minuscule changes in the length of the hair. A tiny movement of the nail can pull or release the hair ever so slightly, which looks like the hair got shorter or longer. Students might read this as a change in humidity and get confusing measurements.
- We call the air humid when it holds almost all the water vapor it can possibly hold. We say it is dry when it contains very little water vapor. Hair strands expand in humid air and contract in dry air.
What do you think will happen to the pointer if the hair expands (becomes longer) or contract (becomes shorter)? Why do you think this, and how can this help us measure humidity?

- Make a sketch of how you think your hygrometer will look in dry and humid conditions.
Find extreme values for the hygrometer
Split the class in 2 groups for this step:- One group shares the hair dryer and observes dry conditions first (steps 16–19). The teams can decorate their hygrometer while waiting their turn to use the hairdryer. These students fill in the worksheet after they do the test.
- The other group observes humid conditions first (steps 20–21). Note it can take 10 minutes to create humid conditions in the bag, and an additional 10 for the hygrometer to fully adjust to these surroundings. Students can start observing and work on the worksheet while waiting.
After both groups are done, they switch roles so all get to test dry and humid conditions.
Explain that the pointer will move when there is a change in the amount of water vapor in the air. You will want to know where it points for the two humidity extremes: dry air and very humid air. In this section, students will find these points. You can use the video starting at 1:30 to explain students how to determine these extremes.
Dry Conditions
- Dry the air around the hair gently with a hair dryer on low heat. Take care not to touch the pointer or blow it upwards.
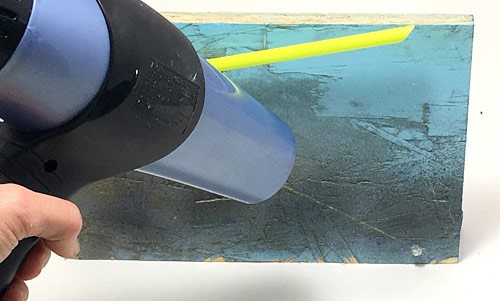
Figure 6. A hairdryer can create dry air around the hair strand.
- When the pointer stops moving, mark the pointer location on the wood.
- Label the point you just marked "Dry." Observe that the location of this point is not necessarily the same for all hygrometers. The pointer should have moved up at least a tiny bit.
How and why did the pointer move when you blew warm air onto the hair?
See if your prediction was correct. If it was not, try to explain why it was not.
- Decorate your hygrometer while waiting to use the hairdryer. Make sure not to spill any paint on the hair, or get anything in the way of the pointer.
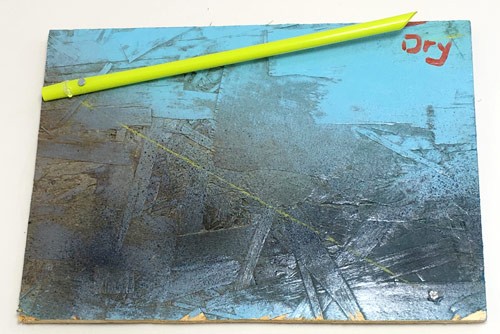
Figure 7. The pointer pointing up indicates dry air.Humid Conditions
- To place your hygrometer in humid conditions, enclose it in the plastic bag with a small, wet (not dripping) sponge or towel. Close the bag tightly. Make sure there is room for the pointer to move inside the bag.
Tip: to shorten the wait time, place the wet sponge in the bag in advance so the air in the bag is already humid when you place the hygrometer in it.
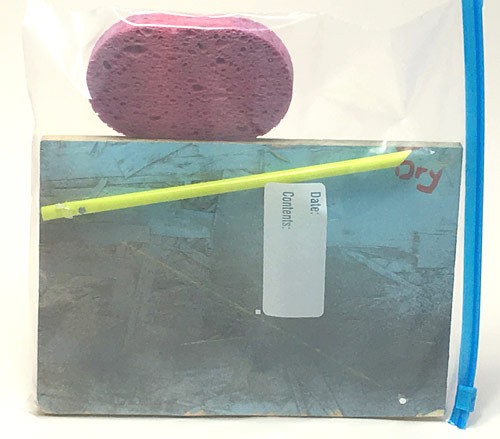
Figure 8. Place the hygrometer in humid conditions.
Wait for 10 to 20 minutes to let the hygrometer adjust to the new conditions. You can wait longer.
How and why does the pointer move? Why does this happen?See if your prediction was correct. If it was not, try to explain why it was not.
- Take the hygrometer out of the bag and clearly mark the final pointer location and label it "Very Humid." Note the location of this point is not necessarily the same for all hygrometers. The pointer should have moved at least a bit down.
Use the hygrometer
Finally, you can use your hygrometer to measure different humidity levels! Notice that the hygrometers are not identical. The "Dry" mark might be located very high up on one hygrometer and more to the middle on another. That is fine. To read the hygrometer, you compare the position of the pointer relative to the marks "Dry" and "Very Humid". This should be identical for all hygrometers when measuring the humidity of the same air. For example, all hygrometers might point towards a point midway between the "Dry" and "Very Humid" marks when acclimatized to the air in the classroom. If one hygrometer shows a different reading, check if it is functioning by drying the air around the hair. If the pointer moves up, check the indication of the extreme values.
- Place the hygrometers somewhere in the classroom. Give them some time to adjust to their surroundings and do the reading collectively. Have a discussion about what words can be used to describe the level.
A possible scale could be: extremely humid, somewhat humid, midway between very humid and dry, somewhat dry, dry.
How humid does the hygrometer say it is in in your classroom? Let students record the data on their worksheet.
- Place the hygrometers outside in an area protected from rain. Give them some time to adjust to their surroundings and let each student individually read the level and record it on their worksheet.
While you wait for your hygrometer to adjust to its surroundings, discuss as a class how humid you think it currently is outside, and what clues you can use to determine humidity.Examples can be the presence of fog, precipitation, and clouds that indicate a more humid condition.Reverse the question. If you know it is often very humid at a location you will visit soon, what type of weather would you expect?Maybe rain and fog, snow, etc.
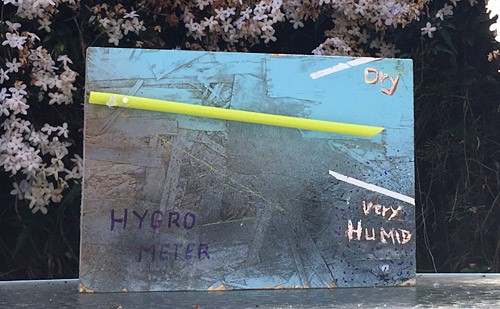
Figure 9. Using the hygrometer to measure the humidity.How humid does the hygrometer say it is outside? Let students record the data on their worksheet.How does the humidity outdoors compare to the humidity in the classroom?The answer will depend on your local conditions. Ask your students to write the answer on their worksheet before discussing it with the class. This can help you evaluate if all students understand how to read the hygrometer.
/-/https/www.sciencebuddies.org/Files/13314/7/measure-straw-for-hygrometer-pointer.jpg)
/-/https/www.sciencebuddies.org/Files/13742/5/cut-pointer-for-hygrometer-lesson-plan.jpg)
/-/https/www.sciencebuddies.org/Files/13316/7/hygrometer-before-calibration-with-labels.jpg)
/-/https/www.sciencebuddies.org/Files/13318/7/dry-air-around-hygrometer.jpg)
/-/https/www.sciencebuddies.org/Files/13319/8/calibrate-hygrometer-for-dry-air.jpg)
/-/https/www.sciencebuddies.org/Files/13320/7/calibrate-hygrometer-for-humid-conditions.jpg)
/-/https/www.sciencebuddies.org/Files/13312/8/hygrometer-outside.jpg)
Reflect (15 minutes)
| In the beginning of the lesson, we were wondering where the water on the plate I left out for a week went. Does anyone have an idea where that water went? |
If students knew before, ask if they would like to change their answer.
| The water turned into water vapor, it evaporated and is now floating around as tiny particles in the air. |
Give students a few minutes to draw this idea on the worksheet.
| So, we noticed water evaporated from our plate. Where do we have large bodies of water in nature? Do you think that water evaporates too? |
| Large bodies of water in nature are oceans, seas, lakes and rivers. That water evaporates too. |
| Do you think this process changes the humidity in the air near oceans, lakes and rivers? Why or why not?
|
| Evaporation from ocean, lake and river water makes the air around these bodies humid. |
| I also said humidity affects the weather. How do you think humidity and the weather are related? |
| Water vapor in the air—or
humid air—is needed to create rain,
snow, hail, drizzle, fog or muggy weather, just like you need to have a lot of water vapor in the air before little droplets appear on the mirror or windows in your car or in the bathroom after a hot shower. |
Ask students to draw evaporation everywhere it happens in the drawing provided in the worksheet. A colored version of the drawing can be found in the slideshow.
If you will discuss precipitation and/or the water cycle on a later day (e.g. in this precipitation lesson), inform the students that you will come back to this in a future lesson.
Assess
You can use the quiz to assess student learning after the activity.
- Online quiz, assignable in any LMS
- Quiz (pdf) and Answer key (pdf)
Make Career Connections
Discussing or reading about these careers can help students make important connections between the in-class lesson and STEM job opportunities in the real world.
/-/https/careerdiscovery.sciencebuddies.org/Files/815/17/unsplash-5hZJVGPG6vo.jpg)

/-/https/careerdiscovery.sciencebuddies.org/Files/1141/17/iStock-1170687091.jpg)
Lesson Plan Variations
- Students can use a commercial hygrometer to calibrate their hygrometer. This is best done on a dry day. They can start with the current condition in the classroom and indicate that level on their hygrometer. They can then put both hygrometers in a bag with a wet sponge and make marks on their hygrometer at regular humidity intervals.
- Students can follow the humidity over a longer period of time and see how it changes over different time periods like hours, days, and seasons. If they observe a change, challenge them to find other factors in the weather that changed too. Can they see patterns? Can they explain the pattern they see? Is the pattern causal? A causal relationship they might see is the increase in humidity when the fog rolled in, or a humidity decrease as the temperature rises. A correlational pattern could be a humidity increase than happens daily at 5pm caused by the sprinklers being run at that time of day.
- Students can use hair strands of different lengths to create their hygrometer and see how that influences the readings. Is one more accurate than the other? If so, why?
- Challenge the students to find a place where the current humidity is in a specific range, like 10% to 40%, 40% to 70%, and 70% to 100%.
/-/https/img.youtube.com/vi/tv6LvMgVDcQ/0.jpg)
/-/https/img.youtube.com/vi/Dg3uYPvSoIs/0.jpg)
/-/https/img.youtube.com/vi/nhgNh3BdMsc/0.jpg)