/-/https/www.sciencebuddies.org/cdn/Files/21464/5/sb-logo.png)
/-/https/www.sciencebuddies.org/cdn/Files/21464/5/sb-logo.png)
Oceanic Circulation: What Keeps the Ocean in Motion?
Summary
/-/https/www.sciencebuddies.org/cdn/Files/11949/5/ocean-circulation-setup.jpg)
Overview
Why is the ocean vital to our planet? There are many reasons, but one important one is that the ocean is a major player in regulating our weather and climate through currents. In this lesson plan, your students will model ocean currents with cups, water, and food coloring, and explore how temperature and density differences set deep ocean waters in motion to create a global oceanic circulation system.Learning Objectives
- Understand the ocean's impact on global climate.
- Investigate and describe how temperature differences drive oceanic water movement.
- Explain how climate change can affect oceanic circulation systems.
NGSS Alignment
This lesson helps students prepare for these Next Generation Science Standards Performance Expectations:- MS-ESS2-6. Develop and use a model to describe how unequal heating and rotation of the Earth cause patterns of atmospheric and oceanic circulation that determine regional climates.
|
Science & Engineering Practices
Developing and Using Models. Develop and use a model to describe phenomena.
Planning and Carrying Out Investigations. Collect data to produce data to serve as the basis for evidence to answer scientific questions or test design solutions under a range of conditions. Analyzing and Interpreting Data. Analyze and interpret data to provide evidence for phenomena. |
Disciplinary Core Ideas
ESS2.C: The Roles of Water in Earth's Surface Processes.
Variations in density due to variations in temperature and salinity drive a global pattern of interconnected ocean currents.
ESS2.D: Weather and Climate. The ocean exerts a major influence on weather and climate by absorbing energy from the sun, releasing it over time, and globally redistributing it through ocean currents. |
Crosscutting Concepts
Energy and Matter. Within a natural or designed system, the transfer of energy drives the motion and/or cycling of matter.
Systems and System Models. Models can be used to represent systems and their interactions—such as inputs, processes and outputs—and energy, matter, and information flows within systems. Scale Proportion and Quantity. Time, space, and energy phenomena can be observed at various scales using models to study systems that are too large or too small. |
Materials
/-/https/www.sciencebuddies.org/cdn/Files/11950/11/ocean-circulation-materials.jpg)
Materials per group of 3–4 students:
- Plastic cups, 9 oz. (2 of the same size)
- CD
- Laminated paper or stiff plastic sheet; available from Amazon. Plastic strips cut from the lid of clamshell boxes for fresh produce also work well.
- Food coloring (dark colors such as blue and green work better than light colors)
- Hot water
- Ice water
- Spoon for mixing
- Small flashlight
- Immersion thermometer; available from Amazon
- Aluminum tray
- Smartphone with a sensor app such as phyphox, available for free on
Google Play for Android devices (version 4.0 or newer) or from the App Store for iOS devices (iOS 9.0 or newer). Note: Phyphox does not support the light sensor on iOS devices. If you need the light sensor, you have to use Android devices for your experiment. Note that on some devices the light sensor is only updated when there is a coarse change of illuminance. This means that if the light intensity does not change or only changes slightly, the sensor appears to not record any data. The recording will continue once the light intensity changes again. If your experiments allows, it helps to wiggle the phone or the light source (e.g. flashlight) slightly to induce minimal reading fluctuations and keep the sensor active.
Materials for teacher preparation and demonstration:
- Scissors
- World map or globe
- Plastic cup
- Food coloring
- Teaspoon
Disclaimer: Science Buddies participates in affiliate programs with Home Science Tools®, Amazon.com, Carolina Biological, and Jameco Electronics. Proceeds from the affiliate programs help support Science Buddies, a 501(c)(3) public charity, and keep our resources free for everyone. Our top priority is student learning. If you have any comments (positive or negative) related to purchases you've made for science projects from recommendations on our site, please let us know. Write to us at [email protected].
Background Information for Teachers
This section contains a quick review for teachers of the science and concepts covered in this lesson.Water covers about 70% of Earth's surface. Seen from space, the blue of the oceans and the white of clouds are the dominant visual features of our planet. The ocean is of chief importance to us—it provides us with a major source of food, water (through the water cycle), and microscopic phytoplankton that live in the ocean produce more than 50% of the oxygen we breathe. In fact, more than 80% of life on Earth is in the ocean! In addition to that, the ocean is a major player in regulating our weather and climate. In short, the ocean is the life support system of our planet. Similar to a heart pumping blood, ocean water is in constant motion and transports life-sustaining heat, nutrients, and oxygen around the world.
This constant motion or water movement is driven by ocean currents. In general, there is a lot of water movement in the ocean. The most obvious examples—the ones we can see—are the waves and ripples on the water's surface that are generated by wind, or ocean currents due to tides. However, water can also be moved without wind or tides, which is what happens in the deep ocean. There, currents are set in motion by variations in water density caused by differences in temperature and salinity (amount of dissolved salt), a process called convection.
The water of the oceans is not uniform. Unequal heating by the sun and climatic processes create large-scale differences in ocean water temperature and salinity, as illustrated in Figures 1 and 2. As you might expect, ocean waters near the equator tend to be warmer than those at higher latitudes as these areas receive more solar radiation. Figure 1 shows sea surface temperature, coded in color (see legend).
/-/https/www.sciencebuddies.org/cdn/Files/11951/6/global-ocean-surface-temperatures.jpg)
Temperature on a heatmap is color coded, red areas are the hottest and purple areas are the coolest. The sea surface temperatures are hottest around the equator and gradually cool down the closer the water is to the poles.
Figure 1. Color-coded map of sea surface temperature in degrees Celsius.
Figure 2 shows global differences in ocean surface salinity. At the surface, in general, salinity is higher in equatorial regions and lower at high latitudes.
/-/https/www.sciencebuddies.org/cdn/Files/11952/5/global-ocean-salinities.jpg)
Map showing areas of high and low salinity in the worlds oceans. Areas of high salinity are represented in red and low salinity in dark blue. The area of highest surface salinity is in the Mediterranean Sea and extends outward into the Atlantic ocean from the coast of Western Europe to the Eastern coast of North America. The areas of lowest surface salinity are near the arctic circle and the waters around Alaska.
Figure 2. Color-coded map of sea surface salinity in PSU (Practical Salinity Units), which is similar to parts per thousand (ppt or 0/00). (Image credit: NASA's Goddard Space Flight Center Scientific Visualization Studio).
The density of water varies with temperature (warm water is less dense than cold water) and salinity (more salt makes water heavier). These two factors are the main driving forces behind the global ocean conveyor belt, also called thermohaline circulation, which is a huge water circulation system in the deep ocean, as shown in Figure 3. Currents begin near the pole in the North Atlantic, where the surface of the ocean gets cooled by the arctic temperatures. As sea ice forms, the water becomes saltier (the majority of the salt does not freeze into the ice, but remains in the liquid water below the ice). This water is now denser and will sink to the bottom of the ocean floor. This creates a current, as warm surface water moves in to replace the sinking cold water. The cold, deep water moves all the way south to Antarctica, then to the Indian and Pacific Oceans. Once the water reaches warmer regions, it warms up, becomes less dense, and rises to the surface. Eventually, it finds its way back to the North Atlantic where the whole cycle begins again. The completion of one full cycle is estimated to take about 1,000 years!
/-/https/www.sciencebuddies.org/cdn/Files/11953/5/global-ocean-conveyor-belt.jpg)
Figure 3. Global ocean conveyor belt. (Image credit: Courtesy NASA/JPL-Caltech).
What would happen if, due to climate change, temperature and salinity differences in the ocean became less pronounced? Scientists are concerned that heating the globe, which increases ocean temperatures and melts large quantities of polar ice, will lead to a decrease in ocean temperature and salinity differences. This could potentially have devastating effects on the ocean currents of the global conveyor belt.
In this lesson plan, you will do experiments with your students to see what happens when layers of water at different temperatures are brought together. You will monitor how temperature differences result in the movement of water using a mobile phone equipped with a sensor app and simulate how a decrease in temperature variances could affect ocean currents.
Additional Background Links
- The Global Conveyor Belt, National Oceanic and Atmospheric Administration (NOAA), Ocean Service Education
- A Chilling Possibility, NASA, Science@NASA
- Shutdown of thermohaline circulation, Wikipedia
Prep Work (15 minutes)
- Make sure you are familiar with the sensor app you are using before you show it to your students. The best way to do this is to play with the app on your phone to get comfortable enough using it to explain it to your students. Ideally, you want to test the experiment yourself with the app before class to make sure it works as intended.
- For the teacher demonstration, prepare one cup of water and set aside one vial of food coloring.
- For each student group, cut one long strip of the laminated paper or plastic sheet. It should be wide enough to cover the hole in the CD and longer than the CD's diameter.
Teacher Tool Box
Engage (15 minutes)
- Show your students a world map or a globe. Let them estimate what percent of the Earth's surface is covered with water. Then, tell them that about 70% of the Earth's surface is covered by water, which is mostly comprised of oceans. Start a discussion on the importance of the ocean.
 Do you think it is good or bad that so much of the surface of our planet is covered by oceans? Can you give some examples for why the ocean might be important to us? [You might need to prompt students with additional questions like, "What are things that we get from the ocean?" or, "What would happen to the world if there were no oceans?" etc.]
 There are many reasons why the ocean is important to us. Answers that the student might come up with might include but are not limited to:
- We get food from the ocean.
- A lot of our water comes from the ocean (water cycle).
- We can travel and transport goods on the ocean using ships.
- There are a lot of animals living in the ocean (biodiversity).
- The phytoplankton in the ocean produces lots of oxygen for us to breathe.
- The ocean absorbs carbon dioxide.
- We can vacation at beaches.
- The ocean regulates our temperature and climate.
Most likely, students will only mention a subset of these.
- Optionally, once you have collected all the answers, you can show your students the video "Healthy Oceans, Healthy Planet" to complete the list or review the importance of the ocean.
- After collecting reasons for why the ocean is important, tell your students that the ocean is Earth's life support system. Similar to a heart pumping blood in our body, the ocean transports life-sustaining heat, nutrients, and oxygen around the world and is in constant motion. Show an image of the global conveyor belt that displays how water circulates around the globe and that all the world's oceans are connected by a water circulation system. Explain that this circulation system is called the ocean conveyor belt.
Do you have an idea of why the ocean is in constant motion? What causes ocean currents?Most likely students will say that the water moves because of wind or tides.
- Explain to your class that it is correct that wind and tides cause water movement, but these phenomena only apply to the surface water of the ocean. Deep ocean water is not affected by wind. Deep ocean waters are set in motion by different forces. Show this video to your students and afterwards start a short class discussion by asking following questions:
Create AssignmentEmbed Link
 Google Classroom
 Microsoft Teams
 Canvas
 Schoology
 OtherWhat did the video say about the global conveyor belt? What role does temperature play in the ocean circulation system?The global conveyor belt transports oxygen to the deep ocean. The global conveyor belt takes warm surface water and takes it to the poles. There, it is cooled, the water gets denser, and sinks to the bottom of the ocean, distributing oxygen into that region. The sinking of cold water creates a current that "sucks in" warm water from the equator to replace the sinking water, setting the whole global conveyor belt in motion. The main driver of the ocean conveyor belt is the unequal heating of the ocean water by the sun (more at the equator, less at the poles) and the difference of water densities created by different water temperatures.The video ends by claiming that we would trigger a mass extinction event if, due to climate change, we alter the ocean temperatures in a way that eliminates temperature differences in the ocean. Do you think this is true? What do you think would happen if the temperature difference between the poles and the equator became less and less over time due to climate change? Do you think this could stop the ocean currents?
 - Ask your students to each formulate a hypothesis on how they think temperature affects the movement of water and the ocean conveyor belt. Then, tell them that you will do some experiments to investigate how temperature differences affect water movement.
/-/https/www.sciencebuddies.org/cdn/Files/14174/23/note-question-mark-30.png)
/-/https/www.sciencebuddies.org/cdn/Files/14175/24/conversation-bubbles-30.png)
/-/https/i.ytimg.com/vi/nAOSFAGOuS8/hqdefault.jpg)
/-/https/www.sciencebuddies.org/cdn/Files/20511/4/google-classroom.png)
/-/https/www.sciencebuddies.org/cdn/Files/20512/4/ms-teams.png)
/-/https/www.sciencebuddies.org/cdn/Files/20469/4/Canvas_Bug_Color_RGB.png)
/-/https/www.sciencebuddies.org/cdn/Files/20470/5/Schoology-Logo.png)
/-/https/www.sciencebuddies.org/cdn/Files/20471/4/lms.png)
/-/https/www.sciencebuddies.org/cdn/Files/20469/4/Canvas_Bug_Color_RGB.png)
/-/https/www.sciencebuddies.org/cdn/Files/20470/5/Schoology-Logo.png)
/-/https/www.sciencebuddies.org/cdn/Files/20471/4/lms.png)
Explore (45 minutes)
- Tell the students that you will
create a small-scale model of water movements
to find out if and how temperature differences drive water movement. Together, think about how the model could look:
Can you think of a way to make the movement of water visible? What could we put in the water to make it more visible?You could use a tracer such as food coloring to visualize the water flow.How could we prove that different water temperatures result in different water densities which ultimately drives the ocean currents?You could show the layering of water and test if water movement (mixing) only happens in one direction (with warm water on top of cold water and vice versa).How could you test if a decrease in temperature differences has an effect on water movement?You could bring together hot and cold water to see what happens. Then you could test various temperature differences and measure/compare how fast the water moves (mixes).
- Explain the model and the experimental setup: In the experiment, you will use one cup of hot and one cup of cold water, stack them on top of each other (with one cup turned upside-down) and separate both layers with a divider. You will add food coloring to one water layer, remove the divider, and then monitor if and how fast the water is moving from one layer to the other. When both layers mix, the dye will move from one layer to the other, which will lead to a color change in the undyed water layer. This setup allows you to:
- Monitor if and in what direction water moves depending on temperature and density.
- Record how fast the water moves or mixes depending on the temperature differences of both water layers.
- Find out under what conditions water movement stops.
- Explain that during their experiment, they will monitor the color change of the water using the light sensors of their cell phones. With a specific sensor app that can access data from the phone's light sensor, they will be able to measure how fast both water layers mix.
- Introduce the sensor app to your students, specifically the light sensor.
- Let the students locate the light sensor on the phone they will be using for their experiments. Tell them that they should change the sleep setting to 10 minutes or more on their phone, so the screen does not turn off during their experiment.
- Demonstrate how the light sensor readings are affected by different colors of the water. Place your cup with water on top of the light sensor in a well-lit area. Communicate the initial light intensity reading to your students. Then start recording with the light sensor of the app and add 4 drops of food coloring while mixing with a spoon (make sure to not block the light sensor with the spoon while mixing). When you are done recording, show your students how the light intensity readings decrease as the water color gets darker and communicate the final light intensity reading to your students again. The value should be higher for the clear water in the beginning compared to the colored water at the end. Your graph should look similar to Figure 4. Note though, that on some devices the light sensor is only updated when there is a coarse change of illuminance.
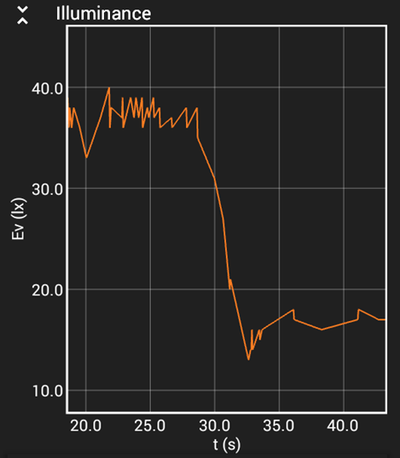
Figure 4. Sample graph for light intensity measurements while mixing food coloring into water. The x-axis is time seconds [s] and the y-axis shows light intensity in lux.Can someone explain why we can use the light sensor to monitor the color change of the water?When light passes through the cup with water, some portion of the light will be absorbed by the solution itself. That means the light sensor can only measure the amount of light that gets through the solution to the sensor. If the color of the solution gets darker, for example, because food coloring is mixed into the water, more light will be absorbed by the solution and the readings of the light sensor will decrease. This way, the light the sensor will tell us if and how fast the color of the solution changed due to the water mixing. - Divide the class into groups of 3–4 students. Within an experiment, students should divide tasks. For example, two students could prepare the solutions, one could take the temperature measurements, and one could operate the phone.
- Walk the students through the experimental procedure described below. A slideshow is available that you can use to guide your students through the experiments. To familiarize students with the experimental procedure, first let them practice setting up the experiment and flipping the cups with room temperature and no dye water to stack them on top of each other (following step f.). This will prevent major water spills and makes the experiment go much more smoothly.
Experiment 1: High temperature difference (30–40°)
- Keep track of which cup has hot water and which one has cold water by labeling one cup "hot" and the other one "cold".
- Fill the cup you labeled "hot" with hot water. If you have hot tap water available, use water from the warmest setting. If not, use an electrical water heater to heat up some water. Make sure that the "hot" water is not so hot that it would scald!
- Fill the other cup with ice water. Then add 5 drops of food coloring to the cold water and mix the solution.
- Remove any remaining ice cubes from the cup with ice water and then top up both cups with either hot or cold water if they are not completely full yet.
- Measure the temperature of each solution by immersing the thermometer in each cup and record it on your student worksheet. Aim to have a temperature difference of about 30-40 C between the hot and cold water. Adjust temperatures with hot or cold water or ice if needed.
- Now the tricky part starts. You are going to invert one cup (turn it upside down) and put it on top of the other without spilling. Do this step inside the aluminum tray to capture any spills. A demonstration of the individual steps is shown in this video:
- Use the CD to cover the top of the cup that you are going to invert (the cup with cold water). Then place the plastic or laminated paper strip on the CD so that it covers the hole and sticks out of the CD a little.
- Hold the cup near the base with one hand while holding the CD with the laminated paper or plastic strip against the opening with the other hand.
- Slowly and carefully flip the cup over, keeping the CD pressed tightly against the opening. Try not to squeeze the cup as you do this, since squeezing will push water out of the cup. Holding near the bottom of the cup where it is stiffer will help.
- Place the inverted cup on the top of the other cup (with hot water). The plastic strip should remain in place between the openings of both cups. See Figure 5.
- Open sensor app on your phone. Then, select the light sensor to record your data.
- Once both cups are stacked on top of each other, lean your phone against a box or books with the light sensor facing sideways towards the bottom cup (with hot water). Put the flashlight in front of the bottom cup so it shines through the solution directly into the light sensor as shown in Figure 5.
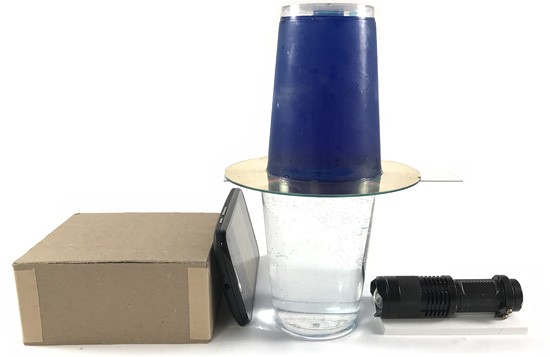
Figure 5. Experimental setup for data collection.Note that the light sensor reading will be dependent on the position of the flashlight with respect to the phone. You might want to try different positions to get the highest readings. However, you should not move the flashlight or the phone significantly while recording data. Try to reproduce your setup, i.e., the exact location of your phone and flashlight, for each experiment.
- Confirm that the sensor readings are stable. Note that on some devices the light sensor is only updated when there is a coarse change of illuminance. This means if the light intensity does not change or changes only slightly the sensor does not appear to collect any data. Then press the play button in the app to collect your data and slowly and carefully pull out the laminated paper or plastic strip that covers the hole of the CD while holding the upper cup in place (one student could hold the upper cup, while another student carefully pulls the plastic strip out).
- Observe what happens to the two solutions. Write your observations in your student worksheet.
- You will observe the food color mix into the bottom cup while the app will record the color change over time with the light sensor. An example graph is shown in Figure 6. Stop recording after five minutes and save your data. You will analyze your data once you have completed all your experiments.
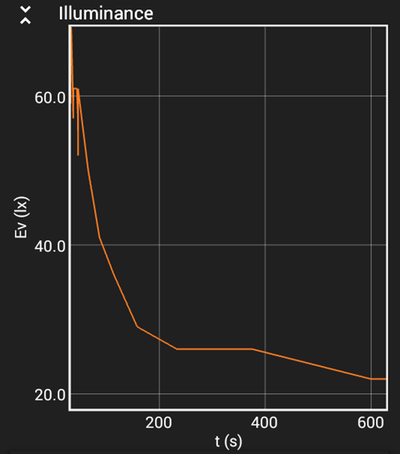
Figure 6. Example graph for light intensity measurements during the water mixing experiment. The x-axis is time in seconds [s] and the y-axis shows light intensity in lux.
- Then separate both cups again by first carefully sliding the laminated paper or plastic strip back in between both cups so it covers the hole of the CD. Then hold the upper cup near the base with one hand while holding the CD with the laminated paper or plastic strip against the opening with the other hand.
- Slowly and carefully flip the cup over, keeping the CD pressed tightly against the opening and set it down next to the other cup into the aluminum tray. You can see a demonstration of this step in the video above.
- Measure the temperature of both cups again and record the readings on your student worksheet.
- Dispose of your water in the sink and rinse out both cups. Then continue with the next experiment.
Experiment 2: Low temperature difference (10–20°)
- Once you have completed your first experiment, repeat steps 8.a–o using hot water and room temperature water instead of ice water. For this experiment, aim to have a temperature difference of about 10-20°C between the hot and cold water. Adjust temperatures with hot or cold water or ice if needed.
Experiment 3: No temperature difference (0°)
- Once you have completed the second experiment, repeat steps 8.a–o using room temperature water in both cups. For this experiment, aim to have no temperature difference between both cups.
Experiment 4: Reverse layering
- Once you have completed the third experiment, repeat steps a–o, but this time, reverse the water layers by stacking the hot water on top of the cold water.
- Once all the students are done with their experiments, let them clean up their supplies. All the solutions can be disposed of in the sink.

If time is short, break here and have students analyze their data in the next class.
/-/https/www.sciencebuddies.org/cdn/Files/11955/10/ocean-circulation-light-graph1-ph.png)
/-/https/i.ytimg.com/vi/E6Kw1YL03zk/maxresdefault.jpg)
/-/https/www.sciencebuddies.org/cdn/Files/11954/11/ocean-circulation-light-graph2.png)
/-/https/www.sciencebuddies.org/cdn/Files/8346/30/clock-purple-32.png)
Reflect (40 minutes)
Data Analysis and Reflect
- Throughout the data analysis process, encourage students to question their data. Possible prompts for students include questions such as:
Did all groups observe the same trend in their results?The trend should be the same for all groups, but the absolute measurements can vary between groups due to different flashlight and phone positioning etc. It might be important to mention that for this activity students should not compare absolute values, i.e., the actual sensor readings between groups and experiments, but the relative values, meaning, how fast did the values change over time?What are possible sources of error in your data? For example, did you see a difference depending on which student conducted the experiment? Were your flashlight and phone always positioned the same way throughout the experiment? Did you notice any light interference from the surroundings that could have influenced the data?
- Let each group review their recorded data in the sensor app. They should enter their results in the data tables provided in the student worksheet.
Did you see water movement in all your experiments?No—the water mixed (the cold water with the dye sank to the bottom to mix with the warm water on top) only in experiments 1 and 2.Under what conditions did you see water movement?The water mixed only when the top water was colder than the bottom water.Under what conditions did you see no water movement?When the top water was warmer than the bottom water or there was no temperature difference between both cups, there should have been no significant water movement between the two water layers.Given that you saw water movement in some experiments and not in others, can you explain which factors drove the water movement in your experiments?The water movement/mixing only happened when the top water was colder than the bottom water. Experiment 3 (no temperature difference) indicates that you need a temperature difference between both water layers to get them to mix. Experiment 4 (hot water on top) indicates that the cold water has to be at the top for water mixing to happen. This occurs because cold water is denser than hot water, so when it is initially on top, it sinks and the hot water rises.What was the temperature before and after the experiment in each cup?In experiments 1 and 2, the temperature difference before the experiment was higher than after the experiment. The temperature should have been similar in both cups at the end of the experiment. This is also the reason why the water mixes quickly in the beginning and then slows down: the differences in temperature and density that drive movement diminish over time. In experiment 3, the temperatures should have been the same before and after the experiment. In experiment 4, as there was no significant mixing, the temperatures also should not have changed much.
- Let each group review their recorded data in the sensor app.
When you look at your graphs for each experiment, do you see any differences between your experiments? Can you tell in which experiment the mixing happened the fastest or the slowest?The mixing does not happen at the same rate. It was faster when the temperature difference between the cups was higher.How can we compare how fast the mixing happened in each experiment by looking at the collected data?You can calculate how fast your sensor readings changed over time for your graph, which reflects the mixing rate for each experimental condition.
- Introduce the concept of rate and what the mixing rate means in this experiment. Rate is how fast a variable changes over time during an experiment. In this experiment, the variable is the light intensity (lux or EV) and we want to see how fast it changed over time.
Tell your students that they will see in their graphs that the rate of mixing is the highest at the very beginning—the values drop very quickly—whereas later, there is not much change. This is due to the fact the temperature difference between both water layers lessens during the mixing.
- Explain to your class that you are most interested in the initial rate, which is when the change is happening the fastest. This is why they should calculate the rate of mixing in the first minute. To do that, they need to measure the light intensity at the beginning of the mixing reaction and after one minute of mixing (or the next closest possible data point). Students can pick individual data points on their graph within the app to view their values. Make sure students account for the delay between pressing the record button and starting the mixing reaction by picking the first time point when the mixing reaction actually started. For example, the measured values in Figure 7 (which was cropped so the data starts at the beginning of the mixing reaction) are 61 lux at the beginning of the mixing reaction and 36 lux 68 seconds later.
/-/https/www.sciencebuddies.org/cdn/Files/11956/10/ocean-circulation-data-analysis.png)
Figure 7. Example graph showing how students can determine the initial rate of color change (mixing rate) for each experiment from their recorded data. X-axis shows time in seconds [s] and the y-axis shows light intensity in lux.
- Ask them to enter their results in the data tables provided in the student worksheet.
- Calculate the difference between these two points. In Figure 7 this would be 61 - 36 lux, which is 25 lux. The result tells you the initial rate of color change (mixing rate), which would be 25 lux per 68 seconds in this case.
- Repeat this calculation for each of the experiments and calculate the temperature difference between the top and bottom water layer for each experiment. Record all results in the data table in the student worksheet.
- Finally, ask your students to create a bar graph to visualize their results that shows the initial temperature difference between the two water layers on the x-axis and the calculated corresponding mixing rate (light intensity change per minute) on the y-axis.
Looking at your bar graph, do you see any trend or pattern in your data?The higher the initial temperature difference between the top and bottom water layer is, the faster the color change (mixing) happens.What does your data tell you about how temperature differences affect water movement?Water only moves and mixes when there are temperature gradients present.Now that we have seen that water density differences due to temperature are a big driving force for water movement and mixing, let us come back to our original question. How do your results of the small-scale model translate to the ocean currents and how water moves in the global conveyor belt?The ocean currents are driven by density differences caused by temperature differences between warm and cold water in the ocean.Can you tell from your data what would happen to the ocean conveyor belt if the water temperature at the poles get hotter due to climate change? Was your hypothesis (and the one in the video) correct?When the temperature difference gets lower, the ocean conveyor belt and ocean currents will slow down, and in the worst-case scenario, could possibly stop.Why do we want to prevent this from happening?As mentioned earlier, the ocean conveyor belt is the pump that transports heat, oxygen, and nutrients around the world. The heat transfer affects the regional climates and the oxygen and nutrient transport that sustains life in the ocean.
- Finally, mention that ocean scientists have started measuring deep ocean currents to monitor whether the global ocean conveyor belt is slowing due to climate change. This is an active field of research, also because ocean currents are very complex and are not only driven by temperature, but ocean salinity, which changes over time. Optionally, you can show the following video to close the lesson.
/-/https/i.ytimg.com/vi/02NRKzemXYE/sddefault.jpg)
Assess
You can use this quiz to assess student learning after the activity:
- Online quiz, assignable in any LMS
- Quiz (pdf) and answer key (PDF)
Make Career Connections
Discussing or reading about these careers can help students make important connections between the in-class lesson and STEM job opportunities in the real world.
/-/https/careerdiscovery.sciencebuddies.org/cdn/Files/1141/17/iStock-1170687091.jpg)

/-/https/careerdiscovery.sciencebuddies.org/cdn/Files/815/17/unsplash-5hZJVGPG6vo.jpg)
/-/https/careerdiscovery.sciencebuddies.org/cdn/Files/1288/18/Career-Map-Environmental-Scientist.jpg)
Lesson Plan Variations
- Instead of adding dye to the cold water on top to demonstrate that cold water is denser and therefore sinks to the bottom, add the food coloring to the cup with hot water at the bottom. You will see that the hot water will flow upwards into the upper cup as warm water is lighter than cold water and floats on top. In this setup, you can monitor the color change of the upper solution instead.
- The ocean conveyor belt is not only driven by temperature differences; salinity plays a major role, as it affects the density of ocean water. A higher salinity results in denser water, which is why it sinks to the bottom of the ocean similar to cold water. Try an extension of the temperature experiment and instead of investigating temperature differences, demonstrate how differences in water salinities drive water movement. What would happen if, due to the melting of the polar ice masses, the oceanic water salinity in this area significantly decreased?
- Increase the complexity of the experiments and combine the salinity and the temperature effects. Let your students investigate different combinations of temperature and salinity differences to demonstrate how they are connected.
- Demonstrate ocean circulation in a different setup that does not allow the measurement of water flow or mixing, but shows how the water starts to circulate due to temperature differences. You can find instructions for how to do this in Science Buddies' project Ocean Currents: Modeling the 'Global Conveyor Belt' in Your Kitchen. Instead of oil and spices, you can also use water and food coloring.
/-/https/img.youtube.com/vi/subFttvmGng/0.jpg)
/-/https/img.youtube.com/vi/qfara8ci2oE/0.jpg)
/-/https/img.youtube.com/vi/0_GOnBtmv70/0.jpg)
