Summary
/-/https/i.ytimg.com/vi/c4Iu_-jqegw/maxresdefault.jpg)
If you want a Project Idea with full instructions, please pick one without an asterisk (*) at the end of the title.
Abstract
Rocket design and operation is a fascinating field and analyzing the flight path provides insight into the rocket's performance. In this project, you will take measurements of the flight path to evaluate how a change in the rocket design or launch procedure impacts the rocket's performance.
Initially, while the bottle rocket expels water (or the rocket expels exhaust), the rocket gets a boost. This push is referred to as thrust and projects the rocket forward. Earth's gravity pulls the rocket down, and air resistance or drag works against the movement of the rocket. The typical path of a bottle rocket consists of an initial boost after which the rocket coasts to its highest point (the apogee). It ends with a steady descent. As you change the rocket or the launch procedure, think about which forces that act on the rocket (thrust, gravity, and drag) change, and how these changes will influence the path the rocket takes.
Some items you can consider changing are:
- Adding fins or a nose cone, or changing the shape of the rocket in other ways.
- Adding a payload (cargo) to the rocket.
- Pumping air to a higher or lower pressure in the bottle before launch.
- Adding less or more water to the bottle before takeoff.
- Adding a parachute to the rocket.
Electronic sensors, like an accelerometer (which measures acceleration) or an altimeter (which measures the rocket's altitude by measuring barometric pressure) provide measurements about the flight path. Some sensors may continuously log data throughout the entire flight, producing detailed information of how altitude, speed, and acceleration change over time. Other sensors record certain values that characterize a flight. Below are a few parameters that might be provided by a sensor, and what they mean.
- Apogee: Highest point reached during a rocket flight.
- Acceleration: How fast the rocket gains or loses speed. It is often expressed in m/s² or in multiples of g, where g is the gravitational acceleration near Earth (about 9.8 m/s²). An acceleration of 1 g at launch means the rocket will go from rest to a speed of 9.8 m/s in 1 second.
- Peak boost acceleration: The highest acceleration measured during the initial boost period.
- Average boost acceleration: The average acceleration over the initial boost period.
- Burn time: Time window starting at takeoff during which your rocket experiences a positive acceleration. The maximum speed is reached when burn time ends.
- Maximum velocity: The highest speed reached, expressed in m/s or mph (miles per hour).
- Total flight duration: Time window between takeoff and landing.
/-/https/www.sciencebuddies.org/cdn/Files/15822/6/rocket-path-over-time.png)
If you start the time period at 0, the rocket will climb rapidly during the boost, or the period where the rocket accelerates. The rocket rises steadily as it coasts to the apogee and has a steady decline as it descends to height 0. The period between reaching the apogee and the touchdown is called the recovery period.
Figure 1. A typical height versus time diagram of a rocket launch
The AltimeterTwo from Jolly Logic is an example of a sensor that records a list of rocket path parameters. It provides easy access to a few essential parameters that describe a rocket's performance. Choose one or a few of these parameters to analyze.
/-/https/www.sciencebuddies.org/cdn/Files/15661/15/jolly-logic-altimeter-two-black.jpg)
Figure 2. The Jolly Logic Altimeter Two. Photo courtesy of Jolly Logic. This altimeter is about 4.9 cm by 1.8 cm by 1.45 cm and has a mass of 9.9 g.
If your meter provides graphs of altitude vs. time as shown in Figure 3, do some research about how these display the maximum altitude, the boost period, the maximum acceleration, etc. Then, choose one or a few of these parameters to analyze.
/-/https/www.sciencebuddies.org/cdn/Files/15658/17/jolly-logic-altimeter-three-screenshot.png)
Figure 3. A display of recorded flight data from the Jolly Logic Altimeter Three software. Photo courtesy of Jolly Logic.
To understand the measured acceleration, it is good to know Newton's second law of motion, which states that if the same force is applied to a heavier rocket, the rocket will accelerate less. Or, keeping the mass of the rocket (and thus also the water level in the bottle rocket at launch) unchanged, one can use the average acceleration during boost as a measure of the force created by the thrust, gravity, and drag combined during boost.
When using an electronic sensor on a rocket, remember to attach it well. These sensors are small and hard to find when they detach during flight. Most of these sensors are not water-resistant. Be sure to pack it in plastic wrap to protect it from moisture or water spills. Because an altimeter measures air pressure to determine elevation changes, it will not give accurate readings if you pack it in an airtight container or bag.
Note that bottle rockets can be used to test parachutes, but because they do not use an ejection system to release the parachute, the ejection time or altitude at ejection (two parameters that might be provided by a sensor) will not be correct. However, you can study how the duration of the descent, or average speed of the descent changes when using a parachute.
To eliminate the influence that weather conditions can have on your results, try to record data under similar weather conditions. You can also choose to study the influence that weather conditions have on rocket performance.
Remember, you can either use the scientific method—changing one variable at a time and studying its influence on the flight path—or the engineering design method, where you aim to design a rocket that fulfills preset criteria.
/-/https/www.sciencebuddies.org/cdn/Files/15821/9/bottle-rocket-launched-example.jpg)
Bibliography
- Science Buddies Staff. Bottle Rocket Blast Off! Science Buddies. Retrieved September 9, 2020.
- Science Buddies Staff. Rocket Science: How High Can You Send a Payload? Science Buddies. Retrieved September 9, 2020.
- Science Buddies Staff. Solid Motor Rocket Propulsion. Science Buddies. Retrieved September 9, 2020.
Ask an Expert
Global Goals
The United Nations Sustainable Development Goals (UNSDGs) are a blueprint to achieve a better and more sustainable future for all.
/-/https/www.sciencebuddies.org/cdn/Files/19752/5/E-WEB-Goal-09.png)
Frequently Asked Questions (FAQ)
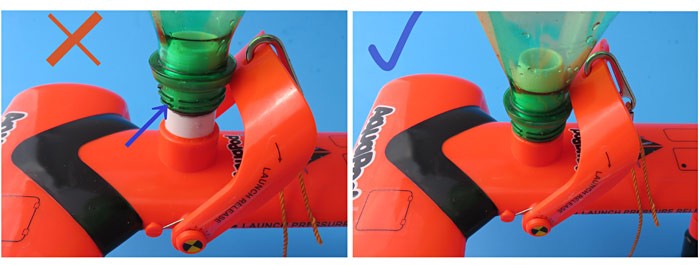
- Check if you placed your bottle rocket properly on the launcher. For example, if you are using the AquaPod bottle rocket launcher, make sure to push the bottle down so it goes over the thin black ring, then pull the bottle back up as far as you can. The launch release latch should hold it in place. The pictures can help you identify if the bottle is pushed down far enough and ensure the release latch is holding the bottle securely in place.

- Check to make sure your bottle fits snugly on your launch tube. When your rocket is loaded with some water and placed on the launch tube, some water might trickle out. If water continues to stream out, see if rubbing some petroleum jelly on the launch tube or just inside the bottle mouth solves the issue. If the mouth of your bottle is too wide, you might have to buy a new bottle.
/-/https/www.sciencebuddies.org/cdn/Files/6715/10/rocket-mounting-under-ring.jpg)
/-/https/www.sciencebuddies.org/cdn/Files/6716/10/rocket-mounting-latch.jpg)
- Ask an adult to remove the bottle from the launcher, as it can be very dangerous since the bottle is under a lot of pressure. Follow the instructions from the bottle rocket launcher manual, or if you have made your own, look up how to safely remove the bottle.
- Rub some petroleum jelly in the bottle mouth or on your launch tube.
- Check if your bottle rocket fits on the launcher. The answer to the question "If your rocket launches prematurely" can help you identify problems.
- Ensure your bottle fits snugly, but not extremely tightly, around the launch tube. If the mouth of your bottle is too tight, you might have to buy a new bottle.
- The launch latch or launch release system should be able to grab the bottle as soon as some pressure is added to the bottle rocket. You can test this by putting an empty bottle rocket on the launch tube, pushing it completely down, and then pulling it back up. The bottle should come up a tiny bit, until the release system stops it.
Careers
If you like this project, you might enjoy exploring these related careers:
/-/https/careerdiscovery.sciencebuddies.org/cdn/Files/835/18/msfc-202000343.jpg)
/-/https/careerdiscovery.sciencebuddies.org/cdn/Files/1450/21/iStock-1227179796.jpg)
/-/https/careerdiscovery.sciencebuddies.org/cdn/Files/842/17/unsplash-Bt9HIKC0Nus.jpg)
/-/https/careerdiscovery.sciencebuddies.org/cdn/Files/1640/26/Fyysikot_tyossaan.jpg)

/-/https/img.youtube.com/vi/OfG4Ex83BiM/0.jpg)
/-/https/img.youtube.com/vi/6Xvqd8hRC6U/0.jpg)
/-/https/img.youtube.com/vi/tv6LvMgVDcQ/0.jpg)