Abstract
How does weight affect a drone's speed? Is there a limit to how much weight a drone can lift? Find out with your own mini popsicle stick drone in this fun science project!Summary
/-/https/i.ytimg.com/vi/Q-BluEJBHLw/maxresdefault.jpg)
Objective
Find out how added weight affects a drone's speed.
Introduction
Unmanned aerial vehicles (UAVs), commonly called drones, are aircraft that fly without a human pilot on board. Some drones are very large—as big as a small airplane. Other drones are much smaller, and are popular as toys, for recreational use, and for aerial photography.
Quadcopters are a popular type of drone with four propellers (Figure 1). Each propeller is driven by a spinning motor. The motors are connected to an on-board battery by an electrical circuit. When the propellers spin, they generate lift, the force that pushes the drone up. In order for the drone to remain in the air or fly upward, the lift must be greater than or equal to the drone's weight, the force that pulls it down toward the Earth. Drones can also steer by making the propellers spin at different speeds.
/-/https/www.sciencebuddies.org/cdn/Files/17035/14/quadcopter.jpg)
Figure 1. A DJI Phantom, a popular type of consumer drone.
In addition to the motors, propellers, and battery, drones may carry other objects, called the payload. For example, many drones have cameras or other electronic sensors that help them avoid crashing. However, adding more payload to a drone also adds weight.
What do you think will happen when you add more weight to a drone? Will it affect how fast the drone can fly? You will find out in this science project as you build your own mini popsicle stick drone and measure how fast it can fly as you add weight.
Terms and Concepts
- Unmanned aerial vehicle (UAV)
- Drone
- Quadcopter
- Propeller
- Motor
- Battery
- Circuit
- Lift
- Force
- Weight
- Payload
Questions
- What is a drone?
- What are drones used for?
- What are the main parts of a drone?
- What do you think will happen when you add more weight to a drone?
Bibliography
- Chandler, N. (n.d.). How Drones Work. HowStuffWorks. Retrieved March 2, 2021.
- Rader, A. (n.d.). Forces. Physics4Kidsphysics4. Retrieved March 2, 2021.
- "Circuits." (n.d.). DKfindout! Circuits. Retrieved March 2, 2021.
For help creating graphs, try this website:
- National Center for Education Statistics, (n.d.). Create a Graph. Retrieved June 25, 2020.
Materials and Equipment 
Recommended Project Supplies
/-/https/www.sciencebuddies.org/cdn/Files/18890/21/SB-MNIDRON_1000x1000.jpg)
- DIY Mini Drone Kit, available from our partner Home Science Tools®.
- You will also need to gather these items, not included in the kit:
- Ruler
- Hot glue gun
- Scissors
- Stopwatch
- Helper to use the stopwatch
- Metric tape measure or meterstick
- Kitchen or jewelry scale with 0.1 g resolution
- Lab notebook
Disclaimer: Science Buddies participates in affiliate programs with Home Science Tools®, Amazon.com, Carolina Biological, and Jameco Electronics. Proceeds from the affiliate programs help support Science Buddies, a 501(c)(3) public charity, and keep our resources free for everyone. Our top priority is student learning. If you have any comments (positive or negative) related to purchases you've made for science projects from recommendations on our site, please let us know. Write to us at [email protected].
Experimental Procedure
Build Your Drone
- If you do not know how to use wire strippers, watch this Wire Stripping tutorial video before you begin.
- Watch the following video for instructions on how to build your drone. You will follow the same procedure, with two exceptions.
- You will use two wooden dowels as guide poles instead of one. This will prevent the drone from spinning and getting its wires twisted around the dowel.
- You will use a 4xAA battery pack instead of a 3xAA battery pack. This gives the drone a little extra power and helps prevent it from getting stuck if the dowels are not perfectly parallel to each other.
- Mark the center of two popsicle sticks. Glue them together with hot glue to form a "+" shaped frame (Figure 2).
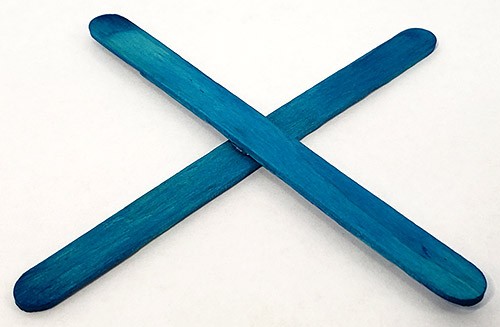
Figure 2. Popsicle stick drone frame.
- Cut four pieces of straw, 2–3 cm long. Glue the pieces to the ends of each popsicle stick to make legs. The straws are clear, so they are hard to see in this photo (Figure 3).
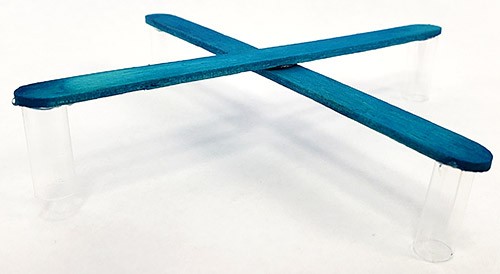
Figure 3. Straw legs.
- Cut the connectors off the motor wires. Strip about 1 cm of insulation off of each wire (Figure 4).
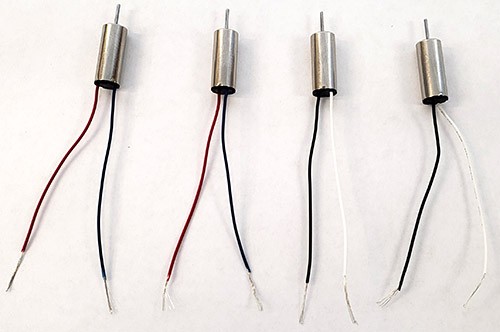
Figure 4. Motors with stripped wires.
- Glue the motors to the tips of the popsicle sticks, with the wires hanging down by the straws. The motors with red and blue wires should go opposite from each other, and the motors with black and white wires should go opposite from each other (Figure 5).
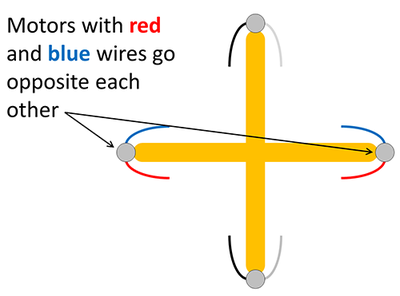
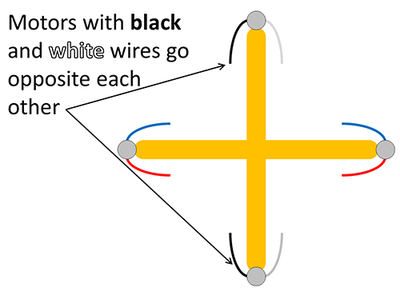
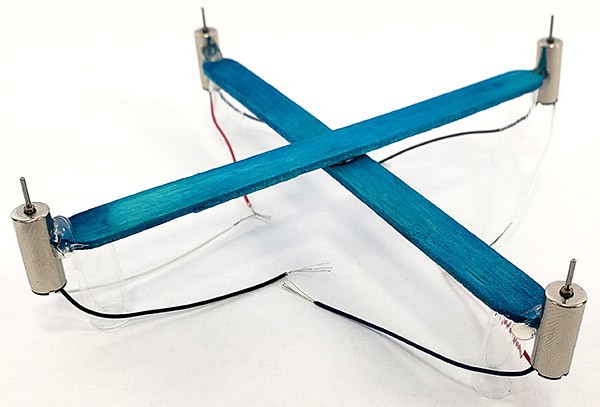
Figure 5. Motors glued to frame.
- Cut two pieces of 30 AWG stranded wire, each about 1 m long. Strip about 1 cm of insulation off the ends.
- Connect all of the red and white motor wires to one of your long pieces of wire. This will be the positive connection to the battery pack. Do this by twisting the ends of the five wires together, and covering the connections with electrical tape. You may need to use additional shorter pieces of wire to make all the connections if the motor wires are not long enough. In this picture, the red and white motor wires are all connected to the long yellow wire (Figure 6).
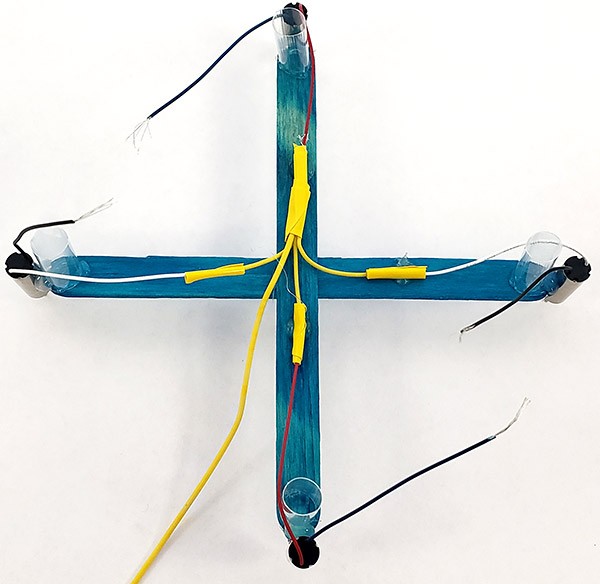
Figure 6. Positive motor wires connected to long wire.
- Use the same process to connect all of the blue and black motor wires to your other long piece of wire. This will be the negative connection to the battery pack. In this photo, the black and blue motor wires are all connected to the long blue wire (Figure 7).
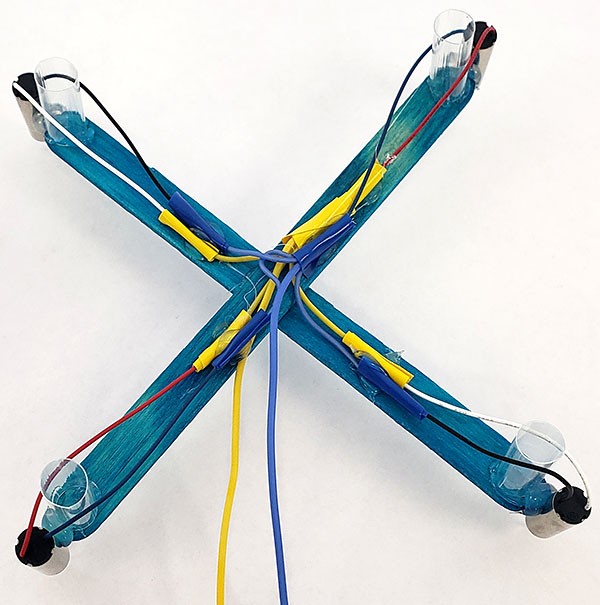
Figure 7. Negative motor wires connected to long wire.
- Glue the wires to the bottom of the frame. This will prevent them from getting caught in the propellers (Figure 8).

Figure 8. Wires glued to bottom of frame.
- Press the propellers onto the motor shafts. There are two types of propellers, with their blades tilted in opposite directions: clockwise (CW) and counterclockwise (CCW). (Figure 9)


Figure 9. Propellers on motor shafts.
- Glue two pieces of straw (roughly 3 cm long) vertically to the sides of the middle of the frame, opposite each other (Figure 10).

Figure 10. Guide straws glued to middle of frame.
- Connect the drone's positive wire (the one connected to the red/white motor wires) to the battery pack's red wire. Connect the drone's negative wire (the one connected to the blue/black motor wires) to the battery pack's black wire. Cover the connections with electrical tape (Figure 11).
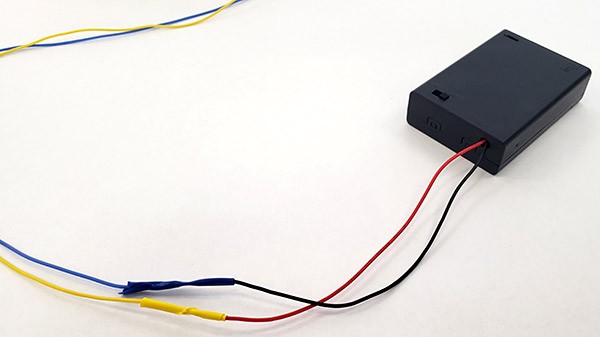
Figure 11. Drone wires connected to battery pack wires.
- Make sure the battery pack is off, and insert the batteries.
- Build a support for your drone with two dowels spaced apart so they fit through both straws. It is important to make sure the dowels are parallel or your drone will get stuck. Make sure the drone slides smoothly up and down the dowels. Place a piece of foam at the base of the dowels. This will provide some padding when your drone falls (Figure 12).

Figure 12. Block of wood with two holes drilled in it to support the wooden dowels and a piece of foam to provide padding for the drone's landing.
- After sliding your drone onto the dowels, press a polystyrene ball or cork onto the top of at least one of the dowels, then securely tape it in place. This will prevent your drone from flying off the top of the dowels (Figure 13).
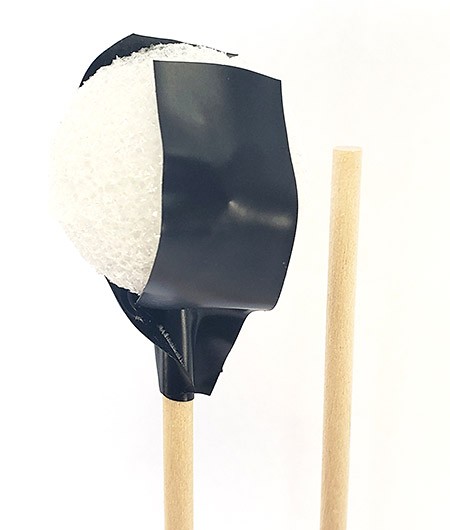
Figure 13. Polystyrene ball taped to the top of a wooden dowel.
/-/https/i.ytimg.com/vi/Q-BluEJBHLw/maxresdefault.jpg)
/-/https/www.sciencebuddies.org/cdn/Files/16849/5/popsicle-stick-frame.jpg)
/-/https/www.sciencebuddies.org/cdn/Files/16850/5/frame-straws.jpg)
/-/https/www.sciencebuddies.org/cdn/Files/16851/5/motor-wires.jpg)
/-/https/www.sciencebuddies.org/cdn/Files/16852/5/red-and-blue-wires.png)
/-/https/www.sciencebuddies.org/cdn/Files/16853/5/black-and-white-wires.png)
/-/https/www.sciencebuddies.org/cdn/Files/16854/5/frame-motors.jpg)
/-/https/www.sciencebuddies.org/cdn/Files/16855/5/motor-wire-connections-1.jpg)
/-/https/www.sciencebuddies.org/cdn/Files/16856/5/motor-wire-connections-2.jpg)
/-/https/www.sciencebuddies.org/cdn/Files/16857/6/wire-glue-frame.jpg)
/-/https/www.sciencebuddies.org/cdn/Files/16858/5/drone-propellers.jpg)
/-/https/www.sciencebuddies.org/cdn/Files/16859/5/drone-propellers-cw-ccw.png)
/-/https/www.sciencebuddies.org/cdn/Files/17039/5/drone-two-straws.jpg)
/-/https/www.sciencebuddies.org/cdn/Files/16861/5/drone-battery-pack.jpg)
/-/https/www.sciencebuddies.org/cdn/Files/17040/6/drone-two-dowel-supports.jpg)
/-/https/www.sciencebuddies.org/cdn/Files/17055/6/dowel-ball-tape.jpg)
Test Your Drone
- Test your drone by turning the battery pack on. It should fly up to the top of the dowels. Turn the battery pack off to let the drone fall back to the bottom.
- If your drone does not fly at all, or does not fly all the way to the top, follow these troubleshooting steps:
- If one or more propellers do not spin at all, double-check your wiring for loose connections.
- If the propellers spin but the drone does not fly up, make sure they are spinning in the correct direction. Hold your hand above the drone. If you feel air blowing up, then the propellers are spinning the wrong way. You can reverse the connection to the battery pack's wires, or swap the CW and CCW propellers between the motors. Make sure air is blowing down.
- If the drone flies up part of the way and gets stuck:
- Make sure the wires are loose and are not snagged on anything.
- Make sure the wooden dowels are as parallel as possible.
Do Your Experiment
- Cut a popsicle stick into four pieces that are roughly the same size (Figure 14).
- Do not worry if they are not exactly the same size. You will weigh them later.
- If it is too difficult to cut all the way through the popsicle stick, score it with the scissors first, then bend it to break it.
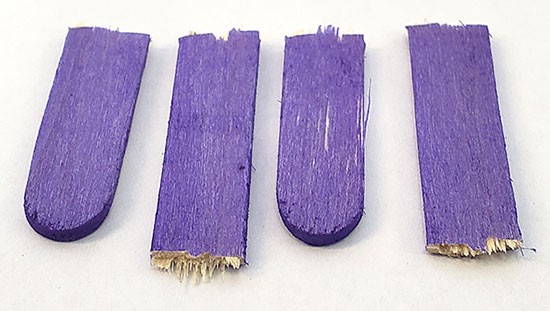
Figure 14. Four popsicle stick pieces.
- Prepare data tables like Table 1 and Table 2 in your lab notebook. You could also combine them into one big table.
/-/https/www.sciencebuddies.org/cdn/Files/17056/7/popsicle-stick-cut.jpg)
| Time to Reach the Top (sec) | |||||||
|---|---|---|---|---|---|---|---|
| # of Popsicle Stick Pieces | Drone Weight (g) | Trial 1 | Trial 2 | Trial 3 | Trial 4 | Trial 5 | Average |
| 0 | |||||||
| 1 | |||||||
| 2 | |||||||
| 3 | |||||||
| 4 | |||||||
| Speed (cm/sec) | |||||||
|---|---|---|---|---|---|---|---|
| # of Popsicle Stick Pieces | Drone Weight (g) | Trial 1 | Trial 2 | Trial 3 | Trial 4 | Trial 5 | Average |
| 0 | |||||||
| 1 | |||||||
| 2 | |||||||
| 3 | |||||||
| 4 | |||||||
- While your drone is resting at the bottom of the guide poles, measure the distance from the top of the drone (from the top of one of the straws around a guide pole) to the bottom of the ball/cork you taped to the top of the guide pole (Figure 15). Record this distance in your lab notebook. You will need it later.
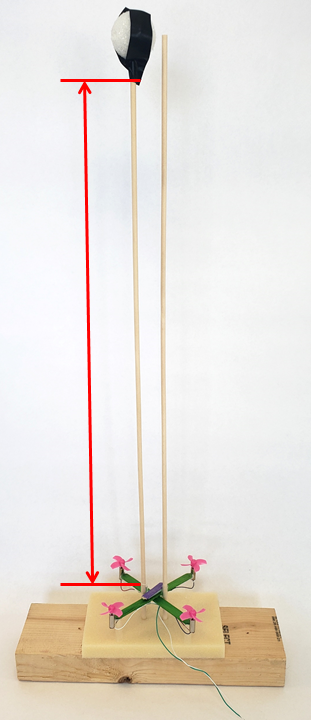
Figure 15. Arrow marking the vertical distance you should measure.
- Measure how long it takes the drone to fly from the bottom to the top of the guide poles. It is difficult to do this step by yourself. Have one person operate the drone and one person use the stopwatch.
- Get the stopwatch and battery pack ready.
- Agree on a countdown, such as "three, two, one, GO!"
- Count down and then turn on the battery pack and start the stopwatch at the same time.
- Stop the stopwatch and turn the battery pack off as soon as the drone hits the ball/cork at the top of the guide poles.
- Record this time in your data table under Trial 1 for the row with zero popsicle stick pieces.
- Tape one of the popsicle stick pieces to the middle of your drone (Figure 16).
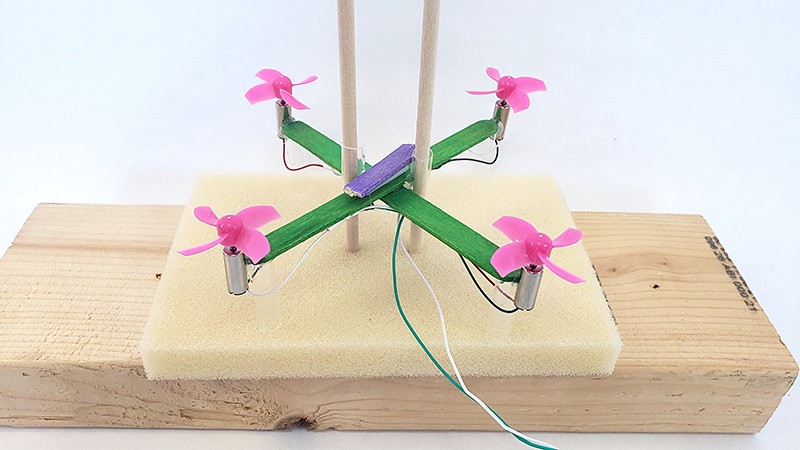
Figure 16. Drone with extra popsicle stick piece taped in the middle to add weight.
- Repeat step 4 and record the result under Trial 1 in the row for one popsicle stick piece.
- Add another popsicle stick piece at a right angle to the first one to help evenly distribute the weight (Figure 17).
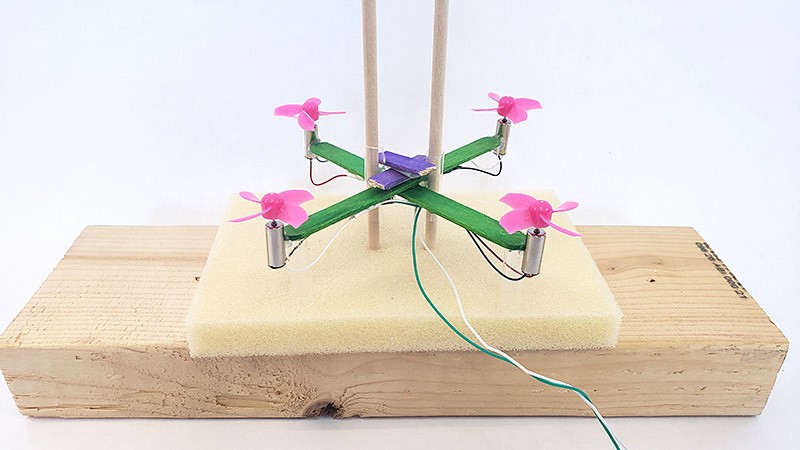
Figure 17. Drone with second popsicle stick added at a right angle to the first one.
- Repeat step 4 and record the result under Trial 1 in the row for two popsicle stick pieces.
- Repeat steps 7–8 for the third and fourth popsicle stick pieces, each time adding the next piece at a right angle to the previous piece.
- Remove all of the popsicle sticks, and repeat steps 4–9 four more times. Record your results in a column for a new trial each time.
- Note: You might be wondering "Why can't I just do all five trials for each amount of weight at once, then add another popsicle stick piece and do five more trials, etc? The answer is that the longer your drone flies, the more it drains the batteries, and the less lift the propellers will generate. So, if you waited until the very end of your experiment to do all the trials for the heaviest weight, the drained batteries could affect your results more. You avoid this problem if you only do one trial at a time for each weight.
- Place your drone, with all four popsicle stick pieces still attached, on your scale and let the wires dangle off the edge (the wires are very light and will not affect your measurement too much, as long as you do not move them around).
- Record the drone's weight in your data table in the row for four popsicle stick pieces. This way you also include the weight of the tape.
- One at a time, remove a popsicle stick piece and the piece of tape holding it in place. Record the new weight in the proper row of your data table.
/-/https/www.sciencebuddies.org/cdn/Files/17057/6/drone-distance.png)
/-/https/www.sciencebuddies.org/cdn/Files/17058/6/drone-added-weight.jpg)
/-/https/www.sciencebuddies.org/cdn/Files/17059/6/drone-added-weight-2.jpg)
Analyze Your Results
- For each amount of weight, calculate an average time. Since you did five trials, you find this by adding up the times for each trial, and dividing the sum by five. Enter the average times in your data table.
- For each trial, calculate the drone's speed. Speed is calculated by dividing the distance the drone traveled by the amount of time it took to travel that distance (Equation 1).
- In this case, the distance is the distance that you measured from the top of the drone to the bottom of the ball/cork. This distance is the same for every trial.
- The time is the time you measured and recorded in your data table.
- The units of speed depend on the units you used to measure distance and time. For example, if you measured distance in centimeters (cm) and time in seconds (sec), your units for speed will be centimeters per second (cm/sec).
Equation 1:
- Make a scatter plot with the time in seconds on the vertical (y) axis and the drone's total weight on the horizontal (x) axis.
- Make another scatter plot with the speed on the vertical (y) axis and the drone's total weight on the horizontal (y) axis.
- Do you see any trends or relationships between variables in your graphs? Are your results what you expected?
- When you are done with your experiment, have some fun with your drone! Can it carry any of your toys (Figure 18)?
/-/https/www.sciencebuddies.org/cdn/Files/17054/6/popsicle-stick-drone-lego.jpg)
Figure 18. Drone lifting a LEGO® mini figure.
Troubleshooting
For troubleshooting tips, please read our FAQ: Build a Simple Drone and Test How Much It Can Lift.
Ask an Expert
Global Goals
The United Nations Sustainable Development Goals (UNSDGs) are a blueprint to achieve a better and more sustainable future for all.
/-/https/www.sciencebuddies.org/cdn/Files/19752/5/E-WEB-Goal-09.png)
Variations
- Keep adding weight to your drone. Do you reach a point where it can no longer make it to the top of the guide poles, or no longer lift off at all? How much weight does it take?
- How does your drone's ability to lift weight change as the batteries drain? Keep doing more trials, and make a graph with time (or speed) on the vertical (y) axis and trial number on the horizontal (x) axis. Does the time increase (or speed decrease) as you do more trials?
- There are many other projects you can do with your popsicle stick drone, such as building a circuit that lets you control the motors' speed.
Frequently Asked Questions (FAQ)
- Make sure your batteries are firmly inserted into the battery pack and facing the proper direction.
- Make sure the battery pack is on.
- Double-check all of your twisted wire connections. Loose connections can prevent the motors from spinning.
- Make sure that you can easily slide the drone up and down the dowels by hand. If you let go of the drone after lifting it, it should fall back to the bottom. If the drone gets stuck:
- Make sure the wooden dowels are parallel and the spacing between them is even. If the dowels are crooked, this will cause the drone to get stuck.
- Make sure the two straws that act as guide for the drone are parallel and aligned with the dowels. If the straws are crooked, this can cause the drone to get stuck even if the dowels are parallel.
- Make sure that all four propellers are properly mounted and spinning in the right direction. If you turn the drone on and hold your hand under each propeller, you should feel air blowing down on your hand. If you hold your hand over a propeller and you feel air blowing up, then you either a) have the wires for that motor reversed or b) mixed up the clockwise and counter-clockwise propellers. Revisit the procedure to make sure you have all four motors wired correctly with the correct propeller mounted on each motor.
- Do not use excessive amounts of glue or tape when building your drone. If the drone is too heavy, it will not lift off, even if everything else is built correctly.
- Make sure the wires from the battery pack are free and not getting snagged on anything.
- Make sure the motors are all pointed straight up. This will give your drone maximum lift. If the motors are tilted at an angle, the drone will not have as much lift.
- Just like any other battery-operated device, your drone's batteries will wear out eventually. If your drone seems sluggish or is no longer lifting off, replace the batteries. Note: some off-brand batteries cannot provide enough power for the drone to lift off. We recommend using name-brand batteries.
- Check if the drone has become damaged from repeated use or if your wooden dowels have become misaligned.
Careers
If you like this project, you might enjoy exploring these related careers:
/-/https/careerdiscovery.sciencebuddies.org/cdn/Files/1725/18/4161_Michelle_Easter_and_Curiousity_Clone.jpg)
/-/https/careerdiscovery.sciencebuddies.org/cdn/Files/835/18/msfc-202000343.jpg)
/-/https/careerdiscovery.sciencebuddies.org/cdn/Files/1450/21/iStock-1227179796.jpg)
/-/https/careerdiscovery.sciencebuddies.org/cdn/Files/1223/17/iStock-971549326.jpg)
Contact Us
Our kits are developed in partnership with Home Science Tools®. If you have purchased a kit for this project, Home Science Tools® is pleased to answer any questions not addressed by the FAQ above.In your email, please follow these instructions:
- Include your Home Science Tools® order number.
- Please describe how you need help as thoroughly as possible:
Examples
Good Question I'm trying to do Experimental Procedure step #5, "Scrape the insulation from the wire. . ." How do I know when I've scraped enough?
Good Question I'm at Experimental Procedure step #7, "Move the magnet back and forth . . ." and the LED is not lighting up.
Bad Question I don't understand the instructions. Help!
Good Question I am purchasing my materials. Can I substitute a 1N34 diode for the 1N25 diode called for in the material list?
Bad Question Can I use a different part?
Contact Support

/-/https/img.youtube.com/vi/BeKdBu5WTkk/0.jpg)
/-/https/img.youtube.com/vi/Vg6tvNNRlTA/0.jpg)
/-/https/img.youtube.com/vi/EGp2LHOEWTI/0.jpg)