Abstract
Have you ever wondered how your cell phone or laptop keeps running once you unplug it? Sure, it is the battery that makes your portable electronics work, but how exactly does a battery do that, and from where does the electricity come? Generally, in a battery chemical energy is converted into electrical energy. In fact, many different types of batteries exist that are all based on a different set of chemical reactions. In this science project, you will explore a special battery variant called the metal air battery—specifically, a zinc-air battery, sometimes also called a saltwater battery. How much electric current do you think it can generate?Summary
/-/https/i.ytimg.com/vi/WdCBoRW-J2I/maxresdefault.jpg)
Objective
Investigate the chemistry of a saltwater zinc-air battery, and measure how much voltage and current it can make.
Introduction
If you need to power something on the go without an electric cord, what do you do? Rely on a battery, of course. You already know that batteries come in all sizes and shapes (Figure 1), from large car batteries to tiny hearing-aid batteries. But, what makes a battery work? Probably something complicated, right? Well, it does get complicated, but the basic idea is pretty simple. So simple that you can make a battery at home out of saltwater, metal, and air! But first, let us explore how a battery works.
/-/https/www.sciencebuddies.org/cdn/Files/8214/7/batteries-comparison.jpg)
Figure 1. A selection of different batteries of different shapes, sizes, and voltage outputs. (Image credit: by Lead holder, via Wikimedia Commons)
There is one thing that all batteries have in common; they consist of one or several electrochemical, or galvanic cells that are embedded in the battery container and that generate the electricity for all electrical devices connected. But what is a "galvanic cell"? It is a device that can generate electrical energy from chemical reactions. In general, electricity is defined as "the presence of an electric charge," which can be either positive or negative. An electric current is the flow of moving charges (usually in the form of electrons or ions) through an electric circuit. In a battery, the galvanic cell usually consists of two electrodes, usually made from metals or carbon, which are in contact with an electrolyte, as shown in Figure 2. The electrodes, as well as the electrolyte, both need to be electrically conductive to allow electrons and ions to flow through an external wire or load from one electrode to the other. Within the electrolyte, the charges are generally carried by ions, whereas electrons carry the charge through the electrodes into the external wires and the load that the battery is connected with. The question now is where do the electrons come from? Here is where the chemistry comes into play.
Electrons are generated through chemical reactions, called redox (reduction-oxidation) reactions, where negative charges (in the form of electrons) are transferred from one chemical to another. There are many different battery types that use different chemical reactions to generate electrons. Two common examples are the lithium ion battery or nickel cadmium battery. The voltage, or electric potential difference, that a battery can generate is mainly determined by the redox reactions that take place at both electrodes. By definition, the electrode at which the oxidation reaction happens, is called the anode, whereas the electrode at which the reduction reaction happens is called the cathode. During an oxidation reaction, a chemical compound loses an electron. This lost electron is transferred to another chemical compound, which then takes it up in a reduction reaction.
/-/https/www.sciencebuddies.org/cdn/Files/8215/8/galvanic-cell.png)
Figure 2. In a galvanic cell, two electrodes are in contact with an electrolyte. Due to the electrical potential difference of the redox reactions at the anode and cathode, a voltage is generated between the electrodes, which induces an electron flow from the anode into an external wire through a load into the cathode. In the electrolyte, charges are carried by cations (positively charged) and anions (negatively charged).
The battery type that you will explore in this science project is called a metal air battery or, more specifically, a zinc-air battery, sometimes also referred to as a saltwater battery. The zinc-air battery is a relatively mature technology and is most commonly used in hearing aids and watches due to its high energy density. The zinc-air battery that you will create has a zinc anode, a copper cathode, and saltwater as an electrolyte. Commercial zinc-air batteries use zinc powder as the anode, a porous carbon cathode, and potassium hydroxide (KOH) as the electrolyte, but the basic chemical reactions are the same. The name already hints at the chemical reactions that drive this battery; the zinc metal at the anode gets oxidized and releases electrons that are transferred to the copper cathode. Here, the electrons are taken up by oxygen (O2) from the air that is dissolved in the electrolyte. Once it comes in contact with the surface of the copper electrode inside the electrolyte, the oxygen is reduced to hydroxyl ions (OH-). As you can see from the chemical equations below, the copper electrode is not participating in this reaction, but instead, functions as a catalyst that facilitates the oxygen reduction. For more detailed information about the zinc-air battery chemistry, see the Technical Note at the end of this introduction.
Anode (oxidation):The need for a continuous oxygen supply as a fuel makes the metal air battery a cross between a traditional battery and a fuel cell, which runs on hydrogen and oxygen. As oxygen is usually not very soluble in liquids like saltwater, the flow of electrons—or the current output of your battery—will be limited by the availability of oxygen at the copper cathode. In this science project, you will explore how you can improve the flow of electrons in your battery using different methods (mechanical and chemical) that are aimed toward increasing the oxygen concentration in your electrolyte. How much current do you think your battery can generate?
The chemical reactions that happen at the electrodes of a galvanic cell determine the voltage a battery can generate. The electrical potential difference between the anode and the cathode induces an electron flow and thus, generates electric current. In a zinc-air battery, the electrons are derived from the zinc anode that, once in contact with the electrolyte, releases electrons in the following oxidation reaction (Reaction 1).
Anode (oxidation):
Reaction 1:The zinc joins the electrolyte as positive ions (Zn2+) where they combine with hydroxyl ions (OH-) to form insoluble zinc hydroxide (Zn(OH)2), as shown in Reaction 2. Zinc hydroxide can then decompose into zinc oxide (ZnO) and water (H2O), as shown in Reaction 3. In an alkaline electrolyte, such as potassium hydroxide, which is used in commercial zinc-air batteries, the zinc ions will react with the excess hydroxyl ions to form soluble zincate ions (Zn(OH)42-), as shown in Reaction 4. At a lower pH, or once the electrolyte is over saturated with zincate ions, these ions decompose into insoluble zinc oxide and water (Reaction 5).
Reaction 4:In addition to these electrochemical reactions, the zinc electrode can also corrode in a parasitic reaction that does not contribute to the generation of electric current, and creates hydrogen gas, as shown in Reaction 6.
Reaction 6:The electrons that are left behind from the zinc electrode flow through an external wire into a load, such as an LED, and then into the copper electrode. There, oxygen from the surrounding air that is dissolved in the electrolyte, takes up the electrons (gets reduced) at the surface of the copper and forms hydroxyl ions. The copper itself is not participating in this reaction, as can be seen in Reaction 7, but instead reacts as a catalyst that facilitates the oxygen reduction process.
Cathode (reduction):
Reaction 7:Combining the anode and cathode reactions results in the overall net reaction that takes place in a zinc-air battery and can be described as:
Net reaction:
Reaction 8:Once you add additional chemicals to the electrolyte, such as hydrogen peroxide, bleach, or a different salt, the battery chemistry can change depending on if this chemical compound is electrochemically active or not. In the case of hydrogen peroxide (H2O2), which you will use in this experiment, two things can happen. First, as H2O2 is not very stable in water (especially in the presence of transition metals), it will decompose into oxygen and water according to Reaction 9.
Reaction 9:At the same time, however, hydrogen peroxide can also react electrochemically with the cathode. Thus, instead of oxygen, H2O2 is taking up electrons from the copper electrode and forms hydroxyl ions (Reaction 10). This results in a change of the battery chemistry, which leads to a different cell voltage.
Reaction 10:Terms and Concepts
- Battery
- Electrochemistry
- Electrochemical, or galvanic cell
- Electricity
- Electric charge
- Current
- Electrode
- Electrolyte
- Redox (reduction-oxidation) reaction
- Voltage
- Electric potential difference
- Anode
- Cathode
- Metal air battery
- Zinc-air battery
- Catalyst
- Fuel cell
- Corrosion
- Open-circuit voltage
- Short-circuit current
Questions
- What different types of batteries exist? What do they all have in common and how are they different from each other?
- What chemical reactions happen at the electrodes of a zinc-air battery? How would the reactions change if you replace the zinc anode with an aluminum anode?
- How is a metal air battery similar to a fuel cell?
- What role does the cathode material (copper or carbon) play in a metal air battery?
- Where are metal air batteries currently used and how do they compare to other batteries?
Bibliography
- MIT Technology Review. (2001). Zinc-Air Batteries. Retrieved August 25, 2016.
- Chasteed, S., Chasteen, D., and Doherty, P. (2002). The Salty Science of the Aluminum-Air Battery. Retrieved August 25, 2016.
- Li, Y. and Dai, H. (2014, June 13). Recent advances in zinc-air batteries. Royal Society of Chemistry. Retrieved August 25, 2016.
Materials and Equipment 
Recommended Project Supplies
/-/https/www.sciencebuddies.org/cdn/Files/9154/12/Veggie-Power-Battery-Kit-2019__04583.jpg)
- Veggie Power Battery Kit, available from our partner
Home Science Tools®.
You will need these items from the kit:
- Copper electrodes (3)
- Zinc electrodes (3)
- Alligator clip leads (6)
- Digital multimeter with test leads
- Piezoelectric buzzer
- You will also need to gather these items, not included in the kit:
- Plastic cups or Mason jars, 8 oz (3)
- Table salt (sodium chloride) (about 25 g)
- Measuring cup, metric
- Bowl that can hold at least 500 mL
- Teaspoon
- Tap water
- Kitchen scale
- Hydrogen peroxide (3%) (about 3 teaspoons), available at the pharmacy or grocery store
- Straw (paper or plastic)
- Paper towels for cleanup of any spills
- Timer or watch with second hand
- Pen
- Permanent marker
- Lab notebook
Disclaimer: Science Buddies participates in affiliate programs with Home Science Tools®, Amazon.com, Carolina Biological, and Jameco Electronics. Proceeds from the affiliate programs help support Science Buddies, a 501(c)(3) public charity, and keep our resources free for everyone. Our top priority is student learning. If you have any comments (positive or negative) related to purchases you've made for science projects from recommendations on our site, please let us know. Write to us at [email protected].
Experimental Procedure
Setting Up and Testing Your Zinc-Air Battery
- Prepare the saltwater electrolyte for your zinc-air battery.
- Place the bowl on your scale and put the balance back to zero (tare the scale).
- Weigh 25 grams (g) of table salt (NaCl) into the bowl.
- Fill your measuring cup with 500 milliliters (mL) of tap water.
- Add the water into the bowl with your weighed salt.
- Stir the solution with a clean spoon until all salt is dissolved.
- Label three plastic cups or Mason jars #1–3 using a permanent marker. You will do three trials in parallel to make sure that you get accurate and reproducible results.
- Get your electrodes ready. The shiny reddish electrode with a "Co" imprint is the copper (Cu) electrode and will be your cathode. The silver-looking electrode with a "Zinc" imprint is your zinc (Zn) anode. Take a picture of your electrodes before you begin your experiment for your project display board. You will compare the electrode condition and appearance at the beginning and at the end of your experiment. Create a data table, such as Table 1, in your lab notebook, and record your observations about the electrodes, such as their color, surface roughness, gloss, etcetera.
| Trial # | Electrode Condition at the Beginning | Electrode Condition at the End | ||
|---|---|---|---|---|
| Anode (Zn) | Cathode (Cu) | Anode (Zn) | Cathode (Cu) | |
| 1 | ||||
| 2 | ||||
| 3 | ||||
- Fill each of your labeled cups or jars with 150 mL of your prepared saltwater electrolyte.
- In each of your cups or jars, insert one zinc and one copper electrode. Place them on opposite sides of the cup so they face each other. Be careful not to knock over the cups. The electrodes should remain in the saltwater electrolyte throughout the entire experiment. You have to make sure that they never touch each other to prevent an accidental short circuit.
- Now you are ready to test if your batteries are working. Test each of your batteries successively.
- Take one red and one green alligator clip cable from the Veggie Power Kit and connect one end of the green alligator cable to the zinc anode. Use the clip to attach the electrode to the cup wall, as shown in Figure 3. Note: Figure 3 shows a black alligator clip. Your kit may come with a green alligator clip instead of black. The colors of the cables are just used for convenience and color-coding circuits, but there is no practical difference between wires/cables with different colors.
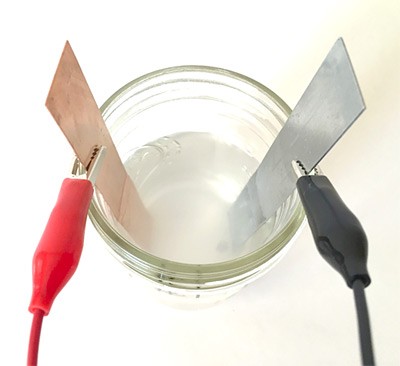
Figure 3. Use the clips of the alligator cables to attach the electrodes to the cup or jar wall to hold them in place.
- Take the red alligator clip cable and connect one end of the cable to the copper cathode. Again, attach the electrode to the cup wall with the clip to hold it in place.
- Get the piezoelectric buzzer (round-shaped black object) from the kit. Connect the second end of the red alligator clip cable to buzzer's positive (red) wire, and the green alligator clip to the buzzer's negative (black) wire, as shown in Figure 4.
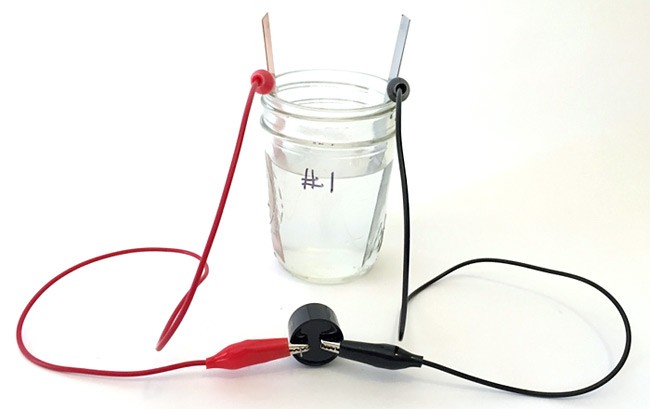
Figure 4. Alligator clips connected to the buzzer. Note: the buzzer shown in this picture has short metal pins, with one marked by a "+" sign for positive. Your buzzer may have longer red (positive) and black (negative) wires attached.
- If your battery is working you should hear the buzzer making some loud noise. If you do not hear a sound, check your battery setup and all your cable connections, or refer to the Frequently Asked Questions. Make sure you did not connect the buzzer backwards by getting red and black wires mixed up.
- Remove the buzzer from the alligator clip cables before you continue with the next step.
- Take one red and one green alligator clip cable from the Veggie Power Kit and connect one end of the green alligator cable to the zinc anode. Use the clip to attach the electrode to the cup wall, as shown in Figure 3. Note: Figure 3 shows a black alligator clip. Your kit may come with a green alligator clip instead of black. The colors of the cables are just used for convenience and color-coding circuits, but there is no practical difference between wires/cables with different colors.
/-/https/www.sciencebuddies.org/cdn/Files/8216/7/clamping-electrodes.jpg)
/-/https/www.sciencebuddies.org/cdn/Files/8217/7/buzzer-test.jpg)
Measuring Voltage and Current Output
- Prepare a data table, like Table 2, in your lab notebook. You will use this table to record the open-circuit voltage (the voltage across both electrodes when no current is flowing) and the short-circuit current (the current when the battery's electrodes are shorted together) for each of your zinc-air batteries under different experimental conditions.
| Treatment | Trial # | Open-circuit Voltage (V) | Short-circuit Current (mA) | |
|---|---|---|---|---|
| Beginning of Measurement | (Highest Value) 3 Minutes Later | |||
| None | 1 | |||
| 2 | ||||
| 3 | ||||
| Average | ||||
| Continuous stirring with straw | 1 | |||
| 2 | ||||
| 3 | ||||
| Average | ||||
| Continuous blowing bubbles with straw | 1 | |||
| 2 | ||||
| 3 | ||||
| Average | ||||
| + 5 mL of 3% H2O2 | 1 | |||
| 2 | ||||
| 3 | ||||
| Average | ||||
| + 5 mL of 3% H2O2 plus continuous stirring | 1 | |||
| 2 | ||||
| 3 | ||||
| Average | ||||
- Measure the open-circuit voltage and short-circuit current of each of your zinc-air batteries. Start with the first one and then continue with the other two trials. These values give you the highest voltage and the highest current that your battery can supply (but note that it cannot provide both at the same time). Refer to the Science Buddies resource How to Use a Multimeter if you need help using a multimeter.
- Connect the alligator clip cables that are still connected to your electrodes to the multimeter leads, as shown in Figure 5.
- First, plug the red multimeter probe into the multimeter port labeled VΩmA, and the black multimeter probe into the multimeter port labeled COM.
- Now clip the end of the red alligator clip cable (still connected to your copper electrode) onto the metal part of the red multimeter probe.
- Finally, clip the end of the green alligator clip cable (still connected to your zinc electrode) onto the metal part of the black multimeter probe.
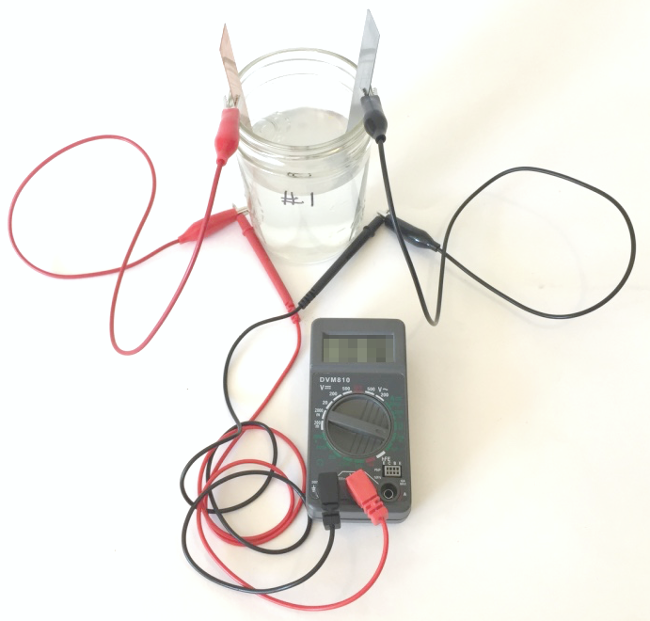
Figure 5. Setup for measuring the open-circuit voltage and short-circuit current of your zinc-air batteries. Note: The multimeter screen has been blurred in the image. We do not want to give away the data!
- Set the multimeter dial to measure in the 20 V range (the "20" in the upper left of the dial). Record the open-circuit voltage in your data table (Table 2).
- Change the multimeter dial to measure in the 200 mA range (the "200m" on the right side of the dial). Quickly record the short-circuit current in your data table. The current will start to drop rapidly as the battery begins to drain and the oxygen dissolved in the electrolyte gets depleted.
- Then set your timer to 3 minutes and record the short-circuit current again in your data table, even if it has not fully stabilized yet. These will be your results for the "no treatment" batteries.
- Refer to the Help section if you get stuck or have trouble taking a reading.
- Connect the alligator clip cables that are still connected to your electrodes to the multimeter leads, as shown in Figure 5.
- Once you finished measuring the open-circuit-voltage and short-circuit-current of all three batteries, you are ready to start with your first mechanical treatment. Start with the first battery and repeat the procedure with the other two afterwards.
- Keep the multimeter dial set to measuring direct current in the 200 mA range (the green "200m" on the right side of the dial). The readings should still be very low and fairly stable from your previous measurements. If the current is still rapidly decreasing, wait 3 more minutes until the reading has stabilized and does not change much anymore.
- Take the straw and stir the solution (electrolyte) in the cup without knocking the cup over. It is okay to touch the electrodes with the straw, but do not bump them too hard.
- Right after you started stirring, watch the short-circuit-current readings on your multimeter display. They probably will fluctuate a lot. In your data table, write down the highest current reading that you see during stirring.
- Keep stirring and set your timer to 3 minutes. You will notice that the current readings will still fluctuate. After 3 minutes of treatment, while still stirring, record the highest reading of the short-circuit current in your data table.
- Set the multimeter dial back to measure in the 20 V range (the "20" in the upper left of the dial). Repeat the stirring procedure and observe the voltage readings on the multimeter. Write down the voltage that you get when you stir the solution in your data table.
- Set your multimeter dial back to measuring direct current in the 200 mA range (the "200m" on the right side of the dial) as you did before, and wait 5 minutes before you continue with the next step until the current reading is stable or does not change much anymore.
- Next, you will continue with your second mechanical treatment. Repeat step 3, but this time, instead of stirring the electrolyte with the straw, use the straw to blow bubbles into the solution. Hold the straw close to the copper electrode, as this is where the dissolved oxygen gets reduced. Note: You do not have to blow bubbles continuously, and can breathe normally in between.
- Now you will do the chemical treatment. Again, start with the first battery and then repeat the same treatment with the second and third one.
- Keep the multimeter set to measuring direct current in the 200 mA range (the "200m" on the right side of the dial). The current reading should be stable again after completing step 4. If not, wait a little longer until the current does not change that much anymore.
- Add 1 tsp. of 3% hydrogen peroxide to the electrolyte and quickly stir the solution with the spoon to disperse the H2O2 equally. Then stop stirring.
- Immediately after adding the hydrogen peroxide and you have stopped stirring, record the current in your data table.
- Just as with the mechanical treatment, wait 3 minutes for the current to get more stable and then write down the short-circuit-current in your data table (even if the current is still decreasing a little bit).
- Set your multimeter back to measure DC voltage in the 20 V range (the white "20" in the upper left of the dial) and note down the voltage that you get with hydrogen peroxide added to your electrolyte.
- The last treatment is the combination of chemical and mechanical treatment. With the hydrogen peroxide still added to your battery, repeat step 3 and stir the electrolyte with a straw for 3 minutes while you are monitoring the short-circuit current.
- Once you have completed your data table (Table 2), you can start disassembling your zinc-air batteries.
- Disconnect the alligator clip cables from the multimeter leads, as well as the two electrodes.
- Take the zinc anode and the copper cathode out of the electrolyte solution and put them down on a paper towel. Look at their appearance and write down your observations in Table 1. Do they look different compared to the beginning?
- Rinse the electrodes with tap water and dry them with a paper towel. How do the electrodes look now?
- Optional: To see a more obvious electrode change, let the saltwater battery run for longer in short-circuit mode, meaning that you keep your electrodes in the saltwater electrolyte with the alligator clip cables attached. Disconnect the multimeter leads, then connect the free ends of the red and black alligator clips directly to each other. After one or two more days, take the electrodes out and assess their condition again.
/-/https/i.ytimg.com/vi/ts0EVc9vXcs/maxresdefault.jpg)
/-/https/www.sciencebuddies.org/cdn/Files/8218/10/Measuring-circuit-blur.png)
Analyzing Your Data
- Both your data tables should be complete. Making graphs helps you to visualize your data.
- Make a bar graph in which you specify the treatment (none, stirring, blowing bubbles, hydrogen peroxide, hydrogen peroxide plus stirring) on the x-axis and plot the average short-circuit current that you measured after 3 minutes on the y-axis.
- How does the current change with each treatment? Why do you think the current changed? What treatment resulted in the highest current output? If you need help with these questions, read the Technical Note in the Introduction to review the electrode reactions in the zinc-air battery.
- Look at your data in Table 2. How do the initial current readings differ from the values you measured after 3 minutes? If you want to visualize your data, you can make another bar graph similar to the one you made in step 2, but this time plot the current that you measured at the very beginning of your treatment on the y-axis. Can you explain your data?
- Make another bar graph that shows the treatment type on the x-axis and the average open-circuit voltage for each treatment on the y-axis.
- How is the battery voltage influenced by the different treatments? Does the cell voltage change with any treatment? Remember that your treatments included mechanical and chemical treatments. Did the type of treatment matter? Note that the voltage or electrical potential difference of a battery is dependent on the redox reactions that happen at the electrodes. Looking at your results, do you think the presence of hydrogen peroxide changes the cell chemistry and electrode reactions? Tip: Revisit the Technical Note in the Introduction for more information.
- Look at your observations in Table 1. Did the electrodes change at all over the course of the experiment? How do they look different? Can you explain your findings? Note: The time frame of your experiment might not be long enough to detect obvious electrode changes. Leave your battery setup in short-circuit measurement mode for 1–3 days to see how the electrodes of a zinc-air battery change over time. For this, leave the alligator clip cables connected to the electrodes, but instead of attaching the other ends of the cables to a buzzer or the multimeter, connect the free ends of the red and black alligator clips directly to each other.
Troubleshooting
For troubleshooting tips, please read our FAQ: How to Make a Battery with Metal, Air, and Saltwater.
Ask an Expert
Global Goals
The United Nations Sustainable Development Goals (UNSDGs) are a blueprint to achieve a better and more sustainable future for all.
/-/https/www.sciencebuddies.org/cdn/Files/19752/5/E-WEB-Goal-09.png)
Variations
- Can you find different ways of improving the performance of your zinc-air battery? Test if you get higher cell voltages and currents when adding other chemicals to your electrolyte, such as bleach, vinegar, or different salts such as Epsom salt. Will these additions change the cell chemistry? Do your own research or read through the references in the Bibliography to find out how the electrode reactions can change when adding different chemicals.
- The electrolyte of a battery has an important function. It has to be electrically conductive to be able to move charges from one electrode to the other as cations or anions. In your experiments, these are the sodium and chloride ions of the table salt (NaCl). What happens if you leave out the salt and only use tap water as the electrolyte? Will the battery work when you use distilled water that has most ions removed? How does your battery performance vary with different salt concentrations?
- Adding more chemicals to your electrolyte is only one way of changing the cell chemistry. What if you switched the electrode materials with a different metal? Try to exchange the zinc anode with an aluminum metal strip that you can cut out from a disposable aluminum tray, or just use aluminum foil as an electrode. How does the open-circuit voltage and the short-circuit current change in this battery setup? What are the anode and cathode reactions in this case?
- How does the zinc-air battery perform over a longer period of time? Let your whole battery setup (as shown in Figure 5 in the Procedure) run for several days and evaluate the battery performance (measuring open-circuit voltage and short-circuit current) twice a day. Does the voltage or the current change a lot? Observe both electrodes over time; what do you notice?
- Can your zinc-air battery create enough power to light up an LED? Use the red LED that comes with the Veggie Power Kit and find out. You can also connect several zinc-air batteries in series or parallel if one battery is not enough. See the Science Buddies project How to Turn a Potato Into a Battery for more details. How many batteries do you think you will need? Does the LED get brighter with blowing bubbles?
- How does the current of your zinc-air battery vary over time during all your different treatments? Instead of just writing down the short-circuit current at the beginning of your treatment and after 3 minutes, monitor the current over time from 0–5 minutes and record the values every 30 seconds. Make a graph showing the time on the x-axis and the current values on the y-axis. Do you see a difference between the individual treatments?
Frequently Asked Questions (FAQ)
- For voltage, start with the 20 volt (V) scale. If the measured value turns out to be less than 2 V, you can move down to the next lowest scale for improved accuracy. On the DT830L multimeter that comes with the Science Buddies Veggie Power Kit, these scales are labeled "20" and "2000m" on the upper left part of the dial. 2000m stands for 2,000 millivolts (mV), which is equal to 2 V.
- For current, start with the 200 milliamp (mA) scale. If the measured current is less than 20 mA, you can move down to the next lowest scale for improved accuracy. On the DT830L multimeter that comes with the kit from our partner Home Science Tools®, these scales are labeled "200m" and "20m" on the right side of the dial.
Your Veggie Power Kit should contain a 1,000 ohm, or 1 kilo-ohm (kΩ) resistor; a small, tan-colored cylindrical piece with two metal wires sticking out of it. You can use this resistor to test your multimeter as described here and shown in Figure 6.
- Set your multimeter to measure current in the 20 mA range (the dial setting labeled "20m" on the right).
- Plug the multimeter's black probe into the port labeled COM.
- Plug the multimeter's red probe into the port labeled VΩmA.
- Use a red alligator clip lead to connect the multimeter's red probe to the positive (+) terminal of the 9 V battery.
- Use a black alligator clip lead to connect the multimeter's black probe to one of the resistor's leads.
- Use another black alligator clip lead to connect the resistor's other lead to the 9 V battery's negative (-) terminal.
- Your multimeter should read about 9 mA (maybe slightly less if you are not using a fresh battery).
- If this works, then you know the current measurement function on your multimeter is working. If you are still having trouble with your experiment, the problem is with something else in your setup. See the other troubleshooting steps for more ideas.
- If this does not work, and you are confident that you set up the test correctly as shown in Figure 6, then your multimeter might be defective or have a blown fuse. Please contact [email protected] for assistance.
- When you are done, disconnect the alligator clips so you do not drain the 9 V battery, and remember to turn your multimeter off.
/-/https/www.sciencebuddies.org/cdn/Files/6655/15/fig13-FAQ-multimeter-fuse-check.jpg)
Figure 6. Setup for making sure the multimeter has a working fuse. Note: this picture was taken with a 100,000 ohm resistor instead of a 1,000 ohm resistor, so the multimeter screen reads 0.08 instead of 8.
Careers
If you like this project, you might enjoy exploring these related careers:
/-/https/careerdiscovery.sciencebuddies.org/cdn/Files/1107/19/pexels-photo-3938023.jpg)
/-/https/careerdiscovery.sciencebuddies.org/cdn/Files/1100/18/unsplash-NP6JLl_2C-c.jpg)
/-/https/careerdiscovery.sciencebuddies.org/cdn/Files/20209/5/chemical-engineer-citgo.jpg)
Contact Us
Our kits are developed in partnership with Home Science Tools®. If you have purchased a kit for this project, Home Science Tools® is pleased to answer any questions not addressed by the FAQ above.In your email, please follow these instructions:
- Include your Home Science Tools® order number.
- Please describe how you need help as thoroughly as possible:
Examples
Good Question I'm trying to do Experimental Procedure step #5, "Scrape the insulation from the wire. . ." How do I know when I've scraped enough?
Good Question I'm at Experimental Procedure step #7, "Move the magnet back and forth . . ." and the LED is not lighting up.
Bad Question I don't understand the instructions. Help!
Good Question I am purchasing my materials. Can I substitute a 1N34 diode for the 1N25 diode called for in the material list?
Bad Question Can I use a different part?
Contact Support

/-/https/img.youtube.com/vi/W1DVEtzrl9g/0.jpg)
/-/https/img.youtube.com/vi/vw-iTxNdnrw/0.jpg)
/-/https/img.youtube.com/vi/n--zawliqvA/0.jpg)