Abstract
What looks pretty, stops flooding, and helps fight pollution? A rain garden! Find out how by building and testing your own miniature rain garden in a plastic bottle.
Summary
None
Readily available
Adult supervision or help required when cutting a jug or bottle.
/-/https/i.ytimg.com/vi/qFefTN5vyMM/maxresdefault.jpg)
Objective
Find out how adding a rain garden changes runoff.
Introduction
A 15-minute heavy rain can deposit 3,000 gallons of water on a basketball court. Where does all that water go? Most basketball surfaces do not allow the water to soak in. Instead, it flows away as runoff. Runoff is the excess rain-, storm-, or meltwater that flows across surfaces that do not let liquids pass through. These surfaces are called impervious surfaces. Concrete or asphalt roads, sidewalks, and parking lots are examples of these surfaces, as are the roofs of buildings. Urban areas are filled with impervious surfaces. Figure 1 illustrates that almost all surfaces of a typical urban street are impervious.
/-/https/www.sciencebuddies.org/cdn/Files/17867/11/raingarden-city-drawing.png)
Figure 1. A typical urban street view mainly consists of impervious surfaces.
Storm drains, like the one shown in Figure 2, collect runoff and guide water to nearby lakes and rivers.
/-/https/www.sciencebuddies.org/cdn/Files/17869/10/storm-drain.jpg)
Figure 2. A storm drain collecting runoff. Picture from Wikimedia Commons user Robert Lawton, licensed under the Attribution-ShareAlike 2.5 Generic (CC BY-SA 2.5) license.
Using storm drains as a solution for excess runoff has two problems. Runoff flows over surfaces and picks up pollutants such as dust and dirt particles, oil (from leaking cars), litter, chemicals (like those found in fertilizers), and bacteria. Runoff can flow into lakes and streams. When storm drains collect runoff, the water also flows directly to nearby lakes and streams, polluting them even more. In addition, drains can only swallow so much runoff at a time. When a storm dumps a lot of water in a short time, there is a risk of flooding. Urban developers tackle these issues by including rain gardens in their designs. These gardens are designed to soak up runoff and to filter out many pollutants taken up by runoff. They have the additional advantage of being beautiful and pleasant.
/-/https/www.sciencebuddies.org/cdn/Files/17866/10/rain-garden-overview.jpg)
Figure 3. An example of a rain garden. Picture from Wikimedia Commons user Rogersoh, licensed under Attribution-ShareAlike 3.0 Unported (CC BY-SA 3.0) license.
Rain gardens are placed on the downside of a slight slope, and they are usually layered, as follows: mulch at the top, potting soil to support vegetation, a sand bed, a rock base, and they typically include native plants. Plants beautify the rain garden and their roots penetrate down into the soil, making it easier for water to flow downward. The roots also suck up some of the water into the plants.
In this project, you will create a miniature rain garden with loose potting soil and test how well this rain garden reduces runoff and filters out pollution. Look at the Variations section for ideas on other types of rain gardens and how to test the performance of these rain gardens.
Terms and Concepts
- Runoff
- Impervious
- Pollutants
- Rain garden
Questions
- Why is runoff more a problem for urban areas compared to rural areas?
- What problems does runoff create in urban areas?
- How can rain gardens address these problems?
- Natural rain gardens often consist of a combination of mulch, soil, sand, and pebbles. What role does each material play?
Bibliography
- Dauphin County Conservation District. (n.d.) Rain Garden. Dauphin County Conservation District. Retrieved September 20, 2021.
- The Groundwater Foundation. (n.d.). All About Rain Gardens. The Groundwater Foundation. Retrieved September 20, 2021.
- Hillsborough County. (April 23, 2018). 5 Steps for Creating a Rain Garden. Retrieved March 29, 2022.
For help creating graphs, try this website:
- National Center for Education Statistics, (n.d.). Create a Graph. Retrieved June 25, 2020.
Materials and Equipment
- Containers, such as 1-gallon jugs, 2-L soda bottles, etc. (2, identical)
- Utility knife
- Clay (about 1 kg or 2 lb); white or gray air-dry clay works well.
- Metric ruler
- Potting soil or dry, loose dirt from the garden. See the Variations section for ideas on other rain garden materials.
- Clear, disposable cups, 12– or16–oz. (5)
- Hole puncher
- Rope or yarn (60 cm)
- Bottle caps or objects of similar height (2)
- Materials to make polluted water:
- Water
- Measuring spoon
- Cooking oil
- Liquid food coloring, preferably blue
- Food that floats on water, such as some cereals or popcorn
- Spoon
- Timer
- Lab notebook
/-/https/www.sciencebuddies.org/cdn/Files/17868/10/rain-garden-materials.jpg)
Experimental Procedure
Engineers and scientists sometimes use small models to test the effectiveness of a solution before they build the real thing. In this project, you will build miniature models in plastic bottles or jugs. You will study the effectiveness of rain gardens by comparing a model with a rain garden to a similar model that does not have a rain garden. You will pour polluted water over both models and collect the runoff. If the rain garden is effective, its model should result in less and cleaner runoff. Will it work? Try it out and see for yourself!
- Prepare containers.
- Collect two clean, empty, identical containers, such as 2-L soda bottles or 1-gallon jugs.
- Ask an adult for help or supervision while you perform the next step.
- For each container: place the container flat on a surface with the spout pointing to the side. Use the utility knife to cut the top third of the container off, lengthwise. Figure 4 shows two examples.

A gallon jug (left) and a 2-liter soda bottle (right) of which the top third has been cut off.
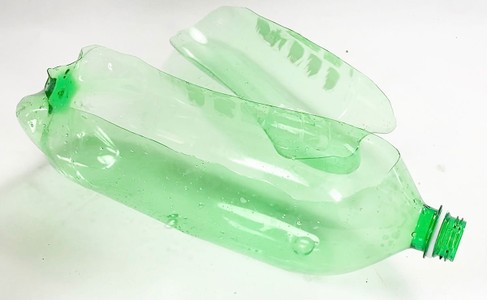
A gallon jug (left) and a 2-liter soda bottle (right) of which the top third has been cut off.
Figure 4. Two examples of prepared rain garden containers. Choose either two 2-L soda bottles or two 1-gallon jugs. Be sure the two containers you choose are the same. - Prepare the control.
You will use the control to compare the performance of the rain garden with. The control has no rain garden, only pavement.
- Take one of the containers created in step 1.
- Cover the length of the container with clay pavement (see Figure 5).
- To reduce spills while testing, it is best to keep the pavement at least 3 cm below the container edge.
- While the clay will take at least 24 hours to dry, it is okay to do the experiment before the clay is dry.
- While drying, the clay might crack or form gaps near the edges. If this happens, fill the cracks and crevices before testing so water does not flow into the cracks, but flows over the surface.
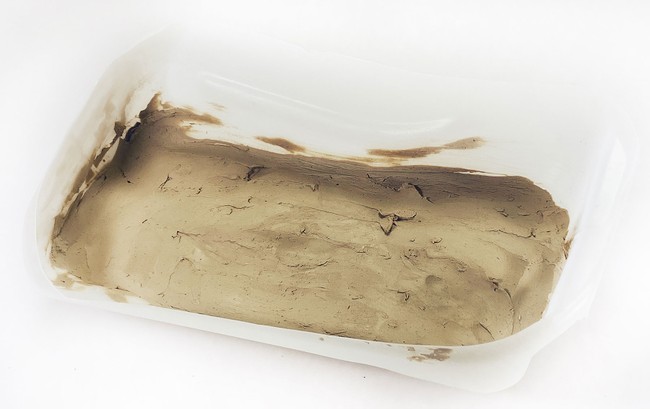
Figure 5. A container prepared with an impervious surface to serve as the control. - Prepare the rain garden.
Rain gardens are always near impervious surfaces. Your rain garden will be next to the pavement.
- Take the second container, which you prepared in step 1.
- Make clay pavement in the area farthest away from the spout.
- Make it about 10 cm long.
- To reduce spills while testing, it is best to keep the pavement at least 3 cm below the container edge.
- The open area between the spout and the pavement will become your rain garden.
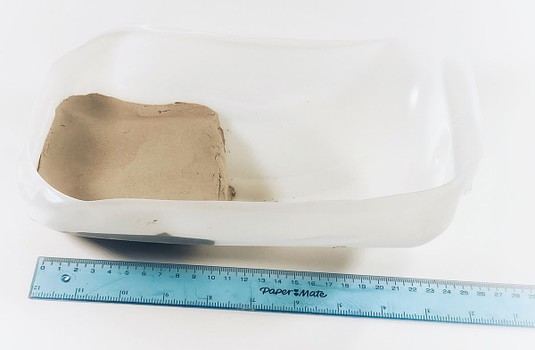
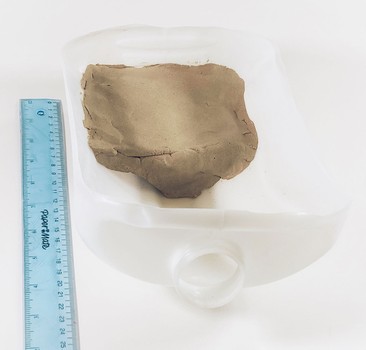
Figure 6. Rain garden container with a raised platform of modeling clay pavement. - Finish the rain garden.
Rain gardens are often made up of mulch, potting soil, sand, and rocks and usually contain vegetation. This project uses loose, dry soil as a rain garden. The Variations section lists other substances you can try.
- Create the garden between the clay (pavement) and the spout (storm drain).
- Fill the area with 6 cm or more or soil (Figure 7). If you decide to try a different type of rain garden, fill the space with a different material. Make sure it is at least 6 cm deep.
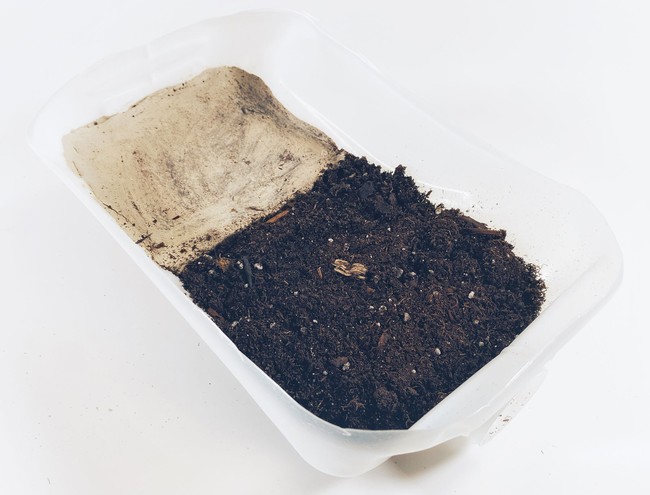
Figure 7. Model soil rain garden. - Prepare runoff collection cups.
Collection cups will collect the runoff in your experiment.
- Start with two identical, clear cups. Identical, clear cups will allow you to compare the height of the water inside easily.
- For each cup: use the hole puncher to make two holes in the cup on opposite sides and near the rim. If this is hard, ask an adult or older sibling to help you.
- Attach a string that is approximately 30 cm long to the cup, as shown in Figure 8. The string will allow the cup to hang from the spout and collect runoff.
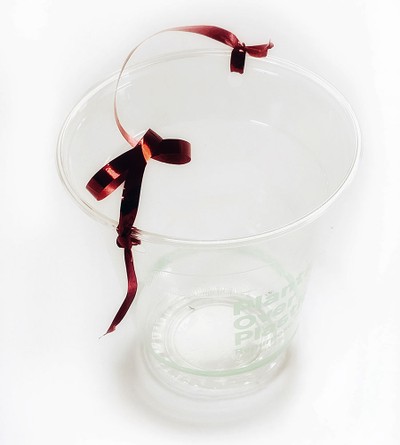
Figure 8. Collection cup with string attached. - Set up the experiment.
Set the experiment up outside or over a surface that can get wet.
You need to do this for the pavement-only container and the container with the rain garden. Use Figure 9 as a guide.
- Place the container near the edge of a table with the spout hanging over the edge.
- Place a small item, like a bottle cap or an eraser, under the bottom end of the container, elevating the side opposite the spout. The elevation should create a slight incline toward the spout.
- Hang a runoff collection cup from the spout of the container.
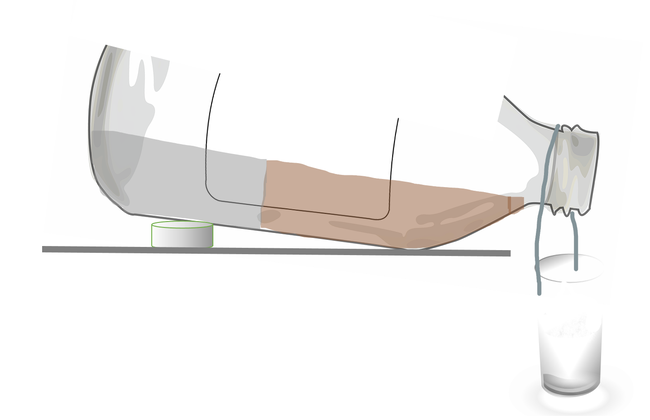
Figure 9. Rain garden experiment setup. - Create homemade runoff.
Because your pavement will not have collected as much pollution as the streets and roofs outside, you will use homemade runoff in your experiment.
Make three cups. Use cups that are identical in size to the collection cups.
Recipe:- Fill one cup halfway with water. This clean water represents rain water.
- Add 1 tsp. of oil to represent oil leaking from cars.
- Add 1 Tbsp. of crumbled-up soil to represent dust and dirt suspended in the water when it runs over gardens.
- Add 2 drops of blue food coloring to represent pollution that is too small to see with the naked eye, such as plant fertilizer.
- Add a few pieces of food that float on water, such as a few pieces of cereal or popcorn. This represents trash.
- Mix well.
- Add water to fill the cup to 1.5 cm from the rim.
- Repeat two more times to make three identical cups. If this is your second or third iteration, you might still have one cup. If so, you only need to make two identical ones now.
Figure 10 shows the result of this recipe.
- Make a prediction.
If you have not made a hypothesis or prediction yet, do it now! The The Scientific Method: Steps and Examples video can help you understand how to make one.
For this project, a prediction could be: "If I include a rain garden, then the pollution of runoff will... (add how you think the pollution or runoff will change)."
A second prediction could read, "If I include a rain garden, then the volume (amount) of runoff... (add how you think the volume of runoff will change)".
- Perform the test.
To test your rain garden, you will pour a cup of homemade runoff on the pavement of each container (Figure 11). This is like a rainstorm. Then you will measure how much runoff is collected in the runoff collection cup. This is like measuring how much runoff reaches a storm drain after a storm. You will also look if the collected runoff is as polluted as the poured runoff. This can help you understand if rain gardens filter out pollutants.
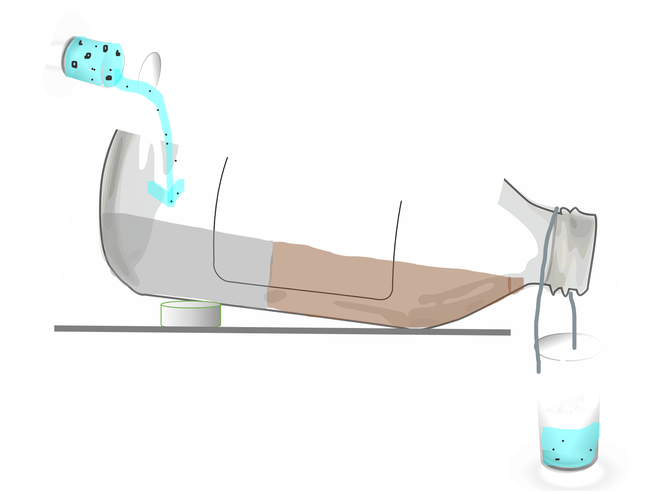
Figure 11. Drawing of how the rain garden experiment will be performed.
- Pour a cup of homemade runoff on the pavement of the model rain garden.
- Set a timer to 2 min. While you wait, describe what you notice and write your observations in your lab notebook.
- How quickly does runoff collect?
- After 2 min, remove the cup collecting runoff and place it close to the garden.
- Place the garden flat so it stops leaking.
- Repeat this procedure for the pavement-only container.
- Collect data.
The first time you collect data, it will be for Trial 1. For Trial 1, you also need to write down how high the polluted water was before you poured it over the gardens. You should still have one cup of polluted water left. Measure its height and write the height in the row "Initial polluted water" in your table like Table 1. Then, circle the pollutants visible in this cup. Because you will always make the same polluted water, you only need to do this once. You can use this cup, however, to take pictures of the cup with runoff next to the cup with initial polluted water.
- Measure the height of the runoff in the collection cups. The height is a good indication of the volume of runoff collected.
- Write the measurements in a table like Table 1. If the cup was too small to collect all of your runoff, write the height of the water collected and add "flowing over" in your table.
- Circle the pollutants visible in the collection cup.
- Compare and contrast the collected runoff with the third cup of homemade runoff you prepared but did not use. Write your observations in your lab notebook.
/-/https/www.sciencebuddies.org/cdn/Files/17872/11/container-for-rain-garden.jpg)
/-/https/www.sciencebuddies.org/cdn/Files/17873/10/bottle-cut-for-rain-garden-experiment.jpg)
/-/https/www.sciencebuddies.org/cdn/Files/17874/10/container-pavement-only.jpg)
/-/https/www.sciencebuddies.org/cdn/Files/17875/10/rain-garden-pavement-side.jpg)
/-/https/www.sciencebuddies.org/cdn/Files/17876/10/rain-garden-pavement-front-view.jpg)
/-/https/www.sciencebuddies.org/cdn/Files/17877/10/rain-garden-container-with-clay-pavement-soil.jpg)
/-/https/www.sciencebuddies.org/cdn/Files/17878/10/rain-garden-cup-with-string.jpg)
/-/https/www.sciencebuddies.org/cdn/Files/17879/10/rain-garden-experiment-setup-drawing.png)
/-/https/www.sciencebuddies.org/cdn/Files/17880/10/homemade-polluted-water.jpg)
/-/https/www.sciencebuddies.org/cdn/Files/17881/10/rain-garden-experiment-drawing.png)
| Rain Garden Experiment: Measurements of Collected Runoff |
|||
|---|---|---|---|
| Trial Number |
Height (cm) |
Pollution (Circle if present) |
|
| Initial polluted water | food soil oil food coloring | ||
| Only pavement | 1 | food soil oil food coloring | |
| 2 | food soil oil food coloring | ||
| 3 | food soil oil food coloring | ||
| Rain garden | 1 | food soil oil food coloring | |
| 2 | food soil oil food coloring | ||
| 3 | food soil oil food coloring | ||
- Repeat the experiment.
Scientists perform their tests a few times to make sure the results are not accidental.
Let your soil garden dry, or remove the wet soil and add new dry soil before repeating steps 7 (create homemade runoff), 9 (do the experiment), and 10 (collect data) for your second trial. Then, repeat this one more time for a third trial.
- Cleanup.
Once you are done with your experiments:
- Dispose of the soil in the garden or composting bin.
- You can reuse the clay. Remove the clay from the container, wash off any dirt, and place it in an airtight bag or container with a few tablespoons of water. Let it sit for a day or two. It will become soft again.
- If your clay became too dirty, break the clay in small pieces before putting them in the composting bin.
- The cut-open plastic bottles can be recycled.
- Analyze the data.
- If you know how to calculate an average, calculate the average height of collected runoff for the three trials on the "Only pavement" container and the three trials on the "Rain garden" container.
- Make a graph of the height for the container with and the one without a rain garden.
- Do you see any trends in your data? Did one container always create more runoff than the other? Did one container always filter out more pollution than the other?
- Did the experiment confirm or contradict your prediction? Is the data inconclusive?
- Does your data confirm the idea that rain gardens reduce runoff and filter out pollutants? Can you explain why or why not?
- If you had more time and more resources, would you improve this experiment or try a different investigation? If so, how or which part?
Ask an Expert
Global Goals
The United Nations Sustainable Development Goals (UNSDGs) are a blueprint to achieve a better and more sustainable future for all.
/-/https/www.sciencebuddies.org/cdn/Files/19754/5/E-WEB-Goal-11.png)
/-/https/www.sciencebuddies.org/cdn/Files/19757/5/E-WEB-Goal-14.png)
Variations
- This project used soil as a rain garden. You can also test other materials, such as sand, pebbles, mulch, or a layered garden with a combination of these materials.
- Instead of comparing one type of rain garden to a pavement-only situation, you can include two or three different types of rain gardens and see which one most reduces the volume and pollution.
- In this experiment, you compared dry pavement to a dry rain garden, assuming it did not rain excessively before a storm hits. Do you think a rain garden's effectiveness changes when storms hit one after the other, with little time in-between to let the garden dry? How could you change the procedure to study this?
- Rain gardens usually contain plants. How can you change the procedure to test if adding plants changes runoff volume and cleanliness? Some examples of plants with fast-germinating seeds are beans, peas, turnips, radishes, pumpkins, and lettuce.
- Urbanization can also create heat islands. The project Rooftop Gardens: Are They a Cool Idea? shows how you can test if rooftop gardens can mitigate this effect.
- Plants help water seep in the ground faster; the project Can Plants Stop Soil Erosion? examines if they also help prevent soil erosion.
- The project Do Your Storm Drains Keep the Ocean Trash Free? will help you investigate how well the storm drains in your area are designed to filter out the trash.
Careers
If you like this project, you might enjoy exploring these related careers:
/-/https/careerdiscovery.sciencebuddies.org/cdn/Files/1832/17/iStock-1158126977.jpg)
/-/https/careerdiscovery.sciencebuddies.org/cdn/Files/1396/17/iStock-473199834.jpg)

/-/https/img.youtube.com/vi/74RnO_wHX7k/0.jpg)
/-/https/img.youtube.com/vi/P8RtSQ9az2U/0.jpg)
/-/https/img.youtube.com/vi/OgRzJmu03VY/0.jpg)