Abstract
Native plants are important for both ecological and medicinal reasons. However, most native plants are not very well studied. One way to know more about these plants is to understand which other species of plants they are most closely related to. In this science project you will sequence part of the chloroplast genome from a native plant and use this information to determine its evolutionary relationship to other species of plants. If the plant you chose has not been sequenced before, you can contribute your data to GenBank-the public gene sequence data bank-for scientists worldwide to see and use!
Summary
High school biology class; familiarity with using the PCR machine and gel electrophoresis equipment, and/or using the equipment with a mentor.
You will need specialized pieces of equipment, including a PCR machine (thermocycler) and a gel electrophoresis apparatus. If your school does not have this equipment you might want to seek out a mentor at a junior college, university, or biotechnology company. If you have the resources you can do the DNA sequencing yourself, otherwise you can send the samples to Dr. Baysdorfer at California State University, East Bay, see Experimental Procedure for more details.
This project uses ethidium bromide, which is a carcinogen. Always wear gloves and safety goggles when handling. Dispose of the ethidium bromide according to your school or institute's hazardous waste protocols. If you have concerns, ask your teacher or mentor for advice.
Shary Rosenbaum, Coordinator, East Bay Biotechnology Education Program
Sandra Slutz, PhD, Science Buddies
This science project was adapted from the East Bay Biotechnology Education Program's High School Chloroplast Sequencing Project:
Panico, E., Rosenbaum, S., and Shellem, B. (n.d.). High School Chloroplast Sequencing Project: Student Guide. Retrieved March 25, 2008.
Science Buddies would like to thank Dr. Baysdorfer for his generous time and resources commitment in providing sequencing support for this science project.
- Taxol® is a registered trademark of the Bristol-Myers Squibb Company.
- AmpliTaq Gold® is a registered trademark of Roche Molecular Systems, Inc.
/-/https/www.sciencebuddies.org/cdn/Files/3284/10/Genom_img057.jpg)
Objective
Sequence part of the chloroplast genome from a local native plant in order to determine what other species of plants the native plant is most closely related to.
Introduction
Native plants are plants that were living in an area before the first pioneers settled there. These plants co-evolved with the local habitat, which means they are uniquely equipped to deal with their particular environment. For example, native Mojave desert plants are drought-tolerant, native Rocky Mountain plants are cold-tolerant, and native California coastal plants are salt-tolerant. Generally, because native plants have adapted to local conditions, they are more environmentally friendly, requiring less water, fertilizer, and effort in pest control, while providing optimal food and shelter for native wild animals.
Native plants also have potential medicinal uses. For example, in the 1960's, pharmacology studies showed that a compound from the Pacific yew, Taxus brevifolia, had anti-cancer properties, but the quantities of the compound were too low for commercial purposes. By exploring similar, more abundant compounds in related yew species, scientists were able to develop the life-saving breast cancer drug Taxol®. Without knowing which species were closely related to Taxus brevifolia, scientists would not have been able to develop Taxol.
But how do scientists determine which other plants a particular species is related to? The answer is cladistics. Cladistics is the organization of organisms into family trees based on characteristics. Historically, scientists used physical characteristics, like the shapes of the leaves or similarities in life cycles, but in the DNA age, the most common characteristics are sequence-based. Comparisons between the nucleotide makeup, or sequence, of particular genes allow scientists to see how closely they are related, and thus, group the organisms accordingly. Fewer nucleotide differences suggest a closer relationship (i.e., a more recent common ancestor), while more nucleotide differences suggest the organisms are more distantly related.
In this science project, you will make a cladogram centered around native plants you collect and identify. During this process, you will extract DNA from the native plants you've collected, use that DNA to amplify - by polymerase chain reaction (PCR) - part of the gene that encodes the large subunit of the chloroplast enzyme ribulose bisphosphate carboxylase/oxygenase (also known as rubisco), and send the PCR product to a sequencing facility for sequencing. Remember, this is the cutting edge of science; if you end up sequencing a native plant whose rubisco nucleotide sequence hasn't been documented before, your data can be entered into GenBank, the public repository for genetic sequences!
Terms and Concepts
- Native plant
- Cladistics
- Characteristic
- Sequence
- Cladogram
- Polymerase chain reaction (PCR)
- Chloroplast
- Ribulose bisphosphate carboxylase/oxygenase (also known as rubisco)
- GenBank
- Gel electrophoresis
- Primers (also called oligos)
Questions
- What does the rubisco enzyme do?
- What is the theory behind PCR?
- How does gel electrophoresis work?
- What are the methods of DNA sequencing?
- How are cladograms made?
- What kind of information do cladograms provide scientists?
- How does the evolutionary rate of a particular gene influence its usefulness in making cladistic comparisons?
Bibliography
This science project was adapted from a classroom lab activity developed by the East Bay Biotechnology Education Program. The student lab handbook that accompanies this lab in the classroom is a great resource for an overview of many of the concepts in this science project.
- Rosenbaum, S., Panico, E., and Shellem, B. (n.d). High School Chloroplast Sequencing Project: Student Guide. Retrieved March 25, 2008.
Most states have a local native plant society. The website below will give you an overview of regional native plants and contact information for nurseries and native plant societies, which can serve as additional information resources.
- PlantNative. (n.d.). Plant Native. Retrieved March 25, 2008.
These websites provide good overviews of PCR.
- Dolan DNA Learning Center. (n.d.). Biology Animation Library: Polymerase Chain Reaction (PCR). Retrieved March 25, 2008.
- Brown, J. (1995). What the Heck is PCR?. Retrieved December 3, 2014.
These websites provide good overviews of gel electrophoresis.
- Dolan DNA Learning Center. (n.d.). Biology Animation Library: Gel Electrophoresis. Retrieved October 3, 2013.
- Wikipedia Contributors. (2008, March 3). Gel Electrophoresis. Wikipedia: The Free Encyclopedia. Retrieved March 4, 2008.
These websites provide good overviews of sequencing.
- Dolan DNA Learning Center. (n.d.). Biology Animation Library: Cycle Sequencing. Retrieved March 25, 2008.
- Wikipedia Contributors. (2008, March 26). DNA sequencing. Wikipedia: The Free Encyclopedia. Retrieved March 26, 2008.
This website provides a good overview of cladistics.
- Thanukos, A. (2006). Phylogenetic systematics, a.k.a. evolutionary trees. Retrieved March 25, 2008.
Materials and Equipment
Note: This science project requires a large number of laboratory staples and special equipment. If your school does not have this kind of equipment, you might need to find a mentor at a local junior college, university, or biotechnology company who would be willing to give you access to and help you with the materials and equipment listed below.
These items can be purchased from Carolina Biological Supply Company, a Science Buddies Approved Supplier:
- Agarose
- TBE (Tris-Borate-EDTA) buffer (500 mL)
- This is the running buffer for the gel electrophoresis.
- Alternatively, instructions for how to make this buffer from scratch can be found in many laboratory manuals and at How to Make TBE Buffer in 3 Easy Steps.
- Note: If you are ordering this chemical through Carolina Biological Supply Company, the chemical must be ordered by a teacher and shipped to a school or business address, so plan accordingly.
- Loading dye. Note: If you are ordering this chemical through Carolina Biological Supply Company, the chemical must be ordered by a teacher and shipped to a school or business address.
- Staining tray
- Chemical splash safety goggles
- Ethidium bromide. Note: If you are ordering this chemical through Carolina Biological Supply Company, the chemical must be ordered by a teacher and shipped to a school or business address.
- UV safety goggles
- Disposable gloves. Alternatively, these can be purchased at a local drug store or pharmacy. If you are allergic to latex, use vinyl or polyethylene gloves.
You will also need to gather these items:
- Leaves from three native plants; see "Plant DNA Extraction" in the Experimental Procedure for tips on how to select these (1 leaf per plant)
- Permanent marker
- Micropipettes (P20 and P200/P1000) and corresponding pipette tips
- Sterile double-distilled water (ddH2O)
- Plain white paper (3 sheets)
- PCR tubes (16), size 0.2 milliliters (mL)
- Sterile toothpicks (3)
- Refrigerator
- PCR primers for amplifying rubisco large subunit
- Two sets of primers are needed (total of 4 primers):
- Primer mix #1
- Forward primer 5' ATGTCACCACAAACAGAAAC 3'
- Reverse primer 5' CTTCACAAGCAGCTAGTTC 3'
- Primer mix #2
- Forward primer 5' ATGTCACCACAAACAGAAAC 3'
- Reverse primer 5' TCCTTTTAGTAAAAGATTGGGCCGAG 3'
- Primer mix #1
- Primers, also called oligos, can be ordered online from a variety of companies. An example of a company that will sell primers to the general public is (Eurofins Genomics).
- It may be easier to order the primers already in solution rather than lyophilized (dry). If they are lyophilized, you will have to re-suspend them in solution prior to starting your experiment.
- When you are making the primer mixes, combine the forward and reverse primers in a 1:1 ratio, each at 100 pM/µl concentrations.
- Two sets of primers are needed (total of 4 primers):
- AmpliTaq Gold® PCR Master Mix was used to troubleshoot this protocol, but any brand PCR reagents should work, as long as the final concentrations are:
- dNTP (200 µM each)
- MgCl2 (5 mM)
- Taq buffer (1x)
- Taq polymerase; units needed for reaction will depend on the exact brand of polymerase; read and follow individual product recommendations.
- Thermocycler
- Gel electrophoresis apparatus
- 100-bp DNA ladder, available from online science education vendors like Bio-Rad laboratories http://www.bio-rad.com, catalog #170-8353EDU
- Camera for photographing gel
- UV light box
- Computer with internet connection
- Lab notebook
Disclaimer: Science Buddies participates in affiliate programs with Home Science Tools®, Amazon.com, Carolina Biological, and Jameco Electronics. Proceeds from the affiliate programs help support Science Buddies, a 501(c)(3) public charity, and keep our resources free for everyone. Our top priority is student learning. If you have any comments (positive or negative) related to purchases you've made for science projects from recommendations on our site, please let us know. Write to us at [email protected].
Experimental Procedure
Note: Dr. Baysdorfer, a professor at California State University, East Bay, has volunteered to perform the actual sequencing reactions to make this project possible. If you plan to rely on his services you must email him prior to beginning your project to check that he is available to run your sequencing reactions. See "Sending Sample for Sequencing" below for more details.
Before beginning this science project, make sure you have all the necessary materials and equipment. You will also need to have done your background research and fully understand the principles behind PCR, gel electrophoresis, sequencing, and cladistics. The techniques in this science project are fairly advanced; the assumption is that you will either be familiar with using the PCR machine and gel electrophoresis equipment through your work in class, and/or will be using the equipment with a mentor. When in doubt, ask a teacher or mentor for advice.
Plant DNA Extraction
- Gather healthy green leaves from three native plants. Identify each plant using field guides or by taking samples from known plants, such as those labeled at a nursery or botanical garden. If you're taking samples from a nursery or garden, make sure to obtain permission first.
- Note: Although in the end only one plant sample can be sent for sequencing, we recommend that you start with three different types of plants in case one or more of them is so divergent in sequence that it fails to amplify using either primer set.
- Give each plant a unique identification code. For example, if you gathered leaves from Ribes amarum (bitter gooseberry) and Quercus agrifolia (coast live oak) you could label the R. amarum "A" and the Q. agrifolia "B."
- For each sample, pipette 200 µl of sterile double-distilled water (ddH2O) into a PCR tube. Make sure to label each tube with the identification code of the plant sample you are going to place in it. For example, the tube containing R. amarum would be labeled "A."
- Place the first plant sample on a clean white sheet of paper.
- Punch out a small leaf disk by pressing the end of a sterile pipette tip into the plant leaf. The disk will be slightly larger than the pipette tip and will stick to the tip. If the plant is especially fibrous, you might have to apply pressure to the tip and pull the excess leaf tissue away from the pipette tip.
- Let the leaf disk fall off the pipette tip into the water in the PCR tube. Because it's so small, make sure the disk is in the tube. Remember to double-check that the PCR tube is labeled properly.
- Take a toothpick and guide the leaf disk to the bottom of the tube.
- Grind the leaf disk into fine particles by twisting and turning the toothpick for 3-5 minutes. The water may turn a light green color and there may be pieces of tissue floating in the water.
- Repeat steps 3-8 for the other two native plant leaves. Store the tubes of plant DNA in the refrigerator until you are ready to proceed to the PCR steps.
PCR of Rubisco Large Subunit
- Label two PCR tubes per plant sample. One tube should be marked "1" for primer set #1 and the other should be marked "2" for primer set #2. For example, the tubes for R. amarum would read "A1" and "A2," while the Q. agrifolia tubes would read "B1" and "B2."
- Pipette 7 µl of ddH2O into each PCR tube.
- Pipette 11 µl of Master Mix into each PCR tube.
- To all PCR tubes marked "1," use a new pipette tip to add 2 µl of primer mix 1.
- To all PCR tubes marked "2," use a new pipette tip to add 2 µl of primer mix 2.
- Remove your plant DNA solutions from the refrigerator. Using a new pipette tip each time, add 2 µl of the plant DNA solution to each PCR tube. Pipette up and down 15-20 times to mix all the reagents. Check your labels carefully to make sure you are adding the DNA to the correspondingly labeled PCR tube.
- Make up two negative controls; one control for each primer mix.
- These controls should contain 10 µl of Master Mix, 2 µl of primer mix, and 9 µl of ddH2O. Do not add DNA. Remember to use a new pipette tip for each component.
- Label the tubes "neg1" and "neg2" for negative control of primer mix 1 and negative control of primer mix 2.
- Place the PCR tubes (six containing plant DNA and two negative controls, for a total of eight tubes) in the thermocycler and use the following cycling parameters to amplify the rubisco large subunit:
- 94°C for 7 min
- 35 cycles of:
- 94°C for 30 sec
- 55°C for 30 sec
- 72°C for 2 min
- 72°C for 7 min
- 4°C hold
- Store the PCR products in the refrigerator until you are ready to run your gel.
Electrophoresis of PCR Products
You will need to use gel electrophoresis to visualize your PCR products in order to determine if the primers successfully amplified the rubisco large subunit from your plant DNA samples.
- Make a 1.5 percent agarose gel (1.5 g of agarose for every 100 mL of TBE buffer). The exact volume of agarose solution you will need depends on the size of your electrophoresis gel box. Read the manual that accompanies the gel electrophoresis box to get a proper volume estimate.
- While your gel is solidifying, prepare your samples for electrophoresis.
- Briefly centrifuge the eight tubes containing your PCR products to bring the liquid to the bottom of the tubes. If you do not have a centrifuge, gently tap the tubes on a countertop until all the liquid has collected at the bottom of the tubes.
- Take out eight clean PCR tubes (one for every PCR product, including the two negative controls) and carefully label them with your identification codes (for example, A1 for the R. amarum sample amplified with primer mix #1).
- Add 5 µl of loading dye to each of the newly labeled tubes.
- Using a new pipette tip for each sample, transfer 7 µl of each PCR product from the original PCR product tube to the corresponding newly labeled tube containing loading dye. Pipette up and down gently to mix the dye and PCR product. These tubes with loading dye + PCR product are your samples for electrophoresis.
- Return the original PCR product tubes to the refrigerator. Each tube should still contain approximately 15 µl of PCR product.
- Load your loading dye + PCR product samples into the gel.
- In addition to your samples, you will want to load 5 µl of a 100-bp DNA ladder.
- Make sure to write down in your lab notebook which samples are loaded into which wells. You may find it easiest to place the 100-bp DNA ladder in one of the middle wells and run all the primer set #1 samples to the left of the ladder and all the primer set #2 samples to the right of the ladder.
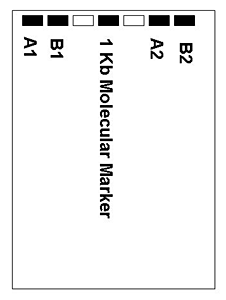
Diagram of samples in a gel. The gel includes seven samples in wells #1, 2, 4, 6, and 7 which are labeled A1, B1, 1Kb Molecular Marker, A2, and B2. Wells #3 and 5 are empty.
Figure 1. The diagram shows an example of how to organize your samples in the gel. - When all the samples are loaded, attach the electrodes from the gel box to the power supply. Run the gel until the loading dye has migrated approximately halfway down the gel.
- Once your samples have finished migrating, you will need to visualize the PCR products in the gel by staining and photographing the gel.
- Place the agarose gel in a staining tray.
- Pour enough ethidium bromide (0.5 µg/mL) to cover the gel. Wait 15 minutes. Caution: Ethidium bromide is a carcinogen. Always wear gloves and safety goggles when handling.
- Pour the ethidium bromide solution from the staining tray back into its storage bottle.
- Pour enough water into the staining tray to cover the gel. Wait 5 minutes.
- Pour the water out of the staining tray into a hazardous waste container and place the stained gel on a UV light box. Caution: Ultraviolet light can damage your eyes and skin. Always wear protective clothing and UV safety goggles when using a light box.
- Place the camera over the gel and take a photograph.
- Analyze the photograph of your gel to determine which plant samples amplified well.
- If there was good amplification, you should see a single, strong band, approximately 200 base pairs (bp) in size. Both sets of primers result in roughly the same-size PCR product. Note: it is possible that only one set of primers works for a given plant.
- Choose only one PCR product which amplified well to send for sequencing.

An agarose gel is stained and labeled with two primer sets separated by a 1 Kb molecular marker. Under ultraviolet light the samples and marker glow in a faint purple band and can be identified for sampling purposes.
Figure 2. These samples show strong bands, which are approximately 200 bp in size, on the agarose gel. They are suitable for sequencing.
/-/https/www.sciencebuddies.org/cdn/Files/3282/10/Genom_img055.gif)
/-/https/www.sciencebuddies.org/cdn/Files/3283/10/Genom_img056.jpg)
Sending Sample for Sequencing
- Before beginning this science project, email Dr. Baysdorfer at California State University, East Bay ([email protected]). Inform him that you are a student doing the Science Buddies Chloroplast Sequencing Project. Give him your best estimate of when you will be sending him your sample and ask him if that is a convenient time for him to sequence it. Remember, he is doing the sequencing on a volunteer basis and you may have to adjust your experimental timeline slightly to accommodate his schedule.
- Once Dr. Baysdorfer gives you the okay, proceed with the experiment as outlined above and mail him the sample. (The sample is the half of the PCR product you have been keeping in the refrigerator.)
- Dr. Baysdorfer's reply will contain the address to which you should send the sample.
- Send the sample via overnight shipping (FedEx, Express Postal Service Mail, or a similar service). The sample will be okay out of the refrigerator for the 24-48 hours it takes to mail it.
- Clearly label the sample with species name, and which primer mix was used for the amplification.
- Dr. Baysdorfer can only accept one sample for sequencing.
- When sequencing is complete, Dr. Baysdorfer will send you the sequence by e-mail.
- Alternatively, if you have access to sequencing facilities through a mentor or a company that you can pay to sequence your samples, you may choose to do the sequencing yourself.
- If this is the case, there is no need to contact Dr. Baysdorfer.
- You may sequence as many samples as you see fit.
Analyzing the Sequence and Creating a Cladogram
- Dr. Baysdorfer will send you a file, called a trace or chromatogram, which is the output from the sequencing machine. You will need to use a program to "read" the trace file and convert it to a file containing the DNA sequence.
- FinchTV is a free program used to view and convert chromatograms. It can be downloaded from: CNet.
- Once you have installed FinchTV, open the program. Drag and drop the chromatogram file that Dr. Baysdorfer sent you directly into the open window of the FinchTV program. You will see a series of spikes in multiple colors; this is the sequence data and each spike represents a nucleotide.
- To convert the chromatogram into DNA sequence. Go to File, and select "Export, DNA Sequence: FASTA." The resulting file contains the DNA sequence and can be opened with a word processor program.
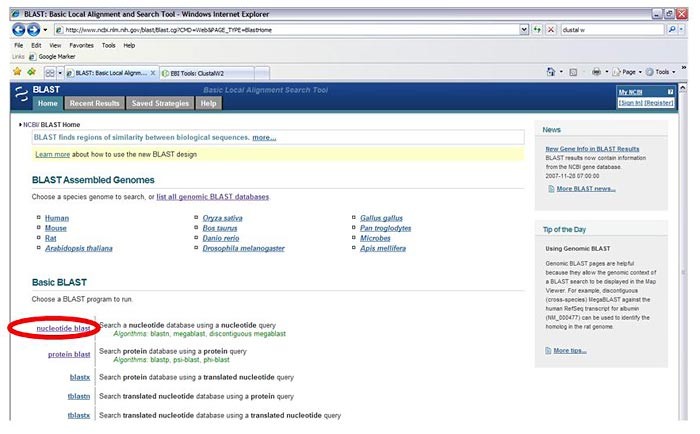
- Search for other plant rubisco sequences that closely match yours, using the BLAST (Basic Local Alignment Search Tool) from NCBI (the National Center for Biotechnology Information).
- Scroll down to the Basic Blast options and select "nucleotide blast."
A screenshot shows the nucleotide blast option highlighted on the blast.ncbi.nlm.nih.gov homepage. The nucleotide blast option is located near the left-center of the screen and is the first link under the Basic BLAST header.
Figure 3. The "nucleotide blast" option is highlighted in red. - Paste your PCR product DNA sequence (which you converted from the chromatogram) into the top box in the section labeled "Enter accession number, gi, or FASTA sequence."
- In the section labeled "Choose Search Set" leave the "Human genomic + transcript" bubble filled in and select "Nucleotide collection (nr/nt)" from the drop-down menu. This option will widen your search to all nucleotide sequences in GenBank and other linked databases.
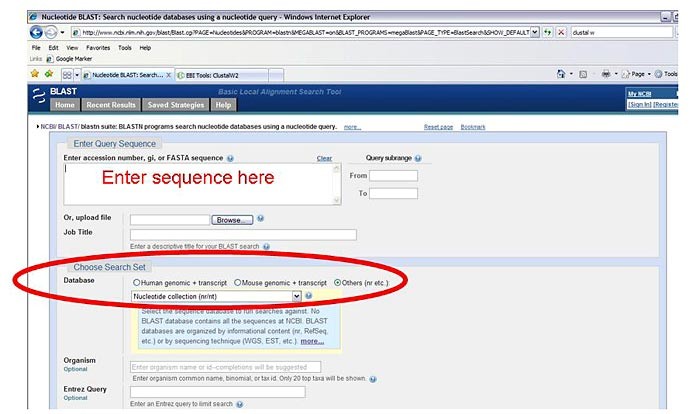
Screenshot of the nucleotide BLAST search box on the ncbi.nlm.nih.gov website. At the top of the BLAST query search page there is a text box where users can fill in search terms. An option under the search box that allow for different databases to be searched is highlighted and other databases is selected (necleotide collection is selected from the drop-down list).
Figure 4. The red text depicts where you should enter your sequence. The red circle highlights the correct database options. - Leave all other search options on their default settings and click on the "BLAST" button at the bottom of the screen to start the search.
- The search results page will have two sections. The first is a graphic representation of how well the search result sequences match your input sequence. The second is a ranked list of matching sequences. In order to rank the matches according to which sequence has the closest nucleotide sequence to your PCR product, click on the "Max ident" column to rank the matches by maximum identity to your input.
Figure 5. The red circle shows the location of the "Max ident" column.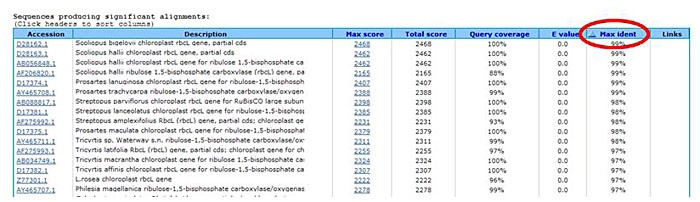
- Scroll down the list. Are any of the matches from the same species as your PCR product? If not, congratulations! You're the first to sequence the rubisco large subunit from that plant! If you submit your sequence data to GenBank, it will be added to the public databases so scientists worldwide can access it and learn from it.
Email to contact a Science Buddies scientist for help with submitting your sequence to GenBank.

- Scroll down to the Basic Blast options and select "nucleotide blast."
- Choose several of the BLAST matches to use in constructing a cladogram.
- Click on the accession code for the sequence you are interested in. This will take you to the report for that sequence.
A cropped screenshot of the BLAST results page on the ncbi.nlm.nih.gov website. The results page in the BLAST tool on the NCBI webpage show results listed that provide additional information such as the percentage match a result has to the specific query string. To the right of the list a column labeled
Figure 6. The red circle shows an example of an accession code. - Under the heading "Display," choose FASTA from the drop-down menu. FASTA is a text-based format for displaying sequence information. It is accepted by most other bioinformatics programs. Therefore, storing the sequences you are interested in with FASTA format is the best thing to do when you want to be able to use them with different bioinformatics programs later.
- From the "Send to" drop-down menu, choose "text." Copy the resulting FASTA-formatted sequence to a Word document for later use.
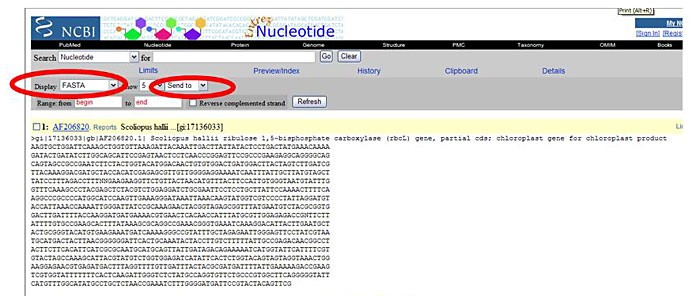
A screenshot shows a nucleotide sequence displayed on a page hosted by NCBI. Above the sequence there is a display drop-down list where FASTA is selected and send to text is chosen as well. The FASTA sequence will be saved in a text document.
Figure 7. This screenshot illustrates what a sequence looks like in FASTA format. The important options are highlighted in red circles. - Repeat the procedure for as many sequences as you are interested in comparing. You may want to take a sampling of both closely matching and less similar sequences.
- Click on the accession code for the sequence you are interested in. This will take you to the report for that sequence.
- Using ClustalW2, build a cladogram of your PCR product sequence and the BLAST matches you've chosen.
- Go to the ClustalW2 homepage http://www.ebi.ac.uk/Tools/msa/clustalw2/
- Paste, in FASTA format, all the sequences you want to use to make your cladogram, including the sequence for your PCR product.
- Click on the "Run" button to obtain your ClustalW2 results. All the other parameters can be left on their default settings.
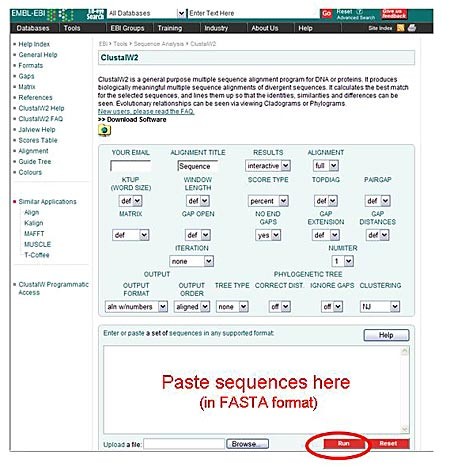
A screenshot shows the ClustalW2 tool hosted on a webpage, there is a large textbox at the bottom of the homepage where FASTA sequences can be pasted into.
Figure 8. Paste the FASTA-formatted sequences into the ClustalW2 tool, as shown in this diagram. - The results page includes an alignment of all the sequences you inputted, and at the bottom of the page is the cladogram depicting the relationships between the different sequences.
/-/https/www.sciencebuddies.org/cdn/Files/3284/10/Genom_img057.jpg)
/-/https/www.sciencebuddies.org/cdn/Files/3285/10/Genom_img058.jpg)
/-/https/www.sciencebuddies.org/cdn/Files/3286/21/Genom-img059.jpg)
/-/https/www.sciencebuddies.org/cdn/Files/3290/12/Help_SK.gif)
/-/https/www.sciencebuddies.org/cdn/Files/3287/13/Genom-img060)
/-/https/www.sciencebuddies.org/cdn/Files/3288/10/Genom_img061.jpg)
/-/https/www.sciencebuddies.org/cdn/Files/3289/10/Genom_img062.jpg)
Ask an Expert
Global Goals
The United Nations Sustainable Development Goals (UNSDGs) are a blueprint to achieve a better and more sustainable future for all.
/-/https/www.sciencebuddies.org/cdn/Files/19746/5/E-WEB-Goal-03.png)
/-/https/www.sciencebuddies.org/cdn/Files/19752/5/E-WEB-Goal-09.png)
Variations
- What is the evolutionary relationship between the plant you sequenced and important agricultural or research plants? Rather than building a cladogram with closely related plant species, use the GenBank database to find the nucleotide sequence of specific plants like Arabidopsis, wheat, corn, and rice, and use those to build your cladogram.
- Use morphological characteristics to build a cladogram that includes the plant you sequence and other plants of your choice. How does your morphology-based prediction match the sequence-based cladogram?
- Do other chloroplast genes result in the same cladogram as the one built by aligning the rubisco gene? Use existing GenBank sequences to compare cladograms of the same plants with different gene inputs.
- If you're interested in other cladistics-based science projects, check out Tree of Life - II
Careers
If you like this project, you might enjoy exploring these related careers:
/-/https/careerdiscovery.sciencebuddies.org/cdn/Files/1662/17/unsplash-oz1NzV2xWXU.jpg)
/-/https/careerdiscovery.sciencebuddies.org/cdn/Files/1505/18/iStock-1187351763.jpg)
/-/https/careerdiscovery.sciencebuddies.org/cdn/Files/1171/18/pexels-photo-4033151.jpg)
/-/https/careerdiscovery.sciencebuddies.org/cdn/Files/956/18/unsplash-mVV0s8ZvEm4.jpg)

/-/https/img.youtube.com/vi/tVrlD2KIvk4/0.jpg)
/-/https/img.youtube.com/vi/Mfk3Qk3-LWU/0.jpg)
/-/https/img.youtube.com/vi/VfWoOQsueBE/0.jpg)