Abstract
Have you ever wondered why a plant that grows well in one environment may not survive in a different environment? For example, plants that grow well in a wet jungle would probably not do so well in a dry desert, lacking enough water. This is because plants have adapted to their specific environment. Some plants have even adapted to tolerate chemicals that would usually be toxic, such as various heavy metals. In this plant biology science project, you will investigate whether different varieties of the same plant (the well-studied Arabidopsis thaliana) are more resistant to heavy metals than others.
Summary
None
The Arabidopsis thaliana seeds for this science project need to be specially ordered in advance with the help of a parent or teacher. See the Materials and Equipment list for details.
Take all proper safety precautions when working with the heavy metals. Wear gloves. You may need additional protection, such as goggles.
Teisha Rowland, Ph.D., Science Buddies.
Thanks to Jelena Brkljacic, Ph.D., Arabidopsis Biological Resource Center (ABRC), The Ohio State University, for assistance with developing this science project.
This project is based on the Arabidopsis Biological Resource Center (ABRC)'s Think Green module:
- Brkljacic, J. (2011). Arabidopsis as a teaching tool: Think Green Module. ABRC, The Ohio State University. Retrieved September 27, 2013.
/-/https/www.sciencebuddies.org/cdn/Files/5561/8/plants_leaf_length.jpg)
Objective
Investigate whether some varieties of Arabidopsis thaliana are more resistant to heavy metals than others.
Introduction
Why do tropical jungle plants usually not grow well in a dry desert or on snowy mountains? We know it is because the plants have adapted to their environment, or natural surroundings. But what does this mean exactly? It has to do with the genetics of the plants. If plants grow well in a certain environment, they usually make more plants and pass on their genetics, or deoxyribonucleic acid (DNA), to the new plants. However, if plants do not survive in an environment, they cannot make more plants, and their DNA is not passed on. (Unlike animals, plants cannot walk away from an area where they do not live well — the plants are pretty much stuck there!) This means that over many, many generations, a certain environment may support plants well-equipped to live there because of their genetics.
The genetics of an organism are called its genotype. A plant's genotype affects how it looks, grows, and responds to its environment. The overall physical appearance of a plant based on its genotype is called the plant's phenotype. Sometimes two plants in the same environment have different genotypes but look the same, or have the same phenotype. However, if those two plants are put in a different environment, they may respond differently, causing them to have different phenotypes (due to their different genotypes). For example, one of the plants could have a genotype that makes it able to withstand drought, or be drought resistant, more than the other plant, which may be susceptible to drought. Consequently, if the plants receive much less water than normal, the drought-resistant plant may still grow well, while the drought-susceptible plant may become wilted and possibly die.
Scientists often study plants to see how changes in their environment affect them. But scientists do not study plants just to understand the plants themselves — they want to learn how the entire ecosystem (the community of plants, animals, and other organisms that all interact with each other) could be affected by the changes. For example, we need to know how climate change and environmental changes, such as amounts of rainfall and the pollution of waters and soils, could affect farm crops, because we depend on that food to survive. Among the pollutants scientists investigate are heavy metals, such as lead, mercury, nickel, and copper. Heavy metals are toxic metals that can be hazardous to organisms exposed to them. Heavy metals can be found naturally, although humans have also contaminated areas with them, such as by dumping mine waste contaminated with heavy metals.
In this plant biology science project, you will investigate whether some genotypes of the plant Arabidopsis thaliana are more resistant to heavy metals (or are less damaged from heavy metals) than other genotypes. Arabidopsis thaliana, shown in Figure 1, is a small, well-studied flowering plant that was the first to have its whole genome sequenced. This means that we know the entire pattern, or sequence, of its genetic material, or DNA.
/-/https/www.sciencebuddies.org/cdn/Files/5555/8/Arabidopsis_plant_toxic.jpg)
Figure 1. In this science project you will be using Arabidopsis thaliana plants, like the one shown flowering here.
The Arabidopsis genotypes you will be investigating are called Col-0, Lov-1, Ws-2, and Santa Clara. Here are some details on these genotypes:
- Col-0 (or Columbia) is a widely used genotype that was originally selected because it was fertile and hardy; it is commonly thought of in experiments as being the wild-type, or normal, Arabidopsis genotype.
- Lov-1 (or Lovvik) is a genotype that grows in an area covered with snow for much of the year, in northern Sweden.
- Ws-2 (or Wassilewskija) is a genotype that grows naturally in Wassilewskija, Russia.
- Santa Clara is a genotype that was found near San Jose, in Santa Clara County, California, and it accumulates a lot of nickel in its cells. Plants such as this that store heavy metals can help decontaminate soils.
Which Arabidopsis genotype do you think will be the most resistant to heavy-metal contamination in its water? Which do you think will be most susceptible to this contamination? Although the Santa Clara genotype can accumulate a lot of nickel in its cells, do you think this means it will still be able to grow well when exposed to nickel or other heavy metals?
If you do not have much experience growing plants in a controlled setting, or want to learn more about some of the concepts covered here, you can watch the video, which was made by the Arabidopsis Biological Resource Center (or ABRC) for the Think Green module that this science project is based on. Note: In ABRC's Think Green module, four different treatments are performed, but in this science project you will only be performing one of these treatments (heavy-metal contamination).
/-/https/i.ytimg.com/vi/8O5qtbQuNhQ/maxresdefault.jpg)
Terms and Concepts
- Environment
- Genetics
- Genotype
- Phenotype
- Resistant
- Susceptible
- Ecosystem
- Climate change
- Heavy metals
- Arabidopsis thaliana
- Wild-type
- True leaves
- Germination
Questions
- How is a genotype related to a phenotype?
- What does it mean if a plant is "drought-resistant"?
- What are some examples of heavy metals?
- How do you think heavy metals will affect plants that are susceptible to them?
Bibliography
The following resources give information on Arabidopsis thaliana and heavy metals:
- ABRC. (n.d.). Seed handling. The Ohio State University. Retrieved September 27, 2013.
- United States Department of Labor. (n.d.). Toxic metals. Occupational Safety & Health Administration. Retrieved September 27, 2013.
This science project is based on the Arabidopsis Biological Resource Center's Think Green module. (Note: You may notice that some of these resources refer to the different plants as different ecotypes as well as different genotypes. The term "ecotype" means that the plant's characteristics are related to its ecological surroundings. For the purposes of this science project, we will just refer to the different types of plants as different "genotypes.") The following resources provide information on this module:
- Brkljacic, J, and Knee, E. (2011). Arabidopsis as a teaching tool: Think Green Module. ABRC, The Ohio State University. Retrieved September 27, 2013.
- ABRC Outreach. (2012, July 2). TRAINED Think Green Module. ABRC, The Ohio State University. Retrieved September 27, 2013.
- ABRC Outreach. (n.d.). Greening the classroom. ABRC, The Ohio State University. Retrieved September 27, 2013.
Materials and Equipment
- Masking tape
- Permanent marker
- Plastic pots, about 2.5 inch (16). Here are options for 2.7 inch square clear pots, and 2.5 inch round green pots. Make sure the pots have a hole, or holes, in the bottom.
- Cotton cheesecloth. This can be purchased from a craft store or fabric store, or through online suppliers such as Amazon.com.
- Large tray, basin, or bucket for mixing soil
- Disposable gloves. They can be purchased at a drug store or pharmacy, or through an online supplier like Amazon.com. If you are allergic to latex, use vinyl or polyethylene gloves.
- Peat-based soil, which is 45% to 80% peat moss (at least 0.2 cubic feet or about 6 quarts; you should get enough to fill all of the pots). For example, Sunshine Mix #1 or Espoma Organic Potting Mix should work well. You may be able to find Espoma Organic Potting Mix, or a similar soil in a plant nursery or garden center, or through online suppliers.
- Time-release fertilizer, such as Osmocote 14-14-14, which is 14% nitrogen, 14% phosphate, and 14% potassium. You will need enough fertilizer for all of the pots of soil you prepare. Fertilizer is available at plant nurseries and garden centers, or online through suppliers such as Amazon.
- Measuring cup
- Water
- Arabidopsis thaliana seeds from the Arabidopsis Biological Resource Center's Think Green Module. Note: You will need to ask a parent or teacher to register with TAIR and order the seeds for you, although the seeds themselves are free. It may take one to two weeks for the seeds to arrive, so plan accordingly.
- Wax paper
- Bottle cap
- Eye dropper or medicine dropper, available at pharmacies or the pharmacy section of grocery stores
- Tray or other shallow container to place the pots in. It must be able to hold all of the pots and fit inside a refrigerator. Multiple trays can be used if one is not big enough.
- Plastic wrap or clear plastic lid to place over the pots
- Refrigerator
- Artificial plant light setup. A setup that should work is the Hydrofarm JSV2 2-Foot Jump Start T5 Grow Light System, available from Amazon.com. Alternatively, you could grow the plants near a sunny window, although it is not recommended.
- Thermometer. A thermometer is available through Amazon.com.
- Graduated cylinder, at least 25 mL. A 100 mL graduated cylinder is available through Amazon.com.
- Ruler, metric
- Digital camera
- Copper sulfate or nickel sulfate (2 g to 5 g). These are the heavy metals you can test. Copper sulfate can usually be purchased from pet stores, and copper sulfate pentahydrate, which is a version of copper sulfate that will work in this science project, is available through Amazon.com.
- Caution: Take all proper safety precautions when working with the heavy metals. Wear gloves, and you may need additional protection, such as goggles.
- 1 L plastic container with a lid. This is for preparing and storing the heavy metal solution. Alternatively, you can use smaller containers, with lids, and make up smaller amounts of the solution.
- Digital scale with 0.1 g increments. A digital scale that would be suitable (the Fast Weigh MS-500-BLK Digital Pocket Scale) is available from Amazon.com
- Volunteers (3) to evaluate the plants at the end of the experiment
- Lab notebook
Disclaimer: Science Buddies participates in affiliate programs with Home Science Tools®, Amazon.com, Carolina Biological, and Jameco Electronics. Proceeds from the affiliate programs help support Science Buddies, a 501(c)(3) public charity, and keep our resources free for everyone. Our top priority is student learning. If you have any comments (positive or negative) related to purchases you've made for science projects from recommendations on our site, please let us know. Write to us at [email protected].
Experimental Procedure
Preparing the Plants
In this part of the science project, you will prepare your plants for testing. You will plant four different Arabidopsis thaliana genotypes, each in four different pots. (Although there are additional seeds in the Think Green module package, use only the seeds for the heavy metals experiment.) You can watch the video in the Introduction to see most of these steps.
- In this science project, you will be following the general timeline as shown in Table 1. You can refer to this timeline as a quick guide while you go through the science project, but be sure to read and go through all of the detailed steps.
| Time | Experiment Event | Watering |
| Day 0 | Prepare seeds in pots and place them in the refrigerator. | Fill the tray with about 1.5 centimeters (cm) of water. Do not add water to the soil in the pots. |
| Days 2 to 4 | Remove seeds from the refrigerator and place them under the lights. | Keep the tray filled with about 2 cm of water until the seeds germinate. |
| Days 5 to 9 | Seeds should germinate (three to five days after removing them from the refrigerator). | Continue watering the plants by adding water to the tray, and not directly to the pots. Do not let the soil dry out until the plants have their first true leaves. |
| Week 2 | First true leaves may start appearing. Start collecting data about your plants. | Once most of the plants have their first true leaves, add water to the tray whenever you notice that the soil just begins to dry, but carefully pour any excess off after an hour. |
| Week 3 | Continue collecting weekly data. | About one week after the plants have their first true leaves: Very gently water the pots by adding 25 mL of water to the top of each pot, directly on the soil (around the seedlings), using a medicine dropper. Continue to water whenever you notice that the soil just begins to dry, but do not leave your plants standing in water for over an hour. |
| Week 4 | Continue collecting weekly data. Start treating plants with heavy metals. | Continue watering the plants in the same way (dropping 25 mL water per pot), but start watering half of the plants with water containing heavy metals (the other plants will be controls). Water these treated plants with heavy metals five times and then switch back to watering all pots with plain water for the rest of the experiment. |
| Weeks 5 to 7 | Continue collecting weekly data. | |
| Week 8 | Collect weekly data and final data/observations. |
Table 1. This is a general timeline for doing this science project. It shows what experimental event will be taking place, and generally how you will be watering the plants, at different stages of the project. This table may be downloaded and printed in pdf.
- Using masking tape and a permanent marker, label the pots with the strains you will put in each and the conditions each will test. You should have a total of 16 pots to label.
- Four pots will hold Col-0 seeds.
- Two of these pots will be treated with heavy metals and two will not (the untreated ones will be your controls in each of the strains).
- Four pots will hold Lov-1 seeds.
- Two of these pots will be treated with heavy metals and two will not.
- Four pots will hold Ws-2 seeds.
- Two of these pots will be treated with heavy metals and two will not.
- Four pots will hold Santa Clara seeds.
- Two of these pots will be treated with heavy metals and two will not.
- Four pots will hold Col-0 seeds.
- Put a small piece of cheesecloth in the bottom of each pot so that it covers the holes, as shown in Figure 2, and helps prevent soil from leaking out.
- For pots that are 2.5 inches square, the right size will probably be about 6 x 6 cm.
/-/https/www.sciencebuddies.org/cdn/Files/5556/8/plants_pot_cheesecloth.jpg)
Figure 2. In the bottom of each pot, place a small piece of cheesecloth to cover the holes so soil does not leak out.
- Prepare the soil by putting it in a large tray, basin, or bucket, putting on a pair of gloves, and mixing fertilizer into the soil with your hands. Then soak the soil with water so that the water is evenly distributed throughout the soil.
- Prepare enough soil so that you can at least fill each pot to the top (it is good to prepare some extra). You may need to do some calculations to figure out how much soil this is.
- For adding the right amount of fertilizer, use the amount recommended on the fertilizer's packaging. If you are using Sunshine Mix # 1 soil and Osmocote 14-14-14 fertilizer, use 0.5 tablespoon (tbsp.) for every 10 cups (2.5 quarts) of soil.
- Fill each pot to the top with damp soil, gently patting it down as you go. You want to flatten the soil, but do not press down on the soil. If the soil is too compacted, it will be hard for the plants to grow their roots in it.
- In each pot, sprinkle and evenly space the Arabidopsis seeds on the soil, putting about 12 seeds in each pot.
-
To measure and prepare the seeds, make a small square of wax paper (about 5 x 5 cm) and push it down into a bottle cap while avoiding making wrinkles (so the seeds do not get trapped), as shown in Figure 3.Figure 3. Cut a small square of wax paper and place it in a bottle cap, as shown here, to measure and prepare the seeds.
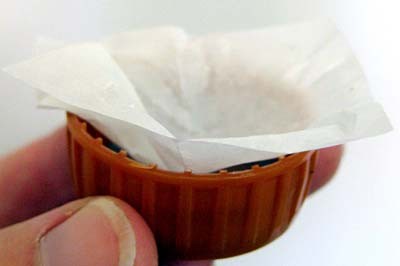
- Put one type of strain on the wax paper (in the bottle cap), pouring out at least 48 seeds.
- Because you have four pots for each type of strain, and you want about 12 seeds per pot, you will want a total of 48 seeds of each type (4 x 12 = 48).
- Use the eye or medicine dropper to add a few drops of water to the seeds on the wax paper. Gently suck the seeds and water up and down in the dropper a few times, making sure all of the seeds get wet and mixed around.
- Using the dropper, put at least 12 seeds in each pot labeled to have that type of seed. Evenly spread the seeds on the surface of the soil.
- You want at least 12 seeds in each pot, but no more than 20. Tip: It is better to put too many seeds in a pot than too few. Extra plants that sprout can be removed later.
- Be sure not to cover any of the seeds with soil. They need light to germinate, or sprout.
- Repeat steps 5a to 5e for each strain, using a fresh wax paper square in the bottle cap for each type and putting seeds in all of the pots.
- Also be sure to rinse out the dropper with fresh water between using the different seed types so you do not contaminate your pots with the wrong seed type.
-
- Place the pots in a tray or other shallow container, as shown in Figure 4. Fill the tray so there is about 1.5 cm of water in it. Do not add water to the soil in the pots.
- You can use multiple trays if you do not have a single tray large enough to fit all of the pots. If you use multiple trays, make sure you treat all of the pots in them similarly (such as keeping the same amount of water in each tray).
/-/https/www.sciencebuddies.org/cdn/Files/5557/8/Plants_seeds_measure.jpg)
/-/https/www.sciencebuddies.org/cdn/Files/5558/8/plants_pots_tray.jpg)
Figure 4. Place the pots in a tray or shallow container. Use multiple trays if one is not large enough.
- Cover the pots and tray with a clear plastic lid or plastic wrap, as shown in Figure 5.
- Do not let the lid or plastic wrap touch the soil.
- The lid/covering does not need to be airtight. It is just there to keep the seeds moist.
- This will help keep the seeds moist and promote germination.
/-/https/www.sciencebuddies.org/cdn/Files/5559/8/plants_pots_lid.jpg)
Figure 5. Place a clear plastic lid (or plastic wrap) on the pots.
- Keep the tray of pots in the refrigerator for somewhere between two to four days (you can pick what works best for your schedule).
- Cold-treating the seeds like this helps synchronize their germination so that they will sprout around the same time.
- In your lab notebook, write down the date when you put the seeds in the refrigerator.
- After the cold treatment, take the tray of pots from the refrigerator (but leave the lid on) and place them under artificial plant lights (highly recommended) or where they will get some direct natural light.
- If you are using artificial plant lights, place the lights close to the pots, about 15 cm above them. Leave the lights on constantly (24 hours a day, seven days a week).
- If you are using natural light, make sure the plants will get some direct light. When they get older, they can take more direct light. For the plants to flower, they need 16 hours of light per day.
- In your lab notebook, record the date when you took the seeds from the refrigerator and the light conditions where you then placed the seeds.
- Make sure there is about 2 cm of water in the tray until the seeds germinate.
- You may need to add water to the tray one to two times a week until the seeds germinate.
- If the water seems stagnant (smelly or very dirty), carefully remove the pots temporarily, pour the water out, clean the tray, and add fresh water to it.
- Check on the seeds daily to see if they have germinated. Depending on the exact conditions, the seeds should germinate within three to five days after you take them from the refrigerator. When they germinate, carefully lift the lid or plastic wrap up about 1 cm and then, a few days later, remove the lid completely.
- In your lab notebook, record the date when the seeds germinated.
- When they first sprout, the plants are tiny, such as the ones shown in Figure 6, so you will need to look closely for them.
- The seeds germinate best at 20 ° Celsius (C) to 22 °C (68 ° Fahrenheit [F] to 72 °F), so adjust your setup if necessary.
/-/https/www.sciencebuddies.org/cdn/Files/5560/9/plants_sprouting.jpg)
Figure 6. The plants are tiny right when they germinate, or sprout.
- Do not let the soil dry out until the plants have their first true leaves (which may start appearing about two weeks after you put the seeds in their pots). Continue to water the plants by adding water to the tray, and not directly to the pots (the force of the water may damage the delicate plants).
- The first two leaves the plant grows (the pair it sprouts with) are called the cotyledons. Cotyledons are not considered true leaves. The leaves that the plant grows after the cotyledons are known as the plant's true leaves.
- When the plants only have cotyledons, they are very delicate and need damp soil to survive.
- Once most of the plants have their first true leaves, water whenever you notice that the soil just begins to dry out, but do not leave your plants standing in water for an extended period of time, which can cause the plants to rot and encourage parasites. Pour off excess water after an hour. (You may need to move the pots briefly to pour off the extra water.)
- When two weeks have passed since you put the seeds in the pots, go on to the next section in the Procedure.
Testing the Plants
In this part of the science project, you will investigate how heavy metals affect your plants.
- Note on watering the plants throughout the testing period (this note applies to the remainder of the experiment, and once you are ready you can start collecting data in step 3): Continue to water whenever you notice that the soil just begins to dry, but do not leave your plants standing in water for an extended period of time. Pour off excess water after an hour.
- About a week after the plants have their first true leaves (which may be about three weeks since you put the seeds in their pots), very gently water the pots by adding water to the top, directly on the soil. Use a medicine or eye dropper to gently squirt a total of 25 milliliters (mL) of water on the soil of each pot. Squirt the water around the seedlings, not letting any water directly land on the plants. They are still fragile. (Use a graduated cylinder to measure the 25 mL.)
- Depending on your exact conditions, you may end up watering the pots about two times a week.
- Note on the ideal temperatures for the plants throughout the testing period: About 21 °C to 25 °C (70 °F to 77 °F) is ideal for growing Arabidopsis plants, so adjust the temperature of your setup if needed.
- Two weeks after you sowed the seeds, the plants may be at the point where they only have cotyledons or are just starting to develop their first true leaves. At this point, start collecting data about your plants by following step 4. (This will help you determine better how your plants are affected by the heavy metals.) In your lab notebook, create a data table like Table 2. You will record your data in this table.
| Leaf Lengths | Observations | |||||
| Genotype | Pot | Five Largest Leaf Lengths | Average Largest Leaf Lengths | Color of the leaves | Overall appearance | |
| Col-0 | Control Pot #1 | Leaf #1 | ||||
| Leaf #2 | ||||||
| Leaf #3 | ||||||
| Leaf #4 | ||||||
| Leaf #5 | ||||||
| Control Pot #2 | Leaf #1 | |||||
| Leaf #2 | ||||||
| Leaf #3 | ||||||
| Leaf #4 | ||||||
| Leaf #5 | ||||||
| Treated Pot #1 | Leaf #1 | |||||
| Leaf #2 | ||||||
| Leaf #3 | ||||||
| Leaf #4 | ||||||
| Leaf #5 | ||||||
| Treated Pot #2 | Leaf #1 | |||||
| Leaf #2 | ||||||
| Leaf #3 | ||||||
| Leaf #4 | ||||||
| Leaf #5 | ||||||
Table 2. Each week, record your data in this data table for each of the four genotypes. (You will need to make a different data table for each genotype, and for each week.) Be sure to date your data tables.
- Each week, starting two weeks after you sowed the seeds, collect the following types of data and record them in the data table in your lab notebook:
- Measure the length of the five largest leaves in each pot, as shown in Figure 7. (You should have more than one plant in each pot - Figure 7 only shows one plant for illustration purposes.)
- Look at the leaves. What color are they in each pot? Are all of the leaves in the pot green, or do some have some yellow or brown coloring? In particular, pay attention to the color of the leaves at the base of the plant.
- Overall, how do the leaves look in each pot? Are the leaves in the pot mostly healthy-looking and green, wilting, or brown and dry?
- You can also record what stage most of the plants are at, such as whether they only have cotyledons, if they have a certain number of true leaves, whether they are shooting up flower stalks, if they have buds but no flowers open, or whether they have open flowers.
- Optional: You may also want to take pictures of each pot each week. If you do this, you can later put some of the pictures on your Science Fair Project Display Board.
/-/https/www.sciencebuddies.org/cdn/Files/5561/8/plants_leaf_length.jpg)
Figure 7. Use a ruler to measure the length of a leaf. While this picture shows a ruler next to a leaf, to actually measure the leaf's length you need to hold the ruler down the middle of the leaf. This leaf would probably be about 3.5 cm long, measuring from the tip of the leaf to where it starts widening from the stem.
- Note: While you can transplant plants from one pot to another (of the same genotype) before you begin treatment with the heavy metals, it is not recommended to do this. This is because it is very easy to damage the plants while transplanting them (not only the plants being transplanted, but also the plants they are being transplanted next to).
- Four weeks after you sowed the seeds, water the plants in two pots in each genotype with water that has heavy metals added to it (but continue watering the two control plants with plain water). You will prepare the heavy metal water with 8 millimolar (mM) of nickel sulfate or copper sulfate. Water these plants with heavy metals five times (following your normal watering routine), and then return to watering them with normal water.
- If you are watering each pot with 25 mL, then you will need to prepare at least 1000 mL of water with heavy metals in it. (25 mL x 8 pots x 5 times of watering = 1000 mL.)
- To figure out how much nickel sulfate or copper sulfate to add to the water to make 8 mM, you will need to do some calculations.
- First you need to figure out how many moles of heavy metals you need. 8 millimoles equals 0.008 moles. This means that in 1000 mL of an 8 M heavy metal solution, there are 0.008 moles of heavy metals.
- Next figure out the molar mass of your heavy metal. This is often on its packaging, or you can look it up online. For example, the molar mass of copper sulfate pentahydrate (which is recommended in the Materials) is 249.7 grams per mole (g/mol).
- Next calculate how many grams of your heavy metal are in 0.008 moles. For example, for copper sulfate pentahydrate there are 2.0 grams in 0.008 moles (because 249.7 g/mol x 0.008 mol = 2.0 g).
- Once you have determined how to prepare 1000 mL of your 8 mM solution of heavy metals, put on a pair of gloves, use a scale to measure the precise amount of heavy metals needed, and add them to the container. Seal the container tightly with its lid and shake it to completely dissolve the heavy metals in the water.
- Note: Be careful when handling the heavy metals, as they can be hazardous— follow all proper safety precautions.
- You can prepare all 1000 mL of the heavy metal solution now, or you can prepare a smaller amount (such as 500 mL) and make more when you run out.
- Right before watering the plants with the heavy metal solution, make a data table like Table 3 in your lab notebook, and fill it out by counting how many plants are in each pot at four weeks after sowing the seeds.
- Then water the control pots with plain water, and water the treated pots with the heavy metal water. Make sure to keep the control pots and the treated pots in different trays so they do not contaminate each other.
| Genotype | Pot | Number of Live Plants per Pot at Week 4 | Number of Live Plants per Pot at Week 8 |
| Col-0 | Control Pot #1 | ||
| Control Pot #2 | |||
| Treated Pot #1 | |||
| Treated Pot #2 | |||
| Lov-1 | Control Pot #1 | ||
| Control Pot #2 | |||
| Treated Pot #1 | |||
| Treated Pot #2 | |||
| Ws-2 | Control Pot #1 | ||
| Control Pot #2 | |||
| Treated Pot #1 | |||
| Treated Pot #2 | |||
| Santa Clara | Control Pot #1 | ||
| Control Pot #2 | |||
| Treated Pot #1 | |||
| Treated Pot #2 |
Table 3. In your lab notebook, make a data table like this one and record how many plants are alive in each pot at four weeks, and then at eight weeks, after you sowed the seeds.
- Continue observing and collecting data on the plants weekly, as described in step 4 of this section. After you have watered the treated plants with heavy metals five times (following your normal watering routine), switch back to watering them with plain water.
- If the plants ever appear to be crowding each other in a pot, you can use tweezers to carefully remove one or more of the plants (by grabbing that plant at the base of its stem and pulling it out). Be sure not to disturb other plants in the pot when you do this. Also make a note of how many plants you removed in your lab notebook.
- Eight weeks after you sowed the seeds, end your experiment— make your final observations and collect your last data. Observe and collect data as you have been doing each week, and fill in the column on week 8 for the data table in your lab notebook, similar to Table 3. Also weigh the two largest plants from each pot and add a column to your data table to record this in.
- When making observations, compare the four pots for a given strain against each other and rank them from one to four, from healthiest to least healthy. Also ask three volunteers to rank the four pots, for each strain, without knowing what conditions each pot was grown under. This is called a blind experiment. You may want to make a separate data table to record these results in.
- For determining which plants look healthiest, pay attention to the color and shape of the leaves. Healthy leaves should be completely green and look spread out, without any wrinkles. Leaves that are yellow, wilting, brown, and/or feel dry are not healthy. Pay particular attention to how the leaves at the base of the plant look.
- Take pictures of the plants in each pot. You can later put them on your Science Fair Project Display Board.
- To weigh a plant, carefully uproot it and pinch or cut the roots off, right at the base of the plant's stem (discarding the roots). Weigh this de-rooted plant on a scale.
- Tip: You may want to weigh the plant in an envelope if it is difficult to fit the entire plant on the scale. Be sure to subtract the weight of the envelope afterward.
- When making observations, compare the four pots for a given strain against each other and rank them from one to four, from healthiest to least healthy. Also ask three volunteers to rank the four pots, for each strain, without knowing what conditions each pot was grown under. This is called a blind experiment. You may want to make a separate data table to record these results in.
Analyzing Your Results
- In the data tables you have similar to Table 2, calculate the average largest leaf length for each pot, for each week, and record this in your data table.
- Also average the rank that was given to each pot in step 8a of the previous section and record the averages.
- For example, if a pot was given a rank of 4, 3, and 4 by the three volunteers, you would record its average rank as a 3.7 (because 4 + 3 + 4 = 11, and 11 ÷ 3 = 3.7).
- Also average the weights you recorded for the two largest plants for each pot.
- Make three different graphs of your data as follows:
- Make a line graph of the average largest leaf length for each pot, for each week, from the second week to the eighth week after sowing the seeds. Put the time (in weeks) on the x-axis and the length (in cm) on the y-axis.
- Make a bar graph of the number of live plants per pot at the fourth week and at the eighth week. Label the pots on the x-axis and put the number of live plants per pot on the y-axis.
- Make a bar graph of the average rank given to each pot. You may want to make a separate graph for each genotype. Label the pots on the x-axis and put the rank on the y-axis.
- Optional: For an advanced challenge, you can do some statistical analysis on your graphs and add error bars to them. This will help you determine whether your results are significant. In other words, it will help show just how different, or similar, the plants in the different pots are. For more information on statistics and making error bars, see:
- Science Buddies' Data Analysis for Advanced Science Projects
- Click4Biology's Topic 1 Statistical Analysis: State that error bars are a graphical representation of the variability of data
- North Carolina State University's LabWrite Resources: Graphing Resources – Using Error Bars in Your Graph
- Look at your observations, graphs, and any other data you collected (such as pictures) and try to draw conclusions from your results.
- Based on your line graph, which pots had the largest leaves over time? Does this correlate to having been treated with heavy metals or not? Is there a correlation between leaf length and the genotypes tested? What do you think your results tell you about how heavy metals affect the different genotypes?
- It is possible that crowded plants will not grow as large as plants that have lots of space, so see if you have any correlations with your bar graph of plants per pot.
- Based on your bar graph of the average rank for each pot, do the pot rankings correlate with whether the pot was treated with heavy metals or not? Do some genotypes seem more resistant or more susceptible to the heavy metal treatment than other genotypes?
- Overall, based on all of your data, can you draw some conclusions about how the different genotypes are affected by the heavy metals? How did the heavy metals affect the plants? Did they affect the different genotypes differently? Can you explain your results?
- Tip: Try re-reading the Introduction if you need to refresh your memory on the differences between the different genotypes.
- Based on your line graph, which pots had the largest leaves over time? Does this correlate to having been treated with heavy metals or not? Is there a correlation between leaf length and the genotypes tested? What do you think your results tell you about how heavy metals affect the different genotypes?
Ask an Expert
Global Goals
The United Nations Sustainable Development Goals (UNSDGs) are a blueprint to achieve a better and more sustainable future for all.
/-/https/www.sciencebuddies.org/cdn/Files/19758/6/E-WEB-Goal-15.png)
Variations
- The Arabidopsis Biological Resource Center (ABRC) Think Green module that this science project is based on explores other genotypes and environmental conditions in three other experiments. You could explore some of the other experiments, which are temperature stress, water stress, and salt stress. See the resources in the Bibliography for more information on doing these other experiments.
- Think of some other ways to quantify your results, such as by measuring the height of the plants or the amount of time it takes the plants to flower. Do you see differences between the genotypes (with and without heavy metal treatment) when you quantify these other aspects, or do you not see clear differences?
- If you clearly saw that the presence of a heavy metal affected some of the genotypes you tested, you could try figuring out what the minimum amount of heavy metals in the water would be to cause a noticeable change. You could test this by setting up several pots with your plants and then try different, decreasing amounts of heavy metals in each pot. How much of the heavy metal is needed to clearly affect the plants? Similarly, if you saw that some plants were not affected by the heavy metals, you could try increasing the amounts. Just be sure always to follow all proper safety precautions when using the heavy metals.
- How do heavy metals affect other plants besides Arabidopsis? You could try repeating this experiment on other types of plants using the same heavy metals. Are some varieties of plants more resistant than others?
- In this science project, you waited until the plants had been growing for four weeks after sowing them until you started testing the heavy metals on them. You could try testing the heavy metals on the plants before this point, such as two weeks after sowing them. Do you see a bigger difference between genotypes when you use the heavy metals earlier on the plants?
- You could try an adaptation experiment with other kinds of plants. You can do some research on different types of plants you can buy at a plant nursery to see what conditions they naturally live in. Think of some extreme conditions to expose all of your plants to, such as cold, heat, or drought, and make a hypothesis about which plants will survive the best and why. Then try it out!
- Do some additional research on heavy metals, or talk to a chemist, and try repeating this experiment testing a different heavy metal on the plants. You will need to find forms of the heavy metals that can be dissolved in water (or are water soluble) to do this. Be sure to follow all necessary safety precautions when handling the chemicals you use.
- If you want to do a similar science project based on heavy metal contamination in the environment, you can check out Science Buddies' project Heavy Metals and Aquatic Environments.
Careers
If you like this project, you might enjoy exploring these related careers:
/-/https/careerdiscovery.sciencebuddies.org/cdn/Files/1662/17/unsplash-oz1NzV2xWXU.jpg)
/-/https/careerdiscovery.sciencebuddies.org/cdn/Files/1288/18/Career-Map-Environmental-Scientist.jpg)
/-/https/careerdiscovery.sciencebuddies.org/cdn/Files/1775/17/iStock-1156278309.jpg)
/-/https/careerdiscovery.sciencebuddies.org/cdn/Files/1338/23/pexels-photo-3958380.jpg)

/-/https/img.youtube.com/vi/g0Y6yKlDNdM/0.jpg)
/-/https/img.youtube.com/vi/_uruQS6EJyI/0.jpg)
/-/https/img.youtube.com/vi/YxOSHj_kVlA/0.jpg)