Abstract
Self-driving cars use a variety of sensors to evaluate and navigate their environment. Each type of sensor has advantages and disadvantages. In this project you will evaluate two common types of distance sensor (ultrasonic and infrared) and compare their performance in different scenarios.
Summary
Previous experience with an Arduino is recommended.
A kit is available from our partner Home Science Tools®. See the Materials section for details.
No issues
Valuable input provided by Analog Devices employees.
Arduino® is a registered trademark of Arduino SA.
Ping)))™ is a registered trademark of Parallax, Inc.
/-/https/www.sciencebuddies.org/cdn/Files/18285/6/ultrasonic-IR-sensors-thumbnail.jpg)
Objective
Evaluate the performance of two different types of sensors for an autonomous vehicle.
Introduction
Self-driving cars, also called driverless cars or autonomous vehicles, are cars that can drive without input from a human driver. They therefore cannot rely on human senses like sight and sound to steer—they must use electronic sensors instead. Electronic sensors detect things like lane lines, traffic lights, road signs, pedestrians, and other cars and obstacles in the road. Examples of electronic sensors used by driverless cars include:
- Lidar (light detection and ranging) uses lasers to measure the distance to objects in the environment by measuring the amount of time it takes a laser pulse to bounce off an object and come back to the sensor.
- Radar (radio detection and ranging) is similar to Lidar but uses radio waves instead of light.
- Sonar or ultrasonic sensors emit bursts of sound and measure how long they take to reflect and travel back to the sensor. This is similar to how animals like bats use sound for echolocation.
- Cameras record video of the environment around the car and use image-processing algorithms to identify objects in the field of view.
Different sensors might work better under different conditions. For example, some might not work as well at night or in the rain. Some might not do a good job detecting small objects. Some might detect some surfaces or materials better than others. Engineers have to evaluate the pros and cons of different sensors when deciding which ones to use for a self-driving car.
In this project you will compare two types of distance sensors that are commonly used with robotics projects involving an Arduino®: an ultrasonic sensor and an infrared sensor (Figure 1). The ultrasonic sensor sends out a burst of ultrasonic sound and measures how long it takes this sound to bounce back to the sensor. You can then calculate the distance to the target object using the speed of sound. The infrared sensor emits infrared light and measures the amount of reflected light, which decreases as the target object gets farther away. You can find the corresponding distance using a graph in the sensor's datasheet.
If you wanted to build your own autonomous car using an Arduino, this project will help you evaluate which sensor(s) you might want to use.
/-/https/www.sciencebuddies.org/cdn/Files/18284/11/ultrasonic-IR-sensors.jpg)
Figure 1. An ultrasonic distance sensor (left) and an infrared distance sensor (right).
Terms and Concepts
- Self-driving car
- Driverless car
- Autonomous vehicle
- Sensor
- Lidar
- Radar
- Sonar
- Ultrasonic
- Camera
- Infrared
Questions
Look at the datasheets for both sensors linked in the bibliography and answer the following questions.
- What is each sensor's range?
- What are each sensor's power requirements (supply voltage and current)?
- What is each sensor's communication or output type?
- What external factors can affect the performance of each sensor or cause inaccurate readings?
Read the articles about self-driving cars linked in the bibliography and answer the following questions.
- What types of sensors do real-world self-driving cars use?
- What are the advantages and disadvantages of each type of sensor?
Bibliography
- Sharp Corporation (Dec. 1, 2006). GP2Y0A21YK0F Distance Measuring Sensor Unit. Jameco Electronics. Retrieved January 18, 2022.
- Parallax Inc. (Feb. 4, 2013). PING))) Ultrasonic Distance Sensor (#28015). Jameco Electronics. Retrieved January 18, 2022.
- Udacity Team (Mar. 3, 2021). How Self-driving Cars Work: Sensor Systems. Udacity. Retrieved January 18, 2022.
- Burke, K. (Apr. 15, 2019). How Does a Self-Driving Car See?. NVIDIA. Retrieved January 18, 2022.
- Eglowstein, H. (n.d.). How to Use an Arduino. Science Buddies. Retrieved January 18, 2022.
Materials and Equipment 
Recommended Project Supplies
/-/https/www.sciencebuddies.org/cdn/Files/19915/12/SB_ARDNSTR_web__01473.jpg)
-
Electronics Kit for Arduino, available from our partner Home Science Tools®.
- Note: This project will work with the Arduino UNO R3, UNO R4 Minima, UNO R4 WiFi, and compatible third-party boards.
- Windows or Mac computer. See this page if you have a Chromebook. Your computer will need:
- Access to the Arduino IDE, either installed local version or web-based editor (note that Chromebooks can only use the web version). Watch this video for a comparison of the two options.
- USB port. The Science Buddies kit comes with a USB-A to B cable. The "B" end plugs into the Arduino and the "A" end plugs into your computer. You will need an adapter or different cable if your computer only has USB-C ports. Watch this video to learn about the different types of cables and adapters.
- You will also need to gather the following items, not included in the kit:
- Sharp IR distance sensor
- 3-pin JST cable with breadboard pins
- Tape measure or meterstick
- Small box or cup to prop the sensors up on
- Tape to hold the sensor in place
- Assorted objects to test with the sensors. Your objects should be a range of shapes, sizes, and textures. Here are a few examples:
- Paper (different colors)
- Hard materials like metal or plastic
- Soft or porous materials (cloth, fabric, clothing, sponges, foam, stuffed animals, etc.)
- Irregularly-shaped objects (e.g. toys)
- Small or narrow objects (pencil, paperclip, pushpin, etc.)
- Lab notebook
Disclaimer: Science Buddies participates in affiliate programs with Home Science Tools®, Amazon.com, Carolina Biological, and Jameco Electronics. Proceeds from the affiliate programs help support Science Buddies, a 501(c)(3) public charity, and keep our resources free for everyone. Our top priority is student learning. If you have any comments (positive or negative) related to purchases you've made for science projects from recommendations on our site, please let us know. Write to us at [email protected].
Experimental Procedure
- Prepare two data tables like Table 1, one for the ultrasonic sensor and one for the infrared sensor. Plan out what objects you will test and how many trials you will conduct. Test each object at a few different distances from the sensor. Check that the distances you plan to test are within the sensor's operating range according to its datasheet. Make sure you measure the same objects/distances with each sensor.
| Sensor: | ||||
|---|---|---|---|---|
| Object | Object description (size/shape/texture etc.) |
Actual distance (measured with tape measure, cm) |
Sensor distance (measured with Arduino, cm) |
Error (cm) |
- Set up your experiment as shown in Figure 2. Tape the ultrasonic sensor to the top of a cup or other small object to prop it up off the floor or table. This will prevent interference from sound waves reflecting off the table. Aim the sensor along a tape measure so you can use it to measure the distance between the sensor and the target object. Make sure you measure the distance to the part of the object directly in front of the sensor, which is not necessarily the closest part. In Figure 2, that would be the rabbit's stomach, not its feet.
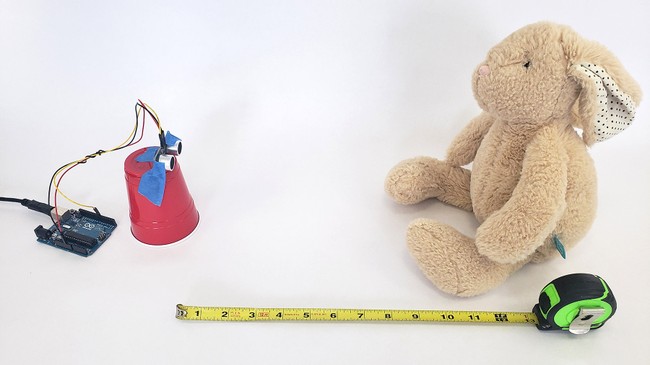
Figure 2. Example experimental setup. - To use the ultrasonic sensor:
- Connect the sensor to your Arduino using the male-female jumper wires. Connect the GND pin to GND, 5V pin to 5V, the Echo pin to Arduino pin 7, and the Trig pin to Arduino pin 8.
- To open code for the ultrasonic sensor, open the Arduino IDE and select File→Examples→06.Sensors→Ping.
- The example code is for the PING ultrasonic distance sensor, which uses a single pin (alternating between output and input) for the trigger and echo signals. If you purchased the Science Buddies kit and have an HC-SR04 ultrasonic sensor, you need to modify the code as shown in the following video.
- Upload the code to your Arduino and open the serial monitor (Tools→Serial Monitor). The monitor will show the distance measured by the sensor in both inches and centimeters.
- Collect data for different objects using your ultrasonic sensor and fill out your data table. To take a reading, place an object in front of the sensor. Measure the actual distance between the sensor and the front of the object using the tape measure. Get the electronic sensor reading from the serial monitor. You should do multiple trials for each distance.
- To use the infrared sensor:
- Connect the sensor to your Arduino using the JST connector. Connect the red wire to 5V, the black wire to GND, and the white wire to pin A5.
- Example code for the infrared sensor is available on Github. Download the code and save it locally on your computer.
- Download the code to your Arduino and open the serial monitor. The monitor will show the distance measured by the sensor in centimeters.
- Collect data for different objects using your infrared sensor and fill out your data table. Use the same process that you used for the ultrasonic sensor.
- Analyze your data.
- Calculate an error for each reading by subtracting the actual measurement (with the tape measure) from the electronic measurement.
- Calculate an average error for each distance you tested.
- Compare the errors for the two sensors when measuring different objects. Does one sensor work better for certain types of objects? What causes a sensor to give an inaccurate reading? Can you explain your observations based on your understanding of how the sensors work?
- Compare results between the sensors at different distances for the same objects. Is one sensor better at accurately detecting objects at a certain range?
- If you were building your own autonomous vehicle using an Arduino (for example, something that would drive around the floor of your house), which sensor would you choose and why? Is cost a factor in your decision (check the links in the materials section for the price of each sensor)? What other factors might influence your decision?
/-/https/www.sciencebuddies.org/cdn/Files/18286/11/ultrasonic-sensor-experiment.jpg)
/-/https/i.ytimg.com/vi/n-gJ00GTsNg/maxresdefault.jpg)
Ask an Expert
Global Goals
The United Nations Sustainable Development Goals (UNSDGs) are a blueprint to achieve a better and more sustainable future for all.
/-/https/www.sciencebuddies.org/cdn/Files/19752/5/E-WEB-Goal-09.png)
Variations
- The materials list for this project suggests two common types of sensors, but there are many others you can test. The HC-SR04 is a much cheaper alternative to the PING))) ultrasonic sensor. Arduino-compatible Lidar sensors are available, although they are generally quite expensive.
- Can you test your sensors under a range of simulated weather conditions? For example, test in direct sunlight, in the dark, or simulate rain, snow, or fog (be careful about getting your sensors wet—for example, you could simulate snow by dropping confetti).
Careers
If you like this project, you might enjoy exploring these related careers:
/-/https/careerdiscovery.sciencebuddies.org/cdn/Files/1725/18/4161_Michelle_Easter_and_Curiousity_Clone.jpg)
/-/https/careerdiscovery.sciencebuddies.org/cdn/Files/928/17/ThomasWallner.jpg)
/-/https/careerdiscovery.sciencebuddies.org/cdn/Files/1223/17/iStock-971549326.jpg)
Contact Us
Our kits are developed in partnership with Home Science Tools®. If you have purchased a kit for this project, Home Science Tools® is pleased to answer any questions.In your email, please follow these instructions:
- Include your Home Science Tools® order number.
- Please describe how you need help as thoroughly as possible:
Examples
Good Question I'm trying to do Experimental Procedure step #5, "Scrape the insulation from the wire. . ." How do I know when I've scraped enough?
Good Question I'm at Experimental Procedure step #7, "Move the magnet back and forth . . ." and the LED is not lighting up.
Bad Question I don't understand the instructions. Help!
Good Question I am purchasing my materials. Can I substitute a 1N34 diode for the 1N25 diode called for in the material list?
Bad Question Can I use a different part?
Contact Support

/-/https/img.youtube.com/vi/0hThMoHB88w/0.jpg)
/-/https/img.youtube.com/vi/6KttMKX17YE/0.jpg)
/-/https/img.youtube.com/vi/q9X-ez31oiY/0.jpg)