Abstract
Do you like making paper airplanes? What about origami animals? Have you ever thought about making a paper robot? In this engineering project, you will make a three-dimensional robotic gripper that starts out as a single flat sheet of paper! Try it out—see what objects you can pick up with the gripper, then see if you can improve the design.Summary
Sawyer Fuller, PhD, University of Washington
NSF grant 2054850
/-/https/i.ytimg.com/vi/a9Nn3ppWhK0/maxresdefault.jpg)
Objective
Build an origami robotic gripper and improve the design.
Introduction
/-/https/www.sciencebuddies.org/cdn/Files/19699/6/origami-robot-gripper-thumbnail.jpg)
The gripper consists of two finger shapes and a base where two thin strands, or tendons, enter. Below is a cut-out cardstock template with dotted lines that indicate where to fold.
When you think of robots, what materials do you think of? Maybe you have seen metal robots in movies or have a plastic toy robot at home. But have you ever seen a robot made from paper, cardboard, or foam board, like the one in Figure 1? Paper might not be the first material that comes to mind when you think about robots, but there are some surprising advantages to using it as a construction material!
/-/https/www.sciencebuddies.org/cdn/Files/19708/8/foambot.jpg)
Figure 1. A hexapod robot with a body made from foam board.
Paper is cheap and readily available. This makes it easy to build a robot from paper, even if you do not have access to more expensive tools or materials. Paper is very fast to cut, so you do not have to wait hours to make parts like you do with a 3D printer. You can make moving parts with paper by making folds that can bend back and forth, so you do not need any additional materials. Paper is also very strong for its weight (engineers say it has a high strength-to-weight ratio), allowing you to design sturdy but lightweight structures. Of course, there are some disadvantages too. You probably do not want to get your paper robot wet or expose it to flames! Thinking about advantages and disadvantages of different materials is something engineers do as part of the engineering design process.
In this project you will make a robotic gripper and use it to pick things up. Inspired by origami, the entire gripper is folded into a three-dimensional shape from a single sheet of paper (Figure 2). The simple gripper has two "fingers" and two tendons. Pulling on the tendons makes the finger joints bend, just like the fingers in a real hand. You can follow the steps in the project procedure to make the gripper shown in Figure 2, then use the engineering design process to try to improve the design and make it better at picking things up. Get ready to start building your own paper robots!
/-/https/www.sciencebuddies.org/cdn/Files/19709/7/origami-robot-gripper.jpg)
The gripper consists of two finger shapes and a base where two thin strands, or tendons, enter. Below is a cut-out cardstock template with dotted lines that indicate where to fold.
Figure 2. The robotic gripper (top) and the paper template used to make it (bottom).
Terms and Concepts
- Strength-to-weight ratio
- Engineering design process
- Origami
- Tendon
Questions
- What are some advantages and disadvantages of using paper to make robots?
- What are some real-world uses for robotic grippers?
Bibliography
- Science Buddies. (n.d.). Engineering Design Process. Retrieved June 1, 2023.
Materials and Equipment
Note: You can print the template for the gripper design and cut it out with scissors, but you can also use a laser cutter or vinyl cutter if you have access to one. See procedure for details.
- Cardstock
- Printer
- Scissors
- Ruler
- Something pointy, like a sharp pencil or pushpin
- School glue or glue stick
- Optional: Hobby knife
- Optional: Reverse-action tweezers
- An assortment of small objects to pick up with your gripper
- Lab notebook
- Pen or pencil
Experimental Procedure
- If you plan to cut out your gripper by hand, download and print the origami gripper template PDF. If you want to cut out the template on a laser cutter or vinyl cutter, download the origami gripper SVG file.
- Practice making a gripper using the template. Follow the instructions in the origami gripper assembly steps PDF to cut out and assemble your gripper.
- Experiment with using your gripper to pick up a variety of objects. Hold the gripper by the base and pull on the tendons to pinch the fingers together (Figure 3). Release the tendons and the fingers should spring open again.
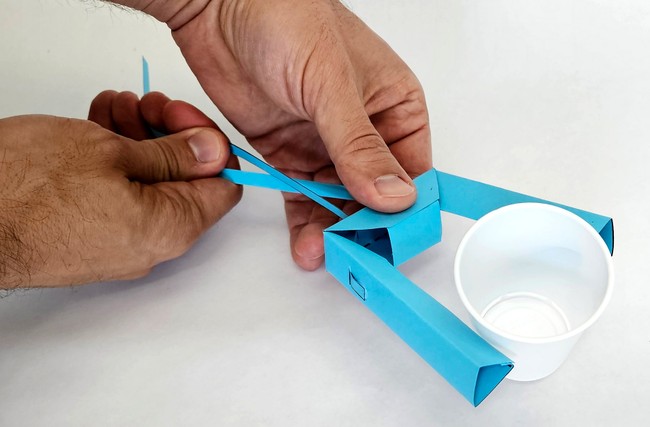
Figure 3. The gripper picks up a small plastic cup. - Make and record observations as you try picking up different things. Does the gripper work better on some objects than others? What changes could you make to the gripper to improve its ability to pick things up? You can record your observations in a data table like Table 1.
/-/https/www.sciencebuddies.org/cdn/Files/19707/5/paper-gripper-cup.jpg)
| Object | Can the gripper pick it up? | Notes and observations |
|---|---|---|
- Now it is time to use the engineering design process to try to improve your gripper design. There are two different approaches you can take here. (You do not have to choose one or the other. You can try both.)
- Can you make changes to your existing 3D gripper? For example, what happens if you add material like rubber bands or strips of hot glue to the fingers to improve their grip? What are the advantages and disadvantages of using additional materials?
- Can you make changes to the 2D template that will affect the resulting 3D design? This can be tricky, as changing different dimensions of the 2D design can have different effects on the resulting 3D shape. This is where your experience with paper airplanes or origami may be helpful! You can use a pencil and ruler to modify the design by hand, but you can also use a computer program like Inkscape to modify the SVG file for the gripper. You might want to start with something simple, like changing the length of the fingers (which will not affect the folding and assembly process) before you try more complex changes.
- Once you have modified your existing gripper or made a new one, test its performance when grasping different objects again. How has its performance changed? Can you continue to make more improvements?
- Continue iterating and improving your gripper until it meets your design requirements. See the Variations section if you would like to try an even more advanced gripper design.
Ask an Expert
Global Goals
The United Nations Sustainable Development Goals (UNSDGs) are a blueprint to achieve a better and more sustainable future for all.
/-/https/www.sciencebuddies.org/cdn/Files/19752/5/E-WEB-Goal-09.png)
Variations
- Try this advanced gripper design. This design results in a gripper that keeps the finger surfaces parallel to each other as they move. You can download a left-side PDF and right-side PDF for the gripper if you plan to print it. (Print it on two pieces of paper and glue them together, as shown in the following video). Alternatively, you can download an SVG file for laser cutting, cut two copies of it, and flip one of them over to mirror it. Can you do this project with the advanced gripper design instead of the basic design? You will need to be even more careful when modifying the 2D template, since the folding and assembly process is much more complicated. You can watch the following video or follow the steps in our advanced gripper assembly PDF.
- Can you come up with your own foldable robotic gripper design that is different from either of the two designs presented in this project?
- What about another type of origami robot, like a walking robot or a flapping-wing robot?
- Can you motorize your gripper? See the Science Buddies project Motorizing a Robotic Hand and our Arduino tutorial series for reference.
- Can you mount your gripper on the end of a robotic arm?
/-/https/i.ytimg.com/vi/mhPrxoMnVds/maxresdefault.jpg)
Careers
If you like this project, you might enjoy exploring these related careers:
/-/https/careerdiscovery.sciencebuddies.org/cdn/Files/1725/18/4161_Michelle_Easter_and_Curiousity_Clone.jpg)
/-/https/careerdiscovery.sciencebuddies.org/cdn/Files/1450/21/iStock-1227179796.jpg)

/-/https/img.youtube.com/vi/BnWtqdFw9YA/0.jpg)
/-/https/img.youtube.com/vi/C0IAQzxgQa8/0.jpg)
/-/https/img.youtube.com/vi/tl73_mQ60Zc/0.jpg)