Abstract
Do you like playing with radio-controlled (RC) toys like cars, planes, and boats? What if you could build and customize your own? In this engineering project, you will learn how to build your own RC boat using an Arduino and a plastic food storage container.
Summary
Previous experience with Arduino is recommended. See our How to Use an Arduino page.
A kit is available from our partner Home Science Tools®. See the Materials section for details.
Make sure you have permission to operate your boat in any body of water where you plan to test it.
/-/https/i.ytimg.com/vi/B6w-RKSVKLU/maxresdefault.jpg)
Objective
Design and build a radio-controlled boat.
Introduction
Radio-controlled (RC) vehicles are immensely popular as toys and among hobbyists. You can buy a complete working toy off the shelf, or you can buy parts to build your own at a hobby store. Some people use them just for fun, while others participate in competitive racing leagues. RC vehicles are also useful for exploring areas that might be hard for humans to reach, like flooded waterways (Figure 1).
/-/https/www.sciencebuddies.org/cdn/Files/19727/11/RC-boat-floodplain.jpg)
If you buy an RC toy, it usually comes with a remote control, or transmitter, that is paired with a receiver inside the toy. The remote control sends wireless radio frequency signals to the receiver. These signals control the vehicle's movement. In this project, you will learn more about how the electrical signals from the receiver work and how you can interface these signals with an Arduino® for your own custom radio control project. Watch this video for an explanation of how to use an RC transmitter and receiver with an Arduino:
/-/https/i.ytimg.com/vi/dkQXaeSIE5I/maxresdefault.jpg)
In this project, you will build a boat with two motors, each of which can spin in forward or reverse. This will allow you to steer your boat left and right. For this build, you will need to use a circuit called an H-bridge with your Arduino. You can find our complete Arduino tutorial series in the bibliography, but the following video about how to use an H-bridge will be particularly helpful:
/-/https/i.ytimg.com/vi/YU17L650k3s/maxresdefault.jpg)
Get ready to start zooming around with your own custom RC boat!
Terms and Concepts
- Radio-controlled (RC)
- Transmitter
- Receiver
- Radio frequency
Questions
- What are some uses for radio-controlled vehicles?
- What are some different ways a boat can steer?
Bibliography
- Science Buddies. (n.d.). How to Use an Arduino. Retrieved June 28, 2023.
- Science Buddies. (n.d.). Engineering Design Process. Retrieved June 28, 2023.
- Arduino. (n.d.). pulseIn(). Retrieved June 28, 2023.
Materials and Equipment 
Recommended Project Supplies
/-/https/www.sciencebuddies.org/cdn/Files/19915/12/SB_ARDNSTR_web__01473.jpg)
The following is the list of parts needed to build the RC boat shown in the procedure of this project. Consider this list a starting point. Since this is an engineering design project, you may choose to change or add to the materials on this list.
- Circuit parts
-
Electronics Kit for Arduino, available from our partner Home Science Tools®.
- Note: This project will work with the Arduino UNO R3, UNO R4 Minima, UNO R4 WiFi, and compatible third-party boards.
- RC transmitter and receiver. (Make sure you purchase the "Dual Stick Self Center" version)
- Solderless breadboard (2, one is included in the Science Buddies kit)
- Solid-core jumper wires for connections on breadboard
- L293D H-bridge
- Brushless underwater thrusters (2) such as these thrusters or these thrusters.
- 7.4 V Lithium polymer battery
- Compatible lithium battery charger
- JST plug connector
- T-plug to JST adapter
- Waterproof rocker switch
- Spring or screw quick connectors
-
Electronics Kit for Arduino, available from our partner Home Science Tools®.
- Windows or Mac computer. See this page if you have a Chromebook. Your computer will need:
- Access to the Arduino IDE, either installed local version or web-based editor (note that Chromebooks can only use the web version). Watch this video for a comparison of the two options.
- USB port. The Science Buddies kit comes with a USB-A to B cable. The "B" end plugs into the Arduino and the "A" end plugs into your computer. You will need an adapter or different cable if your computer only has USB-C ports. Watch this video to learn about the different types of cables and adapters.
- Other parts, hardware, and tools
- Clear, airtight plastic food storage container big enough to hold the Arduino, breadboard, battery, and RC receiver
- Optional: Larger food storage container that can hold the first one, for an additional layer of waterproofing
- Waterproof silicone sealant
- Disposable gloves
- Eye protection
- Wire strippers
- Drill and drill bits
- Sandpaper, file, or de-burring tool
- Stainless steel hardware, such as nuts, bolts, and washers, for mounting thrusters
- Double-sided foam tape
- Bathtub or kiddie pool for initial testing of your boat
- Larger body of water, like a pool or a pond, for further testing. We recommend avoiding bodies of water with strong currents.
Disclaimer: Science Buddies participates in affiliate programs with Home Science Tools®, Amazon.com, Carolina Biological, and Jameco Electronics. Proceeds from the affiliate programs help support Science Buddies, a 501(c)(3) public charity, and keep our resources free for everyone. Our top priority is student learning. If you have any comments (positive or negative) related to purchases you've made for science projects from recommendations on our site, please let us know. Write to us at [email protected].
Experimental Procedure
- Charge your lithium battery and your RC remote so they are ready to use when you test your circuit.
- Remember that this is an engineering design project. The following procedure will show you how to build a basic RC boat. If you want to enter your boat in a science or engineering fair, you should go beyond what is shown in this procedure. Can you improve the boat's design somehow? Can you use your boat to collect scientific data about the environment? See the Variations section for some ideas.
- Before you start physical construction of your boat, you should build and test the circuit. It will be much easier to debug and fix the circuit before everything is mounted inside the plastic containers. Figure 2 shows a picture of the completed circuit, Figure 3 shows a breadboard diagram, and Figure 4 shows the circuit schematic. You can build the circuit based on the diagrams or use the following steps:
- H-bridge Note: Pins are numbered counter-clockwise from the top left. Make sure the notch on one end of the H-bridge is facing up on the breadboard (toward row 1).
- Pin 1 to Arduino pin 10
- Pin 2 to Arduino pin 8
- Pin 3 to left motor white wire. Note: The motor wires are too big to fit into the breadboard. Cut and strip them, then use the spring clips to connect them to jumper wires.
- Pin 4 to ground
- Pin 5 to ground
- Pin 6 to left motor black wire
- Pin 7 to Arduino pin 7
- Pin 8 to left-side power bus (7.4 V from lithium battery)
- Pin 9 to Arduino pin 11
- Pin 10 to Arduino pin 9
- Pin 11 to right motor black wire
- Pin 12 to ground
- Pin 13 to ground
- Pin 14 to right motor white wire
- Pin 15 to Arduino pin 12
- Pin 16 to right-side power bus (5 V from Arduino)
- RC receiver
- One negative pin to ground bus. (You do not need to connect multiple ground pins.)
- One positive pin to right-side power bus. (You do not need to connect multiple 5 V pins.)
- Channel 2 signal to Arduino pin 2
- Channel 3 signal to Arduino pin 3
- Arduino power
- Make sure the two ground buses on the breadboard are connected with a jumper wire. Important: Do not connect the two power buses, as this will create a short circuit between the 5 V supply from the Arduino and the 7.4 V supply from the lithium battery.
- Connect the Arduino's 5 V pin to the right-side power bus. This provides power to the H-bridge and RC receiver.
- Connect the Arduino's Vin pin to the left-side power bus. This will allow the lithium battery to power the Arduino.
- Switch
- Black wire to ground bus
- One red wire to left-side power bus
- One red wire to an empty row on the breadboard
- Make sure the switch is OFF before you continue.
- Battery (Do this last!)
- Use the JST connector and T-plug adapter to connect the battery to the breadboard.
- Black wire to ground bus
- Red wire to same breadboard row as the switch red wire
- H-bridge Note: Pins are numbered counter-clockwise from the top left. Make sure the notch on one end of the H-bridge is facing up on the breadboard (toward row 1).
/-/https/www.sciencebuddies.org/cdn/Files/19728/11/RC-boat-circuit.jpg)
Figure 2. Picture of the assembled circuit.
/-/https/www.sciencebuddies.org/cdn/Files/19729/9/rc-boat-breadboard.png)
Figure 3. Breadboard diagram for the circuit. You can download a larger version of the diagram here.
/-/https/www.sciencebuddies.org/cdn/Files/19730/9/rc-boat-schematic.png)
Figure 4. Schematic for the circuit. You can download a larger version of the schematic here.
- Test your circuit to make sure it works.
- Turn on the switch. If you see or smell smoke, immediately turn the switch off. You have a short circuit somewhere. Carefully double-check all of your breadboard wiring and make sure that no loose wires are touching each other.
- Download RC_boat.ino and upload it to your Arduino.
- Turn on your RC remote. Try gently pressing the joysticks forward and backward one at a time. You should see the motors spin. The farther you press the joysticks, the faster the motors should spin.
- If the motors do not spin at all, make sure your RC receiver is paired with the remote. Follow the instructions that came with the receiver to do this.
- If the motors spin even when you are not touching the joysticks, try pressing the reset button on the Arduino or turning the power switch off and then on again.
- Our Arduino troubleshooting video has more tips if your circuit is still not working properly.
- Calibrate your RC transmitter.
- With the Arduino and transmitter powered on, open the serial monitor in the Arduino IDE (Tools→Serial monitor) and look at the output. The monitor will print out the pulse width in microseconds, the direction, and the speed (0–255) for each motor.
- One at a time, press each joystick all the way forward and all the way back. Write down the minimum and maximum pulse values for each joystick.
- Edit the joyLmin, joyLmax, joyRmin, and joyRmax variables in the code to match the minimum and maximum pulse values you recorded for the left and right joysticks respectively.
- Save the code and re-upload it to your Arduino.
- Once you have your circuit working, you are ready to mount everything inside the waterproof container. You can use two containers for a double-hulled design that provides extra leak protection.
- For now, remove the battery from the circuit. (Do not just turn off the power switch.) This will help avoid accidentally bumping loose wires into each other while you are moving things around.
- Plan out where you will mount the motors and switch on the outside of the larger container. Make sure the lid will still close tightly with the switch in place.
- Drill holes for the switch, motor mounting hardware, and motor wires and mount them to the container (Figure 5). Use the smallest drill bit possible to avoid large gaps.
- Drill holes for jumper wires in the smaller container, two for each motor and three for the switch, and pass the wires through the holes (Figure 6).
- Place the Arduino, breadboard, and RC receiver inside the smaller container.
- Use the spring clips to connect the jumper wires from the inner container to the motor and switch wires from the outer container (Figure 7).
/-/https/www.sciencebuddies.org/cdn/Files/19731/11/RC-boat-motors.jpg)
Figure 5. Bottom view of the outer container with motors and switch attached.
/-/https/www.sciencebuddies.org/cdn/Files/19732/11/wire-pass-through.jpg)
Figure 6. Jumper wires passed through holes in the inner container.
/-/https/www.sciencebuddies.org/cdn/Files/19733/11/RC-boat-spring-clips.jpg)
The smaller plastic container holding the Arduino, breadboard, and RC receiver sits inside the larger container, to which the motors and switch are mounted. Spring clips connect the jumper wires coming out of the small container to the motor and switch wires in the outer container.
Figure 7. Jumper wires from inner container connected to motor and switch wires using spring clips.
- Reconnect the battery and make sure your circuit still works. If the motors do not spin, double check that the spring clip connections are tight and that you did not accidentally pull any wires out of the breadboard while moving things around.
- Next you will seal your containers and conduct leak testing. Remove the Arduino and breadboard from the inner container before you do this (disconnect the jumper wires that pass through the container wall from the breadboard) and disconnect the spring clips so you can separate the containers. You do not want to find out that your containers have leaks while the Arduino is still inside!
- Seal all holes in both containers with silicone sealant (Figure 8). Follow the instructions that came with your sealant to use it. Wear gloves and eye protection. For the motors, you may want to remove them, apply sealant around the holes, then re-attach the bolts. For wires, you can remove them, apply a blob of sealant over the hole, then push the wire back through the hole. Make sure you have a good, complete seal around each hole. Wait for the sealant to dry completely (sometimes up to 24 hours) before you continue.
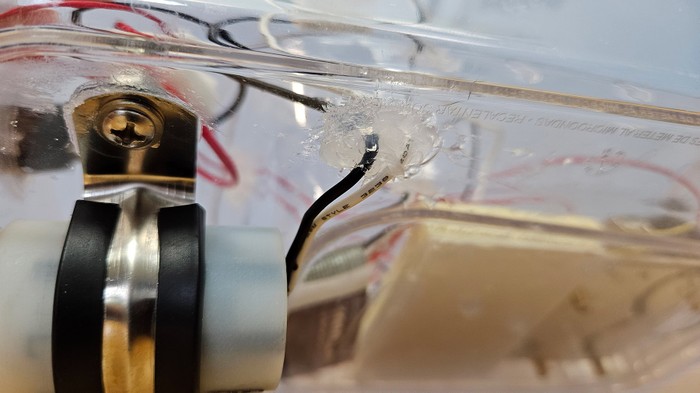
Figure 8. Silicone sealant applied to a pair of wire pass-through holes. - After the sealant has dried completely, fill a bathtub or sink and use it to conduct leak testing of your containers. Seal the lid on each container and then submerge it underwater. Watch carefully for any air bubbles coming out of the container. After a few minutes, remove the container, take off the lid, and check whether any water has leaked inside. If you identify any leaks, you will need to dry the container completely, then patch the leaks with additional silicone sealant.
- After you have patched any leaks, it is time to test your boat! Put the circuit parts back inside the inner container, reconnect the spring clips, and seal both lids. You can use double-sided foam tape to prevent the Arduino and smaller container from sliding around. Our completed boat is shown in Figure 9.
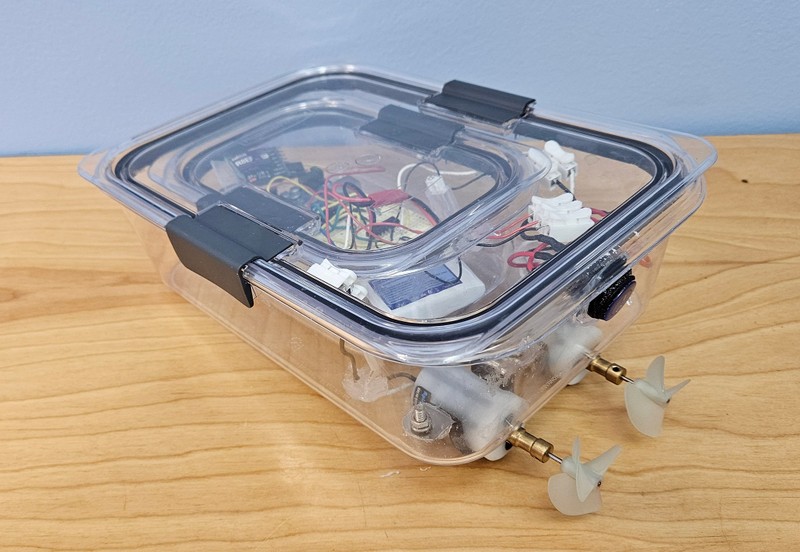
Figure 9. Completed double-hulled Arduino RC boat. - Power on your boat and the transmitter, put the boat in a bathtub or kiddie pool, and try it out! Test your boat's speed and maneuverability:
- Can you make the boat drive forward by pushing both joysticks forward?
- Can you make the boat go in reverse by pulling both joysticks backward?
- Can you make the boat move slowly by only pushing the joysticks a little bit?
- Can you make the boat turn by only pushing one joystick at a time?
- Can you make the boat turn faster by pushing one joystick forward and one backward?
- If your boat's motors seem sluggish when you put them in water, there are a few things you can try. What you need to do will depend on the batteries and motors you purchased, and your results may vary.
- Switch to digitalWrite(pin,HIGH) instead of analogWrite(pin,speed) in your code. This will just make the motors run full-speed all the time. Some motors do not respond as well to the Arduino's analogWrite signal.
- Power the Arduino with a separate 9 V battery using a 9 V snap to barrel plug connector. Sometimes the motors can draw a lot of current and cause the voltage of the lithium polymer battery to drop below the 7 V input minimum required by the Arduino. Powering the Arduino with a separate battery can help mitigate this problem.
- Try ordering a bigger lithium polymer battery. The voltage should still be 7.4 V, but you can order a larger battery with a higher capacity, which will be able to deliver more current to the motors.
- You probably do not have much room to get your boat up to full speed in a bathtub or kiddie pool. Once you are sure your boat works, you may want to test it in something bigger, like a swimming pool or pond. How does your boat handle when you can get it up to top speed? Here are some things to consider:
- You may want to bring extra charged batteries with you.
- Make sure you have a way to retrieve your boat if the battery dies or it loses contact with the remote. You may wish to test the range of your remote on land before driving your boat in a larger body of water.
- Do not use the boat near swimmers, since the spinning propellers could cause injury.
- Follow all applicable safety rules if you are using your boat on a body of water where other watercraft are present.
- Remember that this is an engineering design project. Based on your testing, what could you change or add to the design of your boat? Even if you do not have the time or budget to build another boat, you could include a tentative design as part of your report.
/-/https/www.sciencebuddies.org/cdn/Files/19734/11/silicone-sealant-wires.jpg)
/-/https/www.sciencebuddies.org/cdn/Files/19735/11/arduino-RC-boat.jpg)
Ask an Expert
Global Goals
The United Nations Sustainable Development Goals (UNSDGs) are a blueprint to achieve a better and more sustainable future for all.
/-/https/www.sciencebuddies.org/cdn/Files/19754/5/E-WEB-Goal-11.png)
/-/https/www.sciencebuddies.org/cdn/Files/19757/5/E-WEB-Goal-14.png)
Variations
- Can you mount a waterproof camera on your boat and use it to record footage of aquatic life?
- Can you include sensors in your circuit and make your boat autonomously react to the environment?
- Can you experiment with hull design? Plastic food storage containers are typically boxy and not very hydrodynamic. Can you build a faster boat?
- Can you build a boat that steers with a rudder or single rotating motor instead of two motors?
- Can you improve your boat's speed by changing circuit parts (such as motors and batteries), even if you do not change the hull?
- Could you build the vehicle with wired control instead of radio control? What are the advantages and disadvantages of each approach? See our Arduino ROV project.
- Can you build a different type of radio-controlled vehicle, like a wheeled robot?
Careers
If you like this project, you might enjoy exploring these related careers:
/-/https/careerdiscovery.sciencebuddies.org/cdn/Files/1408/24/iStock-507243709.jpg)
/-/https/careerdiscovery.sciencebuddies.org/cdn/Files/5616/13/iStock-1194430829.jpg)
/-/https/careerdiscovery.sciencebuddies.org/cdn/Files/1223/17/iStock-971549326.jpg)
Contact Us
Our kits are developed in partnership with Home Science Tools®. If you have purchased a kit for this project, Home Science Tools® is pleased to answer any questions.In your email, please follow these instructions:
- Include your Home Science Tools® order number.
- Please describe how you need help as thoroughly as possible:
Examples
Good Question I'm trying to do Experimental Procedure step #5, "Scrape the insulation from the wire. . ." How do I know when I've scraped enough?
Good Question I'm at Experimental Procedure step #7, "Move the magnet back and forth . . ." and the LED is not lighting up.
Bad Question I don't understand the instructions. Help!
Good Question I am purchasing my materials. Can I substitute a 1N34 diode for the 1N25 diode called for in the material list?
Bad Question Can I use a different part?
Contact Support

/-/https/img.youtube.com/vi/ItcTxWW3c5Q/0.jpg)
/-/https/img.youtube.com/vi/ajrNj7JcCpQ/0.jpg)
/-/https/img.youtube.com/vi/P8RtSQ9az2U/0.jpg)