Abstract
What do plants need to grow? Most of us would answer that they need light, air, water, and soil. But by using a process called hydroponics, you can grow plants without soil! How does it work? Try this project and see for yourself!
Summary
None
A kit is available from our partner Home Science Tools®. See the Materials section for details.
Handle chemicals with care including wearing gloves. Adult supervision is recommended.
/-/https/i.ytimg.com/vi/mJCtvZskziI/maxresdefault.jpg)
Objective
Compare the rate of growth of hydroponically-grown plants with and without nutrient-rich water.
Introduction
/-/https/www.sciencebuddies.org/cdn/Files/13876/11/hydroponics-thumbnail.jpg)
You probably know that just as we get our nutrients from food, generally plants get their nutrients from the soil. To thrive, plants need both macronutrients (like carbon, nitrogen, and phosphorus) and micronutrients (like iron, sodium, and zinc). Soil can contain all of these, but purified water does not.
Plants also need water and use it in many ways. First, water acts as a solvent and helps to transport nutrients from the soil throughout the plant. Second, water-filled cells help support various biochemical reactions in the plant. A biochemical reaction is a reaction that occurs between biological molecules inside a plant's cells to keep them alive. A plant biochemical reaction that you may have heard of is photosynthesis. Photosynthesis is a reaction involving sunlight, the chlorophyll in plant cells, water, and carbon dioxide. It produces sugar for the plant to use as food. When a plant doesn't receive water, photosynthesis and other biochemical reactions stop, the plant begins to turn yellow, dries up, and then dies.
So is soil really necessary for a plant to survive, or can plants survive in just water? What if the water had all of the nutrients in it that soil does? The answer to this question is yes. Plants can survive without being planted in soil. The science of growing plants in nutrient-rich water is hydroponics. The word hydroponics means "working water" and comes from the Latin words hydro, meaning "water," and ponos, meaning "work." In hydroponics, the nutrients are available at the plant's roots. So, with little work, the plant gets its food and nutrition. A plant with roots in soil has to work hard to extract its nutrition from the soil, and it uses a lot of energy to be able to do that. Conversely, if a plant's roots are in nutrient-rich water, it expends less of its energy extracting those nutrients so it can conserve its energy and grow bigger leaves, fruits, and flowers faster. One benefit of growing plants hydroponically is that the nutrients in the water can be completely controlled, and the plant can receive exactly the right amount of nutrients when they need them for growth or flowering. Another benefit of hydroponics is that it works in areas where the soil is not arable (not suitable for farming) and in areas where there is no soil. Figure 1 shows a NASA scientist examining hydroponically-grown plants.
/-/https/www.sciencebuddies.org/cdn/Files/4145/10/PlantBio_img047.jpg)
There are six basic types of hydroponic systems: wick system, water culture system, ebb-and-flow system, drip system, nutrient-film technique, and the aeroponics system. Each system has its advantages and disadvantages. In this plant biology science project, you will experiment with the wick system and perform your own hydroponics experiment. You will compare the growth rate of basil or lettuce seeds grown hydroponically, one set with nutrient-rich water and the other with plain water. Which method will produce seedlings the fastest? Will one method yield more vigorously growing plants compared to the other? At the end of this science project, instead of having a "green thumb," you might have a "blue thumb!"
Terms and Concepts
- Macronutrient
- Micronutrient
- Solvent
- Cell
- Biochemical reaction
- Photosynthesis
- Chlorophyll
- Hydroponics
- Arable
- Physiologist
- Wick system
- Water culture system
- Aerate
- Area
- Ellipse
Questions
- What ancient cultures reportedly used or mentioned hydroponics? How old is the science of hydroponics?
- What are macronutrients, and how are they different from micronutrients?
- What is hydroponics, and how do these systems work?
- What are the differences between the six basic types of hydroponic systems? What are the advantages and disadvantages of each?
- Why is NASA interested in hydroponics? What kinds of hydroponics experiments do NASA scientists perform?
- What is the advantage of using hydroponic systems compared to traditional growing methods
Bibliography
- NASA. (2021, November 23). NASA Research Launches a New Generation of Indoor Farming. The National Aeronautics and Space Administration. Retrieved October 19, 2023.
- Epic gardening. (n.a.). Hydroponics. Retrieved July 9, 2019.
- Simply Hydro. (2008). Simply Hydroponics and Organics. Retrieved June 10, 2010.
Materials and Equipment 
Recommended Project Supplies
/-/https/www.sciencebuddies.org/cdn/Files/21851/4/HST-hydroponics-kit.jpg)
Hydroponic Kit Materials:
- 6 bottles
- 6 100% cotton strips (2”x20”)
- 6 coconut coir pellets
- 1 packet of basil seeds
- 1 3-oz bottle of liquid fertilizer
- 1 measuring cup
- 6 pre-cut foil
- 1 pair of gloves, nitrile, medium
Additional items needed:
- Scissors (or knife)
- 1L or 1-gallon bottle for fertilizer dilution (any bottle will work)
- 1/2 tsp measuring spoon (scoop)
- Permanent marker
- Water
- Tape
Disclaimer: Science Buddies participates in affiliate programs with Home Science Tools®, Amazon.com, Carolina Biological, and Jameco Electronics. Proceeds from the affiliate programs help support Science Buddies, a 501(c)(3) public charity, and keep our resources free for everyone. Our top priority is student learning. If you have any comments (positive or negative) related to purchases you've made for science projects from recommendations on our site, please let us know. Write to us at [email protected].
Experimental Procedure
- Remove the cap of each bottle (6 total).
- Where the bottle starts to become flat, about 4 centimeters from the top, make a mark with your permanent marker around the bottle's edge, creating a ring around it to indicate where to cut.
- Cut along the upper half of the bottle (where you marked) until the bottle is separated into two parts. The bottom half will hold the water or nutrient-rich water, while the top will hold the coconut coir and seeds to grow the plants in, as seen in Figure 1.
Figure 1. Image of where to cut the bottle for the hydroponic system.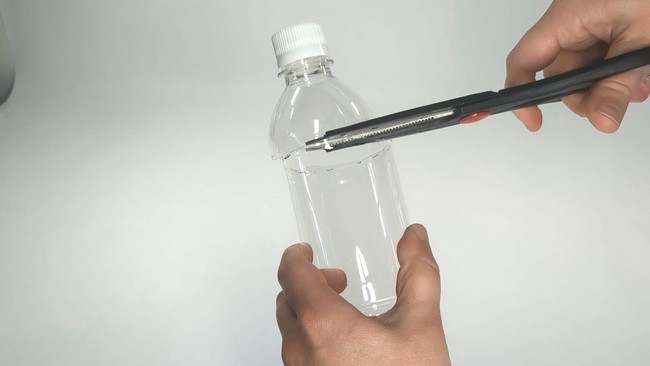
Image of where to cut bottle for hydroponic system, right below the bend on the top of the bottle.
- Invert the top of the bottle, placing the opening downward into the bottom half of the bottle.
- Grab a 2” x 20” piece of cotton to create the wick system.
- Tie the piece of cotton twice in the middle, forming a knot in the cotton strip and two tails on either side to form a wick system.
- Insert the wick's tails through the bottle's opening until the knot stops at the opening and the tails flow freely below it, as seen in Figure 2.
Figure 2. Wick system orientation to ensure water goes up to the seeds.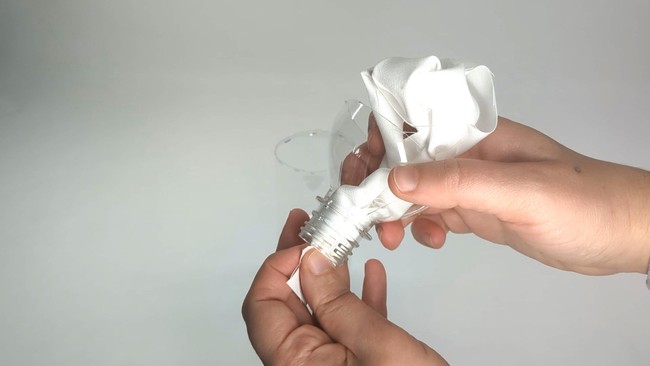
Image of how to insert cotton wick into top of bottle, with tail ends down and knot in top compartment.
- Place the top of the bottle and wick system into the bottom of the bottle.
- Prepare your no nutrient, negative control bottles (3 each):
- Mark each bottle with a negative symbol (-) to indicate that it is without nutrients.
- With your measuring cup, measure 190mL (or 6.5 fl oz.) of water to add to each hydroponic system or bottle, as seen in Figure 3.
Figure 3. Pre-wetting the wick of the hydroponic system.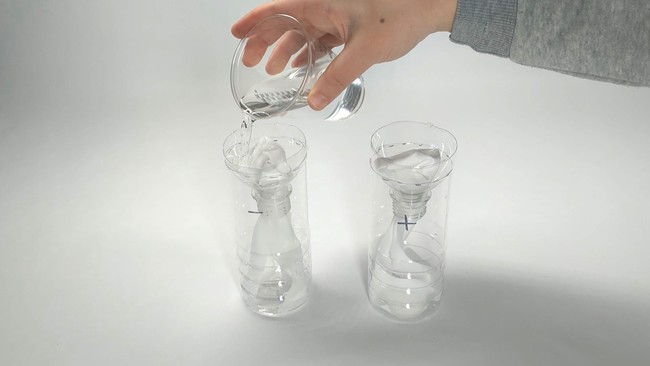
Image illustrating how to pre-wet the wick of the hydroponic system.
- Pour 190 mL of water per bottle over the top knot, allowing it to wet the entire cotton wick and trickle down to the bottom of the apparatus. This will pre-wet the wick.
- Create your diluted nutrient solution by measuring 1/2 tsp of concentrated liquid fertilizer containing the nutrient-rich solution and pouring it into 1 L of water. Invert the bottle 3 times to mix the solution or until it's homogenous or looks all the same.
- Prepare your experimental condition bottles (3 each):
- Mark your bottle with a positive symbol (+) to indicate it contains diluted liquid fertilizer or nutrients.
- Measure 190mL of nutrient-rich solution for each experimental hydroponic system or bottle.
- Pour the 190mL of nutrient-rich solution over the knot of each wick while it's in the bottle, the same way you did for your negative control bottles.
- Prepare the coconut coir for the seeds to have a substrate to grow in.
- Add a pellet of coconut coir to a cup.
- Rehydrate the coconut coir pellet in 50mL of water. This will be enough for one hydroponic system or bottle.
- Note: This can be scaled up to rehydrate multiple coconut coirs at a time.
- Wait about 2-3 minutes for the coconut coir to absorb the water.
- Then gently mix it with your measuring spoon, so that it has a similar consistency throughout the material.
- Carefully transfer the coconut coir into the top half of the bottle to the top edge or lip of the bottle, but do not overfill it, as seen in Figure 4.
Figure 4. Rehydrating the coconut coir and transferring it to the hydroponic system.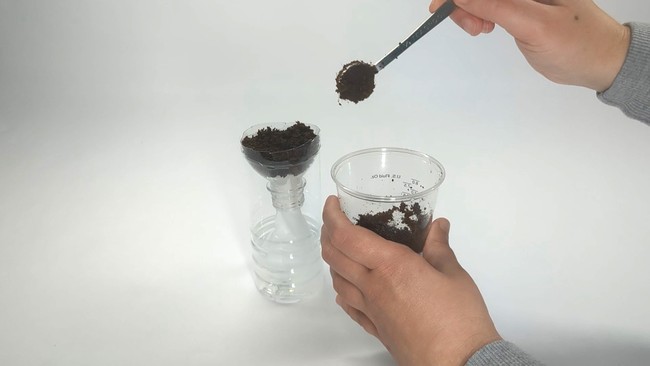
Rehydrating the coconut coir with water.
- Plant the seeds in the coconut coir.
- Before you plant your seeds, use the end of your permanent marker to make small indentations about 1/8 of an inch deep, to the top of the rehydrated coconut coir in each hydroponic container.
- Carefully drop one seed into each of the four indentation, and cover with a thin layer of excess coconut coir as seen in Figure 5.
Figure 5. Adding seeds to each indent in the hydroponic system.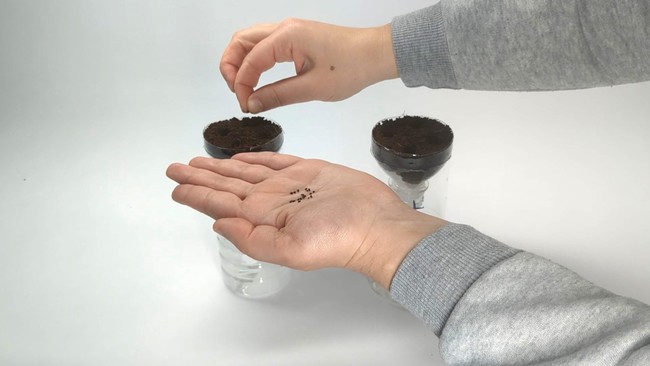
Seeding seeds into indentations in the hydroponic system.
- Cover the bottle with foil to prevent algae from growing inside of the container, tape closed to ensure no light gets in, as seen in Figure 6.
Figure 6. Covering hydroponic system in foil to prevent mold growth.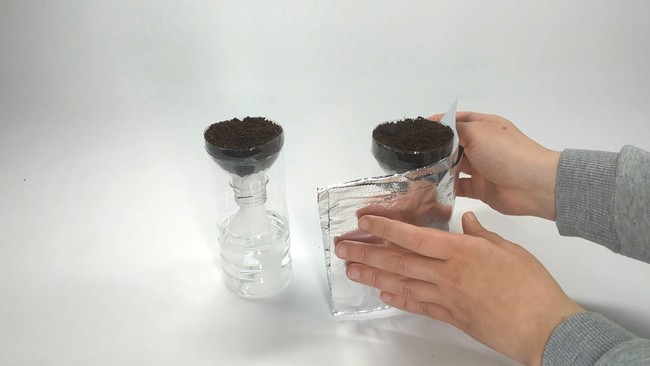
Covering hydroponic systems with foil covers to prevent mold growth.
- Observe and record the growth of the plant over the coming weeks using Table 1.
- Form conclusions about your experiment by answering the following questions:
- How do nutrients impact plant growth? Use your results to inform your answer.
- Is soil necessary for plants to germinate and grow? Remember that these hydroponic systems do not contain soil, but coconut coir.
/-/https/www.sciencebuddies.org/cdn/Files/21345/5/Figure1_Hydroponics-Cut-Bottle_LO-PhD.jpg)
/-/https/www.sciencebuddies.org/cdn/Files/21346/5/Figure2_Hydroponics-Insert-Wick_LO-PhD.jpg)
/-/https/www.sciencebuddies.org/cdn/Files/21347/5/Figure3_Hydroponics-Wet-Wick_LO-PhD.jpg)
/-/https/www.sciencebuddies.org/cdn/Files/21348/5/Figure4_Hydroponis-Coconut-Coir-Rehydration_LO-PhD.jpg)
/-/https/www.sciencebuddies.org/cdn/Files/21349/5/Figure5_Hydroponics-Seeding_LO-PhD.jpg)
/-/https/www.sciencebuddies.org/cdn/Files/21350/5/Figure6_Hydroponics-Foil-Coverage_LO-PhD.jpg)
| Hydroponics plant growth experiment | Nutrient-rich water | No nutrient water | ||||
|---|---|---|---|---|---|---|
| Measurement | N1 | N2 | N3 | N1 | N2 | N3 |
| Number of leaves | ||||||
| Length of largest leaf (mm) | ||||||
| Width of largest leaf (mm) | ||||||
Ask an Expert
Global Goals
The United Nations Sustainable Development Goals (UNSDGs) are a blueprint to achieve a better and more sustainable future for all.
/-/https/www.sciencebuddies.org/cdn/Files/19745/5/E-WEB-Goal-02.png)
/-/https/www.sciencebuddies.org/cdn/Files/19754/5/E-WEB-Goal-11.png)
Variations
- How else can you measure plant growth? Check out our page here, to find other ways to measure this!
- Grow different varieties of plants hydroponically. Do all varieties grow better hydroponically, or does growth depend on the variety?
- Compare hydroponically grown plants with soil-grown plants. Do hydroponically grown plants grow more or less vigorously? Do they taste different?
- Does increasing or decreasing the amount of liquid fertilizer impact the growth and health of the plants? Are there other side effects of adding too much or too little nutrients to the system, like mold? Experiment to find out.
- Study the effect of the acidity of the water on hydroponically grown plants. The pH kit allows you to vary the pH of the prepared water. What happens to plants if they are watered with nutrient-rich but very acidic or very basic water?
Careers
If you like this project, you might enjoy exploring these related careers:
/-/https/careerdiscovery.sciencebuddies.org/cdn/Files/1662/17/unsplash-oz1NzV2xWXU.jpg)
/-/https/careerdiscovery.sciencebuddies.org/cdn/Files/860/17/pexels-photo-5230966.jpg)
/-/https/careerdiscovery.sciencebuddies.org/cdn/Files/20218/6/EnvEng_KeyPhoto.jpg)
Contact Us
Our kits are developed in partnership with Home Science Tools®. If you have purchased a kit for this project, Home Science Tools® is pleased to answer any questions.In your email, please follow these instructions:
- Include your Home Science Tools® order number.
- Please describe how you need help as thoroughly as possible:
Examples
Good Question I'm trying to do Experimental Procedure step #5, "Scrape the insulation from the wire. . ." How do I know when I've scraped enough?
Good Question I'm at Experimental Procedure step #7, "Move the magnet back and forth . . ." and the LED is not lighting up.
Bad Question I don't understand the instructions. Help!
Good Question I am purchasing my materials. Can I substitute a 1N34 diode for the 1N25 diode called for in the material list?
Bad Question Can I use a different part?
Contact Support
Related Links
- Science Fair Project Guide
- Other Ideas Like This
- Plant Biology Project Ideas
- Agricultural Technology Project Ideas
- My Favorites
- Reference Materials: Measuring Plant Growth
- Hydroponics Activity for STEM Events, Outreach, or the Classroom

/-/https/img.youtube.com/vi/04ww-K2Jsa0/0.jpg)
/-/https/img.youtube.com/vi/AAiX76xsIQ8/0.jpg)
/-/https/img.youtube.com/vi/nhgNh3BdMsc/0.jpg)